______________________________________________________________________________________
4
EA350
50
55
60
65
70
0
10
20
30
40
50
60
70
80
90
100
GENERATOR OUT
PUT(%F
RO
M NO
RMIN
AL
)
FREQUENCY (HZ)
50 HZ CURVE
60HZ CURVE
5
10
15
20
25
30
35
40
45
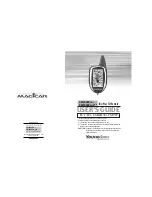
● The EA350 has the roll-off point preset to 58 Hz
in the 60 Hz mode and 48 Hz in the 50 Hz mode.
To change the roll-off point, adjust engine speed
to the desired rated speed. (50 or 60 Hz).
● Set the voltage to the desired setting at rated
speed. Adjust engine speed to the desired roll-off
point. Turn the potentiometer counterclockwise
until the voltage starts to drop off. Then adjust the
potentiometer clockwise until the voltage returns
to rated voltage. Re-adjust engine speed to rated
speed.
2.6 Corner Frequency Jumper
Regulator are delivered with the Corner Frequency
Jumper set for 60 hertz operation. This gives a
corner frequency of 55 hertz. For 50 hertz operation
and a corner frequency of 45 hertz, the Corner
Frequency Jumper must be moved to the 50 Hz
terminal.
2.7 Voltage Adjust Rheostat Jumper
● Rheostat Jumper connected across terminals 6
and 7. This enables adjustment of the generator
output voltage rheostat. A 1000 ohm, half-watt
rheostat
will
provide
adequate
voltage
adjustment range for most applications. Figure
5~6
shows
the
proper
remote
rheostat
connections.
● The EA350 potentiometer controls are accessible
through the controller front panel and are shown
in Figure 2.
2.8 Voltage Adjust Rheostat Jumper
2P DIP switch on for 120Vac generator system
2P DIP switch off for 240Vac generator system
2.9 Stability Selection
When excitation under voltage, it can result in
insufficient adjustment range for stability adjustment
and when excitation over voltage, the response from
the AVR becomes sluggish. The AVR is equipped
with 2 bridging wires J1 and J2 to help improve or
relief the condition. See Figure 2.
● If the unloaded excitation voltage is less than 7
VDC, please cut open the J2 red bridging wires.
● If the unloaded excitation voltage is greater
than25 VDC, please cut open the J1 white
bridging wires.
FREQUENCY COMPENATION (See Figure 1)
1. The frequency compensation characteristic of
Figure 1 used to improve system load pickup
performance by restraining voltage recovery
until frequency has also started to recover.
2. The regulator is shipped from the factory set
at a 45
Hz “corner frequency” for 50 Hz
systems. For 60 Hz systems, a 55 Hz corner
frequency is achieved by removing the
“50-50” external link.
3. OPERATION PROCEDURE
3.1 Operational Test
Complete the following steps before proceeding with
system start-up.
1. Connect the Analog Voltage Controller as shown
in the operational test diagram of Figure 8. Do not
apply power. Ensure that the light bulbs are rated
for 120 volts and less than 100 watts. Figure 4.
Operational Test Diagram.
2. Adjust the Regulator voltage adjust potentiometer
and remote voltage adjust rheostat (if used) fully
counterclockwise.
3. Apply 240 VAC, 60 Hz power to the controller.
The light bulbs should flash momentarily.
4.
Slowly adjust the controller’s voltage adjust
potentiometer clockwise.
RESULT :
1. Before minimum luminance is reached, the light
bulbs should attain maximum luminance to
signify the regulation point.
2. At the regulation point, a small change in the
voltage adjust potentiometer or rheostat position
should turn the light bulbs on or off.
Figure 3 Frequency Compensation Curves