sirena da esterno imago - imago outdoor siren
18
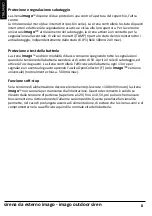
Protection and battery test
When the battery voltage is lower than 5V the
imago
siren will set the low energy
consumption mode. It will open the tamper protection relay and it will activate the
"failure" [F] output. The siren will check the battery efficiency each 13 hours to report a
possible failure opening the "Open collector" output [F] (universal version
imago
only)(normally closed500 mA max).
Soft‐stop function
When the power supply voltage slowly decreases (slew rate < 100 mV/minute) the
imago
siren will not emit any acoustic alarm due to loss of power supply. This slew rate is
effective if detected starting from the initial voltage (higher than 12V) to 10,5V, then the
alarm activation will be prevented even in case of a sudden loss of voltage. This peculiar
function allows to avoid the acoustic warning and to compromise the efficiency and
life‐time of the battery in case of protracted loss of power supply.
INSTALLATION
The siren has to be installed in a hardly accessible location to deter tamper attempts. The
wall chosen must not have any depression or protrusion in order to avoid compromising
the tamper protection function. To ensure a correct installation refer to the paragraph
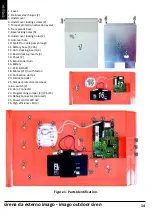
"Parts identification" and comply the following steps:
1 Insert stainless steel hinges (supplied) and screw the nuts inside
avoiding to tighten
(2)
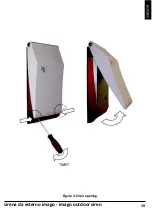
2 Open the PC cover forcing the corners with a screwdriver
(Figure 3)
3 Remove the docking screw of the metallic undercover
(4)
4 Remove the undercover pulling it from above, taking care not
to damage the electronic circuit
(3)
5 Drill the fixing bottom holes
(7)
6 Pass‐through the cable coming from the Control Panel in the eyelet
(10)
7 Lock with Fischer plug the PC Base on the wall
(7)
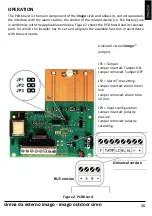
8 Set programming jumpers (universal version
imago
only)
(23), (page 14)
9 Insert a 6V lead battery (not supplied) and link terminals
accordingly with the polarity
10 Connect cables to connection terminals
(19), (page 19)
11 Verify the start up procedure
(page 15)
12 Close the undercover and screw on
(3)
13 Close the cover
(Figure 3)


