background image

Caution

Caution

RPH

6

Safety note:

The permissible operating temperature of the

pump in question is indicated on the data

sheet. If the pump is to be operated at a higher temperature, the

data sheet is missing or if the pump is part of a pool of pumps,

the maximum permissible operating temperature must be

enquired from the pump manufacturer.
Based on an ambient temperature of 40

°

C and proper

maintenance and operation, compliance with temperature

class T4 is warranted in the area of the rolling element bearings.

A special design is required to comply with temperature class

T6 in the bearing area. In such cases, and if ambient

temperature exceeds 40

°

C, contact the manufacturer.

2.9.6

Maintenance

Only a pump unit which is properly serviced and maintai-

ned in perfect technical condition will give safe and relia-

ble operation.

This also applies to the reliable function of the rolling element

bearings whose actual lifetime largely depends on the opera-

ting mode and operating conditions.

Regular checks of the lubricant and the running noises will pre-

vent the risk of excessive temperatures as a result of bearings

running hot or defective bearing seals (also see section

7.2.2.2).

The correct function of the shaft seal must be checked regularly.

Any auxiliary systems installed must be monitored, if neces-

sary, to make sure they function correctly.

Gland packings must be tightened correctly, to prevent exces-

sive temperatures due to packings running hot.

3

Transport and interim storage

3.1

Transport

Transport of the unit requires proper preparation and handling.

Always make sure that the pump or the unit remains in

horizontal position during transport and cannot slip out of the

transport suspension arrangement. Do not use a lifting sling on

the free shaft end of the pump or on the motor eyebolt.

If the pump / unit slips out of the suspension

arrangement, it may cause personal injury and damage

to property!

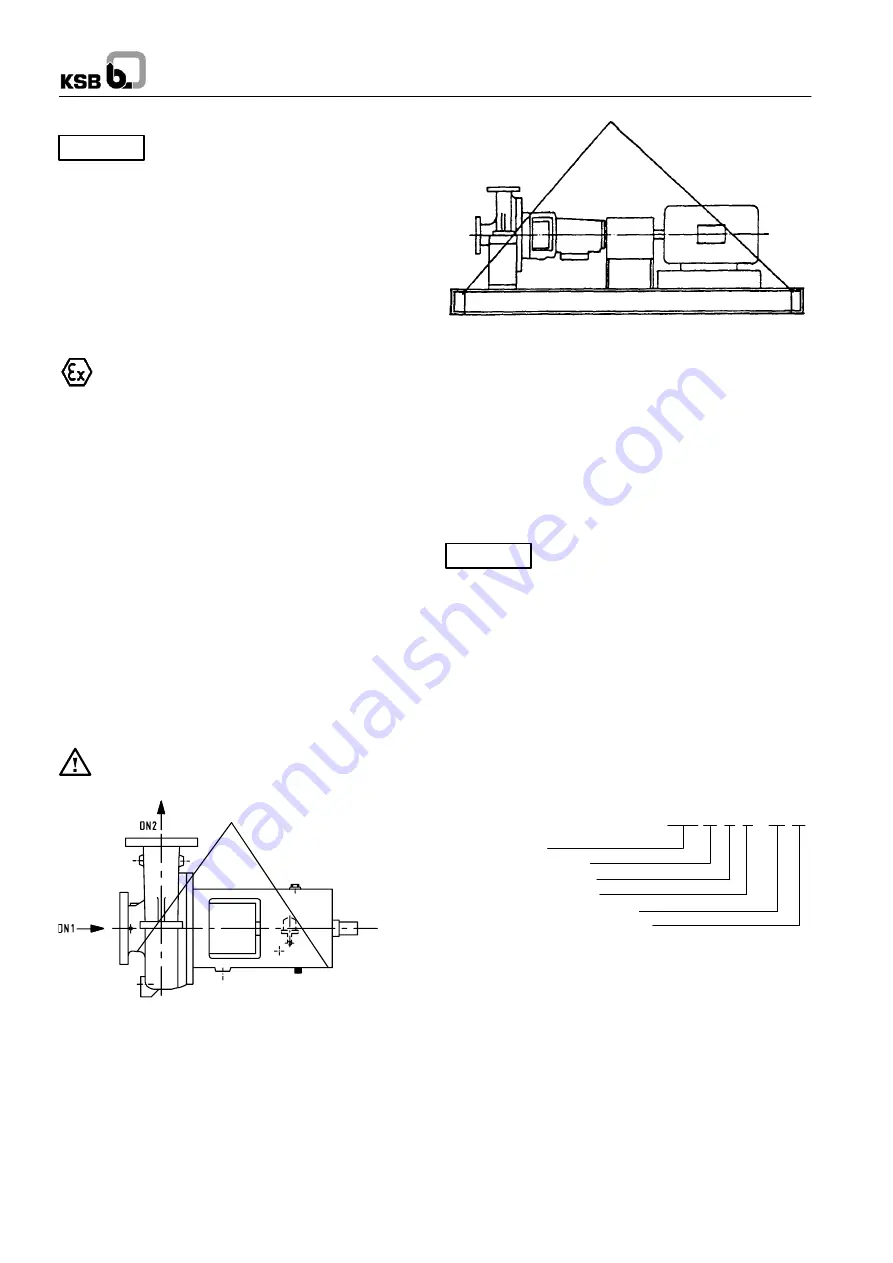
D00311

Fig. 1

Transport of the pump

Fig. 2

Transport of the complete unit

3.2

Interim storage (indoors) / Preservation

When the unit is temporarily put into storage, only the wetted

low alloy components (e.g. JL 1040, JS 1030, A 216 Gr. WCB,

etc.) must be preserved. Commercially available preservatives

can be used for this purpose. Please observe the

manufacturer’s instructions for application/removal.

The relevant procedure is described in section 6.3.
The unit / pump should be stored in a dry room where the

atmospheric humidity is as constant as possible.

If stored outdoors, the unit and crates must be covered by

waterproof material to avoid any contact with humidity.

Protect all stored goods against humidity, dirt,

vermin and unauthorized access! All openings

of the assembled unit components are closed and must only be

opened when required during installation.

All blank parts and surfaces of the pump are oiled or greased

(silicone-free oil and grease) to protect them against corrosion.

4

Description of the product and

accessories

4.1

Technical specification

RPH pumps are used for handling the large variety of crude oil

products, mainly in refineries and chemical and petrochemical

plants.

4.2

Designation

Type series

Material variant

Version with inducer

Discharge nozzle DN

Nominal impeller dia. in mm

Special hydraulics (B-hydraulics)

RPH S1 I 80 - 280 B

4.3

Design details

Horizontal, radially split volute casing pumps in back pull-out

design, to API 610, 10th edition and ISO 13709, with radial

impeller, single-flow, single-stage, centreline pump feet.

4.3.1

Pump casing

Radially split, consisting of volute casing with casing wear ring

and casing cover. The volute casing, the casing cover and the

seal cover form the internal pump chamber.

The wall thickness of the casing includes a corrosion allowance

of 3 mm (0.12 in.).
On some pump sizes, pump casings have a double volute, in

order to compensate radial forces.

Summary of Contents for RPH Series

Page 1: ...______________________ Type series __________________________________ These operating instructions contain fundamental information and precautionary notes Please read the manual thoroughly prior to installation of unit connection to the power supply and commissioning It is imperative to comply with all other operating instructions referring to components of this unit This manual shall always be ke...

Page 2: ...rd 10 5 5 Final check 10 5 6 Connection to power supply 10 Page 6 Commissioning start up shutdown 10 6 1 Commissioning 10 6 1 1 Lubricants 10 6 1 2 Shaft seal 11 6 1 3 Priming the pump and checks to be carried out 11 6 1 4 Checking the direction of rotation 11 6 1 5 Cleaning the plant piping 11 6 1 6 Start up strainer 11 6 1 7 Start up 12 6 1 8 Shutdown 12 6 2 Operating limits 12 6 2 1 Temperature...

Page 3: ...ooled uncoooled 9 1 21 Measures to be taken for prolonged shutdown 6 3 2 13 Mechanical seal installation 7 5 4 16 Minimum Maximum Flow 6 2 5 12 Section Page Noise characteristics 4 3 6 8 Non compliance with safety instructions 2 3 4 Operating limits 6 2 12 Permissible forces and moments at the pump nozzles 4 3 5 7 Personnel qualification and training 2 2 4 Place of installation 5 3 2 9 Priming the...

Page 4: ...indicating the direction of rotation markings for fluid connections must always be complied with and be kept in a perfectly legible condition at all times 2 2 Personnel qualification and training All personnel involved in the operation maintenance inspection and installation of the unit must be fully qualified to carry out the work involved Personnel responsibilities competence and supervision mus...

Page 5: ...s during the installation phase the direction of rotation must never be checked by starting up the unfilled pump unit even for a short period to prevent temperature increases resulting from contact between rotating and stationary components 2 9 4 Pump operating mode Make sure that the pump is always started up with the suction side shut off valve fully open and the discharge side shut off valve sl...

Page 6: ...the pump unit slips out of the suspension arrangement it may cause personal injury and damage to property D00311 Fig 1 Transport of the pump Fig 2 Transport of the complete unit 3 2 Interim storage indoors Preservation When the unit is temporarily put into storage only the wetted low alloy components e g JL 1040 JS 1030 A 216 Gr WCB etc must be preserved Commercially available preservatives can be...

Page 7: ...chanical seal drawing 4 3 4 Bearings 4 3 4 1 Design specifications The shaft is supported byoil lubricatedrolling elementbearings The motor end bearing is a fixed bearing whose axial bearing clearance limits the axial movement of the rotor The standard motor end bearing is a paired angular contact ball bearing For high inlet pressures a triple bearing assembly is used see section 9 design variants...

Page 8: ...65 5 63 5 76 0 70 0 67 5 22 0 68 0 66 5 64 5 76 5 70 5 68 0 30 0 70 0 68 0 66 0 78 0 72 0 69 5 37 0 71 0 69 5 67 0 78 5 72 5 70 0 45 0 72 0 70 5 68 0 79 5 73 5 71 0 55 0 73 0 71 5 69 0 80 0 74 0 71 5 75 0 74 5 73 0 70 5 81 0 75 5 72 5 90 0 75 5 74 0 71 0 81 5 76 0 73 0 110 0 77 0 75 0 72 0 82 0 76 5 74 0 132 0 78 0 76 0 73 0 82 5 77 0 74 5 160 0 79 0 77 0 74 0 83 5 78 0 75 0 200 0 80 0 78 0 75 0 8...

Page 9: ...om each shaft at all points around the circumference In addition the distance between the two coupling halves must remain the same all around the circumference Use a feeler gauge a wedge gauge or a dial micrometer to verify see Fig 6 and Fig 7 Straight edge Straight edge Gauge a a b b Fig 6 Aligning the coupling with the help of a gauge and a straight edge a b a b Gauge Straight edge Straight edge...

Page 10: ...delivery then the operator must supply one In this case it is important to make sure that the materials selected for coupling and coupling guard are non sparking in the event of mechanical contact KSB s scope of supply meets this requirement 5 5 Final check Re check the alignment as described in section 5 3 and verify the correct distance between the coupling and the coupling guard It must be easy...

Page 11: ...6 Bearing bracket 200 1 250 bis 315 2 0 2 Bearing bracket 315 3 0 2 Support on baseplate 250 0 2 1 For n 35001 min andn 2900 1 minin conjunctionwith triplebearing assembly In all other cases from 250 C 2 Water cooling or fan impeller 3 Water cooling and optional fan impeller The cooling liquid quantities indicated are based on Dt max 15 C 6 1 3 1 2 Cooling of heat exchanger For mechanical seals wi...

Page 12: ...e 7 2 1 The safety instructions set forth in section 2 9 must be complied with 6 2 1 1 Heating the stand by pump To make sure that the stand by pump is operational at all times and to keep it warm no special precautions need to be taken provided all cooling points are in operation and the permissible nozzle forces and moments are not exceeded For extreme operating conditions please contact KSB Peg...

Page 13: ...ghtly open for a short period of time the permissible pressure and temperature limits must not be exceeded A special design is required to comply with temperature class T6 in the bearing area In such cases and if am bient temperature exceeds 40 C contact the manufacturer Verify correct oil level as described in section 6 1 1 The shut off elements and the auxiliary feed lines must not be closed dur...

Page 14: ...0 02 and remove seal cover 471 01 Cooled version Note position of O rings 412 01 31 Pull seal cartridge out of casing cover 161 Please observe the mechanical seal drawing Proceed in line with this drawing if further dismantling of the mechanical seal is required If required refer to the supplementary sheet 11 Undo the hex socket head cap screw in the coupling hub and use an extractor to pull the c...

Page 15: ...ed nut slip on lockwasher tighten keywayed nut and bend over lockwasher 2 Cooled version Note position of O rings 412 01 31 3 For mounting the mechanical seal proceed as described on the supplementary sheet if necessary Observe the instructions in section 7 5 4 4 Check the sliding fit of the shaft protecting sleeve on the shaft if fitted 5 Carefully insert the impeller joint ring making sure the r...

Page 16: ...0 B06 20 M 24 5653 4 4 M24 290 8 M 16 190 4 M20 270 1 M 30x1 5 400 6 5 200 670 06 24 565 9704 90 8 6 90 0 0 30 5 00 300 5 250 630 20 250 710 24 3 For material 1 7709 A 193 Grade B7 B16 4 For material 1 6772 Monix 3K A 540 Grade B24 5 For material 1 4571 A 276 Type 316Ti 6 For material 1 4021 A 276 Type 420 The values do not apply if general assembly drawings or other instructions state different v...

Page 17: ...5 100 450 175 0 6 3 0 45 195 0 7 4 0 48 150 230 195 0 7 4 0 48 195 0 7 4 0 48 150 280 195 0 7 4 0 48 195 0 7 4 0 48 150 360 195 0 7 4 0 48 195 0 7 4 0 48 150 450 200 0 7 4 0 48 235 0 7 4 0 53 200 280 225 0 7 4 0 50 225 0 7 4 0 50 200 360 235 0 7 4 0 53 280 0 7 5 0 58 200 450 235 0 7 4 0 53 280 0 7 5 0 58 150 501 225 0 7 5 0 5 225 0 7 5 0 5 200 401 250 0 6 3 0 53 250 0 6 3 0 53 200 501 255 0 6 5 0 ...

Page 18: ...02 322 01 330 433 502 01 02 1 503 01 02 1 542 02 Shaft Impeller Angular contact ball bearing set Cylindrical roller bearing Bearing bracket Mech seal Spring loaded ring Seat ring O rings Secondary seals at seat ring Spring set Casing wear ring Impeller wear ring Throttling bush Other sealing elements 1 1 1 1 2 2 2 2 1 2 2 1 4 1 1 1 1 3 3 3 3 1 2 2 1 6 1 1 2 2 4 4 4 4 1 2 2 2 8 2 2 2 2 5 5 5 5 1 3 ...

Page 19: ...2 2 2 2 2 2 2 2 2 2 2 2 2 2 2 2 2 2 2 2 2 2 2 2 2 2 2 2 2 2 2 2 2 2 2 2 2 2 2 2 2 2 2 3 4 5 2 2 3 4 2 2 3 2 2 2 2 2 2 2 2 2 2 2 2 2 2 2 2 2 2 2 2 2 2 2 2 2 5 5 5 5 6 6 6 6 7 7 7 9 5 5 7 9 6 6 6 7 7 7 7 9 5 5 5 5 6 6 6 6 7 7 7 9 5 5 7 9 6 6 6 7 7 7 7 9 2 2 2 2 2 2 2 2 2 2 2 2 2 2 2 2 2 2 2 2 2 2 2 2 2 2 2 2 2 2 2 2 2 2 2 2 3 3 3 3 3 3 3 3 3 3 3 3 3 3 3 3 3 3 3 3 3 3 3 3 B05S 80 450 100 360 100 450 ...

Page 20: ...n of rotation Interchange two of the phases of the power supply cable Motor is running on two phases only Replace the defective fuse Check the electric cable connections Speed is too low 2 Increase speed Defective bearing s Fit new bearing s Insufficient rate of flow Increase the minimum rate of flow Wear of internal pump parts Replace worn components by new ones Pump back pressure is lower than s...

Page 21: ...with impeller wear ring 503 01 02 grub screw 904 06 07 joint ring 411 31 32 67 optional lockwasher 931 02 320 02 550 2 Angular contact ball bearing with ring 550 adjusting washer 322 01 Cylindrical roller bearing 330 Bearing bracket compl with protective cage 169 10 bearing cover 360 01 02 gasket 400 01 O ring 412 22 constant level oiler 638 oil level sight glass 642 pipe 710 22 hex head bolt 901 ...

Page 22: ...0 Impeller with impeller wear ring 503 01 02 grub screw 904 06 07 joint ring 411 31 32 optional 260 Impeller hub cap 320 02 Angular contact ball bearing 322 01 Cylindrical roller bearing 330 Bearing bracket compl with protective cage 169 10 bearing cover 360 01 02 gasket 400 01 O ring 412 22 constant level oiler 638 oil level sight glass 642 pipe 710 22 hex head bolt 901 31 37 vent plug 913 03 plu...

Page 23: ...ring bracket cooled Tandem bearings Special pump designs for high inlet pressure Special pump design with thrower Pump design with plug 916 01 Part No Description 508 01 Oil thrower 904 20 Grub screw 916 01 Plug D01043 D01044 D01047 D01044 ...

Page 24: ...able casing Oil mist lubrication D01126 D01127 KSB Aktiengesellschaft P O Box 1361 91253 Pegnitz Bahnhofplatz 1 91257 Pegnitz Germany Tel 49 9241 71 0 Fax 49 9241 71 1791 www ksb com RPH Performance curves For individual characteristic curves refer to offer curves 1316 451 and 1316 461 ...

Reviews: