background image

TECHNICAL PARAMETERS

Precision: 800/1600/2400/3200 dpi
Sensor: laser
Sensor model: Pixart 3325IC
Acceleration: 20 G
Polling rate: 1000 Hz
Buttons: 6
Scroll wheel:  button
DPI switch: 4 modes
Stroke life: up to 20 million times
Pad life: 80 km
Lift-off distance: 7 mm +/- 0,3 mm
Skid pads: plastic
Material: ABS
Power supply: battery 600 mAh
Working time: up to 15 h

Communication

Connection type: wireless, wired
Frequency: 2,4 GHz
Interface: USB 2.0
Charging port: USB-C
Supported OS: Windows 7 / Windows 8 / Windows 8.1 / Windows 10 /
Mac

Physical parameters

Hand orientation: right hand
Weight: 102 g
Dimensions: 124 x 68 x 43 mm

Owner’s manual

Owner’s manual

8

9

E

N

E

N

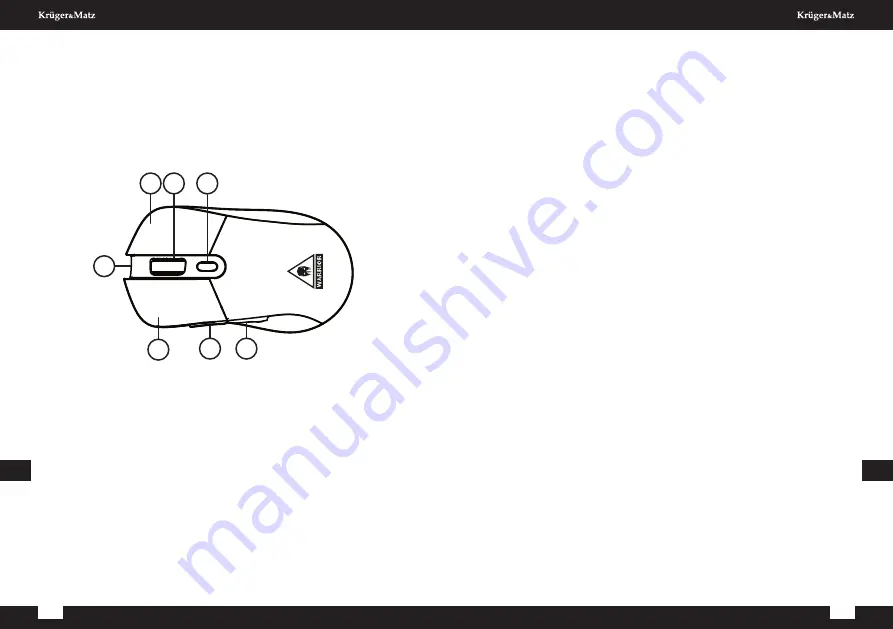
PRODUCT DESCRIPTION

1. Right button
2. DPI button
3. Lighting change button
4. Scroll wheel
5. USB cable
6. Left button
7. Forward button
8. Backward button

INSTALLATION

1. The USB plug of the mouse should be connected to a free,

compatible USB port of the computer.

2. The operating system will automatically detect the mouse and

install the appropriate drivers.

3. On the bottom of the mouse, slide the power switch down. The

mouse will work in wireless mode.

4. To use the mouse in wired mode with a USB cable, connect it to

the USB-C input on the mouse and the USB input on the
computer. The operating system will automatically detect the
mouse and install the appropriate drivers. Move the switch on
the bottom of the mouse all the way up.

5. The mouse is ready for use.
6. To turn off the mouse, move the switch on the bottom of the

mouse to the middle position.

CLEANING

Always disconnect the product from the power source before cleaning.
Clean the device with a soft, slightly damp cloth. Do not use any
chemical agents to clean this device.

1 2

3

4

5

6

7

Summary of Contents for KM0784

Page 1: ...Wireless gaming mouse KM0784 DE EN PL RO BEDIENUNGSANLEITUNG OWNER S MANUAL INSTRUKCJA OBSŁUGI MANUAL DE UTILIZARE ...

Page 2: ...tabile Oberfläche aufstellen 5 Verhindern Sie dass das Gerät auf den Boden fällt oder starken Stößen ausgesetzt wird 6 Der Hersteller übernimmt keine Haftung für Schäden die durch unsachgemäße Verwendung und Handhabung oder mechanische Beschädigungen verursacht wurden 7 Der Hersteller garantiert keine Kompatibilität mit jedem externen Gerät 8 Dieses Produkt ist kein Spielzeug halten Sie es außerha...

Page 3: ...7 Taste Rückwärts INSTALLATION 1 Der USB Stecker der Maus sollte an einen freien kompatiblen USB Port des Computers angeschlossen werden 2 Das Betriebssystem erkennt die Maus automatisch und installiert die entsprechenden Treiber 3 Schieben Sie den Netzschalter an der Unterseite der Maus nach unten Die Maus funktioniert im drahtlosen Modus 4 Um die Maus im kabelgebundenen Modus mit einem USB Kabel...

Page 4: ... Owner s manual 6 7 EN EN Bedienungsanleitung Bedienungsanleitung 6 7 DE DE Deutsch Korrekte Entsorgung dieses Produkts Elektromüll Anzuwenden in den Ländern der Europäischen Union und anderen europäischen Ländern mit einem separaten Sammelsystem Die Kennzeichnung auf dem Produkt bzw auf der dazugehörigen Literatur gibt an dass es nach seiner Lebensdauer nicht zusammen mit dam normalem Haushaltsmü...

Page 5: ...cable 6 Left button 7 Forward button 8 Backward button INSTALLATION 1 The USB plug of the mouse should be connected to a free compatible USB port of the computer 2 The operating system will automatically detect the mouse and install the appropriate drivers 3 On the bottom of the mouse slide the power switch down The mouse will work in wireless mode 4 To use the mouse in wired mode with a USB cable...

Page 6: ...niem Obudowę urządzenia należy regularnie czyścić za pomocą miękkiej lekko wilgotnej ściereczki Nie należy używać środków chemicznych lub detergentów do czyszczenia tego urządzenia 11 Nie należy kierować wiązki lasera bezpośrednio w stronę oczu Instrukcja obsługi Instrukcja obsługi 10 11 PL PL Owner s manual Owner s manual 10 11 EN EN LEARN MORE For more information on this device visit www kruger...

Page 7: ... Przewód USB 6 Lewy przycisk 7 Przycisk do przodu 8 Przycisk do tyłu INSTALACJA 1 Wtyczkę USB myszki należy podłączyć do wolnego kompatybilnego portu USB komputera 2 System operacyjny automatycznie wykryje mysz i zainstaluje odpowiednie sterowniki 3 Na spodzie myszy należy przesunąć przełącznik zasilania w dół Mysz będzie działać w trybie bezprzewodowym 4 Aby używać myszy w trybie przewodowym z uż...

Page 8: ...izați agenți chimici pentru a curăța acest dispozitiv 11 Nu orientați fasciculul laser în ochi Manual de utilizare Manual de utilizare 14 15 RO RO Instrukcja obsługi Instrukcja obsługi 14 15 PL PL Poland Prawidłowe usuwanie produktu Zużyty sprzęt elektryczny i elektroniczny Oznaczenie umieszczone na produkcie lub w odnoszących się do niego tekstach wskazuje że po upływie okresu użytkowania nie nal...

Page 9: ...ton înainte 7 Buton înapoi INSTALARE 1 Mufa USB a mouse ului trebuie conectată la un port USB gratuit și compatibil al computerului 2 Sistemul de operare va detecta automat mouse ul și va instala driverele corespunzătoare 3 În partea de jos a mouse ului glisați comutatorul de alimentare în jos Mouse ul va funcționa în modul wireless 4 Pentru a utiliza mouse ul în modul cablat cu un cablu USB conec...

Page 10: ...tilizatorii casnici sunt rugati să ia legatura fie cu distribuitorul de la care au achizitionat acest produs fie cu autoritatile locale pentru a primi informatii cu privire la locul si modul in care pot depozita acest produs in vederea reciclarii sale ecologice Utilizatorii institutionali sunt rugati să ia legatura cu furnizorul și să verifice condițiile stipulate in contractul de vanzare Acest pr...

Page 11: ...www krugermatz com is a registered trademark ...

Reviews: