11/2022 – 4009097302 - QS SMARTPAT PH R02 en
4
4 Installation
Specific conditions of use to be observed:
Operation with flammable media beyond the ranges of atmospheric conditions (
-20
°
C
≤
T
≤
+ 60
°
C and
0.8 bar
≤
P
≤
1.1 bar) is only permissible if these media do not form explosive medium/air
-mixtures. The
operating company is responsible for the safe operation of the pH
-sensor regarding temperatures and
pressures of the media used.
When the pH-sensor is operated with
flammable media it shall be included in the recurring pressure test of
the system.
For electrostatic discharge, the metal enclosure shall be connected to the local equipotential bonding
system.
The pH-sensor, type SMARPAT PH 8xxx must not be installed and operated in areas where excessive
charge generating processes can occur (e.g. due to friction or oncoming flow with particles).
The safety instructions given in the operating instructions manual shall be observed accordingly.
The installation must alway
s comply with the following requirements:
•
No external forces are affecting the sensor.
•
The device is accessible for any necessary visual inspections and can be viewed from all sides.
• The nameplate is clearly visible.
Ensure that the pipeline is
without pressure before installing or removing a sensor!
Never touch or scratch the pH membrane glass of the sensor.
During installation you should fix a shut
-
off valve in front of and behind the instrument so that the sensor
can be taken out in case of c
heck.
Warning:
The max. permissible temperature for the SMARTPAT electronics is 85°C.
Immersion installation:
M
ax. process temperature is 85°C with a submersed sensor (or lower if glass electrode is rated lower),
e.g. with mounting
assemblies SENSOFIT RET 5000 or IMM 1000.
Insertion installation:
The device must not be heated by radiated heat (e.g. exposure to the sun) to an electronics housing
surface temperature above the maximum permissible ambient temperature. If it is necessar
y to prevent
damage from heat sources, a heat protection (e.g. sun shade) has to be installed.
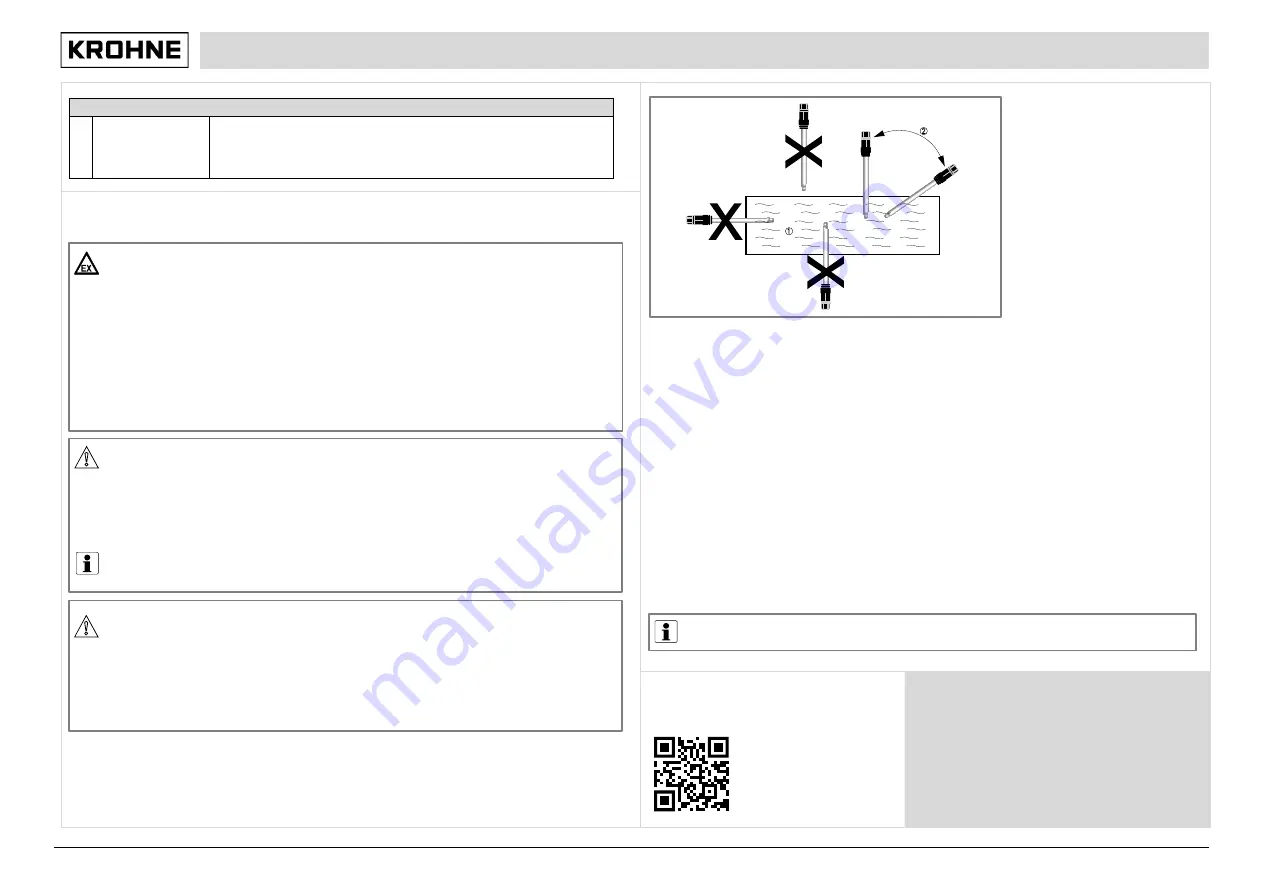
Mounting position of the sensor
The sensor tip must always have full contact with the measuring medium.
The mounting position of the sensor should not deviate more than 75° from vertical position (sensor tip pointing
downwards). Doing otherwise might cause internal air bubbles to float into the sensor tip. This would interrupt the
electrical contact between the inner buffer solution and the gla
s
s surface
.
Calibration with PACTware
TM
, HART Handheld 475 FIELD COMMUNICATOR or SMARTMAC 400 W
6
Re-calibration
In a fully functional sensor, the optimal slope is
-
59 mV for each pH unit and the
optimal zero point is 0 mV at pH 7. The slope should at least have a value between
-50...-65 mV per pH unit. Re-
calibrate the sensor if the slope does not approximate
those limits. Aged pH sensors show slopes between -55...-
50 mV/pH (or flatter)
and significant zero
-point deviations.
①
Measuring medium
②
Maximum deviation of 75° from vertical position
Installation steps
12 mm glass electrodes:
•
Use a mounting assembly for insertion or immersion installation suitable to your purposes, e.g. SENSOFIT
INS 1310, RET
5000 or IMM 1000 etc.
and f
ollow all installation steps described in the appropriate user
manual
of the mounting assembly
.
•
Ensure that the washer and the O-
ring at the electrode are properly fitted, clean and undamaged.
•
Take care when inserting the electrode into the mounting assembly.
•
It is usually sufficient to tighten the PG 13.5 screw at the electrode by hand. If necessary, a wrench can be
used (carefully !). Potential risk when using a wrench: sensor damage / glass break
.
Max. torques:
7 Nm for SMARTP
AT PH 8150, 8320, 8530
10 Nm for SMARTPAT PH 8570
Electrodes with plastic housing (3/4 NPT threads):
•
Apply sealant to NPT thread acc. to your needs, e.g. PTFE tape or liquid sealant.
•
It is usually sufficient to tighten the NPT thread by hand.
Potential risks when using a wrench: sensor damage
(e.g. glass break); overtightening of the thread.
Max. torque for a metal thread connection: 9 Nm
Please contact your local Krohne contact fo
r calibration and regeneration (KCl) solutions.
Download documents and software
Scan the code on the nameplate or scan the
following code and enter the serial number.
Contact
Select your country from the region / language
selector to view your local KROHNE contact details
on:
www.krohne.com
Direct download:
www.krohne.com/en/downloads
Product name:
SMARTPAT
Document type:
Handbook / Software


