background image

KRAMER:  SIMPLE CREATIVE TECHNOLOGY


Connecting and Controlling the VS-81ETH 


16 

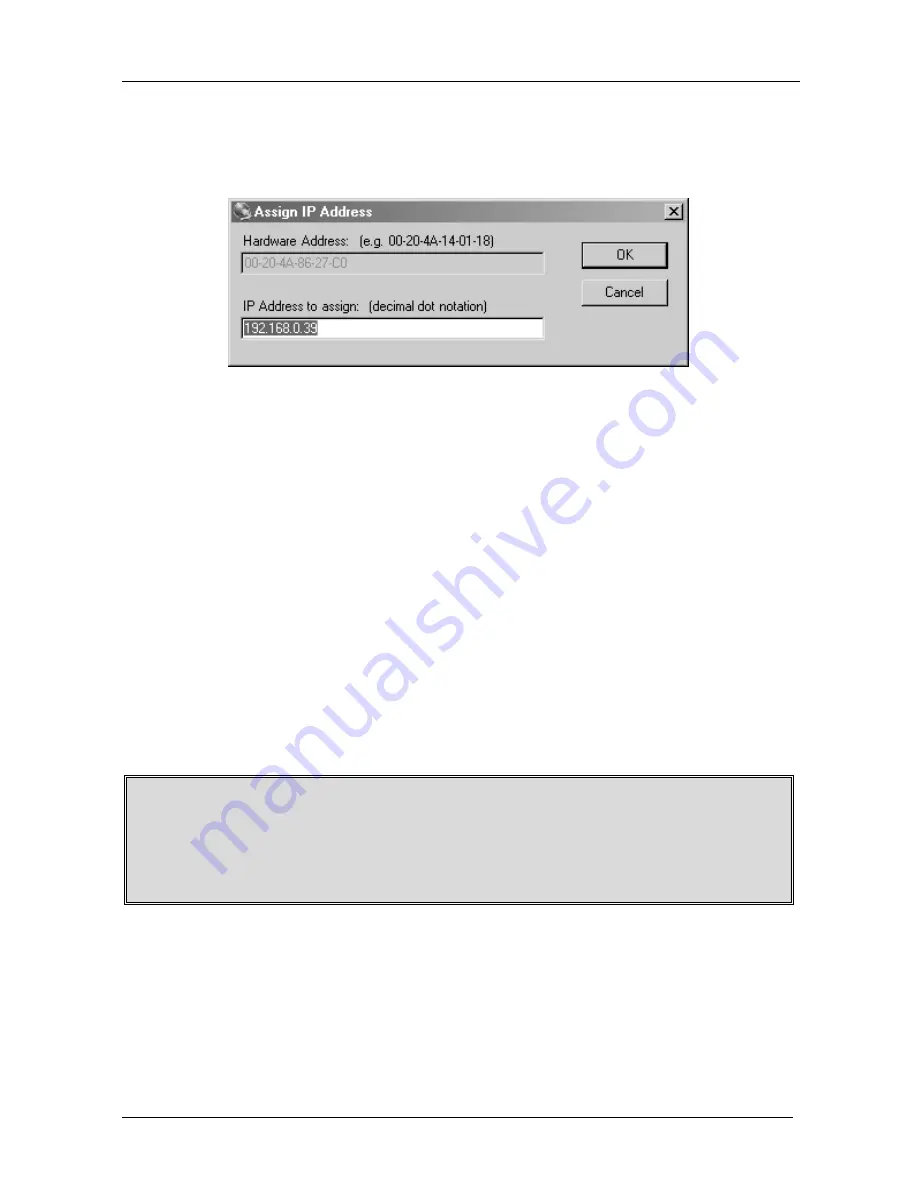
To change the IP address, first select the device from the list, then click the 

Assign IP


icon or select 

Assign IP Address


from the Action menu. The 

hardware address and IP address are loaded into the Assign IP Address dialog 

box (Figure 12).  


Figure 12: IP Address Assignment Dialog Box 


Enter the new IP Address and click 

OK

. The new IP Address will appear in 

the main window.  

5.6.2.4  Test the IP Address  

To test the IP Address, do the following: 

1.  Select the device from the main window list. 
2.  Click the 

Ping


icon or select 

Ping


from the Action menu. The Ping 

Device dialog box shows the IP Address of the selected device.  

3.  Click the 

Ping

 button and the results will be displayed in the Status 

window. Use the 

Clear Status

 button to clear the window so you can 

ping the device again. 

4.  Click the 

Close

 button to close the dialog box and return to the main 

window. 

Note: If you do not receive “Reply” messages, make sure the unit is properly 

attached to the network and that the IP address assigned is valid for the particular 

network segment you are working with. If you are not sure, check with your 

Systems Administrator  


Summary of Contents for VS-81ETH

Page 1: ...Kramer Electronics Ltd USER MANUAL Model VS 81ETH 8x1 Universal CAT 5 Switcher...

Page 2: ...t Configuration Software 14 5 6 3 Configuring the Ethernet Port 17 5 6 4 Using the Web Manager Page 17 5 6 5 Controlling a Machine using the Com Port Redirector 21 5 6 6 Using the Com Port Redirector...

Page 3: ...or Configuration Window 22 Figure 23 Port Setup Window 23 Figure 24 IP Service Setup Dialog Box 24 Figure 25 Port Settings Window 25 Figure 26 Silent Mode Checked in the RDCfg Window 26 Figure 27 Conn...

Page 4: ...ignage The package includes the following items VS 81ETH 8x1 Universal CAT 5 Switcher Power cord and Null modem adapter Windows based Kramer control software2 Windows based Configuration Manager XPort...

Page 5: ...Control the VS 81ETH using the front panel buttons or remotely via RS 485 or RS 232 serial commands transmitted by a touch screen system PC or other serial controller The Kramer Infra Red remote cont...

Page 6: ...Your VS 81ETH 8x1 Universal CAT 5 Switcher 3 Figure 1 VS 81ETH 8x1 Universal CAT 5 Switcher Front and Rear View...

Page 7: ...TE Terminal Block Connects to dry contact switches see section 5 7 8 RS 485 Terminal Block Port Pin G is for Ground connection 1 Pins B and A are for RS 485 9 SETUP Dipswitches SETUP DIPs 1 2 3 4 are...

Page 8: ...onnector to the LINE IN RJ 45 connector on a TP 1202 XGA Line Receiver unit and connect the XGA OUT connector on that TP 120 unit to the acceptor for example a projector 3 Set the dipswitches see sect...

Page 9: ...S 81ETH in the reverse direction do the following2 1 Connect the VGA UXGA computer graphics source to the XGA INPUT of a PT 1103 XGA Line Transmitter and connect4 the LINE OUTPUT on that PT 110 to the...

Page 10: ...ort see section 5 3 5 Connect the power cord3 To transmit the signal from the OUT IN connector to a device connected to the IN OUT connector press the appropriate IN OUT button RS 232 Computer Graphic...

Page 11: ...th RJ 45 connectors Table 3 CAT5 PINOUT EIA TIA 568A EIA TIA 568B PIN Wire Color PIN Wire Color 1 Green White 1 Orange White 2 Green 2 Orange 3 Orange White 3 Green White 4 Blue 4 Blue 5 Blue White 5...

Page 12: ...S 81ETH unit to the Null modem adapter and connect the Null modem adapter with a 9 wire flat cable to the RS 232 DB9 port on your PC To connect a PC to the VS 81ETH unit without using a Null modem ada...

Page 13: ...f the RC 3000 to the A PIN on the RS 485 rear panel port of the VS 81ETH unit Connect the B PIN on the RS 485 rear panel port of the RC 3000 to the B PIN on the RS 485 rear panel port of the VS 81ETH...

Page 14: ...ing controlled when several VS 81ETH units connect to a PC or serial controller Set the Machine on a VS 81ETH unit via SETUP DIPS 1 2 3 and 4 according to Table 4 When using a standalone VS 81ETH unit...

Page 15: ...necting the VS 81ETH Ethernet Port You can connect the Ethernet port either via a crossover cable see section 5 6 1 1 or a straight through cable see section 5 6 1 2 5 6 1 1 Connecting via a Crossover...

Page 16: ...l Area Connection Properties window appears 5 Select Internet Protocol TCP IP and click the Properties Button see Figure 8 Figure 8 Local Area Connection Properties Window 6 Select Use the following I...

Page 17: ...ftware To configure the Ethernet port you have to install and run the XPort configuration software It is important to consider the following points before logging into and configuring the Ethernet por...

Page 18: ...search for devices click the Search icon or select Search Network from the Action menu 5 6 2 3 Assign IP Address Figure 11 shows a device found on the network with the IP addresses assigned at the fac...

Page 19: ...dress do the following 1 Select the device from the main window list 2 Click the Ping icon or select Ping from the Action menu The Ping Device dialog box shows the IP Address of the selected device 3...

Page 20: ...er to access the unit s internal Web pages and configure the unit over the network see section 5 6 4 This is the easiest and preferred method Make sure that the Java 2 Runtime Environment Standard Edi...

Page 21: ...settings Update Settings Press to update settings Channel 1 Disabled When in the Web Manager window 1 Use the menu buttons to navigate to sub pages where you can configure server settings See explana...

Page 22: ...or over one of the fields to display Help messages Figure 16 Server Properties in the Unit Configuration Window Changing the IP address will require you to enter the new IP address in the browser to r...

Page 23: ...w is set1 according to Figure 17 Figure 17 Serial Port Settings Window Make sure that the Local Port in the Dedicated Connection window is set according to Figure 18 Figure 18 Dedicated Connection Win...

Page 24: ...5 1 Installing the Com Port Redirector To install the Com Port Redirector do the following 1 Perform the appropriate step to start the installation If the Com Port Redirector is on a CD ROM insert the...

Page 25: ...or and click Configuration The Com Port Redirector Configuration window appears see Figure 22 Figure 22 Com Port Redirector Configuration Window 6 Click the Com Setup button A Port Setup dialog box ap...

Page 26: ...te After you use the Port Setup dialog box to add or remove Com ports restart your computer 5 6 5 2 Configuring the Com Port Redirector Com Port Redirector is a software utility for network enabling l...

Page 27: ...e Start button in the Windows Taskbar point to Programs point to Lantronix Redirector and click Configuration The Com Port Redirector Configuration window appears see Figure 22 2 Using the Redirect To...

Page 28: ...ng If Timeout Reconnect is disabled the connection attempt fails after this interval and no more attempts are made Force v2 Protocol N A No Net Close If checked prevents the network connection from be...

Page 29: ...e HyperTerminal window opens a pop up window displays Attempting to connect to service If this message is replaced by Successfully redirected to service the connection from the Com Port Redirector to...

Page 30: ...H will route the appropriate IN OUT signal to the OUT IN acceptor4 Figure 27 Connecting a Remote Mechanical Switcher Unit to the VS 81ETH 1 The remote unit can have up to 8 push buttons corresponding...

Page 31: ...the PC using the Null modem adapter provided with the machine recommended as section 5 2 describes 3 Connect the RS 485 terminal block port on the first unit to the RS 485 port on the second VS 81ETH...

Page 32: ...el To prevent changing the settings accidentally or tampering with the unit via the front panel buttons lock1 your VS 81ETH Unlocking releases the protection mechanism To lock the VS 81ETH Press the L...

Page 33: ...re Ethernet IR POWER SOURCE 8 Watts maximum 100 264 VAC 50 60Hz DIMENSIONS 19 inch W 7 inch D 1U H WEIGHT 2 5kg 5 5lbs approx ACCESSORIES Power cord Null modem adapter Windows based control software W...

Page 34: ...e to be set for N5 N0 2nd BYTE Bit 7 Defined as 1 I6 I0 INPUT When switching ie instruction codes 1 and 2 the INPUT 7 bits is set as the input number which is to be switched Similarly if switching is...

Page 35: ...UTPUT byte 32 OR set 0 0 No VIS immediate 1 Input 1 2 External digital sync 3 External analog sync 4 Dynamic sync 5 Inter machine sync 6 Input INPUT byte 7 Output INPUT byte 8 User defined sync 32 RGB...

Page 36: ...t number whose video parameter is to be increased decreased 0 all 0 increase video gain 1 decrease video gain 2 increase contrast 3 decrease contrast 4 increase brightness 5 decrease brightness 6 incr...

Page 37: ...RS 422 controller 14 63 EXTENDED DATA 7 MSBs for INPUT data 7 MSBs for OUTPUT data 20 NOTES on the above table NOTE 1 When the master switcher is reset e g when it is turned on the reset code is sent...

Page 38: ...12 Under normal conditions the machine s present status is saved each time a change is made The power down save auto save may be disabled using this code Note that whenever the machine is turned on t...

Page 39: ...udio gain instruction 22 of output 3 to 681dec 2A9hex you would first send HEX codes 3F 80 85 81 and then send HEX codes 16 83 A9 81 To set the audio gain of output 6 to 10013dec 271Dhex first send HE...

Page 40: ...riginal dated invoice or a copy must be presented as proof of warranty coverage and should be included in any shipment of the product Please also include in any mailing a contact name company address...

Page 41: ...the latest information on our products and a list of Kramer distributors visit our Web site www kramerelectronics com where updates to this user manual may be found We welcome your questions comments...

Reviews: