background image

Installing the Room Controller 


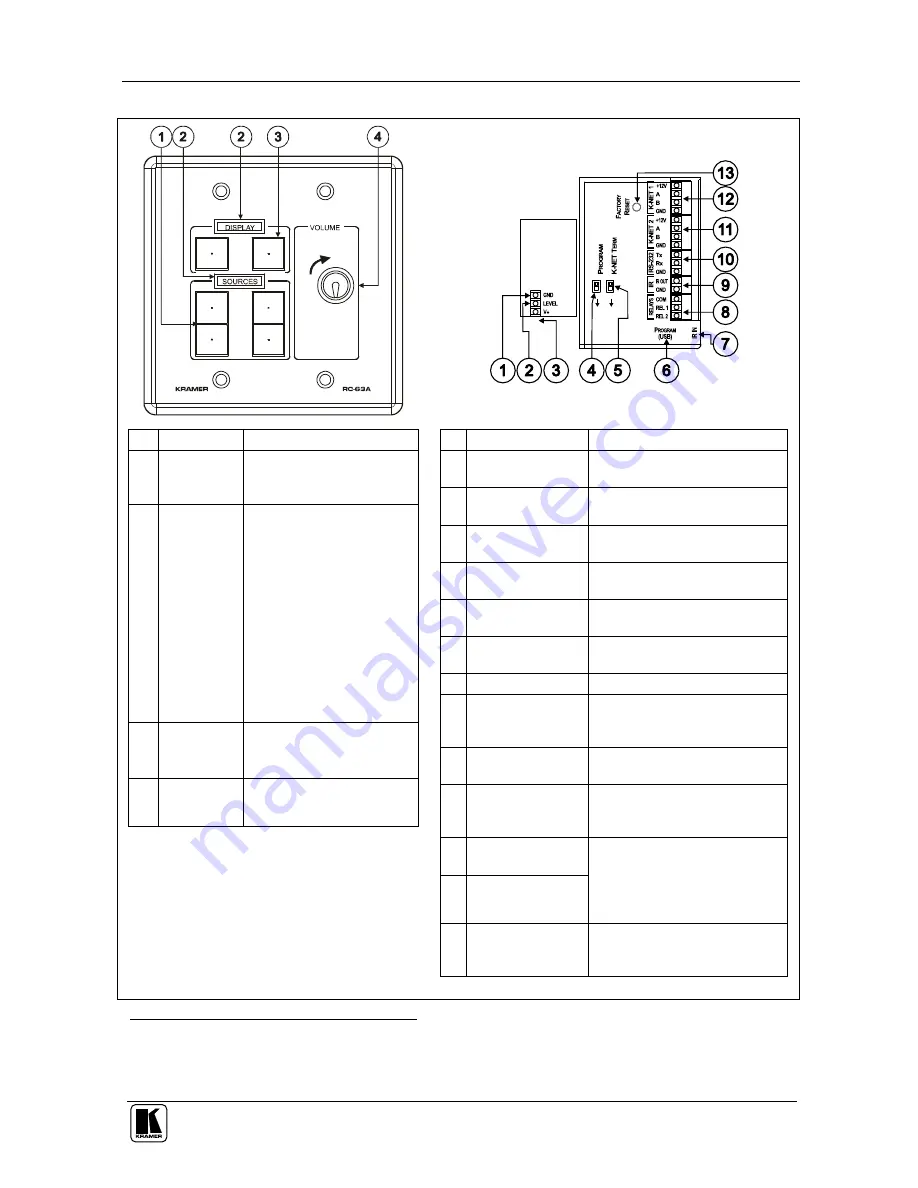
Table 4: Defining the RC-63, RC-63AL and RC-63AP

1


Feature 

Function 

SOURCE 

Buttons 

These 4 configurable 

backlit buttons can set up 

any supported command

2


“DISPLAY” 

and 

“SOURCE” 

Labels 

RC-63A

 - "DISPLAY" and 

“SOURCE” are printed on 

the panel  

RC-63AP

 - backlit plastic 

cap to affix your own 

labels (see Figure 10) 

RC-63AL

 - an LCD 

version on a blue 

background that displays 

up to 8 characters at once 

(programmed via the USB 

port) and includes rolling 

text 

DISPLAY 

Buttons 

These 2 configurable 

backlit buttons can set up 

any supported command

2


VOLUME 

Knob 

Rotate clockwise to 

increase the level 


#  Feature 

Function 

1  GND Connection  Ground connection for the 

potentiometer 

2  LEVEL 

Connection 

Wiper of potentiometer 

3  +V PIN 

+V connection for the 

potentiometer 

4  PROGRAM 

Switch 

For technical support use only 

5  K-NET TERM 

Switch 

For line termination 

6  PROGRAM 

(USB) Connector 

Connect to a computer for unit 

configuration 

7  IR IN Receiver 

Receives IR remote commands 

8  RELAY 

Connections 

Connect to room items (such 

as lighting, screen settings, 

blinds, and so on) 

9  IR Connections 

Control a machine via an IR 

Emitter 

10  RS-232 

Connections 

Connect to the RS-232 connector 

on the A/V equipment or a PC or 

other Serial Controller 

11  K-NET 2 

Connections 

12  K-NET 1 

Connections 

On K-NET 1 and K-NET 2, 

PIN GND is for the Ground 

connection

3

; PIN B (-) and PIN 

A (+) are for RS-485, and PIN 

+12V is for powering the unit 

13  FACTORY 

RESET Button 

Press to revert to the default 

settings, including all the 

configured buttons 


1 This European version has LCD labels 
2 By the system integrator only 
3 The ground connection is sometimes connected to the shield of the RS-485 cable (in most applications, it is not connected) 

Summary of Contents for RC-62

Page 1: ...Kramer Electronics Ltd USER MANUAL Room Controller Models RC 62 Series RC 62 RC 62P RC 62L RC 63A Series RC 63A RC 63AL RC 63AP RC 63D Series RC 63D RC 63DL RC 63DP ...

Page 2: ... Room Controller Front Panel 8 Figure 4 RC 63D Room Controller Rear Panel 9 Figure 5 RC 63D Standalone Power Supply Pinout 10 Figure 6 Example of a Typical RC 63DL Configuration 11 Figure 7 RC 63D connected to the SV 551 SummitView Processor Switcher 12 Figure 8 RC 63DL Labels Setup 13 Figure 9 Sample Button Labels Sheet 14 Figure 10 Sample Panel Labels Sheet 15 Tables Table 1 Defining the Room Co...

Page 3: ... program the required group label as well as rolling text on the display The DISPLAY and SOURCES labels are printed on the unit Has backlit plastic caps to which you can insert a label from a set of supplied stickers RC 62 Series RC 62L RC 62 RC 62P RC 63A series With a separate analog volume control adjustment knob RC 63AL RC 63A RC 63AP RC 63D Series With a separate digital volume control adjust...

Page 4: ...RC SV Configuration Guide available online for details of how to install and configure the Room Controller 6 We recommend that you review the contents of this user manual 1 SummitView is a complete and simple solution for the integration of media and control in classrooms training rooms and presentation rooms SummitView is as easy to use as it is to specify and install Everything required includin...

Page 5: ... the need for an external IR remote control unit Macro mode operation for programming multiple commands with the press of a single button Support for firmware upgrade via USB using K NET connection when used together with the SV 551 For further details see our Web site In addition the RC 63A and the RC 63D feature a separate analog and digital volume adjustment knob respectively To achieve the bes...

Page 6: ...lastic cap to which you can insert a label from a set of supplied stickers see section 6 RC 62L has an LCD label letting you program the required group label The RC 62 series includes two relays for the simplified and centralized control of room functions such as lighting closing blinds screen settings and so on an IR output a bi directional RS 232 port and two K NET ports In addition the RC 62 fe...

Page 7: ...upport use only 2 Grounding Screw Connect to grounding wire optional 3 K NET TERM Switch For line termination 4 PROGRAM USB Connector Connect to a computer for unit configuration 5 IR IN Receiver Receives IR remote commands 6 RELAYS Connections Connect to room items such as lighting screen settings blinds and so on 7 IR Connections Control a machine via an IR Emitter 8 RS 232 Connections Connect t...

Page 8: ...astic cap to which you can insert a label from a set of supplied stickers RC 63AL has an LCD label letting you program the required group label as well as rolling text on the display The RC 63A also includes An analog volume control adjustment knob Two relays for the simplified and centralized control of room functions such as lighting closing blinds screen settings and so on An IR output a bi dir...

Page 9: ...n for the potentiometer 4 PROGRAM Switch For technical support use only 5 K NET TERM Switch For line termination 6 PROGRAM USB Connector Connect to a computer for unit configuration 7 IR IN Receiver Receives IR remote commands 8 RELAY Connections Connect to room items such as lighting screen settings blinds and so on 9 IR Connections Control a machine via an IR Emitter 10 RS 232 Connections Connec...

Page 10: ...d as part of the SummitView Standard Kit Box and the SummitView Essentials Kit Box and described in that user manual and has an LCD label letting you program the required group label as well as rolling text on the display The RC 63D also includes A digital volume control adjustment knob with five LEDs Two relays for the simplified and centralized control of room functions such as lighting closing ...

Page 11: ... Table 6 RC 63D Rear Panel Features Feature Function 1 FIRMWARE UPGRADE Switch For technical support use only 2 Grounding Screw Connect to grounding wire 3 K NET TERM Switch For line termination 4 PROGRAM USB Connector Connect to a computer for unit configuration 5 IR IN Receiver Receives IR remote commands 6 RELAY Connections Connect to room items such as lighting screen settings and so on 7 IR C...

Page 12: ...y to the room controller A power supply unit is required It requires programming3 The power supply pinout is defined in Figure 5 Black GND PINOUT Red 12V RC 63DL Room Controller To power supply Figure 5 RC 63D Standalone Power Supply Pinout The room controller is easy to use as the example in Figure 6 and Table 7 defines4 1 By authorized Kramer technical personnel or by an external system integrat...

Page 13: ...on Scheme for the example in Figure 6 This connector Connects to REL 1 REL 2 The screen IR OUT and GND PINs A DVD player RS 232 TX RX Terminal Block Connector A projector 12V and GND A power supply unit 1 A PC is connected via the USB connector for setup of the room controller 1 Optional see Table 9 ...

Page 14: ...connection to the SV 551 SummitView Processor Switcher A power supply unit is not required1 No programming of the room controller is needed Figure 7 shows how the room controller is used as part of the SummitView system SV 551 To 5A Power Supply Room Controller Black GND PINOUT Red 12V Green A White B Figure 7 RC 63D connected to the SV 551 SummitView Processor Switcher 1 Power supplies are sold s...

Page 15: ... Roll up the projector screen DVD Stop the video player The projector selects the DVD input Play the DVD VCR Stop the DVD The projector selects the VCR input Play the VCR ROOM Figure 8 RC 63DL Labels Setup VOLUME Use the VOLUME knob to adjust the audio level 5 2 Using the Macro Buttons Pressing any button initiates a macro sequence4 during which the button blinks as programmed by the system integr...

Page 16: ...bels The backlit buttons1 are available on plastic caps We recommend you to insert the labels on the Front Panel buttons before installing the controller as it involves removing the face plate Figure 9 illustrates the button labels for the macro buttons2 Figure 9 Sample Button Labels Sheet 1 You can program the color of the button with flexible RGB values 2 Installed by the system integrator only ...

Page 17: ...d Labels 15 6 2 Panel Labels Figure 10 illustrates the sample Labels sheet1 supplied with the RC 62P RC 62AP and the RC 63DP for inserting under the plastic caps Figure 10 Sample Panel Labels Sheet 1 Installed by the system integrator only ...

Page 18: ... 63DL 12V DC 200mA FUSE 500mA FSMD 2920 ADAPTER SummitView kits 12V 5A independent 12V 500mA DIMENSIONS RC 62 for the USA 6 9cm x 2 6cm x 11 4cm 2 72 x 1 02 x 4 49 W D H RC 63A and RC 63D for the USA 11 4cm x 2 6cm x 11 4cm 4 49 x 1 02 x 4 49 W D H RC 62 and RC 63D for Europe 15 2cm x 1 9cm x 8 6cm 5 98 x 0 75 x 3 39 W D H WEIGHT 0 14kg 0 31lbs approx ACCESSORIES USB cable 3 0 91m 2 screwdriver Wi...

Page 19: ...t fire water lightning or otheractsofnature ii Product modification orfailure to follow instructions supplied withtheproduct iii Repairorattemptedrepairby anyone not authorizedbyKramer iv Anyshipment ofthe product claimsmust be presentedto the carrier v Removalorinstallation ofthe product vi Anyothercause whichdoes not relateto a product defect vii Cartons equipment enclosures cablesoraccessoriesu...

Page 20: ...For the latest information on our products and a list of Kramer distributors visit our Web site www kramerelectronics com where updates to this user manual may be found We welcome your questions comments and feedback Caution Safety Warning Disconnect the unit from the power supply before opening servicing ...

Reviews: