background image


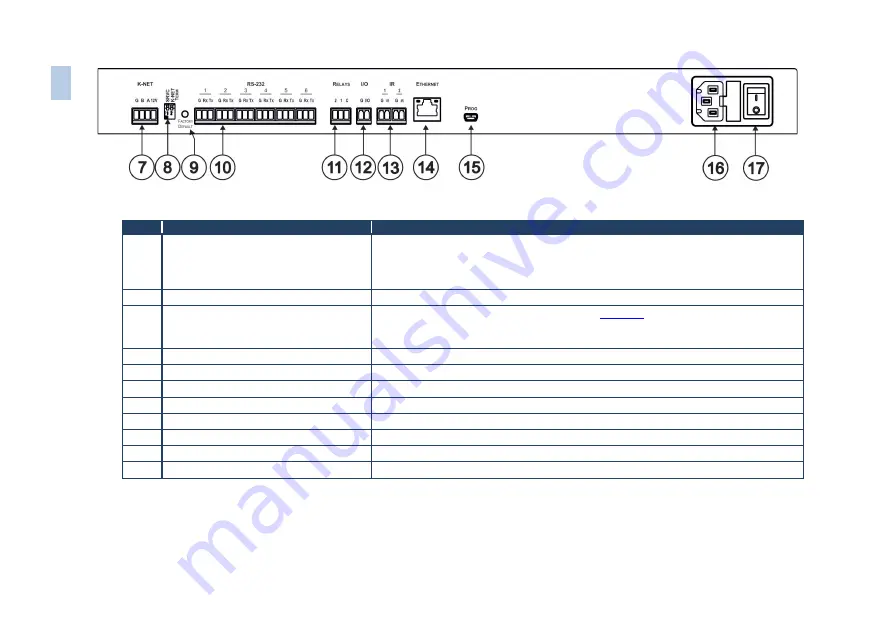
Figure 2: SL-14RC Master Controller Rear Panel 

Feature 

Function 

K-NET

 Connector 

Connect the GND pin to the Ground connection; pin B (-) and pin A (+) are for RS-485, 

and the +12V pin is for powering the unit 

The ground connection is sometimes connected to the shield of the RS-485 cable (in most 

applications, it is not connected) 

SRVC

 and 

K-NET TERM DIP-

Switches 

For service use only. Slides down for K-NET termination, slides up for not terminated 

FACTORY DEFAULT 

Button 

Press to reset to factory default definitions (see 

Section  9

First switch off the unit and then switch it on while pressing the DEFAULT button. The unit 

powers up and loads its memory with the factory default definitions and erases all stored presets 

10 

RS-232 

Terminal Blocks 

Connect to the RS-232 devices (from 1 to 6) 

11 

RELAYS 

Terminal Blocks 

Connect to low-voltage relay-driven devices (from 1 to 2) 

12 

I/O

 Terminal Block 

Connect to various analog and digital sensors  

13 

IR 

Output


Terminal Blocks 

Connect to IR emitter cables (from 1 to 2) 

14 

ETHERNET

 RJ-45 Connector 

Connects to the PC or other serial controller through computer LAN 

15 

PROGRAM

 USB Connector 

Connects to a PC for software upgrading 

16 

Power Receptacle 

Connects to mains power 

17 

Power ON/OFF Switch 

Illuminated switch for turning the unit on and off 


Note

: In earlier versions the USB connector is accessed via the front panel by removing the four front panel screws. 


6


SL

-1

4R

C

 –

 O

ver
view


Summary of Contents for RC-3TB

Page 1: ...KRAMER ELECTRONICS LTD USER MANUAL MODELS SL 14RC Master Controller RC 3TB Remote Control Panel Optional P N 2900 000598 Rev 5...

Page 2: ......

Page 3: ...els Optional 12 7 Operating the SL 14RC 14 8 Front Panel Button Caps and Labels 15 8 1 Installing the Front Panel Button Caps and Labels 17 8 2 Replacing the Front Panel Button Labels 17 9 Technical S...

Page 4: ...defined by function GROUP 1 Distribution Amplifiers GROUP 2 Switchers and Matrix Switchers GROUP 3 Control Systems GROUP 4 Format Standards Converters GROUP 5 Range Extenders and Repeaters GROUP 6 Sp...

Page 5: ...com to check for up to date user manuals application programs and to check if firmware upgrades are available where appropriate 2 1 Achieving the Best Performance To achieve the best performance Use...

Page 6: ...ator LEDs configured using the K Config Configuration software 1 general purpose I O port that can be configured as an analog input digital input or digital output for interfacing with a variety of de...

Page 7: ...4 SL 14RC Overview 3 1 Defining the SL 14RC Master Controller This section defines the SL 14RC...

Page 8: ...tton Switches 1 10 Function is programmed by the K Config Configuration software 4 DISPLAY Configurable Button switches 11 and 12 Function is programmed by the K Config Configuration software 5 Rotary...

Page 9: ...he unit powers up and loads its memory with the factory default definitions and erases all stored presets 10 RS 232 Terminal Blocks Connect to the RS 232 devices from 1 to 6 11 RELAYS Terminal Blocks...

Page 10: ...igned to button 12 on SL 14RC 3 Buttons 2 and 3 Function is assigned by the rotary switch position 4 K NET Connector Connects to either SL 14RC or additional RC 3TB 5 8 Position Rotary Switch For assi...

Page 11: ...d by buttons 2 and 3 on the RC 3TB Rotary Switch Position Button 1 Button 2 Button 3 0 12 7 8 1 12 7 9 2 12 7 10 3 12 8 9 4 12 8 10 5 12 9 10 6 12 7 9 7 Service use only For example if the rotary swit...

Page 12: ...SL 14RC Installing in a Rack 9 5 Installing in a Rack This section provides instructions for rack mounting the unit...

Page 13: ...e screen 2 Connect the I O port to a motion detector 3 Connect the IR outputs as follows Connect an IR emitter to IR OUTPUT 1 and attach the emitter to the DVD player Connect an IR emitter to IR OUTPU...

Page 14: ...Controller 6 1 Connecting the RS 232 Interface To connect an AV device to the SL 14RC using the RS 232 port connect the RS 232 9 pin D sub port on your AV device to the RS 232 terminal block on the r...

Page 15: ...ith RJ 45 connectors 2 At the other end connect the Internet to a PC running Site CTRL 3 After connecting the Ethernet port you have to install and configure it For detailed instructions on how to ins...

Page 16: ...TB in the chain should be terminated 6 3 2 Daisy Chaining Multiple RC 3TB Remote Control Panels The wiring of two RC 3TB panels to the K NET port on the SL 14RC is shown in Figure 6 Connection of more...

Page 17: ...sing the K Config software For instructions on using the software see the K Config Software Guide available from our Web site at www kramerelectronics com RC 3TB Remote Control Panels optional A PC ru...

Page 18: ...Panel Button Caps and Labels 15 8 Front Panel Button Caps and Labels The SL 14RC is supplied with a button label sheet and 12 clear button caps to house the labels Figure 8 illustrates a sample butto...

Page 19: ...16 SL 14RC Front Panel Button Caps and Labels Figure 8 Sample Button Label Sheet...

Page 20: ...g the Front Panel Button Labels Note The button caps are a press fit on the buttons and must be removed carefully or the buttons may be damaged Remove the button caps only with the supplied button cap...

Page 21: ...00 240VAC 22VA OPERATING TEMPERATURE 0 to 55 C 32 to 131 F STORAGE TEMPERATURE 45 to 72 C 49 to 162 F HUMIDITY 10 to 90 RHL non condensing DIMENSIONS 48 3cm x 11 5cm x 1U 19 x 4 5 x 1U W D H SL 14RC 8...

Page 22: ...t modification orfailure to follow instructions supplied withtheproduct iii Repair orattemptedrepairby anyone not authorized by Kramer iv Any shipment of theproduct claims must bepresentedtothe carrie...

Page 23: ...ributors visit our Web site where updates to this user manual may be found We welcome your questions comments and feedback Web site www kramerelectronics com E mail info kramerel com SAFETY WARNING Di...

Reviews: