background image

16 

(GB)

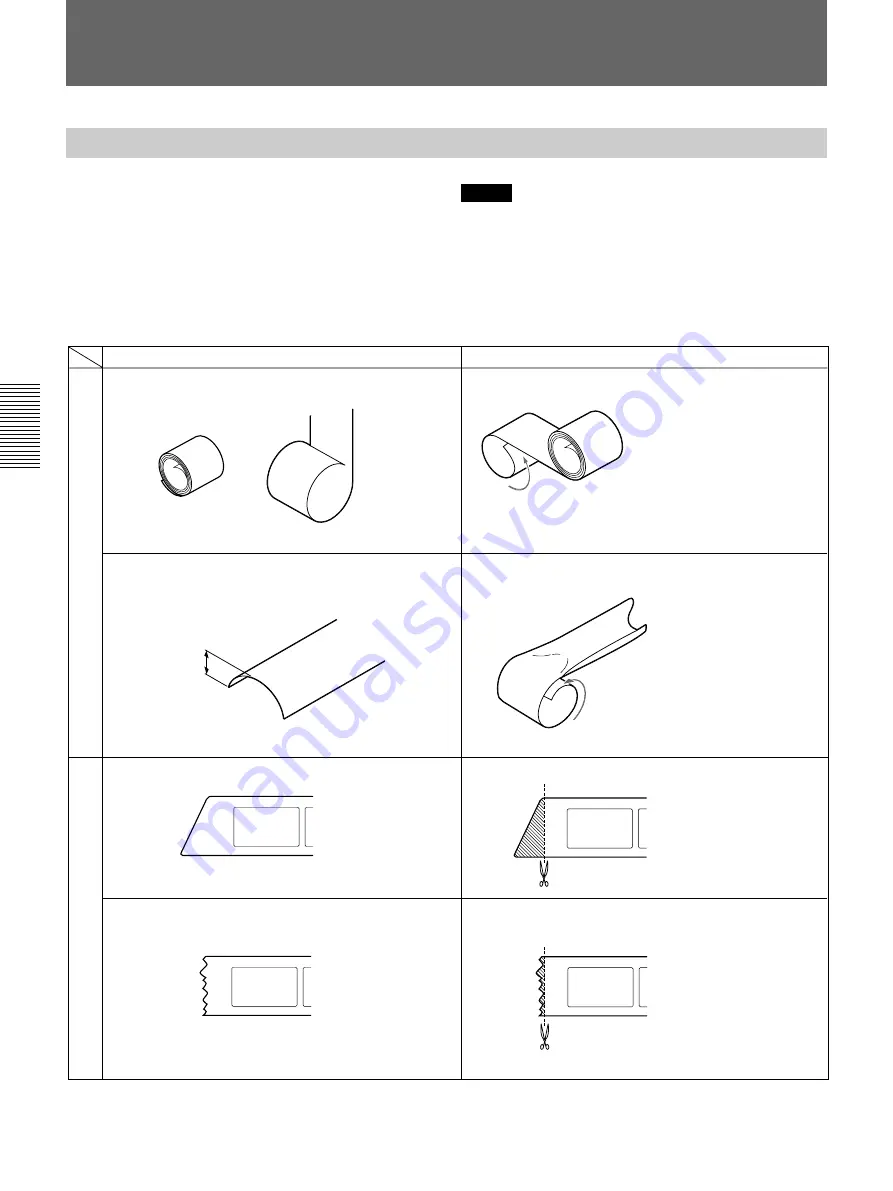
Remedies

Reroll both ends of the film in the opposite direction
of the curl (for about 20 cm or 8 in. each).

(If they cannot be fixed, insert the film while correcting the
curls by hand.)

Reroll both ends of the film in the direction of protrusion of
the curls (for about 20 cm or 8 in. each).

Cut it perpendicularly.

Cut it perpendicularly.

Sleeve film conditions

Sleeve film curls strongly so that the end curls to form a
circle when hanging.

The following curl is more than 5 mm or 

3

/

16

 in.

An end is cut diagonally.

An end is torn.

Precautions

About the conditions of film ends and remedies

Reroll in the opposite
direction of the curl

Reroll in the direction of
protrusion of the curls

More than
5 mm or 

3

/

16

 in.

Curling conditions

Film ends conditions

In order to avoid feeding errors of the sleeve film in
the film carrier, check the curling condition of the film
and film ends before inserting it into the film carrier.
Please fix the following before inserting the film into
the carrier.

Notes

• If film in bad condition is inserted, it could cause

feeding errors or damage the film.

• If positive film (sleeve) has a transparent portion at

the end, it might be mispositioned during scanning.
Please cut the film end so that the transparent portion
is eliminated.

Summary of Contents for RX-II

Page 1: ......

Page 2: ...されています しかし 電気製品は まちがった使いかたをすると 火災や感電などにより死亡や大けがなど人身 事故につながることがあり 危険です 事故を防ぐために次のことを必ずお守りください 安全のための注意事項を守る 4 JP 6 JP ページの注意事項をよくお読みください 21 JP ページの 設置 使用するときのご注意 もあわせてお読みください 定期点検をする 1年に1 度は 電源コードのプラグ部とコンセントとの間や 接続コードの 間にほこりがたまっていないか 破損したまま使用していないか などを点 検してください 故障したら使わない 動作がおかしくなったり 電源コードや接続コードが破損しているのに気づ いたら すぐに販売店に修理をご依頼ください 万一 異常が起きたら 煙が出たら 異常な音 におい がしたら 内部に水 異物が 入ったら 製品を落としたり キャビネットを破 損したときは 1 ...

Page 3: ...キャリアの種類 13 JP キャリアを取り付ける 取り外す 14 JP キャリアにフィルムをセットする 15 JP ス リ ーブフ ィ ルムをセ ッ ト する 15 JP ス ラ イ ド をセ ッ ト する 15 JP IX240カー ト リ ッ ジフ ィ ルムをセ ッ ト する 16 JP 電源を入れる 切る 17 JP 保守 点検 その他 複製禁止事項について 18 JP 使用上のご注意 19 JP フ ィ ルム先端の状態と処置について 19 JP 設置 使用する と きのご注意 21 JP お手入れのしかた 22 JP キャ リ ア内部の清掃 22 JP キャ ビネ ッ ト の清掃 22 JP 故障とお考えになる前に 23 JP 保証書とアフターサービス 24 JP 主な仕様 25 JP ...

Page 4: ... ほこりの多い場所には設置しない 上記のような場所に設置すると 火災や感電の原因となることがあります 取扱説明書に記されている使用条件以外の環境での使用は 火災や感電の原 因となることがあります 内部に水や異物を入れない 水や異物が入ると火災や感電の原因となることがあります 万一 水や異物が入ったときは すぐに電源を切り 電源コードや接続コー ドを抜いて 販売店にご相談ください 内部を開けない 内部には電圧の高い部分があり キャビネットや裏ぶたを開けたり改造した りすると 火災や感電の原因となることがあります 内部の調整や設定 点 検 修理は販売店にご依頼ください ハロゲンランプ取り付け 交換時には以下の注意を守る 下記の注意事項を守らないと ハロゲンランプが破裂し けがの原因となる ことがあります ぶつけたり 無理な力を加えたり キズをつけたりしない 振動や衝撃を与えない ハロゲンランプ...

Page 5: ...置すると 倒れたり落ちたりしてけが の原因となることがあります また 設置 取り付け場所の強度を充分にお 確かめください 接続の際は電源を切る 電源コードや接続コードを接続するときは 電源を切ってください 感電や 故障の原因となることがあります 指定された電源コード 接続コードを使う 取扱説明書に記されている電源コード 接続コードを使わないと 火災や感 電の原因となることがあります ぬれた手で電源プラグをさわらない ぬれた手で電源プラグを抜き差しすると 感電の原因となることがありま す お手入れの際は 電源を切って電源プラグを抜く 電源を接続したままお手入れをすると 感電の原因となることがあります 移動させるときは電源コード 接続コードを抜く 接続したまま移動させると コードが傷つき 火災や感電の原因となること があります 下記の注意を守らないと けがをしたり周辺の物品に損害を与えることが...

Page 6: ... ります 充分に注意してください ハロゲンランプを交換するときは 直接 素手では触れないでください また 必ず電源を切り ランプの温度が完全 に下がるのを待って 15 分以上 から行ってください 天板やレンズブランケットには触れない 天板やレンズブランケットは ハロゲンランプの熱で温度が高くなり 手な どが触れると火傷の原因となることがあります フィルム挿入口に顔を近づけない フィルム挿入口にはフィルムが挿入 排出されます 顔を近づけるとけがの 原因となることがあります 下記の注意を守らないと けがをしたり周辺の物品に損害を与えることがあります ...

Page 7: ...ています 梱包を開けたら部品を確認してく ださい フィルムキャリア 1 スライドキャリア 1 キャリアカバー 1 ハロゲンランプ 1 ドライバーソフトウェア CD ROM 1 電源コード 1 電源プラグ変換コネクター 1 ソフトウェアマニュアル 1 取扱説明書 1 保証書 1 ご注意 箱や梱包材は捨てないでく ださい 運搬や輸送のと き必要です スキャナーを移動させる と きは 必ずキャ リ アをはずしてく ださい 本機の構成品 概 要 ...

Page 8: ...ムと も 5種類の解像度が選べます 選択でき る解像度の種類と 135フ ィ ルムで切り抜きがノ ーマルの場合の読み取り画素数は 以下のとおりです サムネイ ル 192 128 画素 低解像度 LD 384 256 画素 標準 SD 768 512 画素 精細 HD 1 536 1 024画素 高精細 UD 3 072 2 048画素 読み取り画素数は フ ィ ルムの種類や切り抜きの種類 パノ ラマ ス ライ ドなど によって異 なり ます 写真の色や濃度などのマニュアル補正が可能 プレビュー した画像の濃度 デンシティ ー や色 カラーの場合 コン ト ラス ト モノ クロの 場合 をマニュアルで補正できます また 他のコマとは異なる光源で撮影したコマを補 正でき る フルコ レクシ ョ ンや 1コマの大半を特定の色が占めているよ う なコマを補正でき る ロワー ドコレクシ ョ ンなど...

Page 9: ...ャ リ アカバーは必ず閉めておいてく ださい 5 ランプカバー 内部に付属のハロゲンラ ンプを取り付けます ラ ンプカバーが開いている とプレビューやスキャ ンができ ません ま た プレビュー中やスキャン中にカバーを開ける と動作が中止しま す ラ ンプカバーは必ず閉めておいてく ださい ハロゲンラ ンプの取り付けかたは 12 JP ページをご覧く ださい 各部の名称と働き 1 2 3 4 5 6 6 キャリア フ ィ ルムの種類によって 適したキャ リ アをご使用く ださい 詳しく は13 JP ページをご覧く ださい 7 コネクターカバー 内部にスライ ドフ ィ ーダー専用端子があ り ます 8 スライドフィーダー専用端子 D sub 9ピン 別売りのス ライ ドフ ィ ーダーASC 2を接続します この端子には ス ライ ドフ ィ ーダーASC 2以外は絶対に接続しない でく ださ...

Page 10: ...詳細は ご使用になる機器の取扱説明書も合わせて ご覧く ださい SCSIケーブルのコネク ターは完全に挿入してく ださい 1台のホス ト コンピューターに接続するSCSIケーブルの合計の長さは 3m以内にしてく ださい 1台のホス ト コンピューターに本機のみ接続する場合は SCSIケーブルの長さは1m以 内にしてく ださい 接続する 2個のSCSIコネクターのどち らへ接続しても構いません コンピューター AC INへ コンセントへ AC 100 V 50 60 Hz 取り外しかた 付属のハロゲンランプ を取り付ける 12 JP ページ参照 SCSIケーブル 別売り SCSIへ 電源コード 付属 DIPスイッチ 11 JP ページ参照 フィルムスキャナー RX II ...

Page 11: ...ッチで ター ミ ネーター 終端 とSCSI IDを設定します 工場出荷時は SCSI IDスイ ッチは次のよ う に 2 に設定されています ご注意 SCSI IDスイ ッチを切り換える と きは 電源をOFFにしてく ださい TERMINATOR 終端 スイッチの設定 ON 本機をSCSIバスの終端に接続する場合は ONに設定します 内蔵ター ミ ネーター がONになり ます OFF 本機をSCSIバスの中間に接続する場合は OFFに設定します SCSI IDスイッチの設定 他の機器と重複しないよ う にSCSI IDを設定します SCSI IDが重複する と 誤動作の原 因となり ます SCSI ID SCSI IDスイッチ 0 1 2 3 4 5 6 7 ...

Page 12: ...いでく ださい また ラ ンプのガラ ス球や反射鏡を触らないでく ださい 1 本機上部のラ ンプカバーを開け ネジ2本をゆるめる 2 手でラ ンプホルダーを引き上げ 上面パネルにのせる 3 ラ ンプホルダーを手で支えながら 付属のハロゲンラ ンプを差し込む 4 ラ ンプホルダーをも との位置に戻し ネジ2本を閉め ラ ンプカバーを閉める ハロゲンランプの交換 ハロゲンラ ンプの寿命は約1000時間です 付属のラ ンプが切れたら RX II用交換ラ ンプ 別売り と取り換えてく ださい 交換のしかたは上記の取り付けかたと同じです 切れたラ ンプを取り外すには 手順2の あと ラ ンプホルダーを手で支えながら ラ ンプを引き抜き ます ハロゲンランプを取り付ける ピンと穴を合わせて 差し込む コインなど ランプホルダー ...

Page 13: ...置にセッ トするための装置です スキャ ンするフ ィ ルムに適し たキャ リ アを取り付けてく ださい フィルム キャリア 135フィルム フィルムキャリア 付属 長尺フ ィ ルム 3コマ 以上のフィルム 135フィルム IX240フィルム スライドキャリア 付属 スライド マウント IX240カートリッジ アドバンスト フォトシステム フィルムキャリア フィルム 別売り 3コマの長さが38 mm 3 114 mm以上のもの 長さ114 mm以下のフ ィ ルムはスキャ ンできません ...

Page 14: ...使用しています キャリアの取り付けかた 本機上部からキャ リ アを挿入し 取っ手を倒してロ ッ ク します 取り付け後 キャ リ アカバー を閉めます ご注意 キャ リ アカバーと ラ ンプカバーは必ず閉めてく ださい カバーが開いている と フ ィ ルムのプ レビューやスキャ ンができません また プレビュー中やスキャ ン中にどち らかのカバーを開 ける と 動作が中止します キャリアの取り外しかた 取っ手を押してロ ッ クを外し キャ リ アを持ち上げます キャリアを取り付ける 取り外す ランプカバー キャリアカバー ...

Page 15: ...にキャ リ アに引き込まれます ご注意 ポジの露光部など フ ィ ルムに透明な部分がある と フ ィ ルムが正しく 送られません 透明部を切断してく ださい フ ィ ルムのカール状態や先端 後端 パーフ ォ レーシ ョ ンの状態によ り フ ィ ルムが正し く 送られないこ とがあ り ます あ らかじめ正しく 処置してからキャ リ アに挿入してく ださ い 詳しく は 19 JP ページの フ ィ ルム先端の状態と処置について をご覧く ださい スライドをセットする ス ライ ドの表面 乳剤面 を手前にキャ リ アに挿入し キャ リ アのホルダー部を押し込みま す 1 4 キャリアにフィルムをセットする 乳剤面を手前に DXコードを下に 乳剤面を手前に ...

Page 16: ...ッ ト されています カー ト リ ッ ジを取り出してく ださい と表示 されます この場合は 現像済みのカー ト リ ッ ジフ ィ ルムである ことを確認の上 爪を完全 に折ってから 再び入れ直してく ださい プレビュー中やスキャ ン中にキャ リ アに触ったり カー ト リ ッ ジ入れのふたを開けないでく ださい 正しく スキャ ンされない場合があり ます IX240カートリッジフィルムの各部の名称 1 カー ト リ ッ ジ取出しレバーを押してから 手でふたを開ける 2 使用状態マーク面を上にしてカー ト リ ッ ジフ ィ ルムを入れる 3 カー ト リ ッ ジ入れのふたを閉める カートリッジ取出しレバー 爪が折れていることを 確認 遮光ぶた 使用状態マーク 1 未使用 2 撮影途中 3 撮影済み 4 現像済み 未現像表示爪 キャリアにフィルムをセットする ...

Page 17: ... オレ ンジ が点灯します 異常がなければ 数秒後にBUSYイ ンジケーターとALARMイ ンジケー ターは消えます 電源が入り POWERイ ンジケーターは点灯したままになり ます 以後の操作のしかたは ソフ ト ウェアマニュアルをご覧く ださい ご注意 A L A R Mイ ンジケーター オレンジ が点灯したままのときは ハロゲンラ ンプやキャ リ ア キャ リ アカバーが正しく 取り付けられているかど う かを確かめてく ださい 12 JP ページ 14 JP ページ参照 本機の電源を切る POWERスイ ッチを押します POWER イ ンジケーターが消え 電源が切れます 電源を入れる 切る POWERスイッチとインジケーター ALARMインジケーター BUSYインジケーター ...

Page 18: ...いる証紙類 関連法律 通貨及ビ証券模造取締法 外国ニ於テ流通スル 貨幣 紙幣 銀行券 証券 偽造変造及ビ模造ニ関スル法律 郵便切手類模造取締法 印紙等模造取締法 紙幣類似証券取締法 2 注意を要するもの 株券 手形 小切手などの民間発行の有価証券 定期券 回数券などは 事業会社 が業務に供するための最低必要部数を複製する以外は 政府指導によって注意を呼 びかけられています 政府発行のパスポー ト 公共機関や民間団体の免許証 許可証 身分証明書や通行 券 食券などの切符類も勝手に複製しない方がよいと考え られています 3 著作権の目的となっているもの 著作権の目的となっている書籍 音楽 絵画 版画 地図 映画 図画 写真などの著作 物は 個人的にまたは 家庭内その他 これに準ずる限られた範囲内で使用するために複 製する以外は禁じられています ...

Page 19: ...に切断します 直角に切断します 5mm以上 使用上のご注意 フィルムの状態 処置方法 カ ー ル 曲 が り の 状 態 フ ィ ル ム 先 端 お よ び 後 端 の 状 態 カールと逆方向に巻き直す カールの凸側方向に巻き 直す フィルム先端の状態と処置について フ ィ ルムキャ リ ア内でのフ ィ ルムづま り を未然に防ぐため キャ リ アにフ ィ ルムを通す前に カール状態や先端の状態を確認してく ださい 下記に示すよ う なフ ィ ルムは あ らかじめ処 置を行ってからキャ リ アに挿入してく ださい ご注意 フ ィ ルムの状態を無視して挿入した場合 フ ィ ルムづま りや破損のおそれがあり ます ポジフ ィ ルム ス リ ーブ の先端に曝写部 透明部 がある場合は スキャ ン時コマ位 置ズレを起こすおそれがあ り ますので 透明部分がなく なるよ う フ ィ ルム先端を切断し...

Page 20: ...の余裕があれば 目切れ部分を切断します 画面までの余裕があれば テープ部を切断します パーフ ォ レーシ ョ ン部を破損しないよう に テープをすべてはがします テープののりが残らないよ う にきれいにはがしてく ださい 画面までの余裕があれば 折れた部分を切断します テープで目切れ部を修正します フ ィ ルムの先端及び後端で目切れをしている場合は 目切れ部分を切断しま す テープ DXコードの マーク幅以下 フィルムの状態 切り落とす余裕がない場合は 斜めに 切断します 画面までの余裕がなければテープの のりが残らないようにきれいにはが します まっすぐ伸ばす 切り落とす余裕がない場合は 先を まっすぐにして挿入します パ ー フ ォ レ ー シ ョ ン の 状 態 処置方法 テープ ...

Page 21: ... 本機は振動に敏感ですので 設置する台 机など はしっかり したものを選んでく ださい また 使用中 特にスキャン中は振動を加えないよ う ご注意く ださい レンズに触れないでください レンズが汚れる とデータのスキャ ンができなく なったりする場合があ り ます 温度上昇について 本機を長時間お使いになる と 本体の温度が上昇する こ とがあ り ますが 故障ではあ り ま せん 結露について 温度の低い場所から暖かい場所に移動したり 暖房で湯気や湿気が立ちこめた部屋に置 く と 本機の内部に水滴がつく こ とがあり ます これを結露といいます この状態で本機を 使用する と 正常に動かないばかりでなく 故障の原因になり ます 結露の可能性のある と きは 電源を切り しばら く そのまま放置しておいてく ださい 本製品使用によって生じた金銭上の損害 逸失利益 および第三者からのいかなる...

Page 22: ... ださい キャ リ ア内部を開け 水で湿らせた布をかたく しぼってほこ りや汚れをふき と り ます 下図の斜線部のローラー 7か所 と上下のレール面を清掃します キャビネットの清掃 汚れがひどいと きは 水または水で薄めた中性洗剤溶液で湿らせた布をかたく しぼってか ら 汚れをふき とってく ださい シンナーやベンジン アルコール 化学ぞう きんなどは 表 面の仕上げをいためる こ とがあ り ますので 使用しないでく ださい お手入れのしかた つまみを押しながら開く ローラー 7か所 ...

Page 23: ...プカバーが開いていませんか 14 JP ページ 梱包材をはずしま したか ハロゲンラ ンプが切れていませんか 12 JP ページ スキャンした画像がおかしい キャ リ アなどに強い力を加えませんでしたか キャ リ アをいったんはずし 取り付け直 してく ださい ハロゲンラ ンプは点灯しま したか 通風口をふさ ぐと ラ ンプが消える こ とがあ り ます スキャン中に振動を加えませんでしたか ハロゲンラ ンプが切れていませんか 12 JP ページ ス ライ ドキャ リ アの場合 ホルダーを押し込んだ状態でキャ リ アを取り付けま したか ソフ ト ウェアは正しく 設定してあ り ますか ソフ ト ウェアマニュアル参照 フィルムが送られない または送りがおかしい フ ィ ルムのカール状態や先端の状態を確認しま したか 19 JP ページ フ ィ ルムがからんだり 無理な力が加わったり しませ...

Page 24: ...をも う 一度ご覧になってお 調べく ださい それでも調子の悪いときはサービスへ 販売店にご相談く ださい 保証期間中の修理は 保証書の記載内容に基づいて修理させていただきます 詳しく は 保証書をご覧く ださい 保証期間経過後の修理は 修理によって機能が維持でき る場合は ご要望によ り有料修理さ せていただきます 部品の保有期間について 当社ではフ ィ ルムスキャナー RX IIの補修用性能部品 製品の機 能を維持するために必要な部品 を 製造打ち切り後最低7年間 保有しています この部品保有期間を修理可能の期間と させてい ただきます 保有期間が経過した後も 故障箇所によっては修理 可能の場合があ り ますので 販売店にご相談く ださい 保証書とアフターサービス ...

Page 25: ...2 A 100 V 入力最大定格負荷電流時 動作温度 5 35 動作湿度 30 85 外形寸法 本体 438 148 560 mm 幅 高さ 奥 行き 後部コネク ター部含まず フ ィ ルムキャ リ ア 201 110 58 mm 幅 高さ 奥行き 突起部含まず ス ライ ドキャ リ ア 232 96 40 mm 幅 高さ 奥行き 突起部含まず 質量 本体 12 2 kg フ ィ ルムキャ リ ア 0 7 kg ス ライ ドキャ リ ア 0 4 kg 付属品 ハロゲンラ ンプ 1 フ ィ ルムキャ リ ア 1 ス ライ ドキャ リ ア 1 キャ リ アカバー 1 電源コー ド 1 電源プラグ変換コネクター 1 ドライ バーソフ ト ウェア CD ROM 1 ソフ ト ウェアマニュアル 1 取扱説明書 1 保証書 1 主な仕様および外観は改良のため予告な く 変更する こ とがあ り ます ...

Page 26: ... possibly cause a slight injury or a medium degree of injury if the situation is not avoided This word is also used for the critical situation under which a material damage will be caused Note It is forbidden to copy or duplicate copyrighted matters without the permission of the copyright holder Possession of copies or duplicates of currency coins securities uncancelled stamps or postcards revenue...

Page 27: ...for less amperage than the appliance may overheat 7 Always unplug appliance from electrical outlet before cleaning and servicing and when not in use Never yank cord to pull plug from outlet Grasp plug and pull to disconnect 8 Let appliance cool completely before putting away Loop cord loosely around appliance when storing 9 To reduce the risk of electric shock do not immerse this appliance in wate...

Page 28: ...r Software CD ROM 1 AC power cord 1 Software Manual 1 Operating Instructions 1 Notes Retain the original carton and packing materials in case you have to transport the unit in the future Remove the carrier when transporting the Film Scanner Checking the Package Film carrier 1 Slide carrier 1 Carrier cover 1 Halogen lamp 1 ...

Page 29: ...GB Loading a sleeve film into the carrier 13 GB Loading a slide into the carrier 13 GB Loading an IX240 cartridge film into the carrier 14 GB Turning the Power ON OFF 15 GB Maintenance Checking and Other Information Precautions 16 GB About the conditions of film ends and remedies 16 GB On safety 18 GB On installation 18 GB On heat build up 18 GB On cleaning 18 GB On repacking 18 GB Maintenance 19 ...

Page 30: ...film or IX240 film The following shows the available resolution modes and the number of scanned pixels when 135 film is scanned in the normal cropping mode Thumbnail 192 128 pixels Low 384 256 pixels Standard 768 512 pixels High 1 536 1 024 pixels Ultra high 3 072 2 048 pixels Note The number of scanned pixels differs according to the film type and croppingmode panorama slide etc Manual adjustment...

Page 31: ...Scanner on or off The indicator lights up while the power is ON 2 BUSY indicator green Lights while the Film Scanner is in operation 3 ALARM indicator orange Lights when a problem occurs 4 Carrier cover Protectsthecarrier If the carrier cover is open prescanning and scanning cannot be performed Also opening the cover during prescanning or scanning stops the operation Make sure to close the carrier...

Page 32: ...lt its manual as well Insert the connector into the socket firmly The total length of the SCSI cabling used with a single host computer should be less than 3 meters 10 feet The length of the SCSI cabling used with a single host computer should be less than 1 meter 3 feet 3 inches Hooking Up Connect to either of two SCSI connectors SCSI cable not supplied Mount the supplied halogen lamp see page 10...

Page 33: ...ctory to 2 as shown below Note Turn off the power before changing the SCSI ID switch setting TERMINATOR ON OFF setting ON If the scanner is located at the end of the SCSI bus this switch should be set to ON The internal terminator is ON OFF If another device is at the end of the bus this switch should be OFF SCSI ID setting The SCSI ID selection must be different from any other device on the bus I...

Page 34: ...r located on the top of the unit and loosen two screws 2 Pull up the lamp holder and set it on the panel 3 Hold the lamp holder and insert the supplied lamp 4 Set the lamp holder in the original position tighten two screws and closethelampcover Replacing the halogen lamp The life of a halogen lamp is about 1 000 hours When the supplied lamp burns out replace it with a new lamp To replace the halog...

Page 35: ...ed The carrier is a device which loads film or slides in the correct position Mount a carrier appropriate to the type of film to be scanned Film Carrier 135 film Film carrier supplied Sleeve film Film with more than three frames 135 film IX240 film Slide carrier supplied Slides mounted IX240 cartridge film IX240 film carrier optional Usable Films and Carriers ...

Page 36: ...e scanner and fold down the handle to lock Then close the carrier cover Note Be sure to close the carrier cover and lamp cover If either cover is open prescanning and scanning cannot be performed Also opening the cover duringprescanningorscanningstopstheoperation Removing the carrier Press the handle to unlock and lift the carrier Mounting Removing the Carrier Lamp cover Carrier cover ...

Page 37: ... film the film cannot be fed properly Cut off the transparent portion The curling condition of the sleeve film and film ends may cause feeding error Fix the film correctly before inserting it into the carrier For details see About the conditions of film ends and remedies on page 16 GB Loading a slide into the carrier Insert the slide into the carrier with the emulsion side facing you and push in t...

Page 38: ...dge film is processed and remove the tab completely Then insert thecartridgefilmagain Do not touch the carrier or open the lid of the cartridge holder during prescanningorscanning Thismaycauseimproperscanning Parts identification of IX240 cartridge film 1 Press the cartridge eject lever and open the lid 2 Insert the cartridge with the film status indicator end up 3 Close the lid Film status indica...

Page 39: ...e scanner turnson To proceed with the operation consult the instruction manual Software Manual Note If any trouble occurs when the power is turned on the ALARM indicator remains lit in orange In this case check if the halogen lamp carrier carrier cover and lamp cover are mounted correctly pages 10 GB and 12 GB Turning off the power of the Film Scanner Press the POWER switch The POWER indicator goe...

Page 40: ...n Precautions About the conditions of film ends and remedies Reroll in the opposite direction of the curl Reroll in the direction of protrusion of the curls More than 5 mm or 3 16 in Curling conditions Film ends conditions In order to avoid feeding errors of the sleeve film in the film carrier check the curling condition of the film and film ends before inserting it into the film carrier Please fi...

Page 41: ... is broken Film ends conditions Perforation conditions If there is enough space between the broken perforation and the image area cut the broken portion If there is not enough space cut it off diagonally If there is enough space between the taped portion and the image area cut the taped portion If there is not enough space peel off the tape completely Less than the mark width of DX code Tape Tape ...

Page 42: ...t is brought directly from a cold to a warm location moisture may condense inside the unit and cause damage to the unit When you first install the unit or when you move it from a cold to a warm location wait for a while before operating the unit On heat build up Heat builds up in the unit if it is used for an extended period of time If this occurs allow the unit to cool down On cleaning To keep th...

Page 43: ... cloth slightly moistened with water Wipe the seven rollers shaded in the following figure and the set of rails top and bottom Cleaning cabinet When the cabinet becomes dirty wipe it with a close moistened with water or neutral detergent dissolved in water Do not use benzene alcohol thinner or chemical cloth as they may damage the finish ...

Page 44: ...rned out page 10 GB Scanned image appears strange Check if you applied force to the carrier Remove the carrier and mount it again Check the halogen lamp is turned on Blocking the ventilation holes may cause the lamp to turn off Check if you applied vibration to the unit during scanning Check if the halogen lamp is burned out page 10 GB If you are using the slide carrier check if you mounted the ca...

Page 45: ...20 220 240 V AC 50 60 Hz Input current 1 2 A max with maximum input load at 100 V AC 0 6 A max with maximum input load at 220 V AC Operating temperature 5 35 C 41 95 F Operating humidity 30 85 RH Dimensions Main unit 438 148 560 mm w h d 171 4 57 8 221 8 inches not including connectors on the rear Film carrier 201 110 58 mm w h d 8 43 8 23 8 inches not including projecting part Slide carrier 232 9...

Page 46: ...gés par des droits d auteur sans le consentement du détenteur de ces droits La possession de copies ou de répliques de monnaies pièces de monnaies de titres de timbres ou de cartes postales non oblitérés de timbres fiscaux et d autres certificats de valeur est punissable par la loi Afin d éviter tout risque d incendie ou d électrocution ne pas exposer cet appareil à la pluie ou à l humidité Afin d...

Page 47: ...er de film Raccordement 6 FR Réglage des microcommutateurs 7 FR Installation de la lampe halogène 8 FR Films et chariots utilisables 9 FR Installation dépose du chariot 10 FR Chargement du film dans le chariot 11 FR Chargement d un film enroulé dans le chariot 11 FR Chargement d une diapositive dans le chariot 11 FR Chargement d une cartouche de film IX240 dans le chariot 12 FR Mise sous hors tens...

Page 48: ... pour film 135 ou IX240 Nous indiquons ci dessous les modes de résolution disponibles et le nombre de pixels numérisés lors du balayage d un film 135 en mode de détourage Onglet 192 128 pixels Basse 384 256 pixels Standard 768 512 pixels Haute 1 536 1 024 pixels Ultra haute 3 072 2 048 pixels Remarque Le nombre de pixels numérisés diffère suivant le type de film et le mode de détourage panorama di...

Page 49: ...allumer éteindre le scanner de film Le témoin s allume pour signaler que l appareil est sous tension 2 Témoin BUSY vert S allume lorsque le scanner de film fonctionne 3 Témoin ALARM orange S allume en cas de problème 4 Couvercle du chariot Protège le chariot Si le couvercle du chariot est ouvert la prénumérisation et la numérisation ne peuvent pas s effectuer De même l ouverture du couvercle penda...

Page 50: ... d emploi Insérez fermement le connecteur dans sa prise La longueur totale du câblage SCSI utilisé avec un ordinateur hôte simple doit être inférieure à 3 mètres 10 pieds La longueur du câblage SCSI utilisé avec un ordinateur hôte simple doit être inférieure à 1 mètre 3 pieds 3 pouces Raccordement Effectuez le branchement à l un des deux connecteurs SCSI Câble SCSI non fourni Installez la lampe ha...

Page 51: ... illustré ci dessous Remarque Mettez l appareil hors tension avant de changer le réglage des commutateurs SCSI ID Réglage TERMINATOR ON OFF ON Si le scanner est situé à l extrémité du bus SCSI ce commutateur doit être mis sur ON Le terminateur interne est sur ON OFF Si un autre appareil est à l extrémité du bus ce commutateur doit être mis sur OFF Réglage ID SCSI La sélection ID SCSI doit être dif...

Page 52: ... l appareil et dévissez les deux vis 2 Soulevez le support de la lampe et placez le sur le panneau 3 Maintenez le support de la lampe et insérez la lampe fournie 4 Remettez le support de la lampe dans sa position d origine serrez les deux vis et fermez le couvercle de la lampe Remplacement de la lampe halogène La durée de vie d une lampe halogène est estimée à environ 1 000 heures Lorsque la lampe...

Page 53: ...ables Le chariot est un dispositif qui charge les films ou diapositives dans la bonne position Placez un chariot correspondant au type de film à numériser Film Chariot Film 135 Chariot de film fourni Film enroulé Film avec plus de trois images Film 135 Film IX240 Chariot de diapositive fourni Diapositives montées Film à cartouche IX240 Chariot de film IX240 option ...

Page 54: ...efermez le couvercle du chariot Remarque Veillez à fermer le couvercle de chariot et le couvercle de la lampe Si l un des couvercles est ouvert la prénumérisation ou la numérisation ne peut pas s effectuer De même l ouverture du couvercle pendant la prénumérisation ou la numérisation arrête toute opération Retrait du chariot Appuyez sur la poignée pour déverrouiller et soulevez le chariot Installa...

Page 55: ...ra pas être chargé convenablement Coupez la portion transparente L état de la boucle du film enroulé et des extrémités de film peut entraîner des erreurs de chargement Placez le film correctement avant de l insérer dans le chariot Pour plus de détails reportez vous à A propos de l état des extrémités de film et des remèdes à la page 14 FR Chargement d une diapositive dans le chariot Insérez la dia...

Page 56: ...introduisez ensuite la cartouche Ne touchez pas le chariot et n ouvrez pas le couvercle du support de cartouche durant la prénumérisation ou la numérisation La numérisation risque de ne pas être correcte Identification des composants d une cartouche de film IX240 1 Appuyez sur le levier d éjection de la cartouche et ouvrez le couvercle 2 Insérez la cartouche avec l extrémité de l indicateur de sta...

Page 57: ...s tension Pour continuer l utilisation consultez le mode d emploi Software Manual Remarque En cas de problème lorsque l appareil est sous tension l indicateur ALARM reste allumé en orange Dans ce cas vérifiez si la lampe halogène le chariot le couvercle du chariot et le couvercle de la lampe sont montés correctement Pages 8 FR et 10 FR Mise hors tension du scanner de film Appuyez sur le commutateu...

Page 58: ...xtrémités de film et des remèdes Remèdes Enroulez de nouveau les deux extrémités du film dans le sens opposé de la boucle pendant environ 20 cm chacune Si vous ne parvenez pas à résoudre ce problème introduisez le film tout en corrigeant la boucle à la main Rebobinez les deux extrémités du film dans le sens de la partie saillante des boucles pendant environ 20 cm chacune Coupez perpendiculairement...

Page 59: ...sé Etat des extrémités du film Etat des orifices S il y a suffisamment d espace entre l orifice endommagé et la zone réservée à l image coupez la portion endommagée S il n y a pas suffisamment d espace coupez la en diagonale S il y a suffisamment d espace entre la portion d adhésif et la zone réservée à l image coupez la portion d adhésif S il n y a pas suffisamment d espace décollez complètement ...

Page 60: ...boîtier débranchez l appareil et faites le examiner par un personnel qualifié avant de l utiliser à nouveau Débranchez l appareil de la prise murale si vous comptez ne pas l utiliser pendant plusieurs jours Pour débrancher le câble d alimentation saisissez la fiche Ne tirez jamais sur le câble Ne tentez pas de démonter le boîtier Ne vous adressez qu à du personnel qualifié pour la maintenance de l...

Page 61: ...ans la figure suivante ainsi que les rails supérieur et inférieur Nettoyage du boîtier Lorsque le boîtier est encrassé nettoyez le avec un chiffon humidifié à l eau ou avec un détergent neutre dissout dans l eau N utilisez pas de benzène d alcool de solvant ou de chiffons chimiques car ils risquent d endommager la finition Entretien Appuyez sur la languette pour ouvrir Rouleau 7 ...

Page 62: ...rillée page 8 FR L image numérisée présente un aspect étrange Assurez vous que vous n avez pas forcé le chariot Retirez le chariot et remettez le de nouveau Assurez vous que la lampe halogène est allumée L obstruction des trous de ventilation peut provoquer l extinction de la lampe Assurez vous que vous n avez pas soumis l appareil à des vibrations pendant la numérisation Vérifiez si la lampe halo...

Page 63: ...0 Hz Courant d entrée 1 2 A max avec charge d entrée maximum à 100 V CA 0 6 A max avec charge d entrée maximum à 220 V CA Température d utilisation 5 35 C 41 95 F Humidité d utilisation 30 85 HR Spécifications Dimensions Appareil principal 438 148 560 mm l h p 171 4 57 8 221 8 po sans les connecteurs à l arrière Chariot de film 201 110 58 mm l h p 8 43 8 23 8 po sans la partie saillante Chariot de...

Page 64: ...is Das Kopieren oder Duplizieren urheberrechtlich geschützten Materials ist ohne die Erlaubnis des Urheberrechtseigentümers untersagt Der Besitz von Kopien oder Duplikaten von Geldscheinen und anderen gesetzlichen Zahlungsmitteln Wertpapieren nicht entwerteten Postwertzeichen bzw Postkarten mit aufgedruckten Postwertzeichen Wertmarken Urkunden u ä verstößt gegen das Gesetz und ist strafbar Um Feue...

Page 65: ...enelemente 5 DE Arbeiten mit dem Film Scanner Anschließen des Geräts 6 DE Einstellen der DIP Schalter 7 DE Anbringen der Halogenbirne 8 DE Geeignete Filme und Träger 9 DE Anbringen Abnehmen des Filmträgers 10 DE Einlegen des Films in den Träger 11 DE Einlegen einer Filmrolle in den Filmträger 11 DE Einlegen eines Dias in den Träger 11 DE Einlegen einer IX240 Filmpatrone in den Filmträger 12 DE Ein...

Page 66: ...fgeführt zusammen mit der Anzahl der gescannten Pixel wenn ein 135er Film im normalen Beschneidemodusgescanntwird Miniaturasicht 192 128 Pixel Niedrig 384 256 Pixel Standard 768 512 Pixel Hoch 1 536 1 024 Pixel Ultrahoch 3 072 2 048 Pixel Hinweis Die Anzahl der gescannten Pixel variiert je nach Filmtyp und Beschneidemodus Panorama Diausw Farben und Farbintensität der Bilder manuell einstellbar Sie...

Page 67: ...haltet ist 2 Anzeige BUSY grün Leuchtet während der Film Scanner in Betrieb ist 3 Anzeige ALARM orange Leuchtet wenn ein Problem vorliegt 4 Trägerabdeckung Zum Schutz des Filmträgers Ist die Trägerabdeckung offen so ist das Vorscannen bzw Scannen nicht möglich Außerdem wird das Vorscannen bzw Scannen gestoppt wenn Sie die Abdeckung während des Betriebs öffnen Halten Sie dieTrägerabdeckungalsounbed...

Page 68: ...zugehörigen Handbuch nach Stecken Sie einen Stecker immer fest in die Buchse Die Gesamtlänge der SCSI Verkabelung bei einem einzelnen Host Computer sollte weniger als 3 m betragen Die Länge der einzelnen SCSI Kabel bei einem einzelnen Host Computer sollte weniger als 1 m betragen Zum Anschließen an einen der beiden SCSI Anschlüsse SCSI Kabel nicht mitgeliefert Bringen Sie die mitgelieferte Halogen...

Page 69: ...das Gerät aus bevor Sie die Einstellung der SCSI ID Schalter ändern Einstellung des Abschlußwiderstands TERMINATOR ON OFF ON Wenn sich der Scanner am Ende des SCSI Busses befindet muß dieser Schalter auf ON stehen Der interne Abschlußwiderstand steht auf ON OFF Wenn sich ein anderes Gerät am Busende befindet muß dieser Schalter auf OFF stehen SCSI ID Einstellung Die SCSI ID des Geräts muß eindeuti...

Page 70: ...t und lösen Sie die zweiSchrauben 2 Ziehen Sie den Birnenhalter heraus und legen Sie ihn auf die Abdeckung 3 Halten Sie den Birnenhalter und setzen Sie die mitgelieferte Birne ein 4 Bringen Sie den Halter wieder in seine ursprüngliche Position ziehen Sie die beiden Schrauben an und schließen Sie die Birnenabdeckung Austauschen der Halogenbirne Eine Halogenbirne hält etwa 1 000 Stunden Wenn die mit...

Page 71: ... Film Filmträger mitgeliefert Filmrolle Film mit mehr als drei Bildern 135er Film IX240 Film Diaträger mitgeliefert Dias gerahmt IX240 Filmpatrone IX240 Filmträger optional Die Länge von drei Bildern muß mehr als 114 mm betragen 38 mm 3 Ein Filmstreifen mit einer Länge von weniger als 114 mm kann nicht eingescannt werden Geeignete Filme und Träger ...

Page 72: ...e die Abdeckung des Filmträgers Hinweis Achten Sie darauf daß die Abdeckung des Filmträgers und die Birnenabdeckung geschlossen sind Ist eine der Abdeckungen offen so ist das Vorscannen bzw Scannen nicht möglich Außerdem wird das Vorscannen bzw Scannen gestoppt wenn Sie eine Abdeckung während des Betriebs öffnen Abnehmen des Filmträgers Drücken Sie auf den Griff um die Arretierung zu lösen und heb...

Page 73: ...r Film nicht korrekt eingezogenwerden SchneidenSiedentransparentenBereichab Wenn sich Filmrollen bzw deren Enden einrollen kann es zu Problemen beim Einzug kommen Bringen Sie den Film in einen geeigneten Zustand bevor Sie ihn in den Träger einlegen Einzelheiten dazu finden Sie unter Hinweise zum Zustand des Films und zu ergreifende Maßnahmen auf Seite 14 DE Einlegen eines Dias in den Träger Legen ...

Page 74: ...n und entfernen Sie die Lasche vollständig Legen Sie dann den Film erneut ein Berühren Sie während des Vorscannens oder Scannens den Filmträger nicht und öffnen Sie auch nicht den Deckel des Filmpatronenhalters Dadurch könnte es zu Fehlern beim Scannen kommen Komponenten einer IX240 Filmpatrone 1 Drücken Sie den Patronenlösehebel und öffnen Sie den Deckel 2 Legen Sie die Patrone mit der Statusanze...

Page 75: ...et sichein Wie Sie nun fortfahren lesen Sie in der Anleitung zur Software Software Manual Hinweis Wenn beim Einschalten eine Störung auftritt leuchtet die Anzeige ALARM orange und erlischt nicht Überprüfen Sie in diesem Fall ob Halogenbirne Träger Trägerabdeckung und Birnenabdeckung korrekt angebracht sind Seite 8 DE und 10 DE Ausschalten des Film Scanners Drücken Sie den Schalter POWER Die Anzeig...

Page 76: ...um Zustand des Films und zu ergreifende Maßnahmen Abhilfemaßnahmen Rollen Sie beide Enden des Films in die dem Bogen entgegengesetzte Richtung ein jeweils etwa 20 cm Wenn sich der Film dadurch nicht strecken läßt legen Sie ihn ein und korrigieren dabei die eingerollten Enden von Hand Rollen Sie beide Enden des Films in der Richtung ein in die sich der Bogen wölbt jeweils etwa 20 cm Schneiden Sie e...

Page 77: ...n den Perforationen ist der Filmstreifen ausgerissen Zustand der Filmenden Perforation Wenn zwischen der beschädigten Perforation und dem Bildbereich genügend Platz ist schneiden Sie den beschädigten Bereich ab Andernfalls schneiden Sie ihn diagonal ab Wenn zwischen dem beklebten Bereich und dem Bildbereich genügend Platz ist schneiden Sie den beklebten Bereich ab Andernfalls lösen Sie das Klebeba...

Page 78: ...ld mit Betriebsspannung Leistungsaufnahme usw befindet sich an der Geräterückseite Sollten Fremdkörper oder Flüssigkeiten in das Gerät gelangen trennen Sie es von der Netzsteckdose und lassen Sie es von qualifiziertem Fachpersonal überprüfen bevor Sie es wieder benutzen Wollen Sie das Gerät einige Tage oder länger nicht benutzen ziehen Sie den Netzstecker aus der Steckdose Ziehen Sie dabei immer a...

Page 79: ...n Abbildung schattiert dargestellt sowiedieFührungsschienen obenundunten Reinigen des Gehäuses Wenn das Gehäuse verschmutzt ist reinigen Sie es mit einem Tuch das Sie mit Wasser oder einem milden Reinigungsmittel in Wasser gelöst angefeuchtet haben Benzin Alkohol Verdünner oder ein chemisch imprägniertesReinigungstuchsindnichtgeeignet dasiedieOberfläche desGehäusesangreifenkönnten Zum Öffnen die L...

Page 80: ... die Halogenbirne durchgebrannt ist Seite 8 DE Das gescannte Bild erscheint nicht korrekt Der Träger muß sorgsam behandelt werden Lösen Sie den Träger und bringen Sie ihn wieder an Sehen Sie nach ob die Halogenbirne eingeschaltet ist Wenn die Lüftungsöffnungen blockiert sind schaltet sich die Birne möglicherweise aus Das Gerät darf während des Scannens keinen Erschütterungen ausgesetzt sein Sehen ...

Page 81: ...Bildspeicher 4 096 2 048 Punkte 8 Bit pro RGB SCSI Anschluß 50poliger Half Pitch Anschluß 2 Scanner Typ Draft Shifting Farbbild Scanner für Übertragung Abtastverfahren 1 Pfad Abtastung mit 3zeiligem Farb CCD Bildsensor 3zeiliger Farb CCD 2 700 Bildelemente Lichtquelle Halogenbirne mit 24 V 60 W Abtastgröße 135er Film 23 5 35 3 mm IX240 Film 15 6 27 8 mm Maximale Auflösung 135er Film IX240 Film Dia...

Page 82: ...20 DE ...

Page 83: ...21 DE ...

Page 84: ...26 ...

Reviews: