23
⿎
Transmittance measurements
○
Before starting transmittance calibration and
measurements, attach the LAV (ø25.4 mm)
target mask and position the white calibration
plate at the reflectance measuring port.
○
Before starting transmittance calibration and
measurements, set the measurement area to LAV and
the specular component to SCI using the software.
○
Before starting transmittance calibration and
measurements, set the UV light quantity using the software.
1.
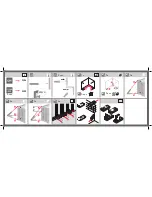
Open the cover of the transmittance chamber.
2.
Place the specimen against the illumination
window tightly. (When measuring a liquid
specimen, the specimen container must be
placed against the illumination window.)
○
The specimen must be placed so that
the area to be measured entirely covers
the entire illumination window.
Memo
• Although the specimen can be plaied in front of either the
illumination or receiving window, it is reccommended
that it is placed in front of the illumination window.
In this position, the illumination/observation
geometry is diffuse illumination/0° viewing angle.
In the position in front of the receiving window, the
illumination/observation geometry is approximately 0°
:0° . It does not strictly satisfy the difinition of sush as
CIE No.15. However, this presents no problem if the values are used as relative values.
• It is recommended that the optional Transmittance Specimen Holder CM-A96 be used to hold the specimen in place.
• In the case of a liquid specimen, use of an optional cell (CM-A97 to 99, A130 to 132) is recommended.
○
If you are going to use a container other than the above cells, it must be transparent and constructed in such
a way that it can be positioned with opposing surfaces parallel to both illumination and receiving windows.
○
Take care not to spill the liquid specimen on the CM-3600A. Should there be any spillage, immediately wipe
it with a soft, dry cloth.
○
Never measure flammable liquids.
○
No measurements must be performed if the specimen or inside and outside of the specimen container is
scratched or dirty. If you hold the measuring surface of the specimen with your fingers, it will be marked with
fingerprints, so always hold another part of the specimen when setting it in place.
○
Air bubbles on the inner surface of the specimen's container will hinder correct measurements, so make
sure that all air bubbles are removed before measurement. (Air bubbles sometimes develop even if the
container is just left standing still.)
○
Correct measurements will be hindered if water drops develop on the specimen or its container due to
condensation.
○
Liquids containing particles may cause unstable measurements due to precipitation of the particles.
3.
Close the cover of the transmittance chamber.
⿎
About haze measurements
When the White Calibration Plate is positioned over the
reflectance measuring aperture, the measurement geometry
for transmittance measurements becomes di:0°. When the
Zero Calibration Box is positioned over the reflectance
measuring aper ture, the measurement geometr y for
transmittance measurements becomes de:0°.
The illumination/observation system does not strictly satisfy the definition of haze (ASTM D 1003).
However, this presents no problem if the values are used as relative values.
When using the optional Color Management Software SpectraMagic™ NX, these two types of transmittance
measurements (di:0°, de:0°) with and without specimen can be taken and haze can be calculated.
Receiving window
Illumination window
Illumination window
Receiving window
Summary of Contents for CM-3600A
Page 9: ...7 Using the CM 3600A...
Page 30: ...28...
Page 31: ...29 Explanations...
Page 36: ...34 Dimensions 29 5 15 6 30 244 2 115 6 23 4 28 7 87 178 3 50 2 376 6 20 11 205 6 225 6 mm...
Page 38: ...36 MEMO...
Page 40: ...9222 A3UJ 12 BHEFDK 2011 2017 KONICA MINOLTA INC...


