Basic operations
3
3-6
bizhub 165
3.2
Configuring a custom size
1
To load a custom size in
Tray 1
, press the
Menu/Select
key
ö
[COPY JOB SETTING]
ö
[TRAY1 PA-
PER]
ö
[SIZE]
ö
[SIZE INPUT].
To load a custom size into the
Bypass Tray
, press the
Menu/Select
key
ö
[COPY JOB SETTING]
ö
[BYPASS PAPER]
ö
[SIZE]
ö
[SIZE INPUT].
2
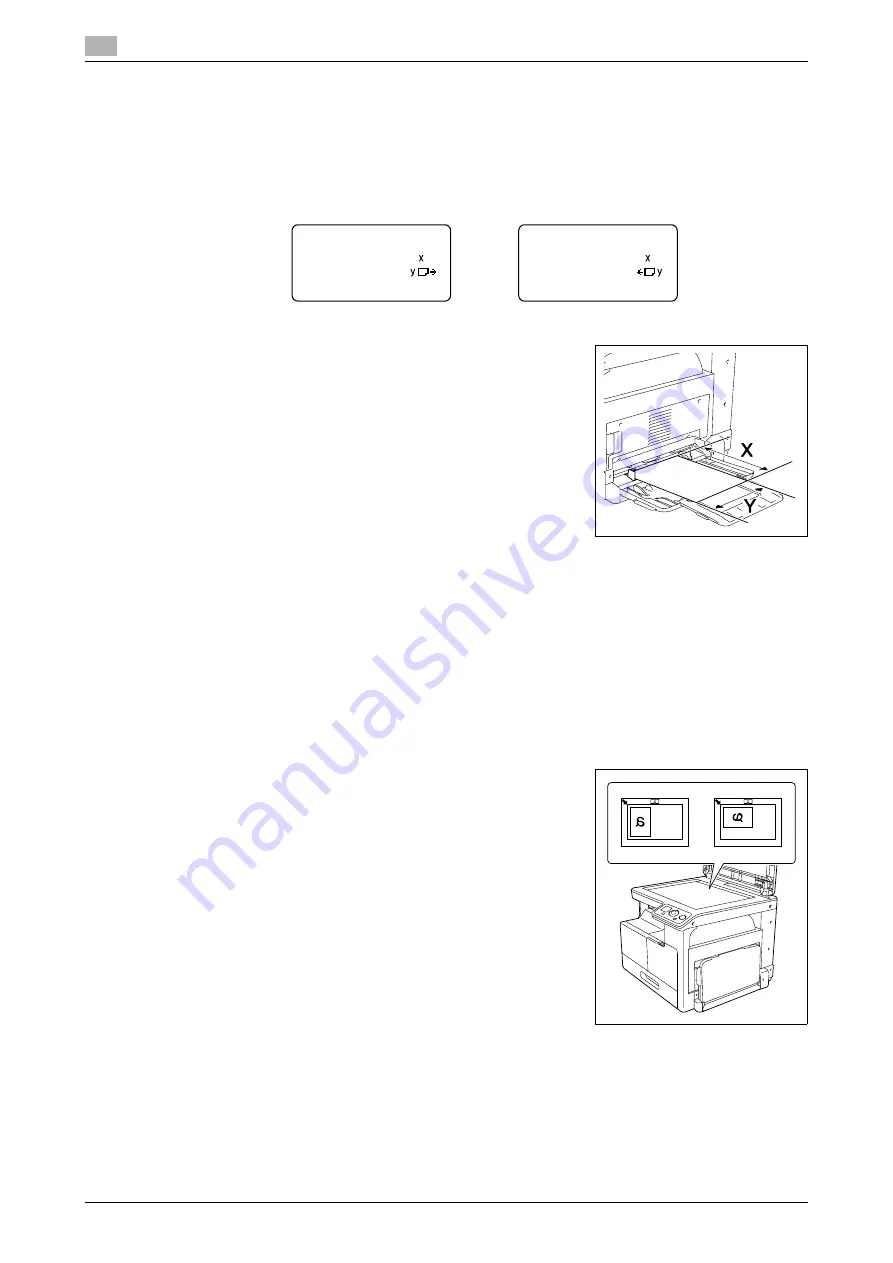
Specify the length [X] of the paper by pressing the
keypad
, then
press the
Menu/Select
key.
%
To delete the paper size, press
Clear/Stop
key.
3
Specify the width [Y] of the paper by pressing the
keypad
, then
press the
Menu/Select
key.
%
To delete the paper size, press
Clear/Stop
key.
Specified paper size appears on the
Display
.
3.2.2
Placing originals
0
Do not place an original weighing more than 2 kg (4-7/16 lb) on the
Original Glass
. Furthermore, do not
use a strong force to press down on a book or any other form of original that must be spread on the
Original Glass
. Otherwise, the machine may be damaged or a failure may occur.
0
For thick books or large objects, perform scanning without closing the
Original Cover
. When a original
is being scanned with the
Original Cover
open, do not look directly at the
Original Glass
surface where
light may be emitted through. Note, however, that the light coming through the
Original Glass
is not a
laser beam, and will not expose the user to the related hazards.
0
Make sure that the original and the loaded paper have the same orientation. Otherwise, some parts of
the image may be lost.
1
Lift open the
Original Cover
.
2
Place the original face down on the
Original Glass
.
%
Load the original by placing it so that its top side faces the
back or the left side of the machine.
TRAY1 PAPER SIZE
X=210(140-432)
Y=297( 90-297)
BYPASS PAPER SIZE
X=210(140-432)
Y=297( 90-297)
X
Y
Summary of Contents for Bizhub 165
Page 2: ......
Page 7: ...1 Introduction...
Page 8: ......
Page 25: ...2 Part names and their functions...
Page 26: ......
Page 31: ...3 Using this machine...
Page 32: ......
Page 38: ...Basic operations 3 3 8 bizhub 165 3 2...
Page 39: ...4 Control Panel keys...
Page 40: ......
Page 45: ...5 Copy function...
Page 46: ......
Page 62: ...Function combination matrix 5 5 18 bizhub 165 5 5...
Page 63: ...6 Installing the driver...
Page 64: ......
Page 72: ...Uninstalling the driver 6 6 10 bizhub 165 6 5...
Page 73: ...7 Printer function...
Page 74: ......
Page 86: ...XPS printer driver settings 7 7 14 bizhub 165 7 3...
Page 87: ...8 Scan function...
Page 88: ......
Page 93: ...9 MENU...
Page 94: ......
Page 106: ...TOTAL PAGE 9 9 14 bizhub 165 9 4...
Page 107: ...10 Maintenance...
Page 108: ......
Page 116: ...Cleaning procedure 10 10 10 bizhub 165 10 3...
Page 117: ...11 Troubleshooting...
Page 118: ......
Page 130: ...Clearing paper jams 11 11 14 bizhub 165 11 3...
Page 131: ...12 Specifications...
Page 132: ......
Page 137: ...13 Appendix...
Page 138: ......
Page 141: ...14 Index...
Page 142: ......


