Konica Minolta BIZHUB 131F User Manual Download Page 73

Getting started

4

bizhub 131f/190f

4-9

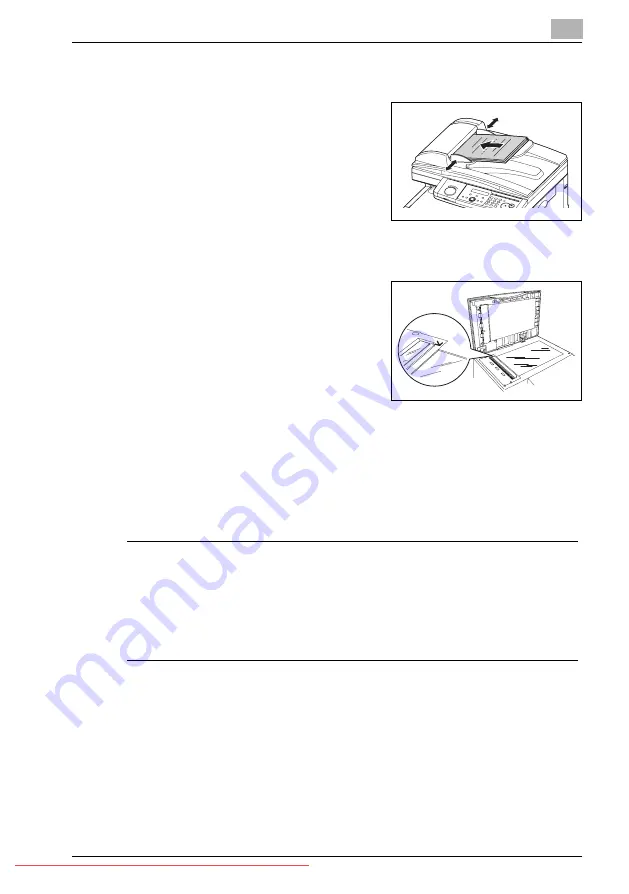
Loading the documents in the ADF

1

Insert the documents, face up, top 
edge first.

2

Adjust the document guides to the 
document size.

Loading the document on the document glass

1

Make sure there is no documents in 
the ADF

.

2

Lift the platen cover.

3

Place the document face down on the document glass. The document 
should be aligned to the upper left corner.

4

Gently close the platen cover.

7

IMPORTANT

%

When copying a bound document, such as a book, the copied image 
may contain some black areas. To reduce this effect, hold down the doc-
ument to prevent its bound part from rising. However, do not press too 
strongly. This may break the document glass and cause an injury.

Downloaded From ManualsPrinter.com Manuals

Summary of Contents for BIZHUB 131F

Page 1: ...131f 190f User Manual User Manual Downloaded From ManualsPrinter com Manuals...

Page 2: ...Downloaded From ManualsPrinter com Manuals...

Page 3: ...Space Requirements 2 9 2 3 4 Operation Precautions 2 10 2 3 5 Legal Restrictions on Copying 2 12 3 Layout and installation 3 1 Packing contents 3 3 3 2 Machine layout 3 4 3 3 Control Panel Overview 3...

Page 4: ...mode 4 3 4 1 2 Entering character 4 4 4 1 3 Memory back up CD 4 6 4 1 4 How to select the function CD 4 6 4 1 5 Function table CD 4 6 4 2 Document and Paper handling 4 7 4 2 1 Document handling 4 7 4...

Page 5: ...print job from the machine 6 12 7 Scanning 7 1 Getting ready to use the TWAIN driver 7 3 7 1 1 Changing your machine to the Scanner mode 7 3 7 1 2 Display in the scan standby mode 7 3 7 1 3 Scanning...

Page 6: ...tiple page 9 4 9 1 5 Sending method 9 5 9 1 6 Memory overflow message 9 6 9 2 Sending a fax 9 7 9 2 1 Memory transmission 9 7 9 2 2 Real time transmission Non memory transmission 9 11 9 3 Redialing CD...

Page 7: ...eport 15 7 15 4 Stored document list 15 8 15 5 Documents erased notification 15 9 16 Maintenance and Troubleshooting 16 1 Maintenance 16 3 16 1 1 Cleaning tips 16 3 16 1 2 Cleaning the scanning area 1...

Page 8: ...Scanner problems 16 30 16 2 11 Print quality problems 16 31 16 2 12 If you cannot solve the problem 16 34 17 Appendix 17 1 Specifications 17 3 17 1 1 General 17 3 17 1 2 Fax 17 5 17 1 3 Copy 17 5 17 1...

Page 9: ...1 Introduction Downloaded From ManualsPrinter com Manuals...

Page 10: ...Downloaded From ManualsPrinter com Manuals...

Page 11: ...ith the following EU directives 89 336 EEC 73 23 EEC and 93 68 EEC directives This declaration is valid for the region of the European Union This device must be used with shielded interface cables The...

Page 12: ...ntilated Room A negligible amount of ozone is generated during normal operation of this machine An unpleasant odor may however be created in poorly venti lated rooms during extensive machine operation...

Page 13: ...es energy more efficiently saves you money on utility bills and helps protect the environment Super G3 Super G3 is an extension of Group 3 fax technology standards allowing the use of high speed ITU T...

Page 14: ...1 Introduction 1 6 bizhub 131f 190f Downloaded From ManualsPrinter com Manuals...

Page 15: ...2 Safety Information Downloaded From ManualsPrinter com Manuals...

Page 16: ...Downloaded From ManualsPrinter com Manuals...

Page 17: ...section before using this device It contains important information related to user safety and preventing equipment problems Make sure you observe all of the precautions listed in this manual Please n...

Page 18: ...e power cord supplied in the package only for this machine and NEVER use it for any other product Failure to observe this precaution could result in a fire or electrical shock Use only the specified p...

Page 19: ...l Meaning Symbol Meaning Do not use flammable sprays liquids or gases near this product as a fire could result Do not leave toner units or drum units within easy reach of children Licking or ingesting...

Page 20: ...nits PC drum units and other supplies and consumables in a place subject to direct sunlight and high temperature and humidity as poor image quality and malfunctions could result Do not attempt to repl...

Page 21: ...up memory batteries Please dispose according to local state and federal regu lations Symbol term Meaning 7 This symbol how to avoid personal injury IMPORTANT This instruction describes conditions or...

Page 22: ...r conditioner or heater and not exposed to extremely high or low temperatures A well ventilated location A location that is not exposed to high humidity A location that is not extremely dusty A locati...

Page 23: ...2 Note In order to enable easy machine maintenance and replacement of con sumables maintain an adequate amount of space around the machine When lifting the machine be sure to grab the handles on the l...

Page 24: ...s or liquids near the machine Always make sure that the power plug is completely plugged into the electrical output Always make sure that the machine s power plug is visible and not hid den by the mac...

Page 25: ...apparatus Not subjected to high humidity Not extremely dusty Paper that has been removed from its wrapper but not loaded in the ma chine should be stored in a sealed plastic bag in a cool dark place...

Page 26: ...ertificates Legal Documents Food stamps Postage stamps canceled or uncanceled Checks or drafts drawn by government agencies Internal revenue stamps canceled or uncanceled Passports Immigration papers...

Page 27: ...3 Layout and installation Downloaded From ManualsPrinter com Manuals...

Page 28: ...Downloaded From ManualsPrinter com Manuals...

Page 29: ...ine is starter toner cartridge which yields 3 000 printouts Please purchase regular full yield toner cartridge from your local dealer Telephone line cable Documentation labels User manual this book Pa...

Page 30: ...eeder Document Guides Document Tray Document Exit Tray Bypass Tray Control Panel Paper Level Indicator Front Cover 2nd Paper Cassette Option Paper Cassette Platen Cover Document Glass Paper Exit Tray...

Page 31: ...Doc In copy mode Selects the paper you want to use While scanning a document Instructs the machine to scan one or more additional documents after the current scanning ends 7 LCD Liquid crystal display...

Page 32: ...t key 1 Sort Turn the sort feature on or off Soft key 2 Bypass Set the paper size in the bypass tray Soft key 3 Combine Turn the combine feature on or off 16 Advanced Functions You can choose any func...

Page 33: ...f 3 7 23 Macro keys Performs a series of key operations through one touch See Special features CD on page 12 3 for more information 24 One Touch keys Dials a pre registered fax or phone number 23 24 D...

Page 34: ...RTANT Do not turn the power on until after you have unlocked the scanner unit Otherwise damage could result 1 Slide the scanner unit lock switch to the unlock position as shown be low 2 After you have...

Page 35: ...out and installation 3 bizhub 131f 190f 3 9 3 4 2 Attaching the document tray Attach the document tray by inserting it into the appropriate holes as shown below Downloaded From ManualsPrinter com Manu...

Page 36: ...LINE jack and the other end to the wall jack Connecting an external phone If you want to use your machine for receiving both faxes and voice calls con nect the external telephone or an answering mach...

Page 37: ...l the release lever to open the side cover 2 Open the front cover 3 Turn the toner cartridge locking lever to the leftward unlock position 4 Unpack the drum cartridge from its carton and slide it into...

Page 38: ...ng the toner cartridge with both hands gen tly shake it to distribute the toner evenly inside the cartridge 2 Note Do not touch the roller of the toner cartridge 6 Slide the toner cartridge into the m...

Page 39: ...Layout and installation 3 bizhub 131f 190f 3 13 8 Close the front cover and side cover 2 Note The machine will not work if the covers are not closed properly Downloaded From ManualsPrinter com Manuals...

Page 40: ...ave unlocked the scanner unit locking switch See page 3 8 2 Turn on the power switch The markings are international standards I means on O means off It will take a few seconds for the machine to warm...

Page 41: ...Menu 1 1 4 2 Press or to select Off and press Enter The scanner unit will move to home position and the machine is ready to use 7IMPORTANT If you must reship the machine turn this mode to on then powe...

Page 42: ...n button to switch the machine to fax mode 2 Press Advanced functions repeat edly until Monitor is displayed 3 Press Enter You will hear a dial tone 4 Press or to adjust the volume 5 Press Advanced Fu...

Page 43: ...ensures the memory will hold only your settings 7IMPORTANT After you set the initial settings do not clear the memory again unless an authorized technician asks you to do so To clear the memory 1 Pres...

Page 44: ...me and fax number registration Language on the LCD and lists Current date and time Fax reception mode Dial tone detection Your fax number TTI 1 TTI 2 TTI 3 Usual TTI Idle time for switching to the Ene...

Page 45: ...nter to save the clock setting and continue Daylight Saving Set the daylight saving When you set it to On the machine automatically adjusts the clock in the summer time period 1 Press Menu 9 Enter 2 S...

Page 46: ...the numeric keys to enter your fax number The number can con tain up to 20 characters To enter a symbol before your contry code press Advanced Func tions repeatedly until Pause Dial Opt is displayed o...

Page 47: ...or to move the cursor press Cancel to erase it Then re enter the character correctly 14 Press Enter If you do not want to enter TTI 2 skip to step 19 15 Use the numeric keys to enter the name for TTI...

Page 48: ...w asks you to enter the time for the energy save mode Your machine will automatically en ter the Energy save mode after your entered time has elapsed 23 Enter the time in minutes using the numeric key...

Page 49: ...message during energy save mode the machine will wake up automatically To change the Energy save mode setting 1 Press Menu 2 1 0 5 Enter 2 Press or to select On or Off 3 Press Enter to save the settin...

Page 50: ...s 64 bit edition Windows Vista Home Premium Windows Vista Home Premium 64 bit edition Windows Vista Home Basic Windows Vista Home Basic 64 bit edition Windows Server 2003 Windows XP Professional Windo...

Page 51: ...page 3 37 1 Turn on your computer but do not connect your machine to the USB port yet 2 Insert the supplied CD into your CD ROM drive 2 Note For Windows Vista users If the AutoPlay dialogue box appear...

Page 52: ...l this driver software anyway 11 When the following window appears click Finish to complete installa tion If an error message appears during the installation process or if you have previously installe...

Page 53: ...n Local install Windows USB port on page 3 25 1 Plug the USB cable to your machine and then connect it to your com puter 2 Note Be sure to use a shielded USB cable Use of an unshielded cable may re su...

Page 54: ...Browse to navigate your hard disk C KONICA_MINOLTA_131f 190f_GDI and then click OK 6 Follow the instructions that appears on the window until you can click Finish 7 The Add New Hardware Wizard appear...

Page 55: ...them To activate the device option s 1 Click Start Settings Printers 2 Right click the KONICA MINOLTA GDI printer icon then click Proper ties 3 Click the Device Option tab 4 Select the device s instal...

Page 56: ...cable Use of an unshielded cable may re sult in radio interference 2 Turn your machine on 3 The Found New Hardware Wizard will appear Click Next 4 Select Search for a suitable driver for my device an...

Page 57: ...s device options you must open the printing preferences and activate them To activate the device option s 1 Click Start Settings Printers 2 Right click the KONICA MINOLTA GDI printer icon then click P...

Page 58: ...f an unshielded cable may re sult in radio interference 2 Turn your machine on 3 The Found New Hardware Wizard will appear Click Next 4 Select Install from a list or specific location and click Next 5...

Page 59: ...190f 3 33 9 The Found New Hardware Wizard for other device of KONICA MI NOLTA 131f 190f will appear repeat same procedures from steps 4 to 8 10 Click Finish The driver installation is completed Downl...

Page 60: ...r icon then click Printing Preferences 3 Click the Device Option tab 4 Select the device s installed on your machine 5 Click OK then close the printer properties 2 Note The duplex unit is available on...

Page 61: ...ex Unit The Duplex Unit is available only for bizhub 190f See Activating your device option s on the next page for instructions on how to do this Activating your device option s If your machine has de...

Page 62: ...er 2 Insert the supplied CD into your CD ROM drive 2 Note If this window does not appear run the setup exe located on the root directory of the supplied CD ROM 3 Choose your language then click Next 4...

Page 63: ...s an administrator For Windows 98 98SE and Windows Me 1 Select Start Settings Control Panel Add Remove Programs and the Install Uninstall tab 2 Select KONICA MINOLTA 131f 190f GDI Printer Scanner Driv...

Page 64: ...INOLTA 131f 190f GDI Printer Scanner Driver and click the Change Remove button 3 Follow the instructions that appear on the window For Windows Vista 1 Select Start Control Panel Programs Programs and...

Page 65: ...4 Getting started Downloaded From ManualsPrinter com Manuals...

Page 66: ...Downloaded From ManualsPrinter com Manuals...

Page 67: ...witch the machine mode press the Copy Fax Scan button The mode light indicates the current mode machine is in 2 Note You cannot switch the mode in any of the following cases When scanning a document D...

Page 68: ...lines By pressing the numeric key repeatedly you can access the following char acters as shown in the table below Character Table When you want to enter a character that shares the same numeric key pr...

Page 69: ...nter a name press 1 key The LCD changes to 2 Select the character you want to enter using or key 3 To enter the character press Enter key 4 If you want to enter other character repeat steps 1 to 3 Oth...

Page 70: ...rted in the extended manual on the CD R 4 1 4 How to select the function CD For further information see 4 Getting started in the extended manual on the CD R 4 1 5 Function table CD For further informa...

Page 71: ...nt glass Single sheet Multiple sheet Size W L Max 216 900 mm Min 120 100 mm Max 216 356 mm Min 216 139 5 mm Quantity 1 sheet Max 80 sheets of A4 A5 or F4 size sheets 75 g m or 20lb paper Weight 35 0 t...

Page 72: ...correction flu id Sticky notes or documents with sticky notes attached Cardboard newspaper or fabric Pages with duplicating carbon on either side Credit cards or any small thick items OHP transparency...

Page 73: ...aten cover 3 Place the document face down on the document glass The document should be aligned to the upper left corner 4 Gently close the platen cover 7IMPORTANT When copying a bound document such as...

Page 74: ...remove the paper back ing and or strip before loading Only film should go in not film with any backing or strip Paper Type Paper size Quantity Plain Paper weight 60 90 g m A4 A5 F4 500 sheets weight 8...

Page 75: ...ot use the following pa per Creased paper Wrinkled paper Folded paper Curled paper Torn paper Carbon paper Moist paper Very thin paper Very thick paper Previously printed by a printer Paper with holes...

Page 76: ...ote After you load the paper in paper cassette you need to set the paper size you loaded See Setting of the Paper Size on page 4 17 1 Pull to open the paper cassette 2 Press down the paper lifting pla...

Page 77: ...e and sides of the paper are even Do not stack the paper over the limit mark inside of the cassette 2 Note To prevent paper jams do not refill this paper cassette without first re moving all of any pa...

Page 78: ...r cassette 7 After loading paper in the paper cassette you need to set the paper size See Setting of the Paper Size on page 4 17 8 Attach the paper size sticker supplied with your machine on the cas s...

Page 79: ...custom sized paper use the bypass tray 2 Note Always load only use print media specified in Acceptable paper size on page 4 10 to avoid paper jams and print quality problems 1 Open the bypass tray on...

Page 80: ...4 After loading paper on the bypass tray you need to set the correct pa per size by pressing Bypass 5 Press or to select the paper size you want to use 6 Press Enter 2 Note You can set the default pap...

Page 81: ...sette 3 Press Enter If you have the optional second cassette proceed to step 4 Otherwise skip to step 6 4 Press or to select the paper size you are using in the second cas sette 5 Press Enter 6 Also y...

Page 82: ...4 Getting started 4 18 bizhub 131f 190f Downloaded From ManualsPrinter com Manuals...

Page 83: ...5 Copying Downloaded From ManualsPrinter com Manuals...

Page 84: ...Downloaded From ManualsPrinter com Manuals...

Page 85: ...nging your machine to the Copy mode Press the Copy Fax Scan button until Copy light glow 5 1 3 Display in the copy standby mode Press the Copy Fax Scan button to change the machine to the copy mode Wh...

Page 86: ...ed have too much information on them for your machine to remember If this message appears press Start to tell your machine to copy as many pages in memory or press Cancel to delete from memory all pag...

Page 87: ...using the Document glass 1 Switch the machine to copy mode by pressing the Copy Fax Scan but ton 2 Make sure that there is no document on the ADF If a document is on the ADF this document takes prior...

Page 88: ...ess Doc Resolution 2 Press or to select the document type 5 3 2 Scanning contrast Setting the scanning contrast allows you to compensate for any excessive lightness or darkness of document pages you a...

Page 89: ...n 1 steps 1 Press Advanced Functions until Zoom is appear and press Enter or Press the soft key Special features CD on page 12 3 assigned to Zoom 2 Adjust the ratio by using or 25 to 400 for the docum...

Page 90: ...w Auto for paper size when you set the paper both in the pa per cassette and bypass tray or the option al second paper cassette And the light of available paper source will be lit However if the bypas...

Page 91: ...ize selection is set to Auto see User settings CD on page 14 3 you cannot select the document size by pressing Doc Size In this mode the machine will set the document sizeautomaticallyaccording to the...

Page 92: ...the functions Advanced function Description Reference Page Zoom Adjusts a zoom ratio in 1 steps page 5 7 Duplex Copy Sets on off for the duplex copy the duplex copy This function is available only fo...

Page 93: ...sure the machine is in the copy mode 2 Place your document on the ADF face up or on the document glass face down 3 To make the combine copy Press Combine Combine will illuminate which means the combi...

Page 94: ...s on page 5 6 Document type and scanning contrast Number of copies Zoom ratio 25 to 400 for the document glass 25 to 100 for the ADF To reset the copy parameter to the default setting press Reset 5 Pr...

Page 95: ...of sheet 2 Note When using the ADF enlargement copy is not available This machine has no image rotation function The duplex unit is available only for bizhub 190f Document orientation on the ADF or do...

Page 96: ...e of the followings and press Enter or Press the Duplex Copy soft key and choose one of the followings Off Cancel the duplex copy L R Binding the duplex copy on the left or right side Top Binding the...

Page 97: ...the machine is in the Copy mode 2 Place your document in ADF face up or on the document glass face down 3 Press Doc Resolution 4 Press or or Doc Resolution to select 600dpi 5 As needed set the followi...

Page 98: ...5 Copying 5 16 bizhub 131f 190f Downloaded From ManualsPrinter com Manuals...

Page 99: ...6 PC Printing Downloaded From ManualsPrinter com Manuals...

Page 100: ...Downloaded From ManualsPrinter com Manuals...

Page 101: ...ct the print command Make sure that KONICA MINOLTA 131f 190f GDI is selected as your printer driver 3 If you want to make any adjustments that are appropriate for printing your document click Properti...

Page 102: ...folder This change can affect every user who shares the same printer From the application software Opening the printer properties from application software vary on the type of application software you...

Page 103: ...click Start and then click Printers and Faxes Windows XP Home edition click Start Control Panel Printers and other Hardware then click Printers and Faxes 2 Right click the KONICA MINOLTA GDI icon and...

Page 104: ...ale your print job to any selected paper size regard less of the logical document size If you want your document to be fitted to the selected paper size check on the Scale to fit 2 Note When Combine i...

Page 105: ...d by the Paper Source and Combine settings If you cannot find the objective size in the list change the settings of paper source 2 Note For details of the paper sizes your machine supports see Accepta...

Page 106: ...name that you want to delete 2 Click Delete Resolution Select the print resolution Paper Source This setting specifies the paper cassette or the bypass tray from which the recording paper is supplied...

Page 107: ...se the orientation flipchart select Upper Binding Setting of Duplex Select this button to adjust the binding margin Combine Select the number of page 2 4 or 8 you want to print per sheet 2 Note Before...

Page 108: ...u can print several pages to form a booklet when the paper is half center folded and overlapped To set up this function check the box for Print on Both Side and select 2 up for Combine Booklet Printin...

Page 109: ...n tab Using the device s To activate the 2nd Paper Cassette and or the Duplex Unit device s check the corresponding box in the Device Option window 2 Note The duplex unit is available only for bizhub...

Page 110: ...low the instructions below 1 Press Advanced Functions and press until Online appears on the LCD then press Enter Press or to select Off or Press the soft key assigned to Online Refer to Special featur...

Page 111: ...7 Scanning Downloaded From ManualsPrinter com Manuals...

Page 112: ...Downloaded From ManualsPrinter com Manuals...

Page 113: ...py Fax Scan button until SCAN light glow 7 1 2 Display in the scan standby mode Press the Copy Fax Scan button to change the machine to the scan mode When the machine is in the scan mode the machine s...

Page 114: ...ed data will be stored into your machine s scan box You can download it from your application software that supports TWAIN scanning 7 1 4 Accessing to the TWAIN driver Follow the steps below to access...

Page 115: ...Using the RS mode CD For further information see 7 Scanning in the extended manual on the CD R 7 3 Using the SB mode CD For further information see 7 Scanning in the extended manual on the CD R Downlo...

Page 116: ...7 Scanning 7 6 bizhub 131f 190f Downloaded From ManualsPrinter com Manuals...

Page 117: ...8 Autodialer Downloaded From ManualsPrinter com Manuals...

Page 118: ...Downloaded From ManualsPrinter com Manuals...

Page 119: ...ing CD on page 8 16 8 1 3 Destination names and the Phone directory dialing When you store numbers in your autodialer you can give these numbers de scriptive names such as Chicago office or Billing de...

Page 120: ...number You can change the pause lenght See User settings CD on page 14 3 Press Advanced Functions repea tedly until Pause Dial Opt appears then Enter or Press a soft key assigned to Pause Dial Opt onc...

Page 121: ...gits To change a number press or to move the cursor press Can cel to erase the number Then re enter the number correctly 5 Press Enter 6 Use the numeric keys to enter the name for the one touch key Th...

Page 122: ...Use the one touch key labels supplied with your machine to label the one touch keys with the stored names for easy reference 2 Note To print a list of one touch numbers press Menu 5 1 0 7 Enter Downlo...

Page 123: ...he number can be stored up to 40 digits To change a number press or to move the cursor press Can cel to erase the number Then re enter the number correctly 5 Press Enter 6 Use the numeric keys to ente...

Page 124: ...Autodialer 8 8 bizhub 131f 190f 8 Use the one touch key labels supplied with your machine to label the one touch keys with the stored names for easy reference Downloaded From ManualsPrinter com Manual...

Page 125: ...ect a one touch number You can also select a one touch key by pressing that key 3 Press Enter twice If you want to quit without erasing press Cancel 4 To erase another one touch number repeat the proc...

Page 126: ...button 2 Place the document on the ADF or the document glass 3 When you use the document glass select the document size by press ing Doc Size 4 Adjust document resolution and contrast if necessary 5 O...

Page 127: ...t an external phone to your machine to make a phone call See Connecting an external phone on page 3 10 1 Lift the telephone handset 2 Press the one touch key in which you have stored the number 3 Spea...

Page 128: ...should dial it The number can be stored up to 40 characters To change a number press or to move the cursor press Can cel to erase the number Then re enter the number correctly 5 Press Enter 6 Use the...

Page 129: ...Autodialer 8 bizhub 131f 190f 8 13 2 Note To print a list of speed dial numbers press Menu 5 1 0 8 Enter Downloaded From ManualsPrinter com Manuals...

Page 130: ...ectly entering that three digit identifier code 3 Press Enter twice If you want to quit without erasing press Cancel 4 To erase another speed dial number repeat the procedure from step 2 Otherwise pre...

Page 131: ...the three digit identifier for the speed dial number you want to dial The machine shows the name or fax number you have stored 6 Press Start Phoning via speed dial 2 Note Connect an external phone to...

Page 132: ...group dialing CD For further information see 8 Autodialer in the extended manual on the CD R 8 5 Phone directory dialing CD For further information see 8 Autodialer in the extended manual on the CD R...

Page 133: ...9 Sending Faxes Downloaded From ManualsPrinter com Manuals...

Page 134: ...Downloaded From ManualsPrinter com Manuals...

Page 135: ...suitable for most typed documents and simple drawings Fine is ideal for maps moderately complicated drawings floorplans or hand written documents Superfine S Fine on the LCD reproduces the detail of e...

Page 136: ...ntrast repeat edly to select the contrast To avoid confusing the Light and Dark settings just remember Light lightens and Dark darkens 9 1 4 Mixing document resolution and contrast in a multiple page...

Page 137: ...g the remaining pages of your document into memory The quick memory transmission is on for default setting However you can turn off it for the default See User settings CD on page 14 3 Real time trans...

Page 138: ...ell your machine to keep as many pages in memory as possible or press Cancel to erase from memory all pages stored during the current operation but not previous operations Dividing a large document in...

Page 139: ...8 16 or Use the phone directory dialing See page 8 16 5 Press Start If you pressed a one touch key no need to press Start By pressing Start you are just given your machine a command This command numbe...

Page 140: ...on while scanning the document press the Stop If you want to cancel a transmission in progress use the Review Com mands feature See Reviewing or cancelling commands CD on page 9 12 2 Note If the call...

Page 141: ...de See page 8 15 or Use the call group dialing See page 8 16 or Use the phone directory dialing See page 8 16 6 Press Start If you pressed a one touch key no need to press Start By pressing Start you...

Page 142: ...information stored in the remote fax ma chine The line may even be blank 2 Note If you want to cancel a transmission while scanning the document press the Stop If you want to cancel a transmission in...

Page 143: ...ent on the ADF 2 Note The document glass cannot be used for real time transmission 3 Obtain a dial tone either Press Advanced Functions repeatedly until Monitor is appear then press Enter or Lift the...

Page 144: ...ress Start If the call fails and you used Monitor to dial press Advanced Func tions repeatedly until Monitor is appear then press Enter to hang up If you are using the handset hang up after pressing S...

Page 145: ...10 Receiving faxes Downloaded From ManualsPrinter com Manuals...

Page 146: ...Downloaded From ManualsPrinter com Manuals...

Page 147: ...s five different reception modes Tel Ready see Manual receive mode below Fax Ready see Automatic receive mode below Fax Tel Ready see page 10 4 Tel Fax Ready see page 10 5 Ans Fax Ready see page 10 5...

Page 148: ...a phone or an answering machine In this mode Your machine answers each call and attempts to receive a fax Fax Tel Ready mode Use it if You want to use the same line for both fax and phone calls You ar...

Page 149: ...Use it if You are using an answering machine that is connected to your machine In this mode An answering machine connected to your machine answers each call If a voice call comes in the answering mac...

Page 150: ...a chines will wait several seconds to hear reception tones from your ma chine you have about 30 seconds to walk to your machine and press Start 10 1 5 Switching the Automatic or Manual reception mode...

Page 151: ...e Out of paper reception If your machine runs out of paper it stores up to 250 fax receptions in its memory This is called out of paper reception Once you refill the paper supply the machine prints th...

Page 152: ...x reception CD For further information see 10 Receiving faxes in the extended man ual on the CD R 10 3 Advanced receiving functions CD For further information see 10 Receiving faxes in the extended ma...

Page 153: ...11 Using F code box features CD Downloaded From ManualsPrinter com Manuals...

Page 154: ...Downloaded From ManualsPrinter com Manuals...

Page 155: ...box features CD 11 bizhub 131f 190f 11 3 11 Using F code box features CD For further information see 11 Using F code box features CD in the extended manual on the CD R Downloaded From ManualsPrinter...

Page 156: ...11 Using F code box features CD 11 4 bizhub 131f 190f Downloaded From ManualsPrinter com Manuals...

Page 157: ...12 Special features CD Downloaded From ManualsPrinter com Manuals...

Page 158: ...Downloaded From ManualsPrinter com Manuals...

Page 159: ...Special features CD 12 bizhub 131f 190f 12 3 12 Special features CD For further information see 12 Special features CD in the extended manual on the CD R Downloaded From ManualsPrinter com Manuals...

Page 160: ...12 Special features CD 12 4 bizhub 131f 190f Downloaded From ManualsPrinter com Manuals...

Page 161: ...13 Security features CD Downloaded From ManualsPrinter com Manuals...

Page 162: ...Downloaded From ManualsPrinter com Manuals...

Page 163: ...Security features CD 13 bizhub 131f 190f 13 3 13 Security features CD For further information see 13 Security features CD in the extended manual on the CD R Downloaded From ManualsPrinter com Manuals...

Page 164: ...13 Security features CD 13 4 bizhub 131f 190f Downloaded From ManualsPrinter com Manuals...

Page 165: ...14 User settings CD Downloaded From ManualsPrinter com Manuals...

Page 166: ...Downloaded From ManualsPrinter com Manuals...

Page 167: ...User settings CD 14 bizhub 131f 190f 14 3 14 User settings CD For further information see 14 User settings CD in the extended manual on the CD R Downloaded From ManualsPrinter com Manuals...

Page 168: ...14 User settings CD 14 4 bizhub 131f 190f Downloaded From ManualsPrinter com Manuals...

Page 169: ...15 Report Lists Downloaded From ManualsPrinter com Manuals...

Page 170: ...Downloaded From ManualsPrinter com Manuals...

Page 171: ...name of the destination The start time dd hh mm format A note telling if the command is a polling or F code operation To print this list press Menu 5 1 0 6 Enter page 9 12 One touch List Lists each on...

Page 172: ...tination name fax number and day and time the transmission should start To print this list press Menu 5 1 1 5 Enter page 9 12 Batch Doc List Lists the documents file numbers To print this list press M...

Page 173: ...h in number of pages Department code see Security features CD on page 13 3 Result of the call If preceded by an asterisk this signifies an ECM com munication If preceded by a pound this signifies comm...

Page 174: ...the activity journal Your machine prints the activity journal for every fax transaction For exam ple if your machine has to redial a call it will list those redials on the journal If you want to list...

Page 175: ...ages Result of the call Any special operations For example a fax call made using an external telephone will appear as Manual Sample of the document An image of the first page of the document If an err...

Page 176: ...ocument is using The list includes Type The type of the document such as Batch box will appear Data in Kbyte How much memory is used for the document will appear Page The number of pages will appear N...

Page 177: ...t erased may be printed 1 No The number of the communication 2 Name Registered in the following order TTI number registered for the destination name Space 3 Mode Resolution in the communication 4 Star...

Page 178: ...es refer to page 16 26 9 Remarks Polling Polling reception Manual Manual reception F Polling Indicates F code polling Security Received in F code security box Relay Received by F code relay Bulletin R...

Page 179: ...16 Maintenance and Troubleshooting Downloaded From ManualsPrinter com Manuals...

Page 180: ...Downloaded From ManualsPrinter com Manuals...

Page 181: ...side Never try to clean sealed areas inside your machine They are sealed to protect your safety and the machine For cleaning the machine s exterior use a mild cleaning solution sprayed onto a lint fre...

Page 182: ...ents to feed properly try this procedure 1 Turn off the power and disconnect the power cable from the wall outlet 2 Open the ADF cover 3 Use a cloth moistened with a rubber roller cleaner to clean the...

Page 183: ...2 Note Your machine can print about 100 sheets after this message appears but afterwards the machine displays Printer not usable message and it can not print any page until the charge wire is cleaned...

Page 184: ...cartridge is replaced to new one To replace the toner cartridge 1 Open the front cover 2 Turn the toner cartridge locking lever to the leftward unlock position 3 Pull the used toner cartridge out 4 Un...

Page 185: ...rtridge into the ma chine firmly until it locks into place completely 6 Turn the cartridge locking lever right ward until it locks into place com pletely 7 Clean the drum charge wire and LED print hea...

Page 186: ...lace Drum it cannot print until the drum cartridge is replaced To replace the drum cartridge 1 Open the side cover and front cover 2 Turn the toner cartridge locking lever to the leftward unlock posit...

Page 187: ...ing 16 bizhub 131f 190f 16 9 5 Reinstall the toner cartridge then turn the cartridge locking lever rightward until it locks into place completely 6 Close the front cover and side cover Downloaded From...

Page 188: ...a document jams while scanning it into the memory for sorting copy or normal memory transmission the machine will show 1 If you want to continue the operation press Enter and proceed to step 2 To abo...

Page 189: ...ore than 3 minutes without pressing any key the machine will begin to send or copy the document s it has If you wish to cancel this operation press Stop The machine will delete all pages from memory a...

Page 190: ...e document gently and out of the ADF If you cannot remove turn the release knob to remove the jammed document 3 Close the ADF cover making sure both sides are snapped down se curely 2 Note To prevent...

Page 191: ...rea 1 Open the platen cover Open the ADF cover and turn the release knob to remove the jammed document 2 Close the platen cover and the ADF cover 2 Note To prevent document jam use the document glass...

Page 192: ...ver Gently pull the jammed document If you cannot it open the ADF cover and turn the release knob to remove the jammed document 2 Close the platen cover and the ADF cover 2 Note To prevent document ja...

Page 193: ...am 7CAUTION When you open the side cover to remove the paper DO NOT touch the fuser roller The fuser unit is very hot Do not touch the drum cartridge surface Scratches or smudges will re sult in poor...

Page 194: ...16 Maintenance and Troubleshooting 16 16 bizhub 131f 190f Jammed in feed area Jammed in fuser area Jammed in paper exit area Downloaded From ManualsPrinter com Manuals...

Page 195: ...was fed a little and you cannot seize it easily 1 Open the paper cassette After you pull it out completely lift the front part of the cassette slightly up to release the cassette from the ma chine 2...

Page 196: ...g 16 18 bizhub 131f 190f 3 Close the side cover and insert the paper cassette Lower the rear part of the cassette to align the rear edge to the slot of the machine then insert it completely Downloaded...

Page 197: ...f the paper is not properly fed into the ma chine through the bypass tray the follow ing message will be displayed 1 Pull the flapper release lever and pull the paper out of the machine 2 Open the fro...

Page 198: ...ng must be set to on Set the Memory Tx to on see User settings CD on page 14 3 then try again Check Paper Size Open CloseFront Cover The difference paper which is not same size you told your machine i...

Page 199: ...CD on page 13 3 you entered is not valid Repeat the operation entering the correct pro tection passcode Invalid Password The password you entered is not valid See Security features CD on page 13 3 Ent...

Page 200: ...ata You tried to proceed with the operation for program No 384 Activating the user authentication 385 Resetting the user counter or 5125 Printing a user authentication list without any user registrati...

Page 201: ...cartridge Remove Bypass Pa per Open Close FrontCover A paper is not properly fed into the machine through the bypass tray Pull up the f apper release lever and pull the paper out of the machine Then o...

Page 202: ...o is smaller than minimum reduction ratio 25 this message will appear and you cannot make the reduction copy Use the document glass however parts of the image might not be copied Unable to Sort Start...

Page 203: ...y of things Here is a brief summary Error message Possible meanings Check condition of remote fax Remote machine malfunctioned No Handshake signals from remote fax Wrong phone number reached Repeat tr...

Page 204: ...he industry standard since the early 1980s R 1 4 Someone pressed Stop at the receiving fax machine R 2 3 Poor phone line conditions made fax communication impossible Call someone at the remote machine...

Page 205: ...so try the call again later T 3 1 The page counter in your fax machine detected a document fee der error during transmission Carefully re insert the document into the feeder and re try the call T 4 1...

Page 206: ...stop the sending Your machine cannot cancel a sending by pressing Stop To cancel a sending press Fax Cancel and select a job you want to cancel then press Enter See Reviewing or cancelling commands CD...

Page 207: ...ect Check the printer port setting in the Windows Control Panel The printer driver may not be installed properly Reinstall the printer driver Check the parallel port mode settings in the BIOS Basic In...

Page 208: ...erly Reinstall the printer driver Cannot retrieve the scanned document from the scan box Make sure a scanning application is installed on your compu ter The USB cable or IEEE 1284 parallel cable is no...

Page 209: ...is selected Select a darker contrast setting The toner cartridge may be out of toner or the toner may be very low Remove the toner cartridge and shake it a few times to redistribute the toner inside I...

Page 210: ...oth of the cartridges as indicated The drum charge wire may be dirty Open the front cover To clean the drum charge wire pull the blue rod toward you mak ing sure it fully extends Then return the rod t...

Page 211: ...document guides for the size of the document The ADF glass is dirty while using the ADF Wipe the ADF glass with a dry soft cloth See page 16 3 The document guides are not slid up against the edges of...

Page 212: ...ded in this chapter contact your local technical representa tive 7CAUTION If the machine makes strange noises emits smoke or strange smells un plug it immediately and contact your local technical repr...

Page 213: ...17 Appendix Downloaded From ManualsPrinter com Manuals...

Page 214: ...Downloaded From ManualsPrinter com Manuals...

Page 215: ...Maximum 940 W Environmental temperature 10 oC to 32 oC Relative humidity 20 to 80 RH LCD 20 characters 2 lines Image memory capacity 8 MB 650 pages approx plus optional 32MB additional 2 720 pages ap...

Page 216: ...17 Appendix 17 4 bizhub 131f 190f Dimensions WxDxH 520 450 446 mm Specifications 350 mm 450 mm 446 mm 520 mm Downloaded From ManualsPrinter com Manuals...

Page 217: ...est transmission speeds possible under ITU T guidelines and phone line conditions Scanning width 208 mm Grayscale 256 level Scanning resolution Normal 8 dots mm 3 85 lines mm Fine 8 dots mm 7 7 lines...

Page 218: ...r Mono Monochrom Operating system Refer to page 3 24 Printer driver GDI PCL option Interface USB port IEEE 1284 parallel port option Ethernet port option Specifications Compatibility TWAIN Version 1 9...

Page 219: ...18 Index Downloaded From ManualsPrinter com Manuals...

Page 220: ...Downloaded From ManualsPrinter com Manuals...

Page 221: ...ax reception mode 10 3 Function table 4 6 I Idle time setting 3 22 Initial settings Date Time 3 19 Dial tone detection 3 20 Fax reception mode 3 19 Idle time setting 3 22 Language 3 18 TTI Your name 3...

Page 222: ...e paper 4 7 paper size setting 4 17 Phone directory dialing 8 16 Power source 2 8 Printer properties 6 4 Q Quality tab 6 9 Quick memory transmission 9 5 R Real time transmission 9 5 9 11 Redialing 9 1...

Reviews: