background image

1

3

3

7

2

3

1

4

5

2

6

3

1

ATTENTION!
PLEASE MAKE 
SURE TO 
TIGHTEN ALL 
OFTHE BOLTS

A

s

s

e

m

b

l

y

  I

n

s

t

r

u

c

t

i

o

n

s

    (

R

e

m

o

v

a

b

l

e

)

A

s

s

e

m

b

l

y

  I

n

s

t

r

u

c

t

i

o

n

s

    (

R

e

m

o

v

a

b

l

e

)

2

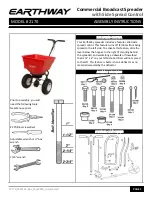
Remove spreader components from box; check that you received all necessary parts.
If you are missing a component please call (800)333-8889 for replacement.

1.

Attach the tow bar adjustable plank (2) 
to the frame plate (1), using 4 ea. (M8) 
Bolts (4), nuts (3), and lock washers (5),
 as shown.

2.

Assemble coupler (2) to tow bar (1),
using 2 ea. (M12) bolts (3), nuts (4) 
and lock washer (5).

3.


1

5

2

4

3

1

5

4

3

2

Assemble tow bar (1) to adjustable 
bracket (2), using 1 ea. (M12) main 
bolt (5) and lock nut (6).  Attach angle 
adjustment bolt (3) using 1ea. (M8) 
bolt (3) and lock nut (4). 

Note: the adjustment bolt is 
used to level the spreader for 
correct spread, place where 
needed to keep spreader level to 
vehicle and terrain.

4.

1

4

2

5

3

6

5. Assemble hopper and bottom plate assembly. 

Make sure label on hopper and bottom plate 
assembly line up. Leave bolts loose until all 
are in place, and then tighten. Fastener heads 
to be inside hopper so not to interfere with 
spreader material.

Attach the sides (7,4,2) paying attention to 
which side is front (7) using 24 ea. (M6) bolts (1) 
and nuts (3). Next install corner caps using 
8 ea.  (M6) bolts (1) and nut (3). Then finally 
attach bottom plate assembly (6) using 12 ea. (M6) bolts 
(1) and nut (3).

Summary of Contents for ATVSS350

Page 1: ...an you expect to receive the service and long life designed and built into it This manual contains valuable information about your new Seeder Spreader It has been carefully prepared to give you helpful suggestions for operating adjusting servicing and ordering repair parts ATVSS350 3 5 0 l b s S e e d e r S p r e a d e r 3 5 0 l b s S e e d e r S p r e a d e r ...

Page 2: ...aintain the equipment in accordance with all instructions and safety procedures in this manual Inspect the equipment and replace or repair any parts that are damaged or worn which under continued operation would cause damage wear to other parts or cause a safety hazard Payment of all costs incurred for transporting the equipment or parts for warranty inspection and or claims It is the purchaser an...

Page 3: ...ssemble tow bar 1 to adjustable bracket 2 using 1 ea M12 main bolt 5 and lock nut 6 Attach angle adjustment bolt 3 using 1ea M8 bolt 3 and lock nut 4 Note the adjustment bolt is used to level the spreader for correct spread place where needed to keep spreader level to vehicle and terrain 4 1 4 2 5 3 6 5 Assemble hopper and bottom plate assembly Make sure label on hopper and bottom plate assembly l...

Page 4: ...ock washers 5 Fasten heads inside hopper as shown 6 Assembly wind drift braces 3 using 3 ea M8 bolts 2 nuts 4 flat washer 6 and lock washers 5 attach as shown 7 Attach wind drift shield 2 with 3 ea M6 bolt 3 nuts 4 flat washer 7 and lock washers 6 as shown 8 2 3 6 5 4 7 1 4 2 1 3 6 5 4 Attach hopper auger 3 to shaft 1 using 1 ea M10 bolt 2 nut 4 and lock washer 5 Make sure label faces upward as sh...

Page 5: ...6 Place connecting rod 1 through hole at bottom of lever 5 and attach using flat washer 15 and cotter pin 17 Place other end of connecting rod 1 into arm of top plate and attach using flat washer 15 and cotter pin 17 Next attach lever 7 to fixed pin 11 using flat washer 8 and cotter pin 9 Then attach opposite end of lever 7 to bottom plate arm using shaft pin 14 flat washer 8 and cotter pin 9 11 1...

Page 6: ...u will see symbols like these The symbol on the left with words shown DANGER ATTENTION WARNING Are used in this manual to draw your attention to the safety and proper operation of the machine it is necessary to observe all written rules as these point out specific areas that may cause damage to the machine or personal injury to operator I m p o r t a n t S a f e t y I n f o r m a t i o n I m p o r...

Page 7: ...r medicines D A N G E R D A N G E R It is forbidden to climb or to transport somebody on spreader Do not put hands inside the hopper for any reason while machine is in motion or capable of moving under its own power Keep hopper free from foreign bodies bags tools miscellaneous as they could damage the operations or the operator Generally fertilizers are corrosive For this reason it is important th...

Page 8: ...ent of the spreader at high speeds can cause damage to the spreader and or personal injury Always move spreader at speeds safe for control Make a check of the vehicle and spreader before switching it on Start to work only if the machine is in perfect condition Before using the spreader please be sure that all the safety devices are correctly placed and in good condition in case of breakdowns or da...

Page 9: ...ring windy days to improve uniform distribution The spread material must always be stored properly to maintain its physical properties do not keep material in hopper for long periods of time It is necessary to determine the speed of the centrifugal spreader before starting the operation of distribution to stay within possible limits and try to keep consistent for the duration of the spread area Im...

Page 10: ...spreading is regulated through the use of the levers that move the adjustable tray open or closed at the bottom of the hopper depending on the amount of material required for operation In order to set the regulation after consulting the spread chart and all the manufactures recommendation from the spread material it is necessary to move the lever along the graduated scale W A R N I N G W A R N I N...

Page 11: ...ng and maintenance Fertilizer or material is of poor quality wet or compacted Material does not correspond to manufactures specifications Foreign material in spread Spreader exit clogged Spreader vanes set incorrectly Worn or damaged spreader parts Common spreading mistakes M a i n t e n a n c e S t o r a g e M a i n t e n a n c e S t o r a g e The following maintenance criteria is not to be consi...

Page 12: ...installation of the replacement Products or replacement parts shall be at Buyer s expense 2 Other Limits THE FOREGOING IS IN LIEU OFALLOTHER WARRANTIES EXPRESS OR IMPLIED INCLUDING BUT NOT LIMITED TO THE IMPLIED WARRANTIES OF MERCHANT ABILITY AND FITNESS FOR A PARTICULAR PURPOSE Distributor does not warrant against damages or defects arising out of improper or abnormal use or handling of the Produ...

Reviews: