©2016 Kohler Co.
3
1207227-X2-A
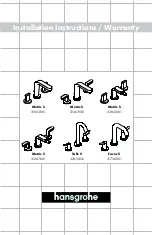
B. Install the Bridge
CAUTION: Risk of product damage.
Use care
when moving the cabinet to avoid impacting, sliding
or side-loading the legs.
Verify the bridge is level and ush against the vanity.
If necessary, turn the levelers to adjust the unit.
Using a 1/8" drill bit, drill two 55 mm depth pilot holes
through the side of the cabinet and into the vanity in the
position as shown.
Secure the bridge to the vanity using two #8 x 1-1/2" screws.
For Double Vanity Installation
Install the second vanity according to the instructions
packed with the vanity.
Using a 1/8" drill bit, drill two 55 mm depth pilot holes
through the side of the cabinet and into the vanity in the
position as shown.
Secure the bridge to the vanity using two #8 x 1-1/2" screws.
ข. ติดตั้งตู้เฟอร์นิเจอร์
ข้อควรระวัง:
ความเสี่ยงซึ่งอาจทำาให้ผลิตภัณฑ์ชำารุด
ใช้ความระมัดระวังในการเคลี่อนย้าย
หลีกเลี่ยงการกระแทก
การเลื่อน หรือการรับน�้าหนักด้วยขาตู้เพียงข้างใดข้างหนึ่ง
ตรวจสอบต�าแหน่งตู้เฟอร์นิเจอร์เชื่อมต่อให้ได้ระดับกับตู้เฟอร์นิเจอร์
ปรับระดับความสูงให้เหมาะสมด้วยขาปรับระดับหากจ�าเป็น
ใช้สว่านขนาด 1/8" เจาะรูยึดลึก 55 มม. 2 รู ผ่านตู้เฟอร์นิเจอร์
เชื่อมต่อและตู้เฟอร์นิเจอร์ ตามต�าแหน่งดังภาพแสดง
ยึดตู้เฟอร์นิเจอร์เชื่อมต่อเข้ากับตู้เฟอร์นิเจอร์ด้วยสกรู #8 x 1-1/2"
สำาหรับการติดตั้งแบบตู้เฟอร์นิเจอร์คู่
ติดตั้งตู้เฟอร์นิเจอร์ตู้ที่สองตามข้อแนะน�าการติดตั้งของผลิตภัณฑ์
ใช้สว่านขนาด 1/8" เจาะรูยึดลึก 55 มม. 2 รู ผ่านตู้เฟอร์นิเจอร์
เชื่อมต่อและตู้เฟอร์นิเจอร์ ตามต�าแหน่งดังภาพแสดง
ยึดตู้เฟอร์นิเจอร์เชื่อมต่อเข้ากับตู้เฟอร์นิเจอร์ด้วยสกรู #8 x 1-1/2"
C. Install the Top
□
Apply silicone on the top of bridge edges.
IMPORTANT:
Ensure the finished side of the stone top is
up when installing.
□
Place stone top on the edges of vanity bridge. The top
is properly positioned when:
For Single Vanity:
The back edge of top is ush with
the wall and the sideedge is ush to the vanity.
Double Vanity:
The back edge of the top is ush with the
wall and the top is centered between the two vanities.
□
Immediately wipe away any excess sealant.
ค. ติดตั้งเคาน์เตอร์
□
ทาซิลิโคนบริเวณขอบด้านบนของตู้เฟอร์นิเจอร์เชื่อมต่อโดยรอบ
ข้อสำาคัญ:
ให้แน่ใจว่า
พื้นผิวด้านบนของเคาน์เตอร์อยู่ในต�าแหน่งที่
ถูกต้องเมื่อท�าการติดตั้ง
□
วางเคาน์เตอร์ลงบนขอบของตู้เฟอร์นิเจอร์เชื่อมต่อโดยเคาน์เตอร์
จะอยู่ในต�าแหน่งที่ถูกต้องเมื่อ:
สำาหรับตู้เฟอร์นิเจอร์เดี่ยว:
ขอบด้านหลังของเคาน์เตอร์จะชิด
กับผนัง และขอบด้านข้างเคาน์เตอร์อยู่ชิดกับตู้เฟอร์นิเจอร์
สำาหรับตู้เฟอร์นิเจอร์คู่:
ขอบด้านหลังของเคาน์เตอร์จะชิดกับ
ผนัง และเคาน์เตอร์จะอยู่ตรงกลางระหว่างตู้เฟอร์นิเจอร์ทั้งสองตู้
□
เช็ดซิลิโคนส่วนเกินออกทันที
Leveler
ขาปรับระดับ
Screw
สกรู
Back Rail
คานด้านหลัง
Ø
1/8"
Pilot Hole
รูยึดขนาด
Ø
1/8"
385
15
Min/
ไม่ตํ�ากว่า
20
170