background image

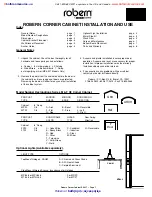
Robern Corner Cabinet SS437 •  Page 7

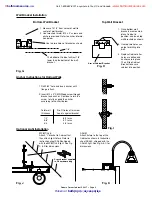
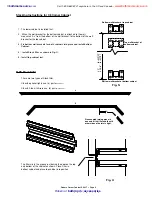
1.  Cut double sided spacing pad into two

equal sized parts.

2.  Place in as shown on under side of

Cabinet.

3.  Fit bottom board to finish installation.

Care and Maintenance • Checklist
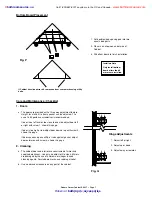
1.  Doors

a.  The doors are provided with a three way adjustment feature.

Height, level and fit to frame gasket, can be adjusted. The
use of a #2 posidrive screwdriver is recommended.

If door is out of level or too close to one side adjust door left
or right with screw 1, shown this page.

If door is too high or low adjust door down or up with screw 2,
shown this page.

If door squeaks, opens stiffly, or rubs against gasket, adjust
door outwards with screw 3, shown this page.

2.  Cleaning

a.  The cabinet door and interior are constructed of mirror and

anodized aluminum.  Use only a damp cloth to clean. Mirrors
are damaged by the use of ammonia or vinegar  based
cleaning agents. For stubborn marks, use rubbing alcohol.

b.  Use no abrasive cleansers on any part of the cabinet.

Hinge Adjustments

1.  Adjust left or right.

2.  Adjust up or down.

3.  Adjust away or towards.

Bottom Board Placement

If Cabinet has side mirror kit, remove ends at score marks using utility
knife.

Fig. P

Fig. Q

1   2    3

Installers Note

Only install bottom
board after side kit
mirrors are installed.

1   2    3

::

bathroomsource

.

com


Call 1-800-667-8721 anywhere in the US and Canada -

www.bathroomsource.com

Robern at 

bathroom

::

accessories

U      N      L      I      M      I      T      E      D

Summary of Contents for ROBERN M Series

Page 1: ...tion Cabinet 8 Deep FP20 C8 C Cobalt Blue S Sandblast N Reversable FT20 C8 E Ebony Black I Industrex R Red C Clear S Silver M Mirror T Turquoise V Verdi Green Y Gold Optional Lights Available separately LIGHT TYPE OPTIONS Top Mount Halogen CAHM A Chrome and Glass Shade B All Chrome Shade C Colored Aluminium Side Mount Mirrored Sconce Incandescent or Halogen MPIL3 5 or MPHL3 5 For MP FP MTIL3 5 or ...

Page 2: ...P20 C8 FBN Top View This side shown with optional MPIL3 5 installed This Side Shown with side kit mirror installed No Optional Side Light Side Mirror Kit 22 5 8 19 1 4 30 6 26 1 4 19 1 4 39 3 8 1 8 5 8 1 4 1 2 C e n t e r o f W a l l B r a c k e t 1 5 7 8 14 1 8 Fig A Fig B Fig C Dimensions Front View bathroomsource com Call 1 800 667 8721 anywhere in the US and Canada www bathroomsource com ...

Page 3: ...screws used for fixing the brackets are provided in the hardware bag These holes are for shelf pins only These holes are for shelf pins only Door For Installation of side Kit Mirrors fix the remaining four Cabinet brackets as shown See page 5 for mirror placement instructions Installers Note Attach from inside Cabinet using one of the provided 10 x 3 8 self threading machine screws Installers Note...

Page 4: ...for drilling into wall 3 Replace Cabinet after holes are drilled and anchors are in place Then fit top Cabinet Bracket to secure cabinet into position Arm of Cabinet Bracket Anchor Instructions for Hollow Walls MP MTIL3 5 Attach L bracket to Cabinet first then attach light fixture Refer to instruction sheet SS498 shipped with the MP MTIL3 5 light See Fig C D for dimensions 1 Measure 14 1 2 from co...

Page 5: ... tape then carefully place mirror onto brackets lining up top and bottom and cabinet edge Care is needed as tape has a strong grip and repositioning is extremely difficult Not Shown to scale Place tape on all four brackets then carefully fit mirror 2 3 Mirror Double Sided Tape Mirror Bracket 1 2 Fig L Fig M Installer Note Install side mirrors after cabinet is mounted on wall bathroomsource com Cal...

Page 6: ...FT Bottom wall bracket of bottom cabinet Bottom wall bracket of top cabinet Top wall bracket of bottom cabinet MSF Stack Filler There are two types of Stack filler C8 with optional lights use a part MSF26 25C C8 with Side kit mirrors use b part MSF19 25C The filler sits in the groove just behind the door on the top and bottom of the cabinet as shown Place Filler in bottom cabinet and place top cab...

Page 7: ...ly or rubs against gasket adjust door outwards with screw 3 shown this page 2 Cleaning a The cabinet door and interior are constructed of mirror and anodized aluminum Use only a damp cloth to clean Mirrors are damaged by the use of ammonia or vinegar based cleaning agents For stubborn marks use rubbing alcohol b Use no abrasive cleansers on any part of the cabinet Hinge Adjustments 1 Adjust left o...

Page 8: ...ted to the terms of this warranty Permission to return any merchandise under this warranty must be authorized by ROBERN and returned prepaid by the purchaser Claims under this warranty should be sent directly to your dealer Parts List for C8 Corner Cabinet 1 C8 Corner Cabinet Refer to Model Number Designations on page one to determine if the Cabinet is as ordered 2 Glass Shelves 4 Shelves are prov...

Reviews: