


Robern Corner Cabinet SS437 • Page 4
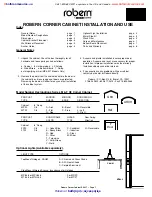
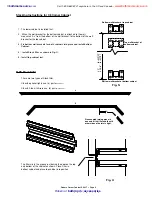
Wall Bracket Installation
Bottom Wall Bracket
Top Wall Bracket
Important: See page 7 for bracket placement of stacked cabinets.
Total wall
No. Of turns after screw
thickness
head is against bracket
1/2”
8-9 turns
5/8”
6-7 turns
3/4
4-5 turns
1. Drill 9/32" hole and insert anchor until
flange is flush.
2. Insert #10 x 2" SMS/Wood screw through
bracket and anchor. Continue to turn the
screw to fully expand the anchor
according to the chart below.
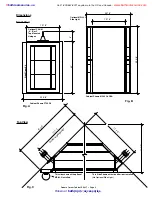
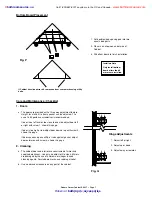
Optional Light Installation
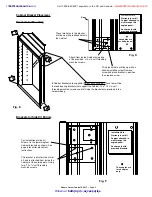
1/8”
The bottom of Cabinet will rest 1/8”
lower than the bottom of the wall
bracket.
1. Once bottom wall
brackets are mounted,
place Cabinet in
position, and invert top
wall brackets as shown.
2. Use top two holes as a
guide for drilling into
wall.
3. Replace Cabinet after
holes are drilled and
anchors are in place.
Then fit top Cabinet
Bracket to secure
cabinet into position.
Arm of Cabinet Bracket.
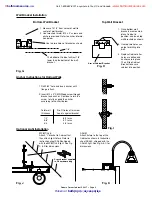
Anchor Instructions for Hollow Walls
MP/MTIL3.5
Attach “L” bracket to Cabinet first
then attach light fixture. Refer to
instruction sheet SS498 shipped
with the MP/MTIL3.5 light. See Fig.
C & D for dimensions.
1. Measure 14 1/2” from corner of wall to
center of wall bracket.
2. Use two sheet metal # 10 x 2” screws and
anchors provided. Refer to anchor informa-
tion below.
Use top two holes of bracket as shown
CAHM
Attach fixture to the top of the
Cabinet as shown in Instruction
sheet SS430, shipped with the
CAHM light. See Fig. A & C for
dimensions.
Fig. G
Fig. H
Fig. I
Fig. J
Fig. K
Cross bracket supplied
in C8 hardware bag
::
bathroomsource
.
com
Call 1-800-667-8721 anywhere in the US and Canada -
www.bathroomsource.com
Robern at
bathroom
::
accessories
U N L I M I T E D


