-3-
Fig.#2
2
Remove the old gasket from the floor
and the closet flange with a putty knife.
Remove the old T-bolts and discard
them.
if the new toilet is not
installed immediately, temporarily stuff
a rag into the closet flange.
NOTICE:
T
Closet Flange
NOTICE:
Do not use white cement or high lime content
cements to install this toilet. The expansion of cement due to
a rise in temperature may make the toilet crack or cause
damage. Kohler is not responsible for any damage caused by
installation with the use of cement.
mm
67mm;
200mm
190
Fig.#3
3
Fig.#4
4
Fig.#5
5
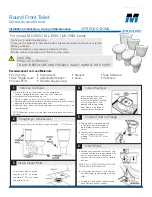
TO INSTALL SUPPLY
SHUT-OFF VALVE
Install the supply shut-off valve so it is
200mm above the finished floor line,
and 190mm to the left of the closet
flange centerline.
The centerline of the supply shut-off
valve outlet should extend 67mm from
the finished wall. Install the supply
shut-off valve with the outlet vertical.
Supply Shut-Off Valve
Closet Flange
Centerline
190
305
200
10mm
:
5
TO INSTALL BOWL
Position the template and align with
drain hole.
Mark down the position of foot and 5
holes.
Drill holes on ground with the drill of
10mm (3/8"), then insert anchor to
holes.
Please make sure there is
no water pipe or spool under the 5
holes to be drilled.
CAUTION:
Drain Hole
3/8
10mm
Fig.#6
6
Install brackets.
1371050-T01-A