background image

5-8

A-61601  June 2010 

Replacement 
procedures

Kodak

 Scanners use replaceable tires that can feed a wide range of 

document types, sizes and thicknesses. Tire life and performance will 
vary based on the customer’s document set, the frequency of cleaning 
the paper path and tires, and following the recommended schedule for 
changing tires. Nominal tire life is approximately 60,000 to 125,000 
photos/pages. Usage figures are not guaranteed. Customer-operating 
environments, document type, the condition of photos being scanned, 
and not following the recommended cleaning and replacement 
procedures, can cause the life of the consumables to vary. You should 
change the tires if you notice an increase in multiple feeds, stoppages, 
or a decrease in feeder performance that is not resolved by following 
the cleaning procedures.

NOTES:

• Before beginning replacement procedures, disconnect the electrical 

power.

• Certain paper types (such as carbonless paper or newsprint), failure 

to clean regularly, and/or use of non-recommended cleaning solvents 
can shorten roller life.

Replacing the separation 
module and tires

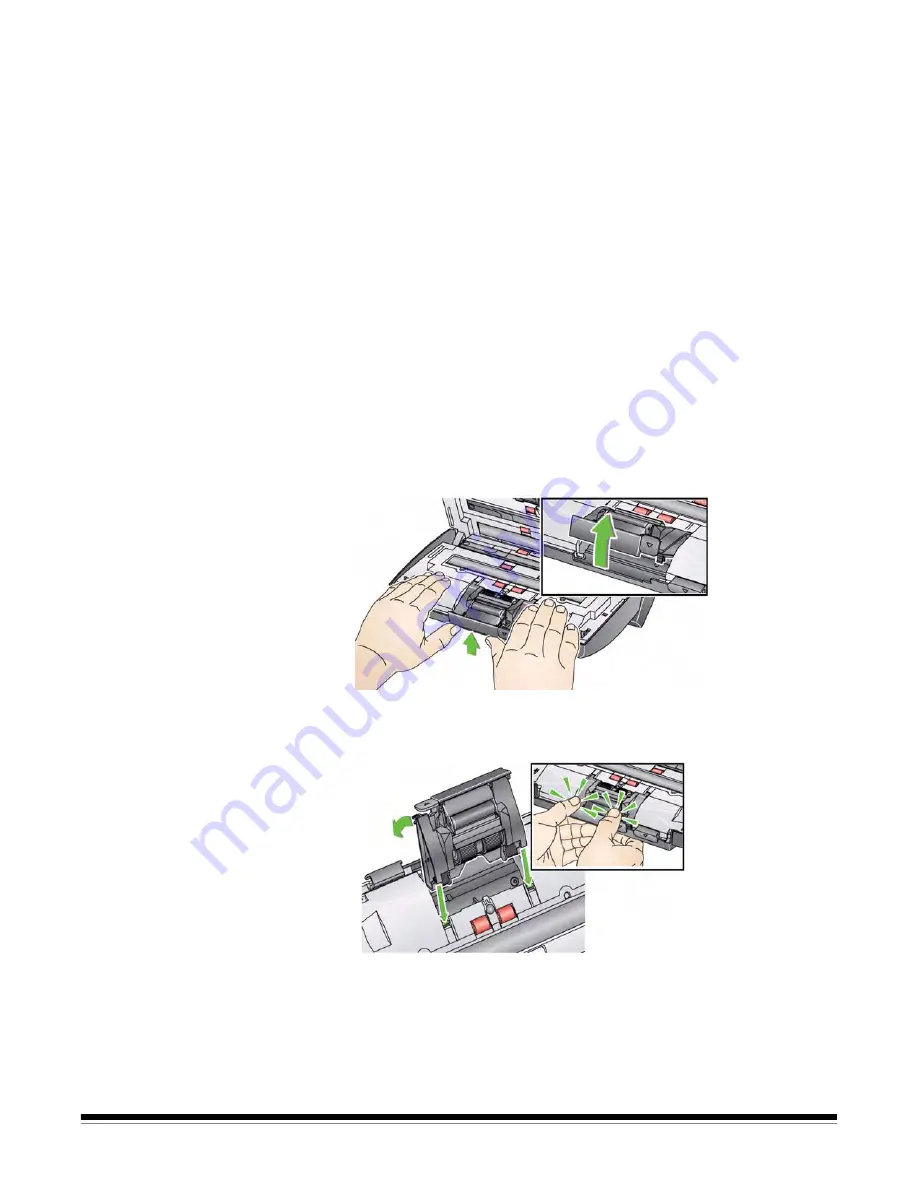
1. Push the separation module up to snap out and lift it out of position.

If you are replacing the separation module, insert the new 

separation module by aligning the tabs with the slots and 
snapping it into position.

If you are replacing the tires, continue with Step 2.

Summary of Contents for PS400 Series

Page 1: ......

Page 2: ...This product contains portions of imaging code owned and copyrighted by Pegasus Imaging Corp Tampa FL www pegasustools com ALL RIGHTS RESERVED...

Page 3: ...he scanner which may cause the scanner to malfunction Material Safety Data Sheets MSDS for chemical products are available on the Kodak website at www kodak com go msds When accessing the MSDSs from t...

Page 4: ...etween the equipment and receiver Connect the equipment into an outlet on a circuit different from that to which the receiver is connected Consult the dealer or an experienced radio TV technician for...

Page 5: ...INTRODUCTION 1 1 INSTALLATION 2 1 SCREEN DESCRIPTIONS 3 1 SCANNING PHOTOS 4 1 MAINTENANCE 5 1 ACHIEVING GOOD QUALITY IMAGES 6 1 TROUBLESHOOTING 7 1 APPENDICIES A B...

Page 6: ...mailed written to a CD DVD Kodak Picture CD or copy to a USB or network drive or uploaded to the Kodak Gallery or other photo management system for sharing and various creative uses such as calendars...

Page 7: ...tallation CD in PDF format and is also available as a Help file Accessories Kodak A4 Flatbed Accessory the Kodak A4 Flatbed adds scanning capability for exception photos e g badly torn or very fragile...

Page 8: ...B 2 0 cable Power supply AC power cord bundles USB software dongle Sample Cleaning Kit Dust cover 10 Kodak Picture CDs PS810 Scanners only Welcome Folio which includes Installation CD including Kodak...

Page 9: ...you are scanning 5 photos or less otherwise use the optional output tray kit included with the Picture Saver Scanning System LED Indicator illuminates or flashes indicating scanner status Steady gree...

Page 10: ...hotos or documents The PS410 Scanner is shown in the above illustration The PS810 Scanner shown below has a larger input tray and the ability to lock the side guides To lock unlock the side guides mov...

Page 11: ...Imaging area for optimum image quality keep the imaging area clean Separation module release lever push this lever down to release the separation module for cleaning or replacement Gap release lever...

Page 12: ...one of the optional flatbed accessories to the scanner Security lock port connects a security lock to the scanner similar to the security lock port used for a laptop You can purchase a standard secur...

Page 13: ...the steps in the Installation Guide skip this section Power down any scanners attached to the PC before installing the Picture Saver System Software application Install the software before connecting...

Page 14: ...e drivers are part of the Kodak Driver Software installation This process can take several minutes To prevent this from happening you can click on the Skip obtaining driver software from Windows updat...

Page 15: ..._Pictures default directory click OK Otherwise use the Browse panel to select the desired directory or type the full pathname of the directory When finished click OK Several progress messages will be...

Page 16: ...umber is located on the bottom of the scanner and on the shipping carton 7 Click Finish when the installation is complete 8 Remove the Installation CD from the CD ROM drive The Picture Saver System ap...

Page 17: ...is recommended when scanning large stacks of photos or documents To install the output tray kit 1 Remove the standard output tray from underneath the scanner by pressing down on the two tabs and pulli...

Page 18: ...rm along the center guide and push it back until it is securely in place NOTE If the clip is not installed you can install it by sliding it up into the scanner between the slots at the center of the s...

Page 19: ...A 61601 June 2010 2 7 4 Snap the dangler onto the clip 5 Slide the standard output tray along the rail underneath the output tray extension and push it back until it is securely in place...

Page 20: ...e 1 Select the appropriate AC power cord for your region from the supply of power cords packed with your scanner 2 Attach the power cord you selected to the power supply NOTE Be sure that the power co...

Page 21: ...nd you are ready to scan photos insert the USB software dongle in a USB port on your PC Wait for the USB software dongle to be recognized by your PC NOTE DO NOT LOSE THE USB SOFTWARE DONGLE THERE IS A...

Page 22: ...der Summary Creation screen 3 15 This chapter describes the screens and icons that are available when using the Kodak Picture Saver Scanning System All screens within the Kodak Picture Saver Scanning...

Page 23: ...enter the customer name address and email address information These are not required fields NOTE These fields will auto fill with any saved values when opening a previous order and the data may be mo...

Page 24: ...er Information screen and clears the system of all data for the current order The confirmation message Do you want to start over will be displayed Batch Scan scans batches of photos using the Picture...

Page 25: ...tled Scan Settings screen Batch Information these values will be 0 until a batch has been scanned Image displays the number of the first image shown in the 16 Up Display window To displays the number...

Page 26: ...l be displayed 16 Up Display window displays up to 16 images at a time Scanning Completed displays the Order Preview screen Previous goes back to the Customer Order Information screen Start Over goes...

Page 27: ...Redo Flatbed Scan allows you to rescan and replace the last batch of scanned images and displays the Scan Viewer screen Auto Rotate when selected the Picture Saver Scanning System will make every atte...

Page 28: ...ompleted Pause Display Continue Display when selected will hold the currently displayed image When selected again will refresh to the most recently scanned image Return returns to the Scan Images or E...

Page 29: ...ou desired Mode select one of the following batch scan modes Front Side captures the front side of the photo that is in the input tray This is the recommended mode for photos Back Side captures the ba...

Page 30: ...default Best optimum compression best image quality Creates a smaller file size than Superior compression Select Best if you want standard size reprints of scanned image files Superior minimum compre...

Page 31: ...the Enhanced Image icons e g Rotate 90 degrees the changes will be displayed in the Enhanced Image window When you are finished a message will be displayed asking if you want to save the changes Retur...

Page 32: ...r all of the rescanned images may be saved or none of the images You may select to rescan the photos Front Side Back Side or Both Sides or from the flatbed if a flatbed is attached Scanned images will...

Page 33: ...7 Display window displays the folder s of scanned photos You can click on a folder to view the contents Continue displays the Order Summary and Creation screen Previous goes back to the Customer Order...

Page 34: ...u want to start over will be displayed Retouch Folder automatically enhances the colors contrast brightness etc of all the black and white or color images scanned as color mode within the selected fol...

Page 35: ...photos as color images and use grayscale scanning for exception processing if color scan results are not what you desired This Folder provides a summary of the images within this folder Image displays...

Page 36: ...Order Information screen It also provides the number of photos scanned and the total size of the images If desired you can change any customer information except the Order Finalize Order completes th...

Page 37: ...iles or folders to the same CD DVD The Burn Kodak Picture CD dialog box is described in the next section NOTE This button may be disabled if the user does not have permission to burn CDs and DVDs Refe...

Page 38: ...ion will take place or select a Quick or Full verification process that the data was burned successfully Burn Cancel click this button to start or cancel a burn Cancelling a burn in progress may resul...

Page 39: ...ported DVD players Eject when finished if checked will automatically eject the Kodak Picture CD when burning is complete Verification after burning is complete is always set to Full Verification for K...

Page 40: ...anner can be tilted to an upward and downward position it is strongly recommended that you scan your photos in the downward position 1 Be sure the scanner is on and ready to scan green indicator light...

Page 41: ...just the input tray If you have a PS410 Scanner you can scan photos with the input tray open or closed Feed your photos with the input tray open if you are scanning a batch of photos If space is limit...

Page 42: ...OTE Do not overfill the PS810 Scanner above the height of the guides 2 Remove all staples and paper clips before scanning Staples and paper clips on photos may damage the scanner and photos 3 Any inks...

Page 43: ...s stack and place them face up in the scanner For example if your stack has 9 photos you would place them face down on the table so that photo 1 is facing the table and the back of photo 9 is on the t...

Page 44: ...ned without written permission from the owner Two sided photo scanning If you have a batch of photos where both sides of some photos need to be scanned group these photos together and scan them in a s...

Page 45: ...0 A splash screen will be displayed while the system initializes then the Customer Order Information screen will be displayed 2 Enter up to 51 alphanumeric characters in the Order field to identify th...

Page 46: ...n the flatbed platen for a Flatbed Scan Be sure the photos you want to scan are facing up properly NOTES For best feeding performance always scan the photos with the scanner body tilted to the downwar...

Page 47: ...splayed Scanning will start when the lamps are ready usually within a few seconds NOTES If you are using an optional Kodak A4 Flatbed or Kodak A3 Flatbed the photo must always be placed face down on t...

Page 48: ...esired or select Auto Rotate for the Picture Saver System Software to make every attempt to automatically rotate images to the correct orientation This option works effectively for photos with faces t...

Page 49: ...lti feed image with images from multiple photos 11 Make any desired changes then click Continue The message Are you done scanning this order will be displayed 12 Click Yes The Order Preview screen wil...

Page 50: ...the Preview Details screen you can make any final changes When finished click Continue The Order Preview screen will be displayed 15 If you want to review the contents of the folder one more time bef...

Page 51: ...that all the information in the order summary is complete Edit customer information if desired If you want to print the order summary check the Print Order Details check box When you click Finalize O...

Page 52: ...to start a new Kodak Picture Saver System Scan Session will be displayed 17 If you want to start a new scan session click Yes Otherwise click No to close the Kodak Picture Saver System Software Unles...

Page 53: ...ires 5 8 Replacing the pre separation pad 5 10 Replacing the feed module and tires 5 11 Adjusting the pre separation roller tension 5 13 Supplies and consumables 5 13 Opening the scanner cover 1 Befor...

Page 54: ...household cleaners Allow surfaces to cool to ambient temperature before use Do not use cleaners on hot surfaces Use adequate ventilation Do not use cleaners in confined areas NOTES Before beginning cl...

Page 55: ...ift it out of position 2 Manually rotate and wipe the separation module tires with a roller cleaning pad 3 Inspect the separation module If the separation module tires show signs of wear or damage rep...

Page 56: ...ove the input tray To remove the input tray gently push the input tray to the left or right to release the pin from the slot and lift it out of position Be careful not to damage the paper present sens...

Page 57: ...rotate and wipe the feed module tires with a roller cleaning pad 4 Inspect the feed module If the feed module tires show signs of wear or damage replace the tires or the feed module See the Replaceme...

Page 58: ...until it snaps into place Vacuuming the scanner Before cleaning the imaging area it is suggested that you vacuum the inside of the scanner to remove any dust and debris Cleaning the imaging area 1 Wip...

Page 59: ...can the transport scanning sheet 5 After the transport cleaning sheet is scanned turn it over adhesive side facing the input tray and scan it again 6 Open the scanner cover and wipe the imaging area w...

Page 60: ...rocedures can cause the life of the consumables to vary You should change the tires if you notice an increase in multiple feeds stoppages or a decrease in feeder performance that is not resolved by fo...

Page 61: ...Remove the separation roller from the separation module housing 4 Remove each tire by sliding the tire off the core 5 Install each new tire by gently pulling it over the core IMPORTANT Do not overstre...

Page 62: ...wo side tabs which protrude slightly from the back of the separation module 3 Push down on the side tabs until the pre separation pad protrudes slightly from the front of the separation module 4 Grasp...

Page 63: ...sh against the raised edge of the feed module cover and lift it up and out of position 2 Rotate the feed module forward and push it to the left to lift it out of position If you are replacing the feed...

Page 64: ...shaft to the right or left so the core fits properly within the feed module housing IMPORTANT Do not overstretch the tire it may tear 5 Reinstall the feed module by aligning the pins and pushing it t...

Page 65: ...y aligning the tabs with the slots and snapping it into position Supplies and consumables Contact your scanner supplier to order supplies NOTE Items and catalog numbers are subject to change Descripti...

Page 66: ...cover and shake it free of dust in a location away from the scanner Use the scanner in an area where the relative humidity is at least 50 Dry environments leads to static which promotes the accumulat...

Page 67: ...ely through the scanner If possible stacks of photos may be safely uncurled before scanning NOTE Photos that are severely curled can either be rotated 90 degrees so the curl is not in the direction of...

Page 68: ...ticles 3 After wiping the glass re inspect for any visible dust particles 4 Close the scanner cover and evaluate the subsequent scans If streaking or other problems remain it may be necessary to do a...

Page 69: ...ternal testing has shown a higher risk of scratching on the prints Reducing streaks The Kodak Picture Saver Scanning System software has been enhanced to reduce the occurrence of streaks in your image...

Page 70: ...ot in the direction of the transport This may eliminate or minimize the banding NOTE It is suggested that you feed photos top first to minimize banding in light areas at the top of photos Place a blan...

Page 71: ...ted for the length of the photos you are scanning all photos meet the specifications for size weight and type as outlined in Appendix A Specifications the scanner and tires are clean the spring on the...

Page 72: ...r 4 Scanning Photos Images are not being cropped correctly Images are not being cropped correctly from the batch scanner Rescan and adjust the side guides for the width of the photos you are scanning...

Page 73: ...software to not load automatically see the next issue If after installation of the application and plug in of the USB software dongle the WIBU software does not automatically load a message may be dis...

Page 74: ...hanged by specifying a new value for the CDFolderSize PCDFolderSize and DVDFolderSize parameters in the PrintScan ini file A3 and A4 Flatbed scanner rotation may be set using the FlatbedRotation param...

Page 75: ...lly logged on user only to Enabled 7 Set Devices Allowed to format and eject removable media to Administrators and Power Users or to Administrators and Interactive Users Data removal It is the respons...

Page 76: ...k Picture Saver Scanning System Refer to Chapter 2 Installation 1002 Error Code 1002 Could not read image processing defaults from scannerprofile Continuing with default settings Verify that a valid s...

Page 77: ...r burner such as an external USB CD DVD burner If you are using XP upgrade to Vista or Windows 7 or use the software application that came with the CD DVD burner to burn the CD DVD 4006 Media Detectio...

Page 78: ...ver Scanning System Refer to Chapter 2 Installation 9001 9002 9003 TWAIN drivers could not be started Please retry If this error persists please contact support with error code 900X Reinstall the Koda...

Page 79: ...e number for your country 2 When calling please have the following information ready A description of your problem The scanner serial number Computer configuration Software application you are using C...

Page 80: ...Scanner 215 x 863 mm 8 5 x 34 in A4 Flatbed 219 x 300 mm 8 62 x 11 81 in A3 Flatbed 302 x 461 mm 11 92 x 18 15 in Paper Weight 34 g m2 to 413 g m2 9 to 110 lbs ADF Capacity PS410 up to 25 mixed size...

Page 81: ...Saver Scanning System is not officially supported on non native Windows PCs including running Windows operating system in a virtual machine or dual boot Only limited technical support is available fo...

Page 82: ...onent including breakage of a connector cover glass pins or seal c from service modification or repair not performed by Kodak or a service provider authorized by Kodak or by tampering use of counterfe...

Page 83: ...seeking services for Kodak Scanners covered under this Limited Warranty must obtain a Return Material Authorization number RMA by calling 800 822 1414 and within ten 10 business days from the date of...

Page 84: ...x to ensure proper receipt and credit of the defective product Depot service If the Kodak Scanner is not eligible for Advance Exchange or On Site Service an eligible purchaser may utilize our Depot Re...

Page 85: ...chnical Assistance by Telephone Telephone technical support is available Monday Friday between the hours of 5 a m to 5 p m excluding Kodak holidays Phone 800 822 1414 For Technical Documentation and F...

Page 86: ......

Reviews: