background image

Additional Calibration Information

September 2000

C-25

Editing Information on the Aim Tab

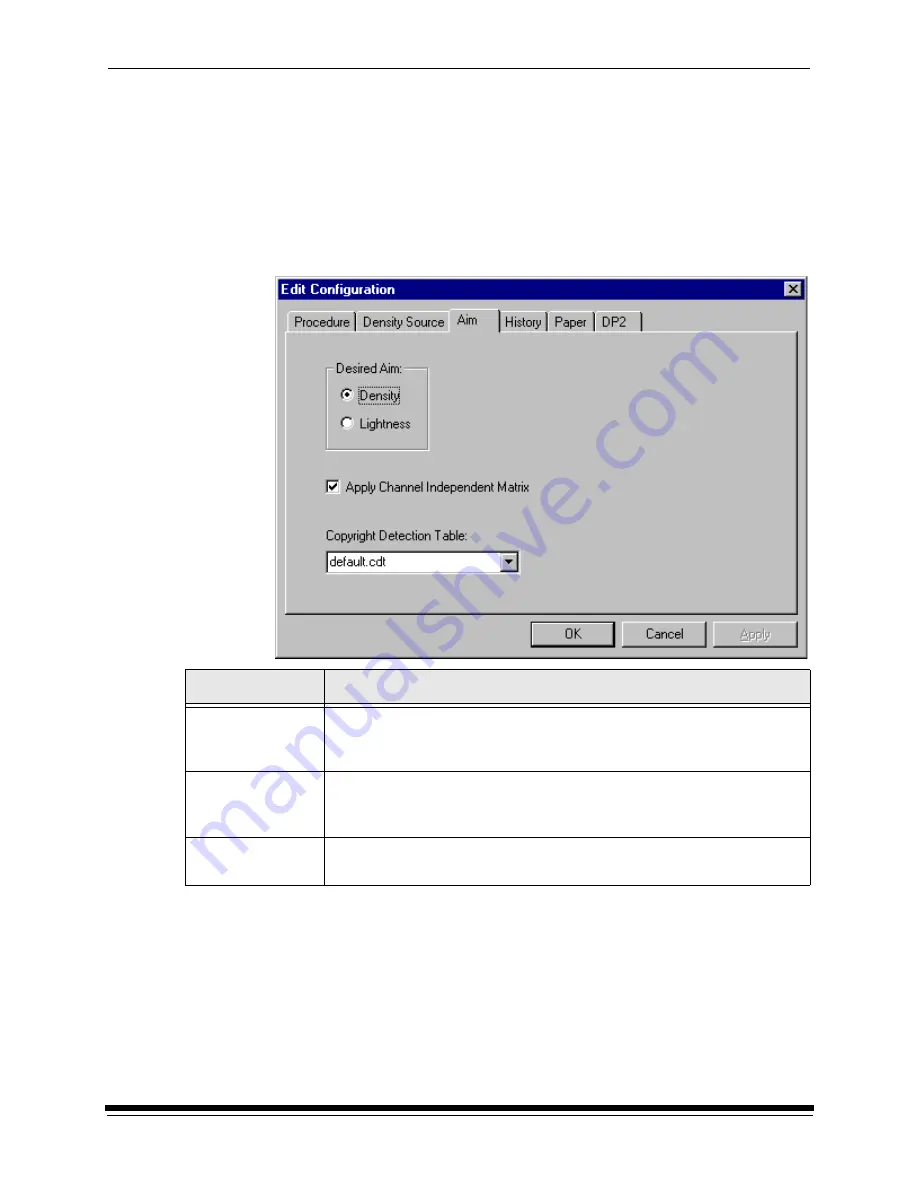
The Aim tab specifies:

whether the aims used for calibration are to be Density Aims or Lightness 
Aims

whether to apply the Channel-Independent Matrix

which table to use if Copyright Detection is functional

The values displayed in the example are the default settings.

To edit the configuration information on the Aim tab:

1.

Change the Aim information as needed.

2.  If you have completed all editing of configuration information (including 

information on the other tabbed screens), click OK to save the changes and 
close the Edit Configuration screen.

NOTE: Click Cancel to cancel all changes made to the Edit Configuration 

screen and close the Edit Configuration screen.

3.  To continue making changes to the Edit Configuration, click on another tab 

and make changes as needed.

Attribute

Description

Desired Aim

Indicates whether to use Density Aims or Lightness Aims for 
calibration. Using Lightness Aims will improve both the highlights and 
shadows of your prints.

Apply Channel 
Independent 
Matrix?

Indicates whether or not to apply the Channel-Independent Matrix to 
the aim values. If the matrix is applied, the number of cycles required 
to successfully calibrate the printer should be reduced.

Copyright 
Detection Table

Select the table to be used. This feature is available with Gen II LED 
printers only. Only use this feature as instructed by Kodak.

Summary of Contents for LED II PRINTER 20R - OPERATOR'S GUIDE

Page 1: ...KODAK PROFESSIONAL LED II Printer 20R Operator s Guide Part No 6B6192 ...

Page 2: ... Eastman Kodak Company 2000 All rights reserved Contents of this publication may not be reproduced in any form without permission from Eastman Kodak Company ...

Page 3: ...t authorized by Eastman Kodak Company could void the FCC Certification and negate your authority to operate this product Canada ICES 003 Issue 2 Rev1 Canada Class A EMC This Class A digital apparatus meets all requirements of the Canadian Interference Causing Equipment Regulations Cet appareil numerique de la classe A respecte toutes les exigences du Reglement sur le materiel brouilleur du Canada ...

Page 4: ...e for safety information The hot symbol B indicates a hot surface area on the printer that should not be touched The electrical hazard shock warning symbol C identifies the possibility of electrical shock inside an area that should only be accessed by Kodak CES personnel CAUTION Before connecting or disconnecting the SCSI cable or terminator turn off the power for the printer and the host computer...

Page 5: ...lished marketing centers in the contiguous United States the island of Oahu in Hawaii and certain areas of Alaska This warranty does not cover circumstances beyond Kodak s control service or parts for any attachments accessories or alterations not marketed by Kodak nor to correct problems resulting from their use Damaged caused by failure to meet electrical specifications in this manual will not b...

Page 6: ......

Page 7: ... Soft Shutdown 2 8 Hard Shutdown 2 9 3 Operating Procedures 3 1 Operator Control Panel OCP 3 2 OCP Key Light Descriptions 3 3 Menu 3 4 Taking the Printer Offline 3 4 Cancelling Jobs 3 4 Printing Deferred or Buffered Jobs 3 4 Status Messages 3 5 Loading Paper Into the Supply Cassette 3 6 Removing the Supply Cassette 3 6 Loading the Paper 3 7 Attaching a Digital Paper Saver 3 10 Installing the Loade...

Page 8: ...0 Resetting the Defaults 3 31 Resetting the Parameters 3 31 Resetting the Printing LUTs 3 31 Resetting the Copyright Detection LUTs 3 32 Selecting the SCSI Ports 3 32 Setting the Target Pad Reads 3 32 Selecting A Modem 3 33 Resetting the Modem Port 3 33 Checking the Modem Presence 3 33 Setting the Time and Date 3 33 Setting the Current Time 3 33 Setting the Current Date 3 33 Setting the Current Da...

Page 9: ... 13 Calibration Troubleshooting 5 14 Calibration Graph 5 14 Numbered Error Messages 5 14 Non Numeric Error Messages 5 21 Getting Additional Help 5 22 Appendix A Ordering Supplies A 1 Accessories A 1 Supplies A 1 Standard U S Paper A 2 Metric Paper A 2 Leaders and Splice Tape A 3 Publications A 3 Appendix B Specifications B 1 Printer Specifications B 1 Dimensions and Weight B 1 Acoustic Specificati...

Page 10: ...formation on the Paper Tab C 27 Editing Information on the DP2 Windows NT or KPIS Macintosh Tab C 27 Completing the Edit Configuration C 31 Creating a Density File for Use with Calibration C 32 File Formats C 32 Installing the Densitometer C 33 Appendix D Using the Image Print Server Software D 1 Installing the IPS Software D 1 Hardware Requirements D 1 Software Requirements D 1 Installing the Sof...

Page 11: ...es and Print Options E 6 KODAK LED Main Dialog Box E 6 Option Descriptions E 6 Other options E 7 Punch Attributes E 7 Option Descriptions E 7 Page Layout Attributes E 8 Option Descriptions E 8 Select an LED Printer Dialog Box E 8 Option Descriptions E 9 Printer Status Dialog Box E 9 Option Descriptions E 10 Troubleshooting E 10 Error messages E 10 General error messages E 10 Other Problems E 11 In...

Page 12: ......

Page 13: ...e step by step instructions for daily operation from startup to shutdown Chapter 3 System Operating Procedures provides an overview of the OCP and all of the procedures for operating the Printer Chapter 4 Maintaining the Equipment includes the information that you need to properly maintain the printer All maintenance procedures are categorized by frequency Chapter 5 Diagnostics and Troubleshooting...

Page 14: ...to your printer Software Included With the Printer The compact disc CD included with the KODAK PROFESSIONAL LED II Printer 20R contains the KODAK Calibration Software and the Printer Calibration Software for WINDOWS NT and MACINTOSH Host Computers It also includes additional applications the printer can interface with This software is usually installed by a Kodak representative However installatio...

Page 15: ...n the Chapter 5 Diagnostics and Troubleshooting You can also use the technical support number for information on operating the printer how or where to obtain supplies how to obtain service the warranty other Kodak products If you are calling for technical support please know your printer s K Number The K Number label is attached to the front of the printer next to the operator control panel Produc...

Page 16: ......

Page 17: ... and manipulate the digital source image a SCSI interface to transfer the digital image to the printing system and the KODAK PROFESSIONAL LED II Printer 20R to expose the digital image You can use a variety of software applications such as KODAK Image Print Server Software to manage and manipulate the digital images SCSI Interface A SCSI cable connects the host computer to the KODAK PROFESSIONAL L...

Page 18: ...computer and SCSI cable Front View densitometer not included front door paper supply printer door control panel operator paper takeup door front slack loop door not included Rear View back door power cord ports connector circuit breaker back slack loop door ...

Page 19: ...r on 2 Press the Start key on the OCP to begin the printer initialization process If paper is loaded when initialization is complete 3 to 4 minutes the message Status ON LINE Ready appears on the OCP Startup is complete and the printer is ready to print Turn the host computer on then go to the next page and calibrate the printer If paper is not loaded the message Out of paper open supply door to l...

Page 20: ...ows for the Macintosh version of the software are similar For information about editing the calibration settings for example you may want to display a calibration graph only if calibration is out of tolerance see Editing the Calibration Configuration on page C 20 To calibrate the printer 1 Check that the densitometer is connected and calibrated the printer status is Online and Ready the processor ...

Page 21: ...s to Ask if processor is in control the Process In Control dialog box appears The processor is critical to printer calibration You can calibrate the printer only if the processor is in control Densitometers require calibration at regular intervals Refer to your densitometer s manual for instructions on how to calibrate your densitometer 4 Click Yes Go icon This icon highlights after you select Go ...

Page 22: ...rocess If you click Load Selected LUT the system automatically downloads the highlighted LUT to the printer to create a test print When the test print has been sent the Scanning Processed Print with Densitometer status icon on the LED Printer Calibration screen is highlighted Go to Obtaining Densities on page 2 5 6 If you selected Load Custom LUT in step 5 the Open dialog box appears Select or typ...

Page 23: ...ile for Use with Calibration on page C 32 1 Click OK to continue with the calibration process 2 Go to Completing the Calibration on page 2 6 Using the Densitometer to Read Densities Do the following to scan the neutral gray patches on the processed test print into the densitometer refer to your densitometer manual for detailed instructions on using the densitometer 1 Slide the lever on the densito...

Page 24: ...n successfully received Go to Completing the Calibration If the test print is not read successfully refer to Calibration Troubleshooting on page 5 14 Completing the Calibration 1 If calibration is in tolerance the LUT Attributes dialog box appears a Enter a name or comment in the dialog box The comment you enter will appear on the Send LUT to Printer screen to identify the LUT file with a name tha...

Page 25: ...es is the most useful when the graphs show an unusual plot Rereading the test print lets you validate the graph then returns you to the Out of Tolerance dialog box Iterate again using a newly calculated calibration LUT allows you to keep printing test prints with the newly created LUT without having to save the LUT table Calculate and download a printing LUT and stop When you select this option th...

Page 26: ...e PHOTOSHOP application For more information about these applications see the appropriate Appendix in this guide Shutting Down the Printer There are two methods for shutting down the printer The soft shutdown method is the recommended way to shut down the printer overnight or for a period of several hours The hard shutdown method should be used for shutting down the printer for an extended period ...

Page 27: ...or longer 1 Do a soft shutdown See Soft Shutdown on page 2 8 CAUTION Turn off the circuit breaker only after doing the soft shutdown Otherwise you could lose printer status information and will cause dark lines to appear in the middle of the prints if paper is loaded 2 Turn off the circuit breaker on the back of the printer circuit breaker ...

Page 28: ......

Page 29: ...g the Paper Hole Punchers 3 22 Using the Printer Features 3 23 Accessing the Menu 3 23 Unloading Paper 3 23 Shutdown and Restart 3 24 Selecting a Loading Option 3 24 Changing the Length of Paper Remaining on the Supply Roll 3 26 Setting the Length of the Paper Trailer 3 27 Setting the Punches 3 27 Using the Automatic Roll ID 3 29 Using Page Starts 3 29 Resetting the Defaults 3 31 Selecting the SCS...

Page 30: ...P displays the current status of the printer including the following information Pages Waiting the number of printing jobs that are waiting in the print queue buffer Paper Supply the approximate amount of paper left in the paper cassette This information is input by you and is for your convenience only Paper Width the width of the current roll of paper that is installed in the printer Paper Takeup...

Page 31: ... mode If you press this key when the printer is in the Offline mode the printer goes into the Online mode Menu Key Pressing this key activates the menu for the OCP when the printer is in the Offline mode Arrow Keys When using the OCP menu the Cancel key functions as a Right Arrow the On Off Line key functions as an Up Arrow and the Menu key functions as a Down Arrow Select Key When using the OCP m...

Page 32: ...e activated for the printer to accept print jobs from the host computer Offline Mode When the printer is in the Offline mode it cannot accept print jobs from the host computer When an error occurs the printer is automatically placed into the Offline mode Cancelling Jobs To cancel the sheet currently being printed press Cancel on the OCP After the sheet has been cancelled the printer automatically ...

Page 33: ...not be initiated status OFF LINE Pages Deferred The printer is offline but there are jobs in the printer that are waiting to be printed A print cycle will not be initiated status OFF LINE Printing The printer will complete the current print cycle and then pause status OFF LINE Cancelling Cancel was pressed when the printer was printing The sheet that was printing was immediately terminated This me...

Page 34: ... one 10 to 20 inch takeup cassette are included with the printer and are designed to hold rolls of paper that are 10 11 12 20 inch and A4 widths The supply cassette and takeup cassette are not interchangeable Removing the Supply Cassette 1 Open the paper supply door 2 Unlock the cassette clamp for the supply cassette 3 Remove the empty supply cassette clamp cassette supply cassette door paper supp...

Page 35: ...sette NOTE Keep the felt surfaces clean to prevent scratches on the paper 5 Remove the screw lock and the old cardboard core from the core support assembly 6 Pull the metal spring for the screw adjuster away from the gear and slide the screw adjuster to the correct position until it locks into place in the detent supply cassette locks felt felt old core and core support assembly gear screw lock sc...

Page 36: ... away from you 8 Insert the core support assembly from the left side into the roll of paper as shown 9 Push the cardboard core toward the gear until it engages the detent 10 Install the screw lock onto the core support assembly and ensure that it is snug 11 Place the core support assembly with the full paper roll into the supply cassette IMPORTANT Make sure that the right and left edges of the pap...

Page 37: ...ssette and that the paper feeds freely NOTES When the paper cassette is locked you can turn on the room lights See page 3 10 for instructions on how to install a digital printer paper saver IMPORTANT When moving the supply cassette pick up and carry the cassette by both handles to prevent the paper from sliding or telescoping to one side slotted opening lead edge of the paper core support assembly...

Page 38: ... supply cassette See Loading Paper Into the Supply Cassette on page 3 6 2 If necessary cut a straight edge on the lead edge of the paper that is coming through the slotted opening in the supply cassette 3 Cut a piece of splice tape that is approximately 2 inches longer than the width of the supply cassette 4 Set the splice tape on the supply cassette with the adhesive side facing up 5 Place the le...

Page 39: ...that is slightly smaller than the width of the paper 9 Install the second piece of splice tape over the paper and the digital printer paper saver 10 Turn the core support assembly to rewind the paper and digital printer paper saver into the supply cassette NOTE Do not wind the entire digital printer paper saver into the supply cassette second piece of splice tape ...

Page 40: ...ter 5 Lock the clamp to secure the paper cassette into place 6 If you are not using the digital printer paper saver check that the cut on the lead edge of the paper is straight NOTE Use scissors to cut the paper Knives and razor blades will shred the paper 7 Adjust the right punch to the correct paper width 10 11 12 or 20 inch and A4 See Adjusting the Paper Hole Punchers on page 3 22 8 Press Start...

Page 41: ...e any paper from the shoe area and repeat steps 7 through 10 If you are not using a digital printer paper saver make sure the lead edge is cut square and does not have any bends or dings If necessary install a new digital printer paper saver 12 Close the paper supply door If a 1 step load option is selected the paper automatically advances to the takeup cassette When this is complete a message on ...

Page 42: ...ect size cardboard core onto the core support assembly Push the cardboard core toward the flange until it engages the detent 5 Install the flanged nut when using 10 11 12 inch and A4 paper or the screw lock for 20 inch paper onto the core support assembly The core support assembly uses left hand threads The threaded parts are color coded to prevent confusion NOTE Make sure the screw lock or flange...

Page 43: ...bly rotates freely in the takeup cassette Installing the Takeup Cassette 1 Open the takeup door If the takeup cassette is in the printer and has paper in it remove it See Removing the Takeup Cassette on page 3 20 or Removing Exposed Paper from the Takeup Cassette on page 3 21 2 If necessary move the adjustable cassette support arm to accommodate the size of the cassette you will be using To move t...

Page 44: ...cedures 3 16 September 2000 3 Install the takeup cassette onto the cassette support arms IMPORTANT Check that the bearings on the cassette are seated in the support arms adjustable cassette support arm clamping knob ...

Page 45: ...he lead edge of the digital printer paper saver against the cardboard core and close to the flange NOTE Align the right edge of the digital printer paper saver with the flange making sure that the paper saver is not skewed b Make a 3 inch cut in the lead edge of the paper at a 45o angle to form a small flap c Pull the rubber band that is in the middle of the cardboard core through the cut in the p...

Page 46: ...assembly until you have wrapped enough digital printer paper saver around the cardboard core to cinch it to the core d Check that the right edge of the paper is still aligned with the flange and close to it e Close and lock both sides of the takeup cassette NOTE The closed takeup cassette should move freely when you press down the front of it If necessary reposition the takeup cassette to move fre...

Page 47: ...ed as appropriate for the loading option selected See Selecting a Loading Option on page 3 24 NOTE You can determine the amount of trailer See Setting the Length of the Paper Trailer on page 3 27 To choose one of the above options see Unloading Paper on page 3 23 Reaching the End of Roll of Paper When the end of the roll is detected the remainder of the paper is wound into the takeup cassette and ...

Page 48: ...or unload paper 1 Open the takeup door 2 Remove the takeup cassette from the printer by lifting it off of the support arms by the cassette handles CAUTION Move the takeup cassette to a darkroom before removing the exposed paper See Removing Exposed Paper from the Takeup Cassette on page 3 21 cassette handle 2 support arm 2 takeup cassette ...

Page 49: ...inter on page 3 19 CAUTION The following steps must be completed in a darkroom 2 Unlatch the locks on the takeup cassette 3 Open the takeup cassette 4 Tape the edge of the paper to the paper roll to prevent the paper from unwinding 5 Remove the roll of paper from the takeup cassette NOTE Keep the roll in the horizontal position to prevent it from telescoping lock 2 tape ...

Page 50: ...m or a dark bag until you process it Adjusting the Paper Hole Punchers 1 Lift the arm for the right paper hole puncher 2 Move the right paper hole puncher to the correct location The hole puncher falls into a detent on the sliding bar when it is in the correct location NOTE The punch positions for A4 and 12 inch paper are very close together and can be easily mistaken for each other Make sure you ...

Page 51: ...Supply and Takeup 1 Select Unload Paper from the main menu on the OCP 2 Select Unload Supply and Takeup from the main menu on the OCP 3 Select Unload Supply and Takeup NOW The printer enters its unload paper sequence When the unload paper sequence is complete the OCP returns to the main menu 4 Select Exit to return to the OCP display You will be prompted to load another roll of paper into the prin...

Page 52: ...ill be made on the paper that was stored before the paper punch when the takeup cassette was loaded All images have the appropriate cut and order punches 1 Step Save Since the paper in the shoe is still unexposed it is used for the first image exposure However since the paper is threaded through the printer during loading the images on the first exposure are not individually punched 2 Step Dark th...

Page 53: ...Step Light option for paper loading This process minimizes paper waste by printing on the paper before the paper is threaded to the takeup area and you cinch it onto the takeup cassette The 2 step loading process is different than the 1 step loading process that is used for loading paper under 1 Step Normal or 1 Step Save conditions When you choose 1 Step Light or 1 Step Save the paper is threaded...

Page 54: ...Loading Only Only one exposure is made on the paper that is in the shoe after loading Some paper may be wasted if the total size of the images on the first exposure does not fully use the paper in the shoe 33 inches If Automatic Roll ID is enabled the first image on the roll for the Roll ID is 6 5 inches long This leaves 22 5 inches available for additional images If the first image for the second...

Page 55: ... to select set the new value 6 Select Exit to return to the previous menu on the OCP Setting the Punches The printer has two paper punches the back paper punch closest to the back of the printer and the front paper punch closest to the front of the printer The front paper punch can be adjusted to accommodate the width of the paper The printer is capable of three types of paper punches Cut Punch oc...

Page 56: ...ation of the Cut and Order Punches 1 Select Setup from the main menu on the OCP 2 Select Printer 3 Select Cut Punches or Order Punches 4 Select Punch Position 5 Select front or back 6 Select Punch Enabled Cut and Order Punches on Same Side of the Paper Gutter Punches With Cut and Order Punches on Opposite Sides of the Paper Cut and Order Punches on Opposite Sides of the Paper gutter width 0 25 in ...

Page 57: ...irst print s on this roll of paper belong with the print s of the last job that was printed on the previous roll of paper 1 Select Setup from the main menu on the OCP 2 Select Printer 3 Select More 4 Select Roll ID 5 Select Printer ID The printer ID will be printed with each roll ID and will not change 6 Select Roll ID Enabled and toggle to Yes if you want a roll ID to be printed at the beginning ...

Page 58: ...set the Page Starts value to adjust the location of the image so that both edges of the image will print off of the paper NOTE The image width must be at least 76 pixels wider than the width of the paper to ensure a borderless print For example If white borders are present on either the front or back edge of the print 1 Measure the white border at both the lead distance A and the trail edge distan...

Page 59: ... parenthesis after Reset Parameters To Factory on the menu NOTE Diagnostic parameters are not reset by this action 1 Select Setup from the main menu on the OCP 2 Select Defaults 3 Select Reset Parameters to Factory 4 Select Exit to return to the previous menu on the OCP Resetting the Printing LUTs This procedure resets the Printing LUTs stored in nvram to the factory setup default values To indica...

Page 60: ...ect SCSI 4 Select SCSI Target ID 5 Use the Up and Down Arrows to select a new SCSI ID Valid SCSI IDs are 0 1 2 3 4 5 6 7 NOTE Make sure the number you select for the SCSI ID has not been assigned to another device 6 Press Select to select set the new value 7 Select Exit to return to the previous menu on the OCP Setting the Target Pad Reads 1 Select Setup from the main menu on the OCP 2 Select Port...

Page 61: ...the OCP 2 Select Ports 3 Select Modem Diag 4 Select Check Presence 5 Select Check Modem Presence Now 6 Select Exit to return to the previous menu on the OCP Setting the Time and Date Setting the Current Time 1 Select Setup from the main menu on the OCP 2 Select Time 3 Select Current Time 4 Use the Up and Down Arrows to select a new time 5 Press Select to select set the new value 6 Select Exit to r...

Page 62: ...acing pixels 8 Use the Up and Down Arrows to select the value for number of pixels that you would like for the width of the space between the images NOTE This value must be a multiple of 8 between 8 and 248 9 Press Select to select set the new value 10 Select Exit to return to the previous menu on the OCP NOTE Another way to maximize the image area of each print is to overfill enlarge the images t...

Page 63: ...r The gutter punch is made in the trail edge of the image See Setting the Punches on page 3 27 1 Select Setup from the main menu on the OCP 2 Select Printer 3 Select More 4 Select More 5 Select Gutter 6 Use the Up and Down Arrows to select the value for number of pixels that you would like the gutter width to be NOTE This value must be between 62 and 250 7 Press Select to select set the new value ...

Page 64: ...ght Detection 4 Use the Up and Down Arrows to select Always On Always Off or Host Select 5 Press Select to select set the setting for the new option 6 Select Exit to return to the previous menu on the OCP Host Select Always On Always Off Copyright Detection can be enabled or disabled by the host on a print by print basis for each image that is downloaded to the printer Copyright Detection is enabl...

Page 65: ...print expose the paper a length of 6 5 inches as it does to print 33 inches Image Size The minimum image length is 6 5 inches 1625 pixels White space will automatically be added to images smaller than 6 5 inches to increase the image size to this minimum The maximum image length is approximately 33 inches 8248 pixels Buffered and Unbuffered Jobs or Deferred and Immediate Jobs can be stored in memo...

Page 66: ...d to be downloaded to the printer NOTE If your host application needs to wait until a print job has been completely downloaded to the printer before it can begin processing the next print job this option should not be used with larger width paper It will slow down the productivity of your system To print deferred or buffered jobs Pages Deferred displays on the OCP and a number other than zero disp...

Page 67: ...aintenance 4 3 Replacing the Air Filter 4 3 Maintaining the Printer Daily Maintenance Calibrating the Printer Calibrate the printer after every 8 to 10 hours of operation or when you change paper emulsions NOTE If the environmental temperature changes more than 5o Fahrenheit 3o Celsius since the printer was last calibrated a calibration will be necessary to maintain the image quality of the prints...

Page 68: ...the Equipment 4 2 September 2000 Removing the Punch Chad Remove and dispose of the punch chad from the punch chad tray in the paper supply area every time you add a new roll of paper to the printer punch chad tray ...

Page 69: ...The air filter under the shoe should be replaced approximately every 3 months 1 Open the front door of the printer 2 Pull back the spring fingers 3 Remove the air filter 4 Install a new air filter For parts ordering information see Supplies on page A 1 front door shoe air filter spring finger ...

Page 70: ......

Page 71: ...ipment For example OUT OF PAPER SUPPLY DOOR OPEN Some error conditions may be easily corrected and some may require the attention of a high level operator or even a service person Miscellaneous Error Messages indicates a problem with the printer has occurred that may or may not require you to call your service person More than one problem can occur at a time however only the message for the first ...

Page 72: ...e carriage CAUTION Do not use sharp objects on the shoe Rotate the flop preventer knob to move the flop preventer out of the way before moving the carriage with the translator knob takeup cassette cassette paper supply flop preventer knob metering roller shoe exit roller translator knob knife shoe shoe exit nip EOL End of Line carriage Start of Line SOL motor knob shoe exit rotor tension roller ro...

Page 73: ...already loaded Load Paper was selected when paper was already loaded Solution not required 7 supply door open please close The paper supply door was left open Close the paper supply door 8 front door open please close The front door was left open Close the front door 9 back door open please close The back door was left open Close the back door 10 takeup door open please close The takeup door was l...

Page 74: ... 30 unexpected knife neither limit Knife not detected at either end Call for service 31 operation failed due to door open The door was opened and closed and paper was fogged Reinitialize the printer 32 need to cinch paper in takeup The paper is not cinched correctly in the takeup cassette Cinch the paper in the takeup cassette Check that the takeup cassette is installed correctly 33 end of roll de...

Page 75: ...all doors are closed and reinitialize the printer 71 unexpected xlator back limit The translator back limit switch was detected unexpectedly Confirm that all doors are closed and reinitialize the printer 72 xlator back limit not detected The translator back limit switch was not detected after moving translator to the back of the printer Confirm that all doors are closed and reinitialize the printe...

Page 76: ...d to the cardboard core in the takeup cassette 87 timeout waiting to cinch takeup The printer door was not closed within the normal amount of time Open the takeup door attach the paper to the cardboard core in the takeup cassette and close the takeup door 89 unexpected deflector nip up not detected The deflector nip up switch was detected after moving the deflector to the down position Check for a...

Page 77: ... in the printer while attempting to load a new roll of paper Remove all paper from the printer and reload the new roll of paper 111 xlator home failed The translator could not find its home position after several attempts Call for service 112 invalid paper width sensor coverage The paper is not laying flat over the paper width sensors or the end of roll has been reached Open the supply door and mo...

Page 78: ...rinter and call for service 261 time out waiting to feed paper Paper did not feed in time during loading Paper was loaded incorrectly Reload the paper Reinitialize the printer and call for service 262 bad communications call service A communications error has occurred Reinitialize the printer and call for service 263 DMA timeout Data being sent to the printhead did not arrive in the specified amou...

Page 79: ...he paper supply door 2 Cut the paper with a scissors or knife 3 Open the takeup door 4 If the paper has not already been cut at the takeup cassette area cut the paper with a scissors in front of the takeup cassette 5 Move the right paper punch away from the paper cut here cut here ...

Page 80: ...objects when clearing paper jams Do not leave small pieces of paper in the printer 7 If necessary wind the paper into the takeup cassette 8 Reload the paper 9 Close the paper supply door CAUTION To avoid damage to the printer and the digital printer paper saver do not send a command that will cut the paper unless you have removed the digital printer paper saver or you are certain that it is on the...

Page 81: ... and causing noise in the printer The vacuum reduction insert was not installed properly and has become damaged A damaged vacuum reduction insert was installed Properly install an undamaged vacuum reduction insert The paper is being creased and crumpled when feeding into the printer The lead edge of the paper has not been squarely trimmed and is being pulled at an angle or unevenly or it is being ...

Page 82: ... at a 45o angle wait for a message to feed push the paper slowly into the printer s rollers keeping the paper taut between the cassette and the rollers NOTE Push the paper evenly so that the paper remains flat and does not buckle and do not push the paper too hard against the paper alignment guide The edge of the paper is damaged in the takeup area The paper was not straight when cinched The paper...

Page 83: ...alling the digital printer paper saver Before connecting or disconnecting the SCSI cable or terminator turn off the power for the printer and the host computer Also if you replace the SCSI cable remove the Ferrite bead from the existing SCSI cable and install it on the new SCSI cable The supply or takeup door will not close The latch on the door was pushed in flush with the door when the door was ...

Page 84: ... Code Status Message Possible Cause Subsystem Possible Solution 1 The following file is locked _filename_ The system is trying to access a file that is currently in use Close any other applications that may be accessing the file 2 The following file is protected _filename_ The system is trying to access a file that is protected Change the protections on the file to grant access to the user 3 The f...

Page 85: ... _devicename_ The device is not ready Wait several minutes and try the activity again 104 The following device is busy _devicename_ The device is busy Wait several minutes and try the activity again 105 The following device is not a TTY port _devicename_ The port name in the configuration file does not refer to a valid serial port Change the port name in the configuration file to a valid serial po...

Page 86: ...onnections between the printer and the host computer has malfunctioned Check that all of the cables are properly connected Check the cables and connections between the printer and the host computer for wear and if necessary replace them 116 A software warning has been issued by the following device _devicename_ Error Message _errmsg_ A software error has occurred on the printer Resolve printer err...

Page 87: ...re the grouper to its previous value If problem continues call for service 303 The call depends on a current grouper but the current grouper has not been set An internal error occurred with the software Restart the application If problem continues call for service 501 An error occurred while applying the data 601 A bad count was entered The expected count was _count_ A file was edited manually and...

Page 88: ...ement at row _row_ column _col_ value _val_ failed audit An input file had incorrectly formatted data in it at the location indicated Verify that you are using the correct file Edit the file and correct the format 910 Configuration file field _filename_is invalid Calibration will be cancelled The user manually edited a field in a configuration file and entered an incorrect value Manually enter the...

Page 89: ... a file but there is not enough disk space Remove any unnecessary files to increase free disk space 1006 Configuration file field _field_ is invalid The user manually edited a field in a configuration file and entered an incorrect value Manually enter the correct value Reinstall the application 1007 Unable to remove directory _directory_ User does not have update authority on the directory Verify ...

Page 90: ...nsitometer is incorrect Unable densities on densitometer Try adjusting frame counts or reread the density patches on the densitometer 1300 Values have not been loaded Matrix file missing Create a new device 1301 Data or Matrix files have not yet been loaded Matrix file missing Create a new device 1302 Data cannot be saved must first apply the matrix Matrix file missing Create a new device Error Co...

Page 91: ... calibration application If the problem continues make sure you have the Calibration Application and ASPI SCSI device driver installed correctly Device not found The host computer attempted to contact the printer at the specified SCSI ID but did not get a response Make sure that the printer is turned on and is on line Make sure the Calibration Application and ASPI SCSI device driver are installed ...

Page 92: ...l panel Help numbers for the Asia Pacific and European regions are listed on the next page Asia Pacific Region European Region Country Country Code Helpline Number Australia 61 1800 034487 Hong Kong 85 2 5649387 Indonesia 62 21 430 4527 Japan 81 0120 451 881 Korea 82 02 708 5471 4 Malaysia 60 3 757 2722 New Zealand 60 0800500135 Philippines 63 2 816 67 18 Singapore 65 4769 688 Taiwan 88 6 2 893 82...

Page 93: ... Kodak Sales Representative Supplies Purchase these items through your dealer or distributor Item Qty Size Catalog Number X RITE DTP 36 Densitometer 1 196 1119 US ROBOTICS SPORTSTER 28 8 Modem 1 873 3743 10 20 Inch Paper Cassette 1 159 2971 10 11 Inch Paper Cassette 1 164 0978 10 20 Inch Take up Cassette 1 861 2079 10 11 Inch Take up Cassette 1 871 1665 SCSI Interface Kit 1 Item Qty Size Catalog N...

Page 94: ... N 11 in x 262 ft KODAK PROFESSIONAL Digital Paper E F or N 11 in x 574 ft KODAK PROFESSIONAL Digital Paper E F or N 12 in x 262 ft KODAK PROFESSIONAL Digital Paper E F or N 20 in x 262 ft Item Surface Type Size KODAK PROFESSIONAL Digital Paper E F or N 25 4 cm x 80 m KODAK PROFESSIONAL Digital Paper E F or N 25 4 cm x 175 m KODAK PROFESSIONAL Digital Paper E F or N 27 9 cm x 80 m KODAK PROFESSION...

Page 95: ...tem Qty Vendor Catalog Number KODAK 1 Inch Splice Tape 2 Kodak 168 1311 10 Inch Digital Printer Paper Saver 10 Liberty Photo Products L 1210 11 Inch Digital Printer Paper Saver 10 Liberty Photo Products L 1211 20 Inch Digital Printer Paper Saver 10 Liberty Photo Products L 1220 Item Qty Size Part Number Catalog Number Operator s Guide for the KODAK PROFESSIONAL LED II Printer 20R 1 Part No 6B1625 ...

Page 96: ......

Page 97: ...e printer through a 71 2 cm 28 in doorway the following parts will be removed by a Kodak representative in addition to the above parts enclosures covers subassemblies for the paper supply module knife and sheet transport module Acoustic Specifications NOTE These specifications apply to the Kodak Professional LED II Printer 20R only Width Length Weight 102 cm 40 in 149 cm 58 5 in 499 kg 1100 lbs 51...

Page 98: ... service Floor Requirements The equipment should be installed on a smooth hard and level floor surface Carpet is not recommended The floor pitch should not exceed 1 inch in 5 feet minimum minimum minimum 91 meters 36 in 91 meters 36 in 91 meters 36 in minimum 91 meters 36 in 1 5 meters 60 in 15A 114 in 2 9 meters 3 7 meters 146 5 in Printer SCSI 2 connection from host here _ _ 2 2 meters 3 meters ...

Page 99: ...gory Type II machine and operates in a Pollution Degree 2 environment in accordance with IEC 664 Normal Office Environment For technical support service repair and fuse replacement information contact Eastman Kodak Company s Technical Assistance Center at 1 800 822 1414 Power Cords A 2 4 m 8 ft grounded power cord with a special three prong plug is provided with your printer The printer conforms t...

Page 100: ... current in its distribution network If the building is supplied with power by its own motor generator make certain that the governor that controls the frequency is capable of delivering power within the required operating frequency range Item Printer Standard amperage 15 amp wire size 14 gauge or larger phase 1 single receptacle NEMA5 N6 15 impedance between ground and neutral wires less than 2 o...

Page 101: ...r the same length of wire The diameter or gauge of the conductor Large diameter conductor exhibits less voltage loss than small diameter conductor The length of the circuit A long circuit layout may result in more voltage loss than a short direct circuit layout The load or current on the circuit amperes A large circuit load may result in voltage loss in a circuit The types and number of connection...

Page 102: ...mber 2000 Power Receptacles U S and Canada Plug 6 15P Receptacle 6 15R NEMA Reference PRINTER branch circuit panel Computer system IG OB IN OC OA 1 Isolated from power panel 15A Isolated from power panel GROUND BUS NEUTRAL BUS ...

Page 103: ...000 B 7 Printer Power Receptacles Europe L N 16A 16A L N 2 1 5 mm OR CEE 7 250 16A 250 16A CEE 7 Pin NEUTRAL BUS GROUND BUS Isolated from power panel Isolated from power panel OA OC IN OB IG Computer system branch circuit panel ...

Page 104: ...t computer to the printer Install a single ended SCSI cable if the distance between the host computer and the printer is less than 6 meters Use a differential ended SCSI cable if the distance between the host computer and the printer is greater than 6 meters but less than 30 meters IMPORTANT The printer is configured in single ended mode at the factory Before installing a differential ended SCSI c...

Page 105: ...he Calibration Software Installing the software includes installing both the Kodak Device Calibration Software which manages the calibration of multiple Kodak devices and the Calibration Software for the Kodak Professional LED II Printer 20P 20R System Requirements MACINTOSH Version Power MACINTOSH System 7 5 or above Minimum of 35 MB free disk space 608 K free disk space for each of as many as si...

Page 106: ...Version NOTE From this point on the installation is similar for Macintosh and Windows NT systems When the instructions say for example click Next or Install the first option is for Windows NT systems the second is for Macintosh systems CAUTION To avoid possible damage do not connect or disconnect the cable between your host computer and the printer when either device is powered up 1 Double click t...

Page 107: ...om the list included under Typical Custom allows you to choose specific features for the application you choose to install for the LED Printer you may choose to install either Gen I or Gen II For Macintosh systems select Easy Install 7 Click Next to install the software on your system A dialog box appears for you to designate where to install the calibration software 8 Either accept the default pa...

Page 108: ...application window for the KODAK Calibration Device Software Window Area Description Title Bar Contains the application name KODAK Device Calibration Menu Bar Contains selectable menu items Tool Bar Contains the user selectable menu choices and is activated by a shortcut keystroke or by a mouse pointer and left mouse button Client Area Contains the icons that represent devices available for calibr...

Page 109: ... dialog box adds a device to the control area Edit Cut MACINTOSH X WINDOWS NT Ctrl X When a calibration device is selected Removes the object from the control area All history data files including log data LUT files etc will be deleted for this device A confirmation dialog box appears to allow you to cancel the action File Edit MACINTOSH E WINDOWS NT Ctrl E Always If no object is selected the Edit...

Page 110: ... a Device To add a calibration device icon to the KODAK Device Calibration Software 1 Select New from the File menu on the KODAK Device Calibration window MACINTOSH Version WINDOWS NT Version 1 Open the folder that contains the files for the calibration application 2 Click on the icon for KODAK Device Calibration Select Programs Eastman Kodak KPRO Applications Kodak Universal Calibration Utility f...

Page 111: ... SCSI ID for the printer is 5 The printer s OCP menu displays the current SCSI ID for the printer Make sure the Device Type field matches the type of printer that is being calibrated for example Digital LED II 20P 3 Click OK to accept the changes A new printer device icon appears on the KODAK Device Calibration screen NOTE If an error message appears refer to Calibration Troubleshooting on page 5 ...

Page 112: ... refresh the screen with the default settings The log operations settings include 3 Click OK to save or Cancel to cancel the changes Device Setting Options Log Type None No logging of events or errors Events Log events only status messages that appear on the screen Errors Log errors only Log all actions Log all actions Keep log for days Enter the number of days you want to keep logged information ...

Page 113: ... the Edit icon The Update a Device dialog box appears 3 Enter the correct device settings The options for the device settings include 4 Click OK to save or Cancel to cancel the changes Device Setting Options Device name Enter the name that you want to give to the device NOTE The MACINTOSH platform limits the device name to 10 characters SCSI Host Adapter Adapter ID on host computer SCSI ID The SCS...

Page 114: ...om the KODAK Device Calibration Software screen 1 Select the device by clicking on the device icon 2 Click the Cut icon The following dialog box appears 3 Click Yes to delete the files and directories for the selected calibration device Click No to stop the deletion process Cut icon Device icon ...

Page 115: ...es you should understand image science technology and the implications of manipulating neutral density calibrations IMPORTANT Printer calibration should not be mistaken for color management Color management is provided by software applications that are independent of the printer and the calibration software Viewing Graphs The View Graphs feature provides access to the available graphs from the mos...

Page 116: ...Additional Calibration Information C 12 September 2000 Value Graph ...

Page 117: ...Additional Calibration Information September 2000 C 13 Difference Graph ...

Page 118: ...Additional Calibration Information C 14 September 2000 History Graph To view calibration graphs 1 From the KODAK Device Calibration screen double click the device for which you want to view graphs ...

Page 119: ...ars 2 Click the Graphs icon One of the graphs appears normally it is the Value graph 3 Select the Graph Type that you want to view When the graph appears select the type of data and planes that you want to see displayed NOTE The graph will be blank if the printer has not been calibrated Graphs icon ...

Page 120: ...You can create a valid printing LUT using an ASCII text editor This option sends the selected LUT to the printer overwriting any existing LUT To send a LUT to the Printer 1 From the KODAK Device Calibration screen double click the device for which you want to send a LUT The LED Calibration Application screen appears 2 Click the Send LUT icon Send LUT icon ...

Page 121: ... overwriting the current LUT Sending Targets The Send Target feature enables you to send any properly formatted target file to the printer without performing a calibration The target file must contain image data in the format for the Kodak Professional LED II Printer 20P 20R The format of this file must be raw RGB pixel interleaved To send a test target to the printer 1 From the KODAK Device Calib...

Page 122: ... September 2000 The LED Calibration Application screen appears 2 Click the Send Test Target icon The Send Target to Printer dialog box appears Both the Windows NT and Macintosh versions are shown here WINDOWS NT Version Send Test Target icon ...

Page 123: ...click Browse to select another file name The Open dialog box appears Select the file name you want then click Open MACINTOSH Version 3 Enter the desired settings and click OK to save the settings or Cancel to keep the previous settings The selected test target is sent to the printer ...

Page 124: ...set of six tabbed screens each with related configuration attributes There can be only one set of configuration attributes for the printer calibration application at a time If you make any changes to one or more of the tabbed screens and then click OK to save your changes the changes will overwrite the previous attributes used for the automated calibration To edit the calibration configuration 1 F...

Page 125: ...ration screen appears with the Procedure tab displayed 3 To navigate among the tabs click the tab you want and follow the instructions for updating the information for that tab Edit Configuration Screen for WINDOWS NT Systems Edit Configuration Screen for MACINTOSH Systems ...

Page 126: ...on the Procedure Tab The Procedure tab contains general configuration attributes as shown and described below The values displayed in the example are the default settings Procedure Attribute Description Graphing Instructs the application when to display the graphs of the data Tolerance Level Indicates whether the level of tolerance is Normal Loose or Strict Out of Tolerance Provides the flexibilit...

Page 127: ...u have completed all editing of configuration information including information on the other tabbed screens click OK to save the changes and close the Edit Configuration screen NOTE Click Cancelto cancelallchanges made to the Edit Configuration screen and close the Edit Configuration screen 3 To continue making changes to the Edit Configuration click on another tab and make changes as needed ...

Page 128: ...ancel to cancel all changes made to the Edit Configuration screen and close the Edit Configuration screen 3 To continue making changes to the Edit Configuration click on another tab and make changes as needed Density Source Attribute Description Density Source Indicates the source densitometer or file of the density data Density Source Port Indicates the name of the RS 232 port that the densitomet...

Page 129: ... Configuration screen NOTE Click Cancel to cancel all changes made to the Edit Configuration screen and close the Edit Configuration screen 3 To continue making changes to the Edit Configuration click on another tab and make changes as needed Attribute Description Desired Aim Indicates whether to use Density Aims or Lightness Aims for calibration Using Lightness Aims will improve both the highligh...

Page 130: ...screen and close the Edit Configuration screen 3 To continue making changes to the Edit Configuration click on another tab and make changes as needed Attribute Description Keep History For days Indicates the number of days that the calibration LUT print LUT density data and LUT history information LED trend data are to be kept Information older than the specified number of days will be deleted Log...

Page 131: ...de to the Edit Configuration screen and close the Edit Configuration screen 3 To continue making changes to the Edit Configuration click on another tab and make changes as needed Editing Information on the DP2 Windows NT or KPIS Macintosh Tab The DP2 or for Macintosh versions KPIS tab specifies whether to activate DP2 or KPIS interoperability and if so names the directory and filename designated f...

Page 132: ...3 If needed change the DP2 Filename 4 If you have completed all editing of configuration information including information on the other tabbed screens click OK to save the changes and close the Edit Configuration screen NOTE Click Cancel to cancel all changes made to the Edit Configuration screen and close the Edit Configuration screen 5 To make other changes to the Edit Configuration click on ano...

Page 133: ...he KPIS tab of the Edit Configuration screen the following tabbed screen appears The values displayed in the example are the default settings 1 Click the Activate KPIS checkbox click again to deactivate Attribute Description Activate KPIS Indicates if the calibration procedure should generate a LUT file to be used with the KPIS system KPIS Location Directory to contain generated LUT files for use ...

Page 134: ...en with the default settings for KPIS Location and KPIS Filename 2 To change the directory for the KPIS file a Click KPIS Location The display shows the Select KPIS Folder dialog box b If needed browse to find the folder you want c Click on Select directoryname the example above shows Select KodakLED ...

Page 135: ...Location of CalDisk CompositeMachine Tables KodakLED Completing the Edit Configuration When finished click OK to save the attributes Click Cancel to exit the screen without saving your changes Macintosh users you can click Default at any time to reset the attributes to their factory defaults and then click OK to save the defaults ...

Page 136: ...le using the density data file format specification see File Formats below The Kodak Calibration Software does not perform this function 3 Move the density data file that you just saved to the folder or path selected on the Density Source tab of the Edit Configuration screen see Editing Information on the Density Source Tab on page C 24 File Formats NOTE If a file contains data in a tabular format...

Page 137: ...faults Refer to the densitometer manual for this information Perform an initial calibration of the densitometer Refer to the densitometer manual 2 Run the calibration software for the printer and click the Edit icon to access the Edit Configuration screen see Editing the Calibration Configuration beginning on page C 20 3 Click the Density Source tab 4 Edit the attribute for the Density Source Sele...

Page 138: ......

Page 139: ... queue inserting new images into the queue applying a tone scale correction to images In addition IPS Software allows you to monitor a specified file system or folder while waiting for TIFF images Communication Channels Your computer can print to the 20P or 20R Printer through a SCSI connection only Installing the IPS Software You must be familiar with the WINDOWS System in order to perform the in...

Page 140: ...ion allows you to submit images by specifying a hot folder for example the Source Directory in the Source Directory Preferences dialog box or inserting through the enqueue function from the application menu bar Source Directory Insertion Images placed in the Source Directory are automatically placed into the print queue The images are then sorted by the date and time that they were placed in the S...

Page 141: ...ny reason an appropriate error message is appended to the log The log file is specified in the Source Directory Preferences dialog box Images in the Source Directory are moved to the FailedJobs Directory The FailedJobs Directory is created as a subdirectory within the Source Directory when the first failure occurs Images that fail and were not inserted through the Source Directory are not moved to...

Page 142: ...Using the Image Print Server Software D 4 September 2000 Enqueue Example 1 Select File Enqueue from the menu bar for the main application screen ...

Page 143: ...me into the Image File text box or click the Browse button 3 Click OK to close the Enqueue dialog box and to insert the specified file into the print queue NOTE You cannot enqueue a file that is being downloaded to the printer You must wait the file has completed downloading before you can access the file ...

Page 144: ...int Server Software D 6 September 2000 Dialog Boxes and Print Options This section describes the dialog boxes and print options for the KODAK Image Print Server Software KODAK PROFESSIONAL Image Print Server Main Window ...

Page 145: ...op entry from the print queue File Flush Allows you to delete all entries from the print queue Server Suspend Suspends the operation of the application If an image is being sent to the printer it will continue to download and is active only when the system is executing normally Server Resume Resumes the operation of the application and is active only when the system is suspended and can only be us...

Page 146: ...el replication capability on the printer 250 ppi prints the image pixel for pixel Print Production Immediate instructs the printer to print the image immediately Deferred allows the printer to buffer the image until an entire sheet of images can be printed Punches Order Punch places a punch between each order ID Punch places a punch 25 in inside each image area to mark a gutter for host image info...

Page 147: ...alid number of copies is 1 9999 Center Image centers the image on the paper Printer Resolution 125 ppi enables the hardware pixel replication capability on the printer 250 ppi prints the image pixel for pixel Print Production Immediate instructs the printer to print the image immediately Deferred allows the printer to buffer the image until an entire sheet of images can be printed Punches Order Pu...

Page 148: ...rver supports the TIFF tags listed below The range of legal values for TIFF tags 256 257 258 273 278 and 279 are image dependent If these values are incorrect an error will occur while reading the image data and an appropriate error message will be placed in the log file Values indicated in the table below by a are image dependent indicates an image dependent value LZW Compression The IPS does not...

Page 149: ...ith the MACINTOSH System Environment Hardware Requirements The following hardware is required for the Export Module 120 MHz PowerPC 601 Processor Minimum of 72 MB of RAM Hard disk space that is at least three times your image size A standard SCSI terminator if you are daisy chaining your external disk drive or other peripheral with the printer and you are not using a MACINTOSH IIfx Computer An APP...

Page 150: ...The Adobe Photoshop window appears It should look similar to the one shown below 2 Insert the Host Software CD included with your printer into the CD drive 3 Double click the CD icon on your desktop 4 Double click on the Macintosh folder 5 Double click the KODAK LED Printer Export Module folder The KODAK LED Printer icons appear ...

Page 151: ...ility folder or another location on your system Printing Images Do the following to print an image See page 6 for details 1 Start PHOTOSHOP and open an image file NOTE Make sure the image is in the RGB Color mode If the image is not in the RGB Color mode when you try printing the file you will receive an error message 2 Choose Export from the File menu NOTE You cannot access the Export submenu if ...

Page 152: ...g the PHOTOSHOP Export Module E 4 September 2000 To select another printer 1 Click Select The Select a KODAK LED Printer dialog box appears 2 Select the printer by clicking the appropriate button 3 Click OK ...

Page 153: ... meet the needs of your print job from the KODAK LED Printer dialog box See Dialog Boxes and Print Options on page E 6 for more information 5 Click Print A PHOTOSHOP progress dialog box appears To cancel printing press the command key and type a period If the cancel command is ignored select Cancel Printing in the PHOTOSHOP progress dialog box ...

Page 154: ...x Defer Print instructs the printer to defer printing the image until the printer queue is full Reprint allows you to print the last page sent to the printer The last page sent remains in the buffer until the printer is shut off the computer is restarted or the next page is sent If a page is not stored on the selected printer the printer ignores the request NOTE The page that prints is the last on...

Page 155: ...or saving changes Help opens a Help dialog box so you can find information about the Export Module within the software program Punch Attributes Option Descriptions The Punch Attributes group box provides the following options to punch the paper on 20R Printer only ID places a page identification punch on the page that you are about to send End Order Inserts an end of order punch on the paper web a...

Page 156: ...ecifies the number of pixels of white border that should surround the image on the page This box is only active when the center box above is checked Scale 200 allows you to scale the image 200 Select an LED Printer Dialog Box The Select a KODAK LED Printer dialog box is shown below and it is accessed by clicking Select in the KODAK LED Printer main dialog box This dialog box displays the KODAK LED...

Page 157: ...that has changed Cancel closes the Select a KODAK LED Printer dialog box without changing the current printer selection OK closes the Select a KODAK LED Printer dialog box Printer Status Dialog Box Selecting the Status button to open the status dialog box in the KODAK LED Printer main dialog box The Printer Status dialog box appears The information that appears corresponds to the printer currently...

Page 158: ...equently encountered messages If you do not find an error message in the list refer to your MACINTOSH or PHOTOSHOP Documentation A good approach for troubleshooting errors is to 1 Check all connections 2 Make sure the printer is in raster mode 3 Make sure that the display shows the READY prompt If the problem persists restart the printer and the computer If you still have trouble try reinstalling ...

Page 159: ...return to close the error dialog box and return to the print dialog box The number of border pixels exceed the maximum printer page size reduce the number of pixels This message occurs when the borders control causes the page limits in the printer to be exceeded Click OK to close the error dialog box and return to PHOTOSHOP Other Problems On Line Pages Deferred appears But Jobs Are Not Printing If...

Page 160: ......

Page 161: ...talling 3 14 takeup removing 3 20 takeup unloading exposed paper 3 21 chad removing 4 2 Index channel independent matrix attribute in configuration file C 25 cinching media 3 17 clearing paper jams 5 9 copyright detection 3 36 C 25 cut punch 3 27 3 28 D daily maintenance 4 1 date setting 3 33 day setting 3 34 defaults resetting 3 31 deferred jobs printing 3 4 deleting a calibration device C 10 den...

Page 162: ...lize default parameters dialog box D 10 LZW compression D 10 menu bar insertion D 2 print queue D 2 server default dialog box D 9 source directory insertion D 2 suspending and resuming D 3 using D 2 K keep history attribute description C 26 keep log attribute description C 26 Kodak Device Calibration Software C 4 to C 32 see also device calibration software KPIS file name attribute in configuratio...

Page 163: ...g down 2 8 starting up 2 1 printing deferred or buffered jobs 3 4 images Export Module E 3 printing aims attribute in configuration file C 25 prints borderless 3 30 prints making 2 8 Process in Control dialog box 2 3 processor in control attribute in configuration file C 22 product description 1 1 punch attributes Export Module E 7 punchers hole 3 22 punches setting 3 27 R removing chad 4 2 replac...

Page 164: ... time setting 3 33 tolerance level attribute in configuration file C 22 troubleshooting calibration 5 14 Export Module E 10 getting additional help 5 22 troubleshooting calibration 5 14 to 5 21 U units of measurement for paper sizes 3 35 unloading paper 3 19 3 23 updating a calibration device C 9 using the image print server IPS D 2 V value graph C 12 version number accessing 3 34 viewing graphs C...

Page 165: ......

Page 166: ...ochester New York 14653 U S A KODAK CANADA INC Toronto Ontario M6M 1V3 Canada Kodak Portra Supra Gold Ektacolor Prime and Kodak Professional are trademarks of Eastman Kodak Company Eastman Kodak Company 2000 Printed in U S A ...

Reviews: