background image

D-6

A-61408     September 1995

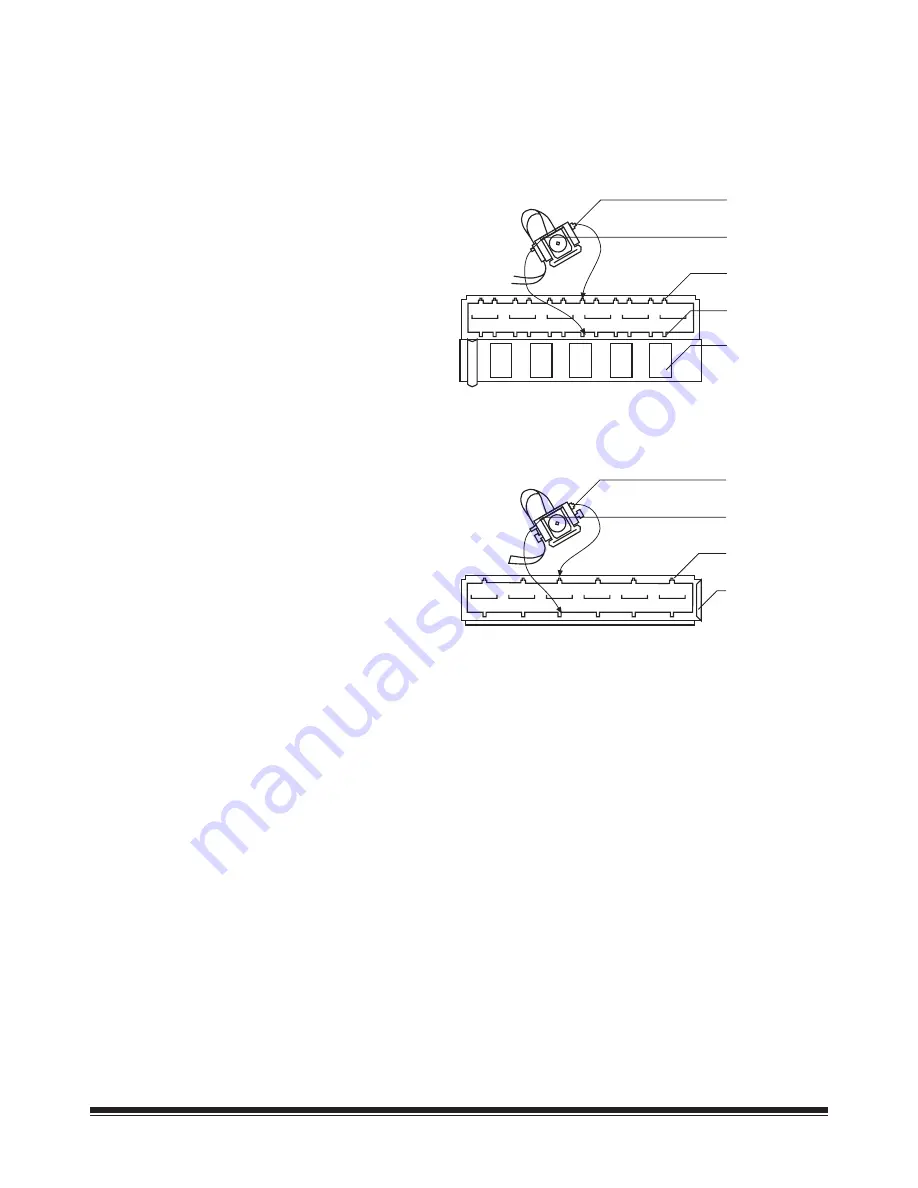
The following illustrations show the Front and Rear Document
Printer Mounting Plates, into which the Document Printer 500
carriages are inserted

Front Document Printer Mounting Plate

Toward
Rear of
Scanner

Toward
Front of
Scanner

Notched Tab

Tab

Notched Gap

Gap

Mounting Holes
for Patch
Reader 500
Accessory

(View from rear of scanner)

Rear Document Printer Mounting Plate

Toward
Rear of
Scanner

Toward
Front of
Scanner

Notched Tab

Tab

Notched Gap

Spring Clip Lips

Gap

(View from rear of scanner)

Summary of Contents for Imagelink 500

Page 1: ...KODAK IMAGELINK TM Scanner 500 BUSINESS IMAGING SYSTEMS User s Manual A 61408 Part Number 693625 September 1995 ...

Page 2: ... the following accessories Patch Reader 500 Bar Code Reader 500 Controller 500 Document Printer 500 Footswitch Conforms with the following standards and bears a CE mark EN 55022 Klasse B 1987 EN 50082 1 1992 and EN 60950 1993 following the provisions of the applicable directives 89 336 EEC and amendments 73 23 EEC and amendments ...

Page 3: ...g Process 3 1 Function Codes 3 2 Using Function Codes 3 2 Function Code Summary 3 3 Function Code Listing 3 4 Setting Image Levels 3 10 Setting Application Modes 3 10 Preparing Documents 3 11 Document Sizes 3 11 Document Orientation 3 11 Scanning Documents 3 12 Automatic Feed Method 3 12 Manual Feed Method 3 13 4 Error Messages User Actions 4 1 System Administrator Actions 4 2 Controlled Power dow...

Page 4: ...ng Patches B 2 Changing the Horizontal Read Position B 3 Cleaning the Patch Reader B 4 Function Codes B 4 Performing the Patch Test Function Future Function B 5 Appendix C Kodak Imagelink Bar Code Reader 500 Use of Bar Code Information C 1 Bar Code Types C 1 Printing Bar Codes on Documents C 2 Function Codes C 3 Performing a Bar Code Test C 3 Bar Code Test Option 1 Evaluate C 5 Fields Displayed C ...

Page 5: ...n its financial subsidiaries in addition to the degree of profit retained by them Accounting Principles The accompanying financial statements include accounts of the Company and all of its sub sidiaries excepts its three finance sudsidiaries The finance subsid iaries are accounted for by the equity method and their profit is included in the consolidated results of operations as a sepa rate item Th...

Page 6: ...th the scanner components Upper Access Door Anti Static Brush Exit Hopper Side Guides Exit Hopper End Stops Lower Access Door Door Handle Feed Roller Separator Roller Self Centering Tray Door Handle Door Release Button Status Display Control Panel Side Access Door Door Handle Feed Roller Cover Release Lever Gap Release Lever Gap Adjustment Knob Feed Tray Side Guides Kodak Imagelink Scanner 500 Fro...

Page 7: ...A 61408 September 1995 1 3 Kodak Imagelink Scanner 500 Side Views ...

Page 8: ...ack View NOTE For European units only WARNING Between the Scanner 500 and the host computer the other SCSI device standard accessory SCSI cables with ferrite cores TDK HF70RH26X29X13 must be used for radio frequency interference suppression Between the Scanner 500 and the host computer the other RS 232C device standard accessory RS 232C cable with ferrite core TDK HF70RH12X15X7 3 must be used for ...

Page 9: ...Stop Enter Image Buffer Status Front Rear Contrast Two line Status Display Status Display The Status Display indicates the Image Address current Applica tion Modes and Error messages Use the following illustration and descriptions to become familiar with the Status Display output E n a b l e d M O D E Ø 1 A B C Ø Ø 2 9 1 Ø 2 5 Ø Field C Scanner Status Enabled Disabled Mode Number or Name Fixed Fie...

Page 10: ...s off for simplex and duplex defined applications modes Rear Same as Front for duplex defined applications modes only Contrast Thumb Wheel Used to adjust the display contrast between the characters and the background in the display Numeric Keys 0 9 Used with the Enter key to enter numeric data such as an Image Address or Function Code Decimal Key Used to insert a field separator in an Image Addres...

Page 11: ...s erased Cal Used to start the calibration function End Used at the end of a batch or job to stop the feeder and transport system and to alert the host computer that the batch or job has ended When pressed the documents in the transport system will be scanned and stacked face down in the exit hopper before the transport is disabled Jog Used to momentarily turn on jog the transport system Level 3 U...

Page 12: ...ort system stops Confirmation Tone Alarm located under the Control Panel The confirmation tone alarm sounds when one of the following conditions occur Run key is pressed one long tone Stop or End key is pressed many short tones followed by one long tone Feeder clutch engages disengages one short tone Incorrect key input three short tones Document skew is greater than allowed skew parameter or when...

Page 13: ...Press Run 8 Feed the documents into the scanner 9 Press Stop or End depending on whether the batch or job has been completed NOTE After pressing Stop Run can be pressed again and more documents can be fed into the scanner After pressing End you must enable the scanner from the host com puter before scanning again Power up Process The following steps are required to power up the scanner 1 Turn the ...

Page 14: ...r Wider than the documents you are going to scan To scan 8 5 x 11 inch 216 x 279 mm documents the calibration paper should be wider than 8 5 inches 216 mm To scan 11 x 17 inch 280 x 432 mm documents the calibration paper should be wider than 11 inches 279 mm but no wider than 12 inches 305 mm Between 12 inch 305 mm and 25 5 inch 648 mm long NOTE For your convenience 12 x 12 calibration targets are...

Page 15: ...rget is 12 3 Make sure no paper is in the document path Refer to the section entitled Clearing the Document Path 4 Clean the imaging guides Refer to the section entitled Cleaning the Imaging Guides 5 Calibrate the scanner again If this calibration fails change the lamps Refer to the section entitled Changing the Lamps Be sure to calibrate the scanner after changing lamps If calibration still fails...

Page 16: ...uments photographic paper plastic coated paper If the gap is not adjusted properly More than one document at a time might be drawn into the transport not all of the documents will be scanned Documents may be drawn into the transport too quickly docu ments may overlap or be spaced too closely causing an error display Documents may become skewed during transport jamming may occur To adjust the feed ...

Page 17: ...esult 9 Firmly hold the trailing edges of the documents and reinsert the leading edges into the gap 10 If the bottom document is not separating from the top docu ment remove the documents from the feeder and repeat steps 7 and 8 until the bottom document separates from the top document 11 When you have adjusted the gap so that the bottom docu ment separates from the top document consistently rotat...

Page 18: ...and separator roller to allow documents to be fed into the transport The Gap Release Lever is located on the front panel of the scanner to the right of the Gap Adjustment Knob 1 Press down and hold the Gap Release Lever This opens the gap between the feed and separator rollers and allows thick documents to pass between them 2 Manually feed the thick documents while holding down the Gap Release Lev...

Page 19: ... be scanning Leave approximately 1 16 inch 2 mm clearance on each side of the largest docu ment to allow for proper feeding NOTE Ensure that documents are center fed so that each document covers the 2 1 2 inch required width as indicated by the label on the feed tray A3 A5 11 X 17 A4 2 5 8 5 X 11 2 For manual feeding the Feed Shelf can be in the 0 30 or 40 position For automatic feeding raise the ...

Page 20: ... the Exit Hopper End Stop to hold the longest document you will be scanning NOTE An End Stop Extension is included to accommodate documents up to 17 inches in length To attach the End Stop Extension fold the spring loaded Exit Hopper End Stops down and slide the extension s tabs into the slits just above the Exit Hopper End Stops To remove the extension slightly press the spring loaded Exit Hopper...

Page 21: ... so the scanned docu ments naturally fall between the Exit Hopper Side Guides and the Exit Hopper End Stop The Exit Hopper has three height positions standard 10 from standard and 20 from stan dard NOTE The 20 position is specifically for A4 size onion skin documents ...

Page 22: ...this information is transferred to the host computer NOTE When a duplex defined application mode is used each document has a front and rear image each having independent image headers These image headers are stored in the front and rear image buffers respectively The host computer initiates a transfer of the image header and electronic image information to a magnetic or optical disk media for fast...

Page 23: ...on Codes To use the available functions 1 Press the F key 2 Press the numeric key s which correspond to the desired Function Code 3 Press Enter 4 If the Function Code is used to enable disable an option turn an option On Off Press the numeric key 1 to turn the option On enable or press the numeric key 0 to turn the option Off disable Press Enter or If the Function Code requires numeric input Press...

Page 24: ...play Language F19 Measurement System F20 Set Time F21 Set Date F22 Controls Length Monitor F70 Omit Length Monitor on Next Document F71 Skew Monitor F72 Host Latch Flag F73 Momentary Flag F74 Patch Reader Accessory Patch Reader F50 Confirmation Tone F53 Omit Patch Read on Next Document F54 Patch Test F55 Bar Code Reader Accessory Bar Code Reader F60 Confirmation Tone F63 Omit Bar Code Read on Next...

Page 25: ... selections The status of the first accessory function is indicated in the Status Display press Enter to display one at a time the status of the next and subsequent accessories and functions On Via Fnc Code and Off Via Fnc Code indicate the optional accessory software function or confirmation tone has been enabled or disabled with the appropriate function code Not Machine Set indicates the optiona...

Page 26: ...el 2 Counter Allows you to display the total number of documents that have entered the feeder as Level 2 documents The counter is auto matically incremented whenever Level 2 is requested and scanned By entering 0 or any valid number the Level 2 Counter can be reset or preset The counter also resets to 0 when 999 999 999 is reached or when the Reset Level Counters function Function Code 14 is perfo...

Page 27: ... for millimeters F21 Set Time Allows you to set the time on the Status Display The format is HH MM HH equals the hour using the 24 hour clock MM equals the minutes valid entries are from 00 to 59 NOTE The HH MM format is the default setting However one of various display formats can be selected at installation or upon request F22 Set Date Allows you to set the date on the Status Display The format...

Page 28: ...ment Printer Vertical Start Print Position Allows you to specify how far printed information will appear vertically from the leading edge of the documents Use the nu meric keys to input values between 0 125 and 20 inches 3 to 508 mm in increments of 0 125 inches 3 mm NOTE The value will correspond to the selected measurement system The value should not exceed the document length The horizontal sta...

Page 29: ...o enable disable the Bar Code Reader Enter 1 to enable or 0 to disable F63 Bar Code Reader Confirmation Tone On Off Allows you to enable disable the confirmation tone that informs you if the Bar Code Reader has successfully read a bar code document Enter 1 to enable or 0 to disable F64 Omit Bar Code Reading on Next Document On Off Allows you to inhibit bar code reading on the next document scanned...

Page 30: ...ion When enabled the Latch Flag function activates the Latch Flag bit in the image header of documents entering the feeder to indicate the scanned documents are of special interest Enter 1 to enable or 0 to disable F74 Momentary Flag On Off Allows you to enable disable the Momentary Flag function When enabled the Momentary Flag function activates the Momentary Flag bit in the image header of docum...

Page 31: ...d selected when a specific combination of functions scanning conditions and values are required These conditions and values include Display Language Measure ment Format Index Format Image Address Rules Level Rules Accessory Status enabled disabled etc This data is saved in the scanner until changed by a Kodak representative All eighteen application modes contain default values for general applicat...

Page 32: ...anying financial statements include accounts of the Company and all of its sub sidiaries excepts its three finance sudsidiaries The finance subsid iaries are accounted for by the equity method and their profit is included in the consolidated results of operations as a sepa rate item The consolidated finan cialposition describes the cost of the Company s investments in its financial subsidiaries in...

Page 33: ...the farthest 5 Make sure the power switch is on then press Run 6 Place the stack of documents into the feeder so the leading edge of the first document meets the feed roller Each docu ment will be drawn into the feeder scanned and deposited face down in the exit hopper in the same order it entered the feeder NOTE Ensure the documents are center fed so each document covers the 2 5 inch required wid...

Page 34: ...ned or press End to alert the host computer the batch or job has ended and to disable the transport system after the last document has been scanned NOTE If the Stop or End key is pressed while scanning a stack of documents the feeder will disable but documents in the transport system will be scanned and deposited face down in the exit tray before the transport system is disabled Manual Feed Method...

Page 35: ...ministrator If the error message persists the system administrator will call service personnel Error Numbers 200 through 299 Operator Recoverable Errors When you see a Operator Recoverable Error perform the action specified by the error message and error code listing If you cannot solve the problem call the system administrator If the error message persists the system administrator will call servi...

Page 36: ... key to perform the calibration process Furthermore the system administrator is required to contact a service representative when the initial error recovery has been performed but the error message persists the initial error recovery has no effect on the error message an indicated accessory must be replaced Controlled Power down Sequence Before performing the controlled power down sequence deter m...

Page 37: ...t that was skewed and press C to clear the message Check self centering feed tray E112 Invalid Patch Level Tried to feed a patch document that is invalid for the current application mode The patch document is ignored and the previous image level and image address remain unchanged After pressing C feed correct patch E113 Incorrect Image Address Tried to use an invalid image address for the current ...

Page 38: ...terval Too Narrow The document interval has become too narrow If not corrected may lead to false document jams or incorrect scanning and image addressing Adjust the gap adjustment knob to widen the document interval See Adjusting the Feed Roller and Separator Roller section in this manual Press C to clear the message E132 Printer Not Machine Enabled Tried to use a Document Printer function code F4...

Page 39: ...d again If this cycle continues contact your system administrator E151 Buffer Data Transfer To Host Tried to use the bar code test via function code F65 This function cannot be performed because scanned images still remain in the image buffer After pressing C enter F65 again If all images have not been read by the host the error message will be displayed again If this cycle continues contact your ...

Page 40: ...ting in this manual E223 Jam Vert Trans Exit Area A document jam has been detected in the vertical transport or exit area Clear the jam by following the procedures outlined in Section 6 Troubleshooting in this manual E224 Jam Or Dble Feed Check Trans A document jam or double feed has been detected Clear the jam by following the procedures outlined in Section 6 Troubleshooting in this manual E225 J...

Page 41: ... front lamp failure was detected while the front lamp was illuminated Press Cal to initiate the calibration process If error persists verify the front optical path is free of obstructions clean the imaging guides and replace both the front and rear duplex scanners only lamps E251 Rear Illu mination Failure A rear lamp failure was detected while the rear lamp was illuminated Press Cal to initiate t...

Page 42: ...tion failure was detected in the Front Scan Module After pressing C press Cal to start the calibration process again If error persists verify the front optical path is free of obstructions clean the imaging guides and replace both the front and rear duplex scanners only lamps E295 Rr Cal Fail CalibraitonReqrd A calibration failure was detected in the Rear Scan Module After pressing C press Cal to ...

Page 43: ... To keep your scanner in good operating condition periodically Clean the image guides Clean the feed and separator rollers Vacuum the inside of the scanner Clean the exterior of the access doors and covers Change the lamps Cleaning Materials You will need the following materials to perform all maintenance A mild cleaning agent A soft lint free cloth A cleaning brush with natural bristles A vacuum ...

Page 44: ...OT use abrasive cleaners industrial solvents or coarse cloth to clean the guides These materi als can damage the optical surfaces and cause poor image quality 1 Open the Upper Access Door 2 Lift open the Lower Access Door CAUTION For safety reasons the movement of the Lower Access Door is intentionally slowed with a two way rotary damper Open and close the door slowly 3 Lift the release bar to rai...

Page 45: ... in order to lift up the Horizontal Transport Plate 5 Open the Side Access Door 6 Release and open the Vertical Transport Plate by rotating the release handle 180 clockwise Front Imaging Guide bottom sits inside the Transport Plate Front Imaging Guide Thumb Screw Transport Plate Holding Magnets Rear Imaging Guide Thumb Tab Rear Imaging Guide top sits about 0 5 inch 10 mm from the Vertical Transpor...

Page 46: ... back into the scanner by seating it on the scanner s mount ing pins Swing the guide toward the rear of the scanner to fix it to the two magnets NOTE Look through the Upper Access Door and Side Access Door to make sure the Imaging Guide is mounted cor rectly There are two sets of pins make sure the guide is seated on the small lower set of pins When the Rear Imaging Guide is seated correctly the t...

Page 47: ...ged when the Vertical Transport Plate is closed Front Imaging Guide Saddle Mount Transport Plate 13 Swing the Vertical Transport Plate closed and rotate the release handle 180 counterclockwise so the red arrow aligns with the red rectangle to latch the plate Red Arrow Red Rectangle 14 Close the Side Access Door 15 Release and lower the Horizontal Transport Plate back into its original position 16 ...

Page 48: ... rollers and may prevent documents from separat ing Clean these rollers weekly or as required i e when docu ment overlapping double feeding occurs or when the last docu ment is not fed 1 Lift open the Lower Access Door CAUTION For safety reasons the movement of the Lower Access Door is intentionally slowed with a two way rotary damper Open and close the door slowly 2 Lift the release bar to raise ...

Page 49: ...d while rotating the feed roller cover to expose the rollers Do not attempt to remove the assembly it is permanently attached to the frame 4 Rotate the feed roller downward and clean with a water moistened cloth Continue cleaning until all residue is re moved from the roller ribs ...

Page 50: ...r a mild cleaning agent Vacuuming Inside the Scanner Vacuum the inside of the scanner weekly or as required to remove any dust or debris Vacuuming the Horizontal Transport Area 1 Turn the power off 2 Lift open the Lower Access Door CAUTION For safety reasons the movement of the Lower Access Door is intentionally slowed with a two way rotary damper Open and close the door slowly 3 Lift the release ...

Page 51: ...nsport Plate 5 Vacuum the Lower Belt Module and Transport Belts WARNING Do not make contact with any electrical compo nents when vacuuming inside the scanner WARNUNG Beim Staubsaugen innerhalb des Abtastgerätes keine elektrischen Einzelteile berühren 6 Release and lower the Horizontal Transport Plate back into its original position 7 Lower the release bar and latch the Front Scan Module into its o...

Page 52: ...the Upper Access Door 4 Release and open the Vertical Transport Plate by rotating the release handle 180 clockwise 5 Use a natural bristle cleaning brush to remove debris from inside the transport system 6 Swing the Vertical Transport Plate closed and rotate the release handle 180 counterclockwise Red Arrow Red Rectangle ...

Page 53: ...Door area WARNING Do not make contact with any electrical compo nents when vacuuming inside the scanner WARNUNG Beim Staubsaugen innerhalb des Abtastgerätes keine elektrischen Einzelteile berühren 8 Close the Upper Access Door 9 Close the Side Access Door ...

Page 54: ...ty Change the lamps every 600 hours when required for error recovery or when image quality is poor WARNING Make sure the lamps are cool before attempting to remove them from the lamp socket holder WARNUNG Sicherstellen dab die Lampen kalt sind bevor versucht wird sie aus der Lampenfassung zu entfernen Changing the Lamps 1 Turn the Power Switch off Den Netzschalter ausschalten 2 Open the Side Acces...

Page 55: ... möglicherweise noch sehr heiß Die Lampe oder den Halter der Lampenfassung nicht entfernen bevor sich die Lampe nicht abgekühlt hat NOTE If the Lamp Socket Holder pulls off from the lamp when removing the lamp and socket from the scanner remove the lamp by grasping the lamp at the end once it has cooled Hinweis Wenn sich der Halter der Lampenfassung beim Entfernen von Lampe und Fassung von der Lam...

Page 56: ... Halter der Lampenfassung gerade entlang seiner Achse einzuschieben 8 Connect the rear lamp cable connector to the scanner electrical system Den hinteren Lampenkabelanschluß an das elektrische System des Abtastgerätes anschließen 9 Repeat steps 3 through 8 referring to the Front Lamp noting that in step 3 the Front Lamp Cable must be released from the Front Lamp Cable Clip and in the step 6 the cl...

Page 57: ...d Adjust the exit hopper end stop to appropriate document length Clear Streak on Scanned Documents There is a foreign object in the optical path Check and clean the imaging guides and the transport area Uneven Image Quality There is dirt dust or fingerprints on the imaging guides Clean the imaging guides The scanner needs to be calibrated Calibrate the scanner There are various causes An error mes...

Page 58: ...ly closed The Document Path can be cleared easily because No tools are needed Three access doors let you quickly locate and clear documents NOTE It is only necessary to remove the jammed and damaged document s obstructing the transport system non jammed and non damaged documents located in the transport system at the time of the jam can be removed via the Jog key after the jam is cleared Document ...

Page 59: ...signate operator accessible areas for maintenance and clearing the document path Clearing a Jam in Area A Complete the following steps to clear the document path in Area A This area is comprised of the Feeder area 1 Turn off the Power Switch 2 Lift up the Lower Access Door CAUTION For safety reasons the movement of the Lower Access Door is intentionally slowed with a two way rotary damper Open and...

Page 60: ...Lower and latch the Front Scan Module by lowering the release bar 8 Close the Lower Access Door Clearing a Jam in Area B Complete the following steps to clear the document path in Area B This area is comprised of the Horizontal Transport Plate the Lower Belt Module and the Lower Turn Roller areas 1 Turn the power off 2 Lift up the Lower Access Door CAUTION For safety reasons the movement of the Lo...

Page 61: ...A 61408 September 1995 6 5 3 Raise the underlying Front Scan Module by lifting the release bar ...

Page 62: ...tch Reader Accessory is installed the Patch Reader must be removed from the mounting plate in order to lift up the Upper Horizontal Transport Plate 5 Remove all jammed documents 6 Release and lower the Transport Plate back to its original position 7 Lower and latch the Front Scan Module 8 Close the Lower Access Door ...

Page 63: ...r the document path in Area C This area is comprised of the Vertical Transport Plate and the Imaging Guide areas 1 Turn the power off 2 Open the Side Access Door 3 Release and swing open the Vertical Transport Plate by rotating the Release Handle 180 clockwise 4 Remove all jammed documents ...

Page 64: ...ed documents can lodge in the transport system 6 Close the Side Access Door Clearing a Jam in Area D Complete the following steps to clear the document path in Area D This area is comprised of the Document Exit and Upper Turn Roller areas 1 Turn the power off 2 Lift up and open the Upper Access Door 3 Remove all jammed and damaged documents CAUTION Be careful not to damage the antistatic brush whe...

Page 65: ...els indicate operator accessible areas 2 Make sure the Horizontal Transport Plate the Vertical Trans port Plate and the three access doors are securely closed 3 Turn the power on 4 Press and hold the Jog key to clear any remaining documents in the transport system Repeat this step until all documents are placed in the exit hopper 5 Reset the image level image address and application mode if necess...

Page 66: ...cument Level 2 Assigns Level 2 to the next document Level 3 Assigns Level 3 to the next document Increment Assigns the next higher level to the next document for pressed action only Function Codes The following function code is available if the Footswitch 500 Accessory has been installed and the current application mode allows use of the Footswitch 500 Accessory F75 Footswitch Confirmation Tone On...

Page 67: ...ation modes allow use of the Footswitch 500 Accessory and what Image Level changes are performed by pressing and or releasing the footswitch Application Mode Number Document Image Level change performed when the footswitch is Pressed Released 1 2 3 4 5 6 7 8 9 10 11 12 13 14 15 16 17 18 ...

Page 68: ...ntrol Panel or to change document Image Levels using the footswitch Available Patches The patch reader is capable of reading and interpreting three different patch codes 3 Patch Assigns to a Level 3 to the patch document 2 Patch Assigns to a Level 2 to the patch document T Patch Transfer Patch Assigns a level 3 2 or 1 depending on the Transfer Patch Definition to the next document At installation ...

Page 69: ...an 0 20 inches 5 mm from the leading edge of the document The bottom of the patch must be no more than 1 6 inches 40 mm from the leading edge of the document There must be at least 0 20 inches 5 mm of clear space surrounding the patch on all sides Printing Patches Patches can be printed on a document or placed on a document using preprinted patch labels A patch can be placed directly on customer d...

Page 70: ...te by magnets To change the position of the Patch Reader lift the reader off the mounting plate and place it in one of the other four available positions Perform the patch test function to make sure the patches printed on the documents are aligned with the new reader position NOTE The Patch Reader must be removed from the mounting plate when raising the Horizontal Transport plate during vacuuming ...

Page 71: ...50 Patch Reader On Off F53 Patch Reader Confirmation Tone On Off F54 Omit Patch Reading on Next Document On Off Used to disable patch reading for the next document only This will disable the Patch Reader if it has been previously enabled F55 Patch Test future function Refer to Performing a Patch Test Follow these steps to use On Off functions 1 Press the F key 2 Press the numeric key s which corre...

Page 72: ...ging Image Address changes level counting etc will occur during this test To perform a patch test 1 Press the F Key 2 Press the numeric key 5 twice 3 Press Enter A message will appear in the Status Display which indicates that the patch test is being performed Patch Test or Feed Patch 4 Feed a document to verify the operation and position of the patch reader 5 A message will appear in the Status D...

Page 73: ... 39 Code 3 of 9 provides a large number of available characters 43 Available characters include alphanumeric space and the following six special charac ters The asterisk is used as both the start and stop character A character is represented by a group of nine elements Three of these elements are wide Interleaved 2 of 5 ITF Interleaved 2 of 5 or I 2 of 5 provides high code density by using the bar...

Page 74: ...the document The bar code must be at least 0 25 inches 6 3 mm from the trailing edge of the document There must be at least 0 25 inches 6 3 mm of blank space preceding the start character and following the stop character The bar code can not exceed 11 inches 275 mm in length The bar code height must be at least 0 38 inches 9 5 mm or 25 of the bar code length whichever is greater More detailed spec...

Page 75: ...sed to initiate a bar code test No other accessories patch reader document printers etc will be enabled during the test In addition no document processing Image Address changes or level counting etc will occur during the test Option 1 Evaluate This is a performance monitoring tool which provides a measure of the overall quality of the bar codes being used by evaluating specific bar code characteri...

Page 76: ...nt measurements calibration is always needed before Function 65 is initiated 2 Perform test Option 3 Read Rate using Kodak Bar Code Standard Test Documents This test will determine whether or not the reduction in readability is caused by a deficiency in the equipment If the resulting read rate is significantly lower than the benchmark given contact service If the resulting read rate is equal to or...

Page 77: ...r Evaluate Press the numeric key 2 for Display Press the numeric key 3 for Read Rate Press the Enter key NOTE Press the Stop or End key without pressing a nu meric key to return to the normal operation display Bar Code Test Option 1 Evaluate This option evaluates the quality and readability of a bar code The following message will appear in the Status Display P u t B C D o c C l o s e D o o r P r ...

Page 78: ...he underlying Front Scan Mod ule 4 Lift up and latch the Horizontal Transport Plate into its open position NOTE If the Patch Reader Accessory is installed the Patch Reader must be removed from the mounting plate in order to lift up the Horizontal Transport Plate ...

Page 79: ... Guide Thumb Screw Transport Plate Holding Magnets Rear Imaging Guide Thumb Tab Rear Imaging Guide top sits about 0 5 inch 10 mm from the Vertical Transport Plate 7 If the Bar Code Reader is set to read data through the Front Scan Module remove the Front Imaging Guide if the Bar Code Reader is set to read data through the Rear Scan Module remove the Rear Imaging Guide NOTE Refer to Section 5 Scann...

Page 80: ...ext 9 Use transparent adhesive tape to adhere the bar code to the appropriate Imaging Guide in the proper direction If the Bar Code Reader is set to read data through the Front Scan Module adhere the bar code to the Front Imaging Guide and ensure that the bar code is facing the Front Scan Module if the Bar Code Reader is set to read data through the Rear Scan Module adhere the bar code to the Rear...

Page 81: ... Front Imaging Guide Saddle Mount Transport Plate 11 Swing the Vertical Transport Plate closed and rotate the release handle 180 counterclockwise so that the red arrow aligns with the red rectangle to latch the plate Red Arrow Red Rectangle 12 Close the Side Access Door 13 Release and lower the Horizontal Transport Plate back into its original position 14 Lower the release bar and latch the Front ...

Page 82: ...ed in the Status Display or The bar code is not positioned properly or faces in the wrong direction on the imaging guide or The bar code quality is poor The following action s should be taken Verify the type of bar code placed on the imaging guide Verify the position of the bar code placed on the imaging guide Clean the Imaging Guides if required NOTE Press the Stop or End key to return to the Fun...

Page 83: ... item displayed is an overall grade which is based upon all six field values The fields which appeared in the three pages are of two types dimensional fields and reflectance fields Each of the reflectance field values are converted to a letter grade where A is the highest and F is the lowest The lowest letter grade assigned to any one of the reflectance fields is the overall grade assigned to the ...

Page 84: ...Door 22 Lift open the Lower Access Door CAUTION For safety reasons the movement of the Lower Access Door is intentionally slowed with a two way rotary damper Open and close the door slowly 23 Lift the release bar to raise the underlying Front Scan Module ...

Page 85: ... Do not leave the Side Access Door open more than 5 minutes 26 Release and open the Vertical Transport Plate by rotating the release handle 180 clockwise 27 Remove the appropriate Imaging Guide NOTE Refer to Section 5 Scanner Maintenance Cleaning Imaging Guides for details on how to remove the Imaging Guides 28 Remove the bar code from the Imaging Guide NOTE Ensure that all of the transparent adhe...

Page 86: ...ing the Vertical Transport Plate closed and rotate the release handle 180 counterclockwise so that the red arrow aligns with the red rectangle to latch the plate Red Arrow Red Rectangle 31 Close the Side A 32 Release and lower the Horizontal Transport Plate back into its original position 33 Lower the release bar and latch the Front Scan Module into its original position 34 Close the Lower Access ...

Page 87: ...ces the smallest of the two ratios is displayed NEW Minimum Narrow Element Width A measure of the smallest narrow element width Reflectance Contrast Symbol contrast A comparison of the darkest element and the lightest element of the bar code MOD Modulation A measure of the consistency of the overall bar code print clarity all elements specifically the sharpness of the bar edge contrast DEF Defect ...

Page 88: ...t clarity field values are converted to letter grades Grade Grade Grade Grade Grade Field A Pass B C D F Fail W N 3 1 2 1 2 1 1 1 3 1 2 2 1 n a n a n a 2 2 1 1 1 NEW 0 0800 0 0100 n a n a n a 0 0099 0 0000 Contrast 100 70 69 55 54 40 39 20 19 0 MOD 100 70 69 60 59 50 49 40 39 0 DEF 0 15 16 20 21 25 26 30 31 100 RMIN 0 49 n a n a n a 50 100 If NEW 0 020 If NEW 0 020 ...

Page 89: ...e too light Causes Use of old ink ribbon Print hammer pressure too light Defective dirty print head Space elements are too dark Causes Dark colored paper background Stain on paper MOD Reflectance Bar code element edges are ragged rather than straight Often caused by use of a dot matrix printer DEFECT Reflectance Bar elements contain voids white spots Causes Use of old ink ribbon Print hammer press...

Page 90: ... bar code quality is poor The following action s should be taken Verify the type of bar code fed into the scanner Verify the direction of the bar code fed into the scanner Verify that the bar code fed into the scanner is the right way up Clean the Imaging Guides if required NOTE Press the Stop key to stop the transport Then press the Stop key again or the End key to return to the Function 65 menu ...

Page 91: ...s the Stop key one more time to return to normal operation Bar Code Test Option 3 Read Rate This option provides the read rate percentage of bar codes properly read 1 Feed 100 test documents into the transport system Until the number of the fed documents is equal to 100 the following message will appear on the Status Display where XXX is the present number of documents fed B C T Y P E C O D E 3 9 ...

Page 92: ...lowed when printing bar codes on documents or printing bar code labels The specifica tions apply to all bar code types except where noted A Code Length The maximum bar code length is 11 inches 275 mm There is no fixed minimum bar code length The minimum length allowed is a function of the type of bar code used and the minimum number of characters allowed The minimum number of characters per bar co...

Page 93: ...re is no intercharacter gap in Interleaved 2 of 5 bar codes B A C D C E 3 of 9 F Top Edge The minimum distance from the top edge of the page to the top edge of the bar code is 0 25 inches 6 35 mm G Quiet Zone A blank area of a minimum of 0 25 inches 6 35 mm is recommended before the start character and after the stop character of each bar code For Interleaved 2 of 5 a quiet zone of 0 25 inches 6 3...

Page 94: ...stance from the bottom edge of the page to the bottom edge of the bar code is 0 25 inches 6 35 mm 12 of 5 Codabar H 12 of 5 K Bottom Edge G Quite Zone I Multiple Codes on Different Lines I Multiple Codes Not on Different Lines 12 of 5 F Top Edge G Quite Zone ...

Page 95: ...eek Date Time Total Document Count Messages 1 9 NOTE Any combination of the above items can be printed provided that the total line length does not exceed 38 characters The information printed is defined at installa tion or by request Appearance of Printed Information The Document Printer 500 Accessory is capable of printing one line per document The information printed by the Document Printer 500...

Page 96: ...Each character orientation is shown below Comic COMIC Comic 180 COMIC 180 Cine 180 C I N E 1 8 0 Cine C I N E Vertical Start Print Position The vertical start print position is defined at installation and determines how far the printed information will appear from the leading edge of the document Leading Edge fed into the transport first Vertical Start Print Position Trailing Edge D P 1 T E S T NO...

Page 97: ...nting Plate The horizontal print position of the Rear Document Printer is manually set in one of six positions on the Rear Document Printer Mounting Plate NOTE The twelve front print positions are indicated with F1 F12 and the six rear print positions are indicated with R1 R6 on the label on the Feed Tray A3 A4 F1 R1 F2 F3 R2 F4 F5 R3 F6 F7 R4 F8 F9 R5 F10 F11 R6 F12 To change the horizontal print...

Page 98: ...er Flat Cable does not interfere with the optical path between the Front Imaging Guide and the Front Scan Module When repositioning the Rear Docu ment Printer ensure that the Cable Magnet is secure to the rear wall inside the scanner so that the Printer Flat Cable does not interfere with the optical path between the Rear Imaging Guide and the Rear Scan Module Cable Magnet not shown Press Spring Cl...

Page 99: ...nter 500 carriage and a Rear Document Printer 500 carriage Cable Magnet not shown Flat Cable Notched Tab Holding Bar Ink Cartridge Tab Bladder inside ink cartridge Jets and Face not shown Mounting Magnets not shown Spring Clips Front Document Printer Carriage Rear Document Printer Carriage ...

Page 100: ...are inserted Front Document Printer Mounting Plate Toward Rear of Scanner Toward Front of Scanner Notched Tab Tab Notched Gap Gap Mounting Holes for Patch Reader 500 Accessory View from rear of scanner Rear Document Printer Mounting Plate Toward Rear of Scanner Toward Front of Scanner Notched Tab Tab Notched Gap Spring Clip Lips Gap View from rear of scanner ...

Page 101: ...functions 1 Press the F Key 2 Press the numeric key s that correspond to the desired function code 3 Press Enter NOTE If the associated accessory is not installed an error message will be displayed 4 Press the numeric key 1 to turn the function ON or press the numeric key 0 to turn the function OFF 5 Press Enter Press C to cancel the function Performing the Print Test Function Function Code F45 ca...

Page 102: ... not careful during the priming procedure Front Document Printer 1 Turn the power Off 2 Open the Lower Access Door CAUTION For safety reasons the movement of the Lower Access Door is intentionally slowed with a two way rotary damper Open and close the door slowly 3 Release the Front Scan Module Release Bar 4 Lift up the underlying Front Scan Module 5 Note the current position of the Front Document...

Page 103: ...k cartridge and carriage 8 Slide the ink cartridge out of the carriage 9 Examine the ink cartridge for a deflated bladder If the bladder appears deflated out of ink discard the cartridge obtain a new cartridge and proceed with step 15 10 Check for any accumulation of ink on the jets or face of the ink cartridge Wipe any ink from the jets and face with a clean dampened lint free cloth Jets Ink Cart...

Page 104: ...ry lint free cloth to wipe the face and jets of the ink cartridge 14 Slide the ink cartridge back into the carriage 15 Lower the holding bar back down to its original position 16 If necessary wipe the carriage clean with a dry lint free cloth 17 Wipe the Front Document Printer Mounting Plate clean of any ink deposits 18 Place the Front Document Printer Carriage into the Front Document Printer Moun...

Page 105: ... remove the Rear Document Printer Carriage from the Rear Document Printer Mounting Plate Press Spring Clips Cable Magnet not shown 5 Raise the holding bar up from the ink cartridge and carriage 6 Slide the ink cartridge out of the carriage 7 Examine the ink cartridge for a deflated bladder If the bladder appears deflated out of ink discard the cartridge obtain a new cartridge and proceed with step...

Page 106: ...inside ink cartridge 10 Remove the paper clip and observe the ink flow back into the bladder through the jets 11 Use a dry lint free cloth to wipe the face and jets of the ink cartridge 12 Slide the ink cartridge back into the carriage 13 Lower the holding bar back down to its original position 14 If necessary wipe the carriage clean with a dry lint free cloth 15 Wipe the Rear Document Printer Mou...

Page 107: ... character quality The cleaning and priming procedure has not improved the overall print quality To replace the Front Document Printer ink cartridge 1 Turn the power Off 2 Open the Lower Access Door CAUTION For safety reasons the movement of the Lower Access Door is intentionally slowed with a two way rotary damper Open and close the door slowly 3 Release the Front Scan Module Release Bar 4 Lift u...

Page 108: ...to the carriage 11 Lower the holding bar back down to its original position 12 If necessary wipe the carriage clean with a dry lint free cloth 13 Wipe the Front Document Printer Mounting Plate clean of any ink deposits 14 Place the Front Document Printer Carriage into the Front Document Printer Mounting Plate 15 Lower the Front Scan Module 16 Latch the Front Scan Module by lowering the Front Scan ...

Page 109: ... up from the ink cartridge and carriage 6 Slide the ink cartridge out of the carriage 7 Discard the cartridge and obtain a new cartridge 8 Slide the ink cartridge back into the carriage 9 Lower the holding bar back down to its original position 10 If necessary wipe the carriage clean with a dry lint free cloth 11 Wipe the Rear Document Printer Mounting Plate clean of any ink deposits 12 Press the ...

Page 110: ... are processed This file contains information about the document scanned such as the Image Address Image Level size of the document etc Image Levels An Image Level is assigned to each document image indicating its relative position in the group of documents scanned For example if you were to scan a book Level 3 might be assigned to the book cover Level 2 might be assigned to each chapter cover and...

Page 111: ...ustomer The value is incriminated increased by a value of 1 for each document side scanned This value differs from the Image Address as it is not affected by Image Level changes etc Skew Skew is an indication that a document is not transported straight through the transport system i e the document may have been fed at an angle ...

Page 112: ... M95F001KB Eastman Kodak Company 1995 Printed in U S A Be the world s best in imaging Business Imaging Systems EASTMAN KODAK COMPANY Rochester New York 14650 Kodak Imagelink Imagecapture and Reliant are trademarks ...

Reviews: