background image

INSTRUCTIONS FOR PLATFORM OPERATION

21

Quick Start

Before using this device, please get familiar with the operations below for better experience.

Language input setting (IME)
Language :

 Select the system language, select 

Settings > IME > Language Setting

, & press “

OK

” key.

press “        ” key to select the desired language, & then press “

OK

” key.

Selecting Input Method : In the smart mode, select 

Settings > IME > Update Input Method

, &

integarted “

Android Keyboard

” & “

Google play in Input Method

”, you can also download & install third party

input method.

Setting System Time :

 In the smart mode, select 

Settings > Date & Time > Set Date & Time

Automatically from the internet, press “

OK

” key & the system update the clock from the network

automatically, if the TV set isn’t connected to the network, you can set the system time manually.

Screenshot

 :

 Before screen shooting, please insert the USB mass storage device into the USB interface,

& press “

” key. After screen shooting, the picture are saved in the “

SNAPSHOT

;\Pictures\Screenshots

folder in the USB mass storage device.

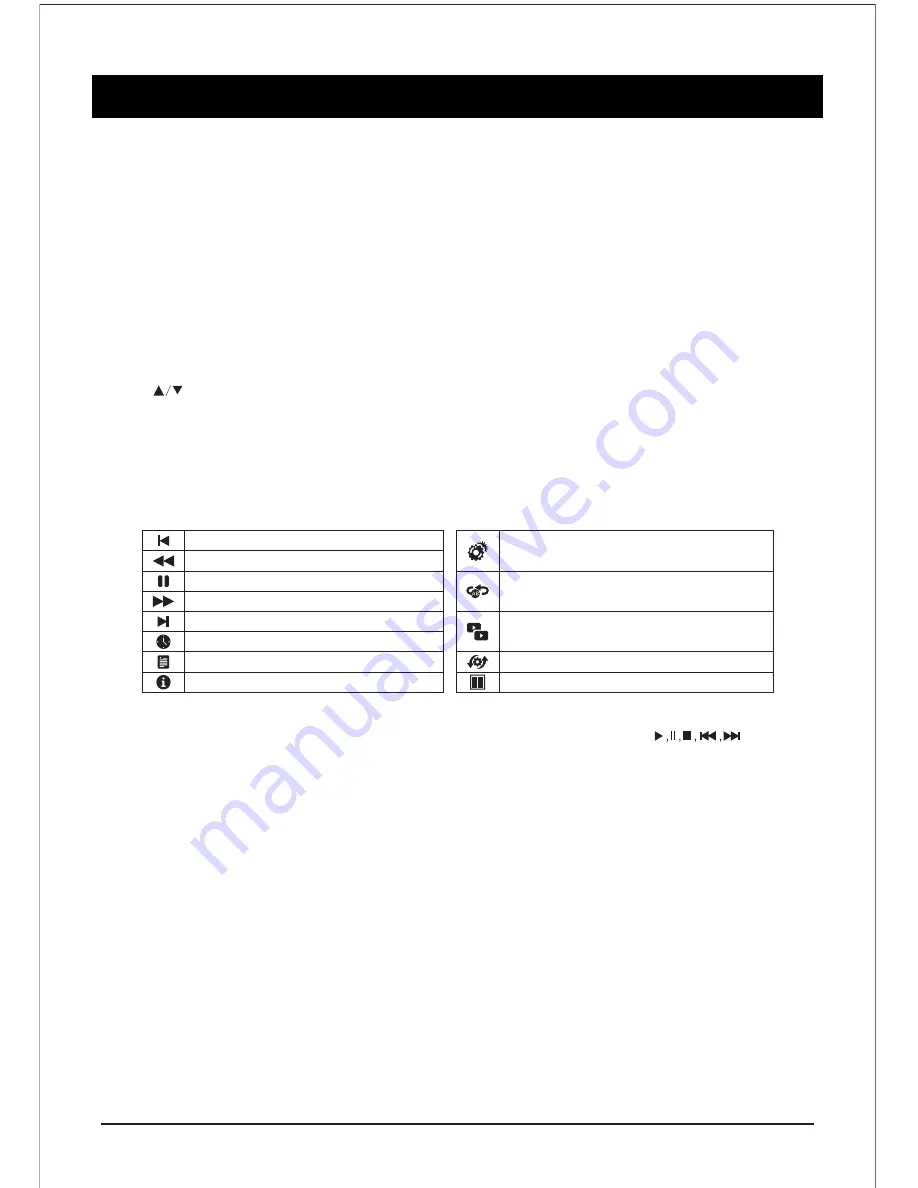
Play the previous video.

Select the speed of fast rewind

Pause / Play the video

Select the speed of fast forward

Play the next video

Select the starting time point of watching

View the playing list

Show details of the video

Playing setup, show/hide subtitle &

adjust the audio progress in this option.

Set A-B repeat playing, set point A & point

B, & the video will repeat between A & B.

A dual-screen display, start or off dual

display function.

Select playing screen.

Select dual display window display mode.

While playing press “OK” key to show the menu options as in the picture above, select an icon & press
“OK” key to perform the operation, you can press “Return” key to exit playing, or “                         ” keys
on the remote control to perform shortcut operation.

Summary of Contents for 24HDX100S

Page 1: ...ODAK HD LED TV User Manual 24HDX100S 32HDX900S 32HDX1000S 32HDX1100S 40FHDX900S 50FHDX900S Please read this manual carefully before installing and operating the TV Keep this manual with you for reference ...

Page 2: ......

Page 3: ...t Safety Precautions 3 Prepration Stand Installation 4 Functional Overview Fornt Side Panel 5 Rear Panel 6 Connections 7 Remote Control 8 Basic Operation 11 Menu Operation 12 Media Play 19 PC Setting 20 Instructions for Platform Operation 21 Specification 24 Troubleshooting 25 CONTENTS ...

Page 4: ...any container which contain fluid including water on or near the TV Do not insert any objects in the ventilation slots Service Do not remove the back cover of the set as this can expose you to very high voltage and other hazards If the set does not operate properly unplug it and call KODAK HD LED TV customer care Antenna Connect the antenna cable to the socket marked ANT IN on the back cover For be...

Page 5: ...ed service personal If the LED TV requries any changes or coarse adjustment electric shocks are imminent Do not attempt to open contact customer support for needed overhual The exclamation point within an equilateral triangle is intended to alert the user to the presence of important operating maintenance servicing instruction in the literature accompanying the appliance The lightning flash with a...

Page 6: ...ratus Unplugthisapparatusduringlightningstormsorwhenunusedforlongperiodoftime Toreducetheriskoffireorelectricshock donotexposethisapparatustorainormoisture The apparatus should be disconnected from the mains by placing the power standby switch in the standby position and unplugging the power cord of the appataus from the AC mainoutlet Thesocketoutletshouldbeinstalled near theequipment shouldbeeasi...

Page 7: ...ed screws to fix the TV stand securely in place Screws Provided with TV unit WARNING The TV stand may not be securely fixed in place after repeated tightening and loosening of screws During assembling and disassembling the TV stand please use your hand to support it Failing to do so may cause the TV stand to fall and result in personal injury damage to the product After installing the TV stand ple...

Page 8: ...als from the remote control 3 Power Press to turn TV on or turn to standby mode 4 Menu Press to display the setup menu on the TV screen 5 CH CH Press to select desired channels or press to select or adjust a menu item 6 Vol Vol Press to select TV or all video input modes TV AV HDMI VGA USB 7 Input Press to select source of viewing ...

Page 9: ... Connect to equipment with HDMI output VGA PC IN Input Terminal Connect to PC PC HDMI Analog Audio Input Terminal Connect to equipment using HDMI DVI connection or PC with audio output AV 1 AV 2 In YPBPR Connect the video output jack of DVD or VCR Antenna Input Terminal Connect to equipment with antenna output or wall antenna socket This image is for reference only to explain uses of various conne...

Page 10: ...ent with VGA Connector If the external equipment has DVI output you can connect it to the HDMI terminal using a HDMI DVI cable In case of using the HDMI DVI cable connect analog audio signal to RGB HDMI analog audio input terminal Please refer to the user manual of the external equipment for more information on connection to the TV Please disconnect all power supplies to the equipment TV before co...

Page 11: ...ote POWER FREEZE INFO S MODE P MODE FAV FAV Setting FAV Capture Turns TV into STANDBY ON OFF Select to freeze the scene still on the screen Displays present source information with details of input signal connected Recalls changes presetted sound settings Recalls changes presetted picture settings Press to add or remove your favorite channels under TV menu Press to switch your favorite channels un...

Page 12: ... you were watching Press this key to save channels when manual tuning or to delete channel when editing TVprogram in program edit function To set sleep timer except when in program Edit Menu or USB mode To delete item selected in USB mode Press this key to display sub title list Press this key to rename channels in program edit function Press this key to switch On Off internal speaker used in TV s...

Page 13: ...Do not leave your TV in standby mode for long periods of time When you are away on holiday for example It is the best to unplug the set from the mains and aerial Changing Programmes Using the programme selection buttons on the remote control to change programmes To select a programme press the corresponding programme selection button remote control For example to select programme 8 press the 8 pro...

Page 14: ...lect input SOURCE Press to select the desired input source then press enter to enter The selected input source image displays INPUT Source TV AV 1 PC HDMI 1 HDMI 2 HDMI 3 USB Volume Adjustment To change the volume Press V to increase the sound volume Press V to decrease the sound volume To Mute the sound Press to temporarily turn off the sound Press or V to restore the sound to previous level You ...

Page 15: ...Weak Middle Strong SOUND 2016 7 1 09 02 40 Setting off Time Off On Date Current Time Off Time Standard Music Movie News User Brass Treble Balance AVC Surround SPDIF Output Screen Off 0 100 0 100 0 100 Off On Off On PCM RAQ OFF Press Ok Only Sound No Picture To exit press any key TIME Setting Boot Time OFF ON On Time Hour 9 0 23 Minute 05 0 59 Off Time must be more than 1 minutes after the current ...

Page 16: ...ess button key the subtopic turns up with full screen Note CHANNEL can be only selected under ATV condition others can t be used Auto Scan Enter Auto it shows the process of frequency the number of channels Press to select country Tune Type at first press to select start or cancel then press OK button to start or exit Auto Scan TV Manual Tuning Storage To Current storage space shows the following ...

Page 17: ... RIGHT Press to switch left right can select by circle GREEN Press to exit RENAME mode return normal condition Yellow Button Channel switching function ATV available as default At normal condition enter SWAP mode current selected channel is mobile channel X At SWAP mode MENU Press to exit SWAP mode turn to normal condition EXIT Press to exit menu UP DOWN Choose switch channels YELLOW If current se...

Page 18: ...lor Temperature Adjust the color temperature level of image The following option are available Normal Warm User Cool RED GREEN BLUE Press buttons to adjust numeric size Press MENU button to turn back picture main menu Aspect Ratio Press buttons to select 16 9 Zoom 1 Zoom 2 Panorama 4 3 Noise Reduction Press buttons to select On Off Color Temperature You can select your favorite color temperature P...

Page 19: ...tem to enter Press buttons on the remote control to increase or decrease the value of desired item Press the MENU button on the remote control to return to upper menu Auto Adjust Press buttons TV system adjust by itself it can adjust H position V position Phase so on that can make the image in center display best H Position Adjust Horizontal Position of the PC Screen V Position Adjust the Vertical...

Page 20: ...in 180 min 120 min 90 min 60 min 30 min 10 min Auto Sleep Within 10 min there is no signal the TV will auto sleep Clock Press the MENU button on the remote control to enter the OSD menu Then press buttons to select the TIME Press button to select CLOCK then press ENTER button to enter Press buttons to select the desired item Press the MENU button on the remote control to return upper menu Press th...

Page 21: ... OSD language OSD Duration Press the MENU button on the remote control to enter the OSD menu then press buttons to select the OPTION Press button to select the desired item to enter Press button on the remote on the remote control to return to upper menu OSD Lanugage Press buttons to select the OSD language OSD Duration Press buttons to select your desired item Off 5S 10S 15S 30S 45S 60S Blue Scre...

Page 22: ...y paste etc Note Select the picture press PLAY button to play after exiting music play mode When playing a movie you can press the ENTER button then the function menu will appear on the screen You can select you desired item The supported file format of media playing File Type PHOTO MUSIC MOVIE TEXT Supported File Format BMP JPEG PNG WMA Mp3 Mp4 AAC MPEG1 MPEG2 MPEG4 RM RMVB TXT File Name jpeg bmp...

Page 23: ... tab on the display dialog box The correct size setting resolution Optimum 1366 x 768 If a vertical frequency option exists on your display settings dialog box the correct value is 60 or 70 Hz Otherwise just click Enter exit the dialog box Display Mode If the signal from the system equals the standard signal mode the screen is adjusted automatically if the signal from the system does not equal the...

Page 24: ...ime manually Screenshot Before screen shooting please insert the USB mass storage device into the USB interface press key After screen shooting the picture are saved in the SNAPSHOT Pictures Screenshots folder in the USB mass storage device Play the previous video Select the speed of fast rewind Pause Play the video Select the speed of fast forward Play the next video Select the starting time poin...

Page 25: ... Before replacing USB device please turn off power supply The system supports standard USB 1 1 USB 2 0 USB 3 0 devices such as USB mass storage devices remo able hard drives The maximum output current of the USB port of this device is 500 mA self protection will be enabled if it is beyond this limit Please use external power supply if an external device of higher current will be conn ected The sys...

Page 26: ...ut notice If at any time in the future you should need to dispose of this product please note that Waste electrical products should not be disposed of with household waste Please recycle where facilities exist Check with your Local Authority or retailer for recycling advice Waste Electrical Electronic Equipment Screen Size Resolution Audio Output Power Consumption Connectivity TV System AV System ...

Page 27: ...improper The display mode in inaccurate The remote control receiving window of the machine is blocked by some object The battery of the remote control is low Check if the antenna plug is loose or the cable is in good condition Check the antenna type VHF UHF Adjust the direction position of the antenna Try to use signal enhancer Check if the power line is connected Press the button on the panel Do ...

Page 28: ...o change the best resolution of Windows system Set refresh rate BLANK SCREEN IN PC MODE If the antenna is located in a fringe area of a television signal where the signal is weak the picture may be marred by dots When the signal is extremely weak it may be necessary to install a special antenna to improve the reception Adjust the position orientation of the indoor outdoor antenna Check the connect...

Page 29: ......

Page 30: ...in c SPPL 2018 Super Plastronics Private Limited B 29 30 31 Sector 81 Phase 2 Noida 201305 Toll Free 1800 3000 2288 customercare kodaktv in The Kodak trademark logo and trade dress are used under license from Kodak ...

Reviews: