


•
Please change the master Pin code after installation.
① - System PIN Number Setup Menu
② - Common PIN Number Setup Menu
③ - Lobby Door Open On-Time Setup Menu
④ - Guardroom Routed Call/Interphone Setup Menu
⑤ - RF-Card Registration Menu
⑥ - RF-Card Deletion by Household Menu
⑦ - All RF-Card Deletion Menu
⑧ - Lobby Phone ID Setup Menu
⑨ - Use of DVR Link Setup Menu
⑩ - System Link Version Setup Menu
⑪ - English/Korean Comment Setup Menu
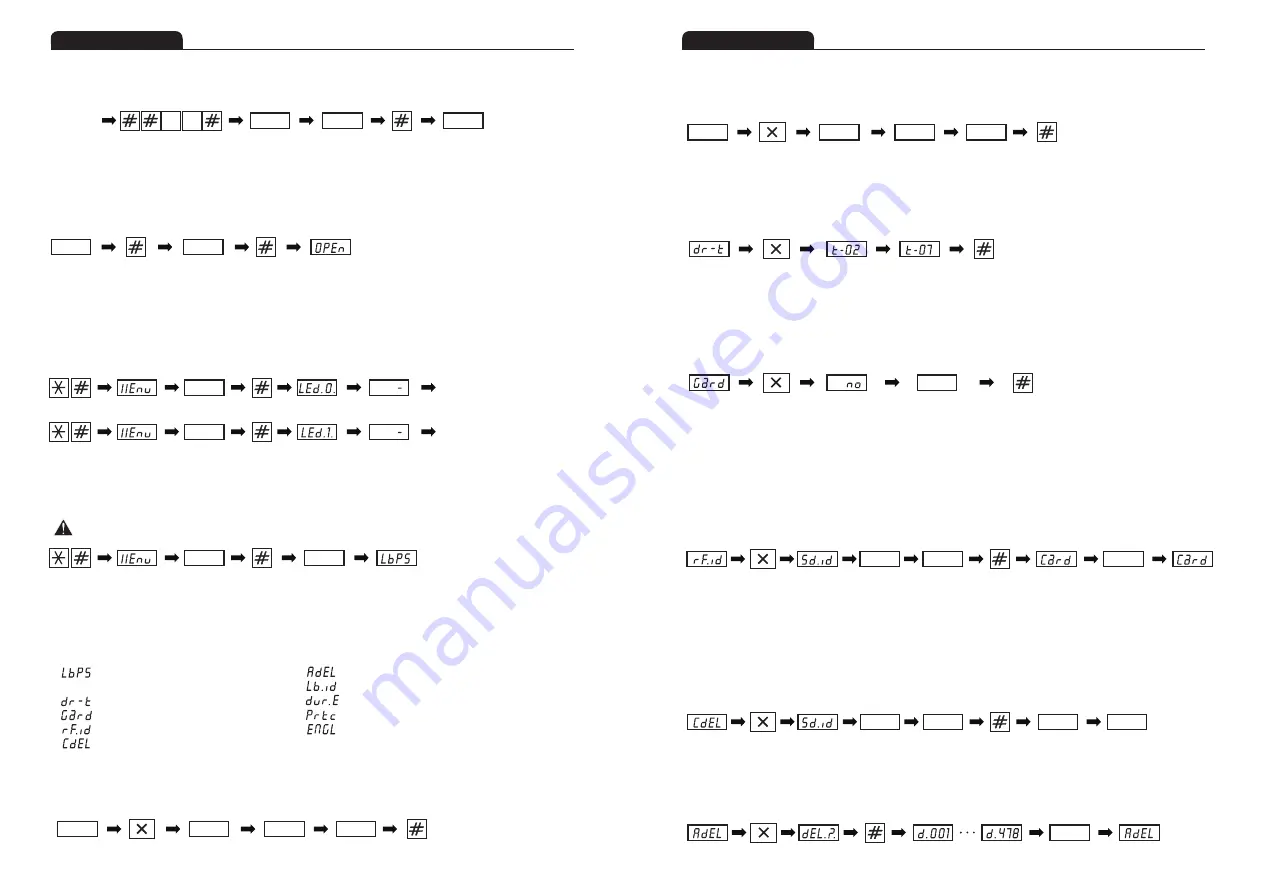
▷Entering Menu Setup
▷Function to open lobby door using household PIN number
▷LED Operation Mode Functions
•
Pressing [*] and [#] at the same time in waiting status will blink [MEnu] for 2 seconds at FND, and display [- - - -] for PIN number input.
•
It enters to PIN number setup menu after pressing system PIN number followed by [#]. (Default pin code : 9999)
▷System PIN Number Setup
•
FND displays [- - - -]after blinking currently registered system PIN number twice when pressing [Cancel]button from System PIN Number Setup menu.
•
Now, pressing new 4 digit PIN number and pressing [#] button. It will blink entered PIN number twice and setup is completed,
and it will display next setup menu of “Common PIN Number Setup”.
▷Common PIN Number Setup
•
Pressing [Cancel]button from Common PIN Number Setup menu will blink currently registered common PIN number twice and FND displays [- - - -].
•
Now, input new 4 digit PIN number and press [#] button. It will blink new PIN number twice and setup is completed, and it will display next setup
menu of “Lobby Door Open On-Time Setup”.
hhhh
0100
[Enter Menu]
[Menu] blinks for
2 seconds
Enter PIN
number
Completion
button
[Program Version]
blinks for 2 seconds
[System PIN
Number Set]
▷Menu display and switching between menu
•
Menu is switched to next menu every time pressing [Guard] button.
•
Frequently used menus of 1~10 can be directly accessed by pressing 1,2,3,4,5,6,7,8,9,0 numeric key.(Pressing 0 will move to Menu 10.)
•
Menu 11, “English/Korean Menu” can be accessed by pressing [Guard] button.
9EPS
LBPS
8282
Enter new
PIN number
1234
Current PIN
number blinking
[System PIN
Number Setup]
Change
completion
[Enter Menu]
9EPS
8282
Enter new
PIN number
1234
Current PIN
number blink
Setup menu
display
Change
completion
[Enter Menu]
- - - -
Waiting
for input
- - - -
Waiting for
input
hhhh
[Enter Menu]
[Menu] blinks
for 2 seconds
4,5,6,8,0 Input
Completion
button
[LED Operation
Mode 0]
[System Waiting
Status]
[Menu] blinks
for 2 seconds
Completion
button
[LED Operation
Mode 1]
[System Waiting
Status]
hhhh
[Enter Menu]
1,2,3,8,0 Input
hhhh
Household PIN
number input
0101
Household
number input
Door opened
Completion
button
[- - - -] appears at FND when pressing [#] button after pressing household number. Pressing 4 digit PIN of corresponding household and [#] will
open lobby door that is connected with lobby phone. [OPEn] is displayed at FND with tone sound.
•
Lobby door is opened only for set time.
•
One PIN number is allowed for each household.
•
Pressing [*] and [#] at the same time in waiting status will blink [Menu] for 2 seconds at FND, and display [- - - -] for PIN number input.
LED Operation Mode 0 Setup : FND displays [Led.0.] when pressing 4,5,6,8,0 and [#] in sequence from [- - - -] state, and it sets LED Operation Mode 0.
LED Operation Mode 1 Setup : FND displays [Led.1.] when pressing 1,2,3,8,0 and [#] in sequence from [- - - -] state, and it sets LED Operation Mode 1.
It is returned to waiting state with LED turned off after 2 seconds (LED is on when touching touch panel).
Touch panel (Key) front LED is always on.
LED in normally off, and is turned on when
user touches touch-panel (Key).
Caution
8
9
Setup
Setup
▷ Guardroom Routed Call Setup
•
Pressing [Cancel] button from Guardroom Routed Call menu will blink currently setup value [no] to FND, and the light is on.
•
Now, set whether user would Guardroom Routed Call function. Selecting 1 means to use the function, and selecting 0 means not to use the function.
•
Select whether to use the function or not, and press [#] button. It will blink the selected status that indicates setup completion, and display the next
setup menu of “RF-Card Registration”.
▷RF-Card Registration
•
Pressing [Cancel] button from RF-Card Registration menu will blink household input waiting status [Sd.id.] to FND, and [____] appears to input the
household number.
•
Input the household number to register the RF-Card, and press [#] button. It will display [Card].
•
Contact the RF-Card to the reader when [Card.] appears, then the RF-Card is registered.
“[[]]”appears when registration is successful, and [Card.]appears again in a few second to register other RF-Card so user can register multiple cards.
•
It will automatically return to RF-Card Registration menu after specified period (15 seconds).
•
RF-Card can be registered up to maximum 1000 cards without regard to the number of households.
▷ RF-Card Deletion by Household Menu
•
Pressing [Cancel] button from RF-Card Deletion by Househole menu will blink household input waiting status [Sd.id.] to FND, and [____] appears
to input the household number.
•
Input the household number to delete the RF-Card, and press [#] button. It will display [C.dEL.]. After a few seconds, RF-Card Data is deleted for
corresponding household and blink“[[]]”to indicate deletion is completed, and [____] appears again to input household number for other RF-Card
to delete
•
Input the household number and press [#] button. It will delete corresponding household’s RF-Card Data.
Current
status blink
Enter new number (0, 1)
to set whet to use the function
Setup Menu
Display
Change
completion
Change
Button
YES
Household
Number ID
Setup Menu
Display
Input
completion
Change
Button
Input Household
Number
1004
Registration
completion
[[ ]]
Wait for
RF-Card input
Wait for
RF-Card input
____
Wait for input
Household
Number ID
Setup Menu
Display
Input
completion
Change Button
Input Household
Number
1004
Deletion
completion
[[ ]]
____
Wait for input
____
Wait for RF-Card
input
▷ All RF-Card Deletion Menu
•
Pressing [Cancel] button from All RF-Card Deletion menu will display [dEL.?] in FND that asks whether the user really wants to delete all RF-Card.
•
Pressing [#] button will count up from [d.001]~[d.470], and display “[[]]” when it is completed, and display All RF-Card Deletion menu [A.dEL.].
Household
Number ID
Setup Menu
Display
Input
completion
Change
Button
Last number
of deletion
start of deletion
[[ ]]
Deletion
completion
Display Setup
Menu
▷Lobby Door Open On-Time Setup
•
Pressing [Cancel] button from Lobby Door Open On-Time Setup menu will blink currently setup value [t-02] to FND, and the light is on.
•
Now, press 1~8 to change the value and press [#] button. It will blink registered Door Open On-Time time and setup is completed, and it will
display next setup menu of “Guardroom Routed Call Setup Menu” (The unit of time is second).
Current Door Open
On-Time blink
Enter new Door
Open On Time
Setup Menu
Display
Change
completion
Change
Button
▷Register household PIN number
[----] appears at FND when pressing [#][#][0][0][#] in sequence during call with household device.
Now, enter PIN number and press [#] button, and household PIN number is registered with [P.YES.] display.
0 0
p.yes.
PIN registered
HHHH
Enter PIN
Change
Completion
During call
with household
- - - -
Input Hold


