background image

4

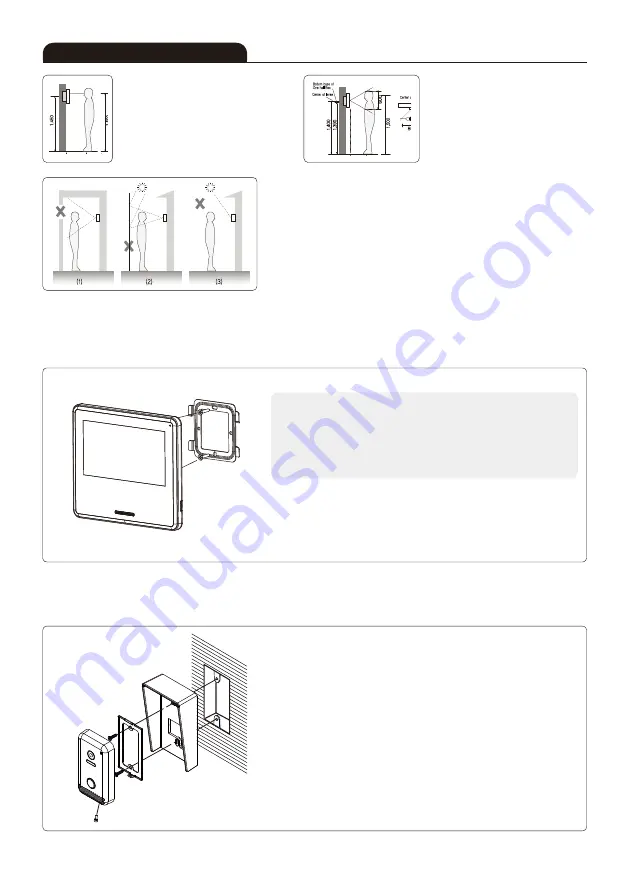
■Door Camera Installation

Sun Visor (Option)

■ Monitor Installation

■ Directly connecting cut-off power cord with power wire

1) Do not do such electric work on your own. Installing product in this way
   requires reliance on electric installation man with electric work license.
2) Insulate with insulating tape while cutting off power cord and connecting with power
   wire so electric wire metal does not expose. Contact between exposed electric wires
   cause fire or electric shock accident.
3) Such electric work requires connection after interception of supplied power.

1) Remove wall hanger frame metal behind monitor.
2) Install wall hanger frame metal on 1 type box or wall with attached Vis.
3) Connect wiring to monitor back terminal referring to product connection diagram.
4) Hang monitor on metal wall hanger frame and fix monitor on metal wall hanger frame 
5) Plug monitor`s power plug into consent and check to see if the power switch is [ON]
    on the left side of monitor.

1) Install metal wall hanger frame on type 1 box or on the wall with attached screws.
2) Connect wiring to terminal on the back of door camera referring to product connection diagram.
3) Hang door camera on metal wall hanger frame and fix door camera on metal wall hanger frame 
   using attached screw.

Avoid heavy rain directed to the product which can cause damage since it is not waterproof.

■ Monitor installation location

·Standard monitor installation height
   is about 1,500mm where screen
   center is at eye level.
   In this case, wall-hanging metal
   center (center of piping) is 1,450mm
   above ground level.
·Standard installation height

■ Caution of camera Installation

·Avoid installing camera exposed to direct ray of light (and sun).
·Beware backlight and darkness of visitor’s face, which makes identification difficult.
·Avoid installing camera in places such as the following picture.
   (1) Place illuminating sky as background
   (2) Place with white wall reflecting direct ray of light
   (3) Place with direct ray of light
·Standard installation in height

■ Camera installation location

·Camera installation in height Standard
   camera installation height is when
   lens is about 1,400mm above the floor.
   In this case, camera stack center
   (piping box) is above 1,390mm above
   ground level.
·Standard installation in height

Installation location

Summary of Contents for KCV-S701IPOE

Page 1: ...SMART IP VIDEOPHONE U S E R M A N U A L KCV S701IPOE Thank you for purchasing our product Read safety instructions and manual carefully before using the product APP Download...

Page 2: ...ot install it slanted place of water leakage which can a short circuit Fix the product on the wall safely according to the installation guideline to prevent any damage or injury Don t put any stuff in...

Page 3: ...picture distortion may occur Do not drop this product Glass is used for monitor and might break or cause other circuit inferiority In such case immediately turn down the power switch and call to cons...

Page 4: ...ached screws 2 Connect wiring to terminal on the back of door camera referring to product connection diagram 3 Hang door camera on metal wall hanger frame and fix door camera on metal wall hanger fram...

Page 5: ...by 7W 20 Full load Operating Temperature 0 40 LCD 7 color LCD Communication Systerm Handsfree Type Wiring Door Camera RJ45 UTP5 Mount Type Surface mount Dimension mm 197 W x 176 H x 23 D mm Door Camer...

Page 6: ...ion Back Back MIC Power Switch LCD Terminal Speaker RJ 45 Connector Mic Camera Lens LED Call button Speaker NC COM NO RX RX TX TX POE2_48V POE2_48V POE2_48V POE2_48V B Camera 1 2 Selection switch A B...

Page 7: ...z POE CLOUD SERVER UTP CAT5E Mobile phone Internet CLOUD SERVER Mobile phone Internet Sensor 2 Sensor 1 2 2 2 3 DOOR CAMERA MONITOR Sensor 2 3 DOOR CAMERA 2 Wire 1 5 50Meter 80Meter 1 pair short 1 pai...

Page 8: ...start screen where all functions of the product can be run Press menu icon in Home screen to run desired functions Menu setting Display device number Monitoring button Internal call button Button for...

Page 9: ...sitivity 1 2 Highly recommend to use in default MIC Sensitivity 1 2 Highly recommend to use in default Auto Image Capture When you select ON automatic screen capture available as per visitor s call Al...

Page 10: ...changed PIN number Setting Device Direct to IP CCTV Setting Screen Brand Select the CCTV Brand IP Enter the CCTV IP address Account Enter the account connected to CCTV Password Enter the passwords con...

Page 11: ...ecommended Spec of Smart Phone Andriod 8 0 version or higher iOS 11 4 version or higher Recommended Network Delay Time KCV S701IPOE AP within 50msec KCV S701IPOE CLOUD within 100msec In case that dela...

Page 12: ...01IPOE you must install APP called KOCOM Home to your Android Phone iPhone Please scan APP QR code on page 1 of this manual Or you can download by following procedures Android Google playstore KOCOM H...

Page 13: ...members through the app and use the same Start KOCOM Home APP pressing Add device Device is registered Main screen after registration KCV S701IPOE is recognized automatically and press Add Call in KO...

Page 14: ...14 Instructions for Operation Door open in KOCOM Home APP To check more menu press button Tap the key shape icon Press Confirm to approve the door opening Activate the door open button pressing...

Page 15: ...button while talking with visitors calling will be off Press door open button then you can open the door Talking time 180 secs Door opening time Default 0 2 seconds you can change at the Settings End...

Page 16: ...tions for Operation CCTV Monitoring With the CCTV connected press CCTV button from the call screen then CCTV can be monitored NOTICE Some CCTV may have compatibility issues so the image won t be displ...

Page 17: ...ogether When calling the interphone of own monitor that you are handling simply press the device number of itself When calling the whole devices all will be rung Extension calling time 30 secs Extensi...

Page 18: ...pears after tapping button on Other setting screen At the image view screen you can see stored images Press left or right arrow button then you can see other images Press delete button and deletion ca...

Page 19: ...19 Memo...

Page 20: ...rsuant to part 15 of the FCC Rules These limits are designed to provide reasonable protection against harmful interference in a residential installation This equipment generates uses and can radiate r...

Reviews: