INSTRUCTIONS for OPERATION
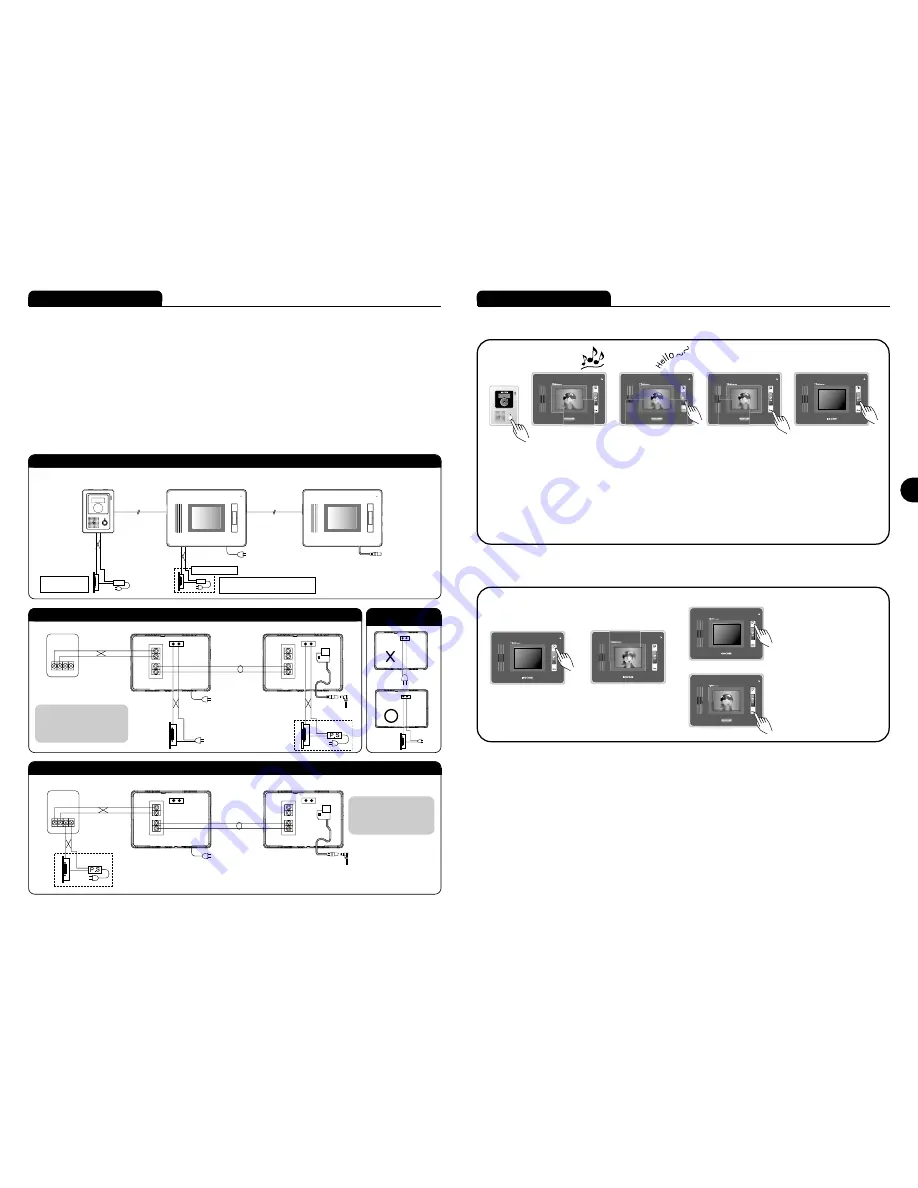
■ Calling from camera
■ Using monitor tool
■ Monitor screen time
- Not pushing speak (or monitor) button after calling from camera : 30 seconds
- Pushing monitor button to check around camera : 60 seconds
- Push speak button to speak with camera : 3 minutes
■ Screen brightness, call sound, speak volume adjustments
- Screen brightness adjustment : Screen brightness variable to volume.
- Call sound adjustment : Call sound variable in 3 steps (high/medium/low).
- Speak volume adjustment : Speak sound (monitor output voice) variable in 3 steps (high/medium/low).
Push call button from
camera. You can
hear small call sound
toward camera and
check the call.
You can hear call
sound
from
all
connected monitors,
and camera image
comes out on screen.
①Push monitor button to
convert to monitor tool
for 60 seconds.
②Push speak button to
speak with camera.
Push open door button to
open front door. About 5
seconds after pushing the
button,
call
ends
automatically.
Call ends when you push
open door button and
speak button once again.
※ Open door opener works only in speaking condition, and does not work when no image is on screen.
Push monitor button when
there is no image on
monitor screen.
Camera image appears on
screen. But(only), voice
speaking is intercepted.
�
�
�
Push door open button after speak
button, and front door opens. 5
seconds after pushing door open
button, speaking ends automatically.
Push monitor button once more, and
image is intercepted. Do not push
the button and after 60 seconds
image is intercepted automatically.
7
■ Product connection diagram
- Beware in installation of pushing open door button, which causes DC switch connected to camera and AC (or DC) switch
connected to monitor to motion.
- Connect DC switch and AC switch movement power separately. Switch connecting to camera can only use DC switch,
and switch connecting to monitor can use AC or DC type.
※Door opener caution total product wiring diagram Connection method, Method for use as below
[ ]
2wire (nonpolar)
nonpolar
polar
2wire (polar)
[KC-C62]
[KCV-352]
[KCV-D352]
AC or DC wiring diagram on monitor
Door opener wiring diagram on door camera in DC
※ Caution of
Door Lock
wiring diagram
Door Camera
[KC-C62]
Monitor
[KCV-352]
Monitor extension
[KCV-D352]
Product connection diagram
nonpolar
nonpolar
DC
Door Lock
(Adapter)
polar
※ Cannot connect door
Lock to monitor.
[KC-C62]
[KCV-352]
[KCV-D352]
<Door Lock spec>
∙DC: Below 12~30V, 3A
∙AC: Below AC 90~250V, 3A
Below
DC 12~24V, 1A
<Door Lock spec>
※ Must use only one switch
for monitor or camera.
nonpolar
nonpolar
nonpolar
nonpolar
AC/DC Door Opener
6
※Cannot connect
door Lock to camera.
(Door Lock must be
purchased separately.)
AC
Door Lock
or
DC Door Lock
DC Electric
Door Lock or
If you connect other types of cable in the middle of communication cable wiring
between monitor/camera, monitor/extension monitor or divide parallel 2wick to
1 pattern, image screen may shake or quality may deteriorate.
Also, wire not used in communication wiring must be deleted or connect product.
En


