background image

KEH10-300 

Hand Ratchet Crimping Tool 


www.grupotemper.com


(2 ) Eliminate breakdown Q & A


1. Q

How to add oil in the inside of tool when the oil is not full enough? 

    A

What was the cause of shortage of oil inside? 

<1> It causes the oil evaporated by using for a long period. 
<2> It causes leak oil by improper uses or moving. 

        Condition <2>: Please return the tool to supplier.   

Condition <1>: Please follow below steps (Figure 5, Figure 6, and Figure 7) 

for adding oil.


Figure 6.

Pull the plug


Figure 7. 

Add oil 


Finish adding oil, please reassemble the parts in sequence.


2. Q

The die cannot be positioned while pressing. 

      A

The causes are: 

<1> Shortage of Oil      Please add oil in the reservoir up to full. 
<2> Air inside        Please add oil in the reservoir up to full. 
<3> Impurities inside the reservoir 


      Exchange new Hydraulic oil. 

<4> Impurities inside the tool          Take apart the inner parts and clean 

Figure 5

. Dismantle the 

fixed handle


Summary of Contents for KEH10-300

Page 1: ...www grupotemper com KEH10 300 Herramienta de engaste manual Ferramenta de Crimpagem manual Pince à sertir manuelle Hand Crimping Tool ...

Page 2: ...JIS mm 2 DIN mm 2 AWG MCM B8001 CU10 16 B8001 CU10 16 AL6 10 K6 8 10 300 600 B8002 CU25 35 B8002 CU25 35 AL16 25 K10 12 B8003 CU50 70 B8003 CU50 70 AL35 50 K14 16 B8004 CU95 120 B8004 CU95 120 AL70 95 K18 20 B8005 CU150 B8005 CU150 AL120 K22 B8006 CU185 B8006 CU185 AL150 K25 TROQUELES ESTÁNDAR mm2 B8007 CU240 B8007 CU240 AL185 K28 CON TROQUEL B8008 CU300 10 16 25 35 50 70 95 120 150 185 240 300 AL...

Page 3: ... un equipode protección Antes de comenzar a engastar asegúrese de que el calibre del cable se encuentre dentro del rango de engaste Cuando utilice la herramienta y durante su limpieza e inspección no se aproxime a la zona de prensado para evitar daños No apunte con la herramienta hacia otras personas cuando esté utilizándola Después de usar la herramienta asegúrese de que el ariete esté en su luga...

Page 4: ...ual www grupotemper com 3 INSTRUCCIONES A Inserte el troquel adecuado como se muestra en la figura de más abajo Atención Inserte el troquel adecuado consulte la pág 1 Instalación del troquel Instalación desinstalación del troquel Figura 1 ...

Page 5: ...Atención Al presionar se liberará el aceite emitiendo un ruido Figura 2 Avance Prensado Avance Inserte el troquel en su lugar y a continuación comience a engastar El troquel se moverá hacia delante y atrás Consulte las figuras 2 3 y 4 Accione el mango para presionar ...

Page 6: ... manual www grupotemper com 5 Retroceso Presione el mango movible mientras la varilla de desenganche permanece en posición vertical para liberar el aceite Figura 3 Rotación del mango movible movible vertical gire el mango desenganche en posición Con la varilla de ...

Page 7: ...rante un largo periodo de tiempo R Antes de almacenarla asegúrese de a Colocar la herramienta en un lugar seco y protegido de la luz directa del sol b Limpiar la herramienta y aplicar un poco de aceite antioxidante Cambie el aceite para mantener la calidad Esto prolongará la vida útil de la herramienta y asegurará su buen funcionamiento Utilice únicamente aceite hidráulico SHELL TELLUS T 15 No lo ...

Page 8: ...el aceite Una vez que haya terminado de añadir el aceite vuelva a montar las piezas en su lugar 2 P El troquel no se mantiene en su lugar durante el engaste R Las causas pueden ser 1 Falta de aceite Añada aceite hasta llenar el depósito 2 Aire en el interior Añada aceite hasta llenar el depósito 3 Impurezas en el depósito Cambie el aceite 4 Impurezas en el interior de la herramienta Desmonte las p...

Page 9: ...2 AWG MCM B8001 CU10 16 B8001 CU10 16 AL6 10 K6 8 10 300 600 B8002 CU25 35 B8002 CU25 35 AL16 25 K10 12 B8003 CU50 70 B8003 CU50 70 AL35 50 K14 16 B8004 CU95 120 B8004 CU95 120 AL70 95 K18 20 B8005 CU150 B8005 CU150 AL120 K22 B8006 CU185 B8006 CU185 AL150 K25 Macho Padrãomm2 B8007 CU240 B8007 CU240 AL185 K28 Com Macho B8008 CU300 10 16 25 35 50 70 95 120 150 185 240 300 LARGURA COMPRIMENTO SAÍDA P...

Page 10: ...lada Por favor desligue a eletricidade enquanto trabalha e use equipamento de proteção Por favor note se o fio pode ser pressionado dentro de o alcance da crimpadora antes de a pressionar Enquanto pressionar limpar e inspecionar por favor não aproxima a área de pressão para evitar quaisquer danos Não mire nas pessoas enquanto opera Por favor verifique a ram se está ou não no lugar certo após a usa...

Page 11: ...rimpagem manual www grupotemper com 3 INSTRUÇÕES A Insira o macho adequado como mostra as imagens abaixo Atenção Inserir um macho adequado Por favor consulte a Página 1 Insira o macho Figura 1 Inserir Desmantelar o set de macho ...

Page 12: ...ção Enquanto pressionar por favor liberte o óleo quando ouvir um som Bo Figura 2 Avançado Pressionar Avançar Insira o macho no lugar depois comece a pressionar Entretanto o macho irá para a frente trás Por favor veja a Figura 2 3 e Figura 4 Atuando a alça para pressionar ...

Page 13: ...H10 300 Ferramenta de Crimpagem manual www grupotemper com 5 A cana de Lançamento ficará na vertical enquanto estiver torcendo com a alça móvel Pressione a alça móvel quando a cana estiver na vertical Por favor liberte o óleo durante esta altura Para trás ...

Page 14: ...empo A Antes de o guardar você tem de a Colocar a ferramenta num lugar seco e com sombra b Limpe a ferramenta e esfregue a com um pouco de óleo antiferrugem antes de a guardar Por favor renove o óleo para manter a qualidade do óleo isso pode prolongar a vida útil e o quão bem efetuará o trabalho Esta ferramenta apenas e somente aceita o óleo da SHELLTELLUST 15hydraulicoil Por favor não misture out...

Page 15: ...eo Ao acabar de adicionar o óleo por favor remonte as partes em sequência 2 Q O macho não pode ser posicionado enquanto aperta A As causas são 1 Falta de óleo Por favor adicione óleo até o reservatório ficar cheio 2 Ar dentro Por favor adicione óleo até o reservatório ficar cheio 3 Impuridades dentro do reservatório Renove para um novo óleo Hidráulico 4 Impuridades dentro da ferramenta Desmonte as...

Page 16: ...001 CU10 16 AL6 10 K6 8 10 300 600 B8002 CU25 35 B8002 CU25 35 AL16 25 K10 12 B8003 CU50 70 B8003 CU50 70 AL35 50 K14 16 B8004 CU95 120 B8004 CU95 120 AL70 95 K18 20 B8005 CU150 B8005 CU150 AL120 K22 B8006 CU185 B8006 CU185 AL150 K25 MATRICE STANDARDS mm 2 B8007 CU240 B8007 CU240 AL185 K28 AVEC MATRICE B8008 CU300 10 16 25 35 50 70 95 120 150 185 240 300 LARGEUR LONGUEUR FORCE DE SERTISSAGE PRESSI...

Page 17: ...ion nettoyage ou inspection Après utilisation vérifier que le vérin se trouve en place et que le ressort interne n est pas endommagé pour assurer son retour à sa position initiale Avant chaque utilisation verifier que le câble est entièrement inséré dans la tête de sertissage Cet outil n est pas isolé Assurez vous de couper le courant avant de commencer à travailler avec cet outil et utilisez touj...

Page 18: ...KEH10 300 Pince à sertir manuelle www grupotemper com 3 INSTRUCTIONS A Attention Illustration 1 Insérer démonter la matrice Insérer la matrice comme montre l images ci dessous ...

Page 19: ...orsque vous appuyez veuillez relâcher l huile lorsque vous entendez un son Bo Illustration 2 Avancée Pression Avance Utiliser la poignée pour appuyer Insérer la matrice à sertir puis presser les poignées de la pince pour commencer à Voir les illustrations 2 3 et 4 sertir ...

Page 20: ... rotatif KEH10 300 Pince à sertir manuelle www grupotemper com 5 Revenir La tige de relâchement sera orientée vers le haut lorsque vous tournerez la poignée mobile Lorsque vous relâcherez la tige verticale appuyez sur la poignée mobile pour renvoyer l huile ...

Page 21: ...pour prolonger la durée et la performance d utilisation de l outil Utiliser uniquement de l huile hydraulique SHELL TELLUS T 15 Pour éviter d endommager l outil ne pas mélanger avec d autres huiles 1 Changer ou ajouter de l huile Si vous ne comptez pas utiliser l outil pendant une longue période a Nettoyer et enduire d huile antirouille b Rangez le dans un endroit sec et somber 2 ...

Page 22: ...uretés à l intérieur de l outil Démontez les pièces internes et nettoyez les Fig 5 Démontez la poignée fixe Fig 6 Tirez le bouchon Fig 7 Ajoutez l huile L utilisation ou manipulation incorrecte de l outil peut causer une fuite d huile Si vous n utiliser pas l outil pendant une longue période l huile peut s évaporer R Quelles sont les causes possibles d un manque d huile Comment ajouter de l huile ...

Page 23: ...NAL APPLICABLE RANGE DIE NO DIE NO CORD NO JIS mm 2 DIN mm 2 A WG MCM B8001 CU10 16 B8001 CU10 16 AL6 10 K6 8 10 300 600 B8002 CU25 35 B8002 CU25 35 AL16 25 K10 12 B8003 CU50 70 B8003 CU50 70 AL35 50 K14 16 B8004 CU95 120 B8004 CU95 120 AL70 95 K18 20 B8005 CU150 B8005 CU150 AL120 K22 B8006 CU185 B8006 CU185 AL150 K25 STANDARD DIES mm2 B8007 CU240 B8007 CU240 AL185 K28 WITH DIE B8008 CU300 10 16 2...

Page 24: ...sing Avoiding inner spring tired and cannot return This tool is non insulated Please turn off the power while working and wear protect equipment Please note the wire whether can be pressed in its crimping range before pressing While pressing cleaning and inspecting please do not approach the pressing area to avoid any damage Do not aim people while operating Movable Handle Able to rotate with 180o...

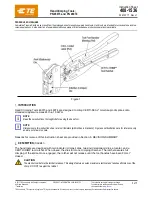
Page 25: ...EH10 300 Hand Ratchet Crimping Tool www grupotemper com 3 INSTRUCTION A Inset the suitable die as below pictures Attention Inset suitable die Please consult P 1 Inset die Inset Dismantle die set Figure 1 ...

Page 26: ...set the die in place then start pressing Meanwhile the die will go forth go back for pressing Please see Figure 2 3 and Figure 4 Attention While pressing please release the oil as hear sound Bo Figure 2 Advance Pressing Advance Acting the handle for pressing being ...

Page 27: ... www grupotemper com 5 Figure 4 Go back Release Figure 3 Twist movable handle The Release Rod will be upstanding while twisting movable handle Press the movable handle when Release Rod upstanding Please go release oil in this time Go back ...

Page 28: ...an be prolong its usage age and working well This tool accepts SHELL TELLUS T 15 hydraulic oil only Please do not mix other ingredient oil to avoid any breakdown Hydraulic Oil SHELL TELLUS T 15 or SEA 20 2 Q The tool will not be used for a long period A Before store it you have to a Place the tool in a dry and shady place b Clear the tool and smear a little anti rusty oil before store it ...

Page 29: ...tool to supplier Condition 1 Please follow below steps Figure 5 Figure 6 and Figure 7 for adding oil Figure 6 Pull the plug Figure 7 Add oil Finish adding oil please reassemble the parts in sequence 2 Q The die cannot be positioned while pressing A The causes are 1 Shortage of Oil Please add oil in the reservoir up to full 2 Air inside Please add oil in the reservoir up to full 3 Impurities inside...

Page 30: ...os anos years années E T E I garantiza este aparato por 3 años ante todo defecto de fabricación Para hacer válida esta garantía es imprescindible presentar el ticket o factura de compra P T E I garantía este aparelho contra defeitos de fábrica ate 3 anos F T E I garantit cet apareil pour le durée de 3 annès contre tout défault de fabrication GB T E I guarantees this device during 3 years against a...

Reviews: