background image

7

Menu Demonstration

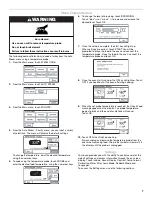
The following demonstrates how to cook a turkey from the Auto 
Steam menu using a temperature probe.

1.

From the Main menu, touch STEAM COOK.

2.

From the Main menu, touch AUTO STEAM.

3.

From the Main menu, touch POULTRY.

4.

From the Auto Steam - Poultry menu, you can input a variety 
of selections. The menu will display the default settings. 

To change the temperature, input the desired temperature 
using the numerical keys. 

5.

To cook using the temperature probe, touch PROBE and 
enter the desired food temperature, using the numerical keys.

6.

To change the level of browning, touch BROWNING.

Touch “plus” (+) or “minus” (-) to increase or decrease the 
desired level. Touch OK.

7.

Once the setup is complete, the start key will light up.

When settings are correct, touch START. You will be 
prompted to place the food in the oven and connect the 
temperature probe. Place the food in the oven, connect the 
temperature probe and touch OK.

8.

Once the oven starts running, the Off key will light up. Touch 
OFF if you need to shut the oven off during cooking.

9.

When the set probe temperature is reached, the Check Food 
message appears on the display. The probe temperature 
begins to blink and the end of cycle tone will sound. 
Touch OK.

10.

Touch OFF when finished cooking.

Always unplug and remove the temperature probe from the 
oven when removing food. The probe symbol will remain lit in 
the display until the probe is unplugged.

Settings

Your oven provides you with the ability to control several of the 
default settings and access information through the on screen 
display. These include; Sound, Display Contrast, Temp Format, 
Calibration, Water Filter, Learn Mode, Sabbath Mode, and 
Languages.

To access the Settings menu, see the following sections.

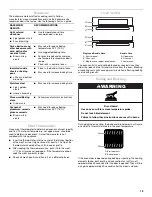
WARNING

Burn Hazard

Use an oven mitt to remove temperature probe.

Do not touch broil element.

Failure to follow these instructions can result in burns.

Summary of Contents for 8304531A

Page 1: ...DDOUBLEOVENS WITHSTEAMASSIST Use CareGuide For questions about features operation performance parts accessories or service call 1 800 422 1230 or visit our website at www kitchenaid com Table of Contents 2 Models KEBU107 KEBU208 8304531A ...

Page 2: ...Baking and Roasting 13 Full and Center Broiling 14 Convection Cooking 15 Convection Bake 15 Convection Roast 16 Convection Broil 17 EasyConvect Conversion 17 Proofing Bread 18 STEAM ASSISTED COOKING 18 Auto Steam 18 Auto Steam Settings 19 Manual Steam 20 Water Filter Cartridge Replacement 21 Keep Warm 21 Temperature Probe 22 Timed Delay Cooking 23 Dehydrating 23 COOKING CHARTS 24 Bread Baking Char...

Page 3: ...to a qualified technician Storage in Oven Flammable materials should not be stored in an oven Do Not Use Water on Grease Fires Smother fire or flame or use dry chemical or foam type extinguisher Use Only Dry Potholders Moist or damp potholders on hot surfaces may result in burns from steam Do not let potholder touch hot heating elements Do not use a towel or other bulky cloth Use Care When Opening...

Page 4: ...h substances WARNING This product contains a chemical known to the State of California to cause cancer birth defects or other reproductive harm This appliance can cause low level exposure to some of the substances listed including benzene formaldehyde carbon monoxide and toluene A Electronic oven control B Oven vent C Broil elements D CleanBake bake element E Lower oven on double oven models F Aut...

Page 5: ... to activate For more information about the individual controls see their respective sections in this manual InteractiveTouchDisplay The display area functions as both a display and an interactive menu driven touch control It is designed to be easily navigable guiding you through the menus offering multiple selections accepting your input and executing your commands It also provides instructions t...

Page 6: ...e oven if not in use sleep mode the right display shows the time of day To turn the clock display on off see Clock section During programming the display shows menus and the appropriate selections for the respective cooking function Touch Screen The LCD touch screen is used to make menu selections adjust settings and input commands Menu selections and input adjustments are made in the center porti...

Page 7: ...mperature probe Place the food in the oven connect the temperature probe and touch OK 8 Once the oven starts running the Off key will light up Touch OFF if you need to shut the oven off during cooking 9 When the set probe temperature is reached the Check Food message appears on the display The probe temperature begins to blink and the end of cycle tone will sound Touch OK 10 Touch OFF when finishe...

Page 8: ... can be changed in Fahrenheit or Celsius A minus sign means the oven will be cooler by the displayed amount The absence of a minus sign means the oven will be warmer by the displayed amount Use the following chart as a guide To Adjust Oven Temperature Calibration 1 From the Main menu touch MORE 2 Touch SETTINGS 3 Touch CALIBRATION 4 Touch the plus or minus to increase or decrease the temperature 5...

Page 9: ...n disabled SABBATH DISABLED will appear on the display and remain on for approximately 5 seconds The Sabbath Mode cannot be regularly set until re enabled To Set Regularly Untimed Sabbath Mode must be enabled before starting the Bake cycle See the To Enable section On double oven models only each oven can be set independently 1 From the Main menu touch BAKE 2 To change the preset temperature enter...

Page 10: ...heat cycle When preheat is complete a tone will sound 12 Once in the Sabbath Mode an End Sabbath key will appear in the lower right hand section of the display Touch and hold the End Sabbath Mode for approximately 3 seconds to return to the regular Bake mode 13 Once Cook Time has reached 0 00 the Sabbath Mode Complete message is displayed The completed time information is updated every minute but ...

Page 11: ...s If a key is touched while the controls are touched the invalid key touch tone will sound and a reminder message will be displayed indicating the controls are locked To Unlock Control Repeat to unlock the control A tone will sound and a controls unlocked message will be displayed for approximately 5 seconds OVEN USE Odors and smoke are normal when the oven is used the first few times or when it i...

Page 12: ...k and the sliding shelf so that the back and front are level on the rack guide 4 Pull the rack and the sliding shelf out To Replace Roll out Rack 1 Using 2 hands grasp the front of the closed rack and the sliding shelf Place the closed rack and the sliding shelf on the rack guide 2 Slowly push the rack and the sliding shelf to the back of the oven until the back edge of the sliding shelf drops 3 P...

Page 13: ...pened during baking or roasting the heating elements bake both broils and convection fan will turn off approximately 30 seconds after the door is opened They will turn on again approximately 30 seconds after the door is closed BAKEWARE RESULTS RECOMMENDATIONS Light colored aluminum Light golden crusts Even browning Use temperature and time recommended in recipe Dark aluminum and other bakeware wit...

Page 14: ...See Assistance or Service section to order Ask for Part Number W10123240 For proper draining do not cover the grid with foil The bottom of the broiler pan may be lined with aluminum foil for easier cleaning Trim excess fat to reduce spattering Slit the remaining fat on the edges to avoid curling Pull out oven rack to stop position before turning or removing food Use tongs to turn food to avoid the...

Page 15: ...ent types of foods be sure to select recipes that require similar temperatures Cookware should sit in the oven with at least 1 2 5 cm of space between the cookware and the sides of the oven During convection baking preheat the T H E convection element and broil element and the CleanBake element all heat the oven cavity After preheat the T H E convection element and the CleanBake element and the fa...

Page 16: ...on again approximately 30 seconds after the door is closed Reduce recipe temperature 25 F 14 C The cook time may need to be reduced also For best results use a broiler pan grid and roasting rack designed to drain juices and help avoid spatter and smoke If you would like to purchase a Broiler Pan Kit it may be ordered See Assistance or Service section to order Ask for Part Number W10123240 To Conve...

Page 17: ...ouch OFF UPPER OVEN OFF or LOWER OVEN OFF when finished cooking EasyConvect Conversion Convection temperatures and times differ from those of standard cooking The oven can automatically reduce standard recipe temperatures and times for convection cooking The conversion may not be exact because foods are grouped in general categories To ensure optimal cooking results the oven will prompt a food che...

Page 18: ... the use of parchment paper wraps for cooking fish water baths and spritzing during the cooking process When cooking with steam place meat poultry seafood vegetables desserts and casseroles into a cool oven For best cooking results allow the oven to cool down from previous cooking before steam cooking If the oven temperature is above 170 F 77 C a message will appear telling you the oven is above 1...

Page 19: ... to be reduced up to 20 percent compared to convection and traditional roasting times Use a meat thermometer to gauge doneness of food Seafood The Seafood setting bakes at a lower temperature than traditional baking This gives you moist tender evenly cooked fish with results similar to those achieved when steaming fish in parchment paper You can cook shellfish fillets steaks or whole fish with thi...

Page 20: ...ck Food message will appear at the end of the cook time or once the set temperature has been reached If enabled end of cycle tones will sound then reminder tones will sound every minute Touch OK to clear the message stop reminder tones and continue the current cooking cycle 12 Touch OFF UPPER OVEN OFF or LOWER OVEN OFF when finished cooking NOTE For breads if the oven temperature is below the set ...

Page 21: ...or Part Number 8212695 To Replace Water Filter Turn filter cartridge to the left to remove cartridge from the filter head Install new cartridge Turn cartridge to the right to reattach to the filter head If you need Assistance or Service Please reference the Assistance or Service section KeepWarm IMPORTANT Food must be at serving temperature before placing it in the warmed oven The steam assisted K...

Page 22: ... jack Keep probe as far away from heat source as possible Close oven door 1 From the entry selection menu of those cooking functions where a temperature probe is used touch PROBE 2 Touch the number keys to enter a probe temperature if other than 160 F 75 C The probe temperature is the desired internal temperature of the food when it is done The temperature can be set between 130 F and 180 F 55 C a...

Page 23: ...l be displayed in the lower left hand portion of the display showing the time remaining until cooking begins 6 When the start time is reached the oven will automatically turn on The minute time countdown will appear on the oven display 7 When the end of the cook time is reached the Check Food message will appear in the oven display If enabled end of cycle tones will sound then reminder tones will ...

Page 24: ...2 rolls in a 13 x 9 x 2 33 cm x 22 9 cm x 5 cm pan Recipe Bake Auto Steam Breads 400 F 200 C 375 F 190 C 425 F 220 C 375 F 190 C 450 F 230 C 400 F 200 C 375 F 190 C 325 F 165 C 350 F 175 C 325 F 165 C 350 F 175 C 325 F 165 C 30 25 or until golden brown 12 12 or until golden brown 30 30 40 35 30 45 36 38 20 25 19 20 FOOD OVEN TEMPERATURE BROWNING BAKING TIME in minutes Spicy Chicken and Rice chicke...

Page 25: ...ff 9 22 9 cm pie plate Recipe Bake Auto Steam Desserts Crème Brulee 6 oz 177 4 mL cups Recipe Bake in water bath Auto Steam Desserts Cheesecake 9 22 9 cm springform pan Recipe Bake in water bath Auto Steam Desserts 350 F 175 C 300 F 150 C 325 F 165 C 300 F 150 C 375 F 190 C 325 F 165 C 375 F 190 C 325 F 165 C 350 F 175 C 325 F 165 C 400 F 200 C 375 F 190 C 250 F 120 C 250 F 120 C 325 F 165 C 275 F...

Page 26: ...50 F 120 C 250 F 120 C 250 F 120 C 250 F 120 C 250 F 120 C 250 F 120 C 250 F 120 C 325 F 165 C 300 F 150 C 375 F 190 C 325 F 163 C Off Off Off Off Off Off Off Off Off Off Off Off 12 16 23 25 20 22 16 18 24 27 20 22 22 24 10 11 25 26 10 11 40 50 27 15 20 or until heated through Use raw peppers do not put in boiling water FOOD OVEN TEMPERATURE BROWNING COOKING TIME in minutes Fillets 0 6 cm thick Fi...

Page 27: ...in skillet add eggs and place in oven Bratwurst fresh Manual Steam Chicken Breasts boneless skinless Manual Steam Meat Loaf 7 x 3 x 2 17 8 cm x 7 6 cm x 5 cm loaf 1 lb 454 g meat Recipe Bake Manual Steam On Off Off Off Off Off 450 F 230 C 425 F 220 C 375 F 190 C 350 F 175 C 350 F 175 C 325 F 165 C 250 F 120 C 350 F 175 C 350 F 175 C 350 F 175 C Off Off Off Off Off Off 80 100 100 100 80 80 15 20 11...

Page 28: ...m Meats medium rare medium Beef Sirloin Roast boneless 4 5 lbs 1 8 2 3 kg Auto Steam Meats medium rare medium 325 F 160 C 325 F 160 C 325 F 160 C 325 F 160 C 325 F 160 C 325 F 160 C Medium Medium Medium Medium High High 1 39 2 08 1 50 2 22 1 43 1 56 1 56 2 10 1 22 1 42 1 35 1 56 24 26 27 28 23 26 26 29 19 21 22 24 130 F 54 C 145 F 63 C 130 F 54 C 145 F 63 C 130 F 54 C 145 F 63 C Pork Pork Top Loin...

Page 29: ...o Steam Poultry Turkey 20 22 lbs 9 10 kg Auto Steam Poultry Turkey Breast whole 7 9 lbs 3 4 4 1 kg Auto Steam Poultry 325 F 165 C 325 F 165 C 300 F 150 C 325 F 165 C Medium Medium Medium Medium 0 59 1 33 1 15 1 45 2 00 2 12 1 15 1 40 6 8 5 6 6 7 9 11 165 F 74 C 165 F 74 C 165 F 74 C 165 F 74 C Duck Duck 5 6 lbs 2 3 2 7 kg Auto Steam Poultry 350 F 175 C Medium 1 07 1 12 11 13 165 F 74 C Cornish Hen...

Page 30: ...e 2 hours 30 minutes for light soil and between 3 hours 30 minutes and 4 hours 30 minutes for average to heavy soil Use the following chart as a guide to determine the desired cleaning level Once the oven has completely cooled remove ash with a damp cloth Do not wipe down any of the inside surfaces until the oven has completely cooled down Applying a cool damp cloth to the inner door glass before ...

Page 31: ... Before cleaning make sure all controls are off and the oven is cool Always follow label instructions on cleaning products Soap water and a soft cloth or sponge are suggested first unless otherwise noted STAINLESS STEEL on some models Cleaning Method Rub in direction of grain to avoid damaging KitchenAid Stainless Steel Cleaner and Polish Part Number 4396920 not included or KitchenAid Stainless St...

Page 32: ... oven 3 Remove bulb from socket 4 Replace bulb using tissue or wearing cotton gloves to handle bulb Do not touch bulb with bare fingers 5 Replace bulb cover by snapping back into wall 6 Reconnect power OvenDoor IMPORTANT To avoid oven door glass breakage Do not close the oven door if the racks are not fully inserted into the oven cavity or when bakeware extends past the front edge of an oven rack ...

Page 33: ... with this oven Does the filter need to be replaced The oven will shut off the steam functions until the filter is replaced See Water Filter Filtration System section Self Cleaning cycle will not operate Is the oven door open Close the oven door all the way Has the function been entered See Self Cleaning Cycle section On some models has a delay start Self Clean cycle been set See Self Cleaning Cyc...

Page 34: ...sistance you can write to KitchenAid with any questions or concerns at KitchenAid Brand Home Appliances Customer eXperience Center 553 Benson Road Benton Harbor MI 49022 2692 Please include a daytime phone number in your correspondence Accessories U S A To order accessories call the KitchenAid Customer eXperience Center toll free at 1 800 442 9991 and follow the menu prompts Or visit our website a...

Page 35: ...irs to parts or systems resulting from unauthorized modifications made to the appliance 8 Expenses for travel and transportation for product service in remote locations 9 The removal and reinstallation of your appliance if it is installed in an inaccessible location or is not installed in accordance with published installation instructions DISCLAIMER OF IMPLIED WARRANTIES LIMITATION OF REMEDIES CU...

Page 36: ...8304531A 2007 All rights reserved Registered Trademark TM Trademark of KitchenAid U S A KitchenAid Canada licensee in Canada 5 07 Printed in U S A ...

Reviews: