22
To Use:
1.
From the Main menu, touch KEEP WARM.
2.
To change the temperature, enter the desired temperature
using the numerical keys.
3.
To change the warm time, touch WARM TIME. Enter the
desired warm time using the numerical keys.
4.
Once a cooking setup function is complete, the Start key will
light up.
5.
When settings are correct, touch START.
6.
During the warming cycle an Adjust Settings key appears on
the lower right hand corner of the display. Touch ADJUST
SETTINGS to change the desired time and/or temperature.
Touch START to enter new settings.
7.
If the Warm Time has been set, the Check Food message will
appear at the end of the warm time has been reached.
If enabled, end-of-cycle tones will sound, then reminder
tones will sound every minute. Touch OK to clear the
message, stop reminder tones, and continue the current
cooking cycle.
8.
Touch OFF, UPPER OVEN OFF or LOWER OVEN OFF when
finished warming.
Temperature Probe
The temperature probe accurately measures the internal
temperature of meat, poultry and casseroles with liquid and
should be used in determining the doneness of meat and poultry.
It should not be used during full and center broiling, convection
broiling, dehydrating or proofing bread.
Always unplug and remove the temperature probe from the oven
when removing food.
The temperature probe is available on most cycles including:
Auto Steam, Manual Steam, Bake, Convect Bake, Convect
Roast, and EasyConvect™ Conversion (Meats, Poultry,
Casseroles, or Fish).
To Use:
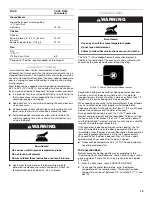
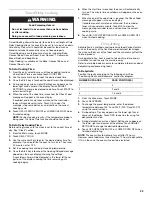
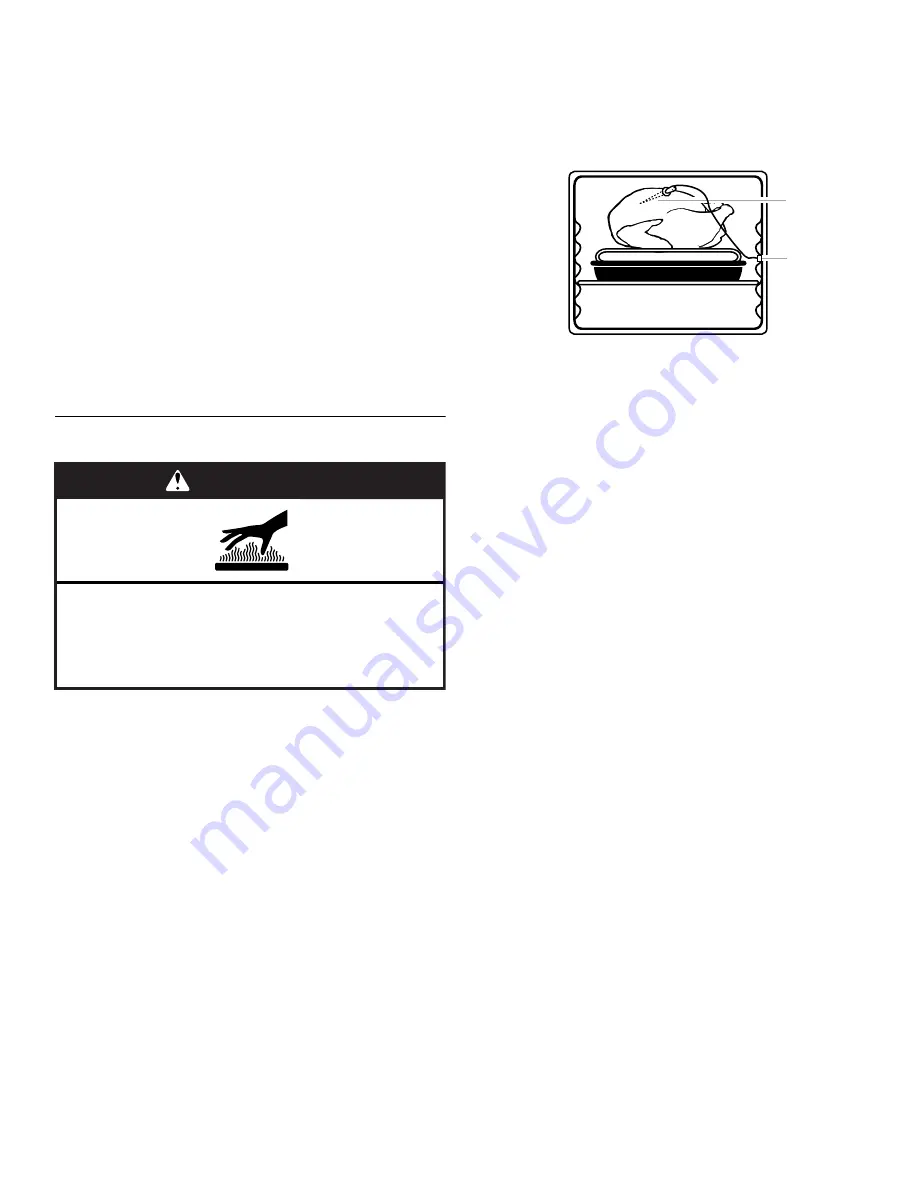
Before using, insert the probe into the center of the thickest
portion of meat or into the inner thigh or breast of poultry, away
from fat or bone at an angle as shown in following diagram. Place
food in oven and connect the temperature probe to the jack.
Keep probe as far away from heat source as possible. Close oven
door.
1.
From the entry selection menu of those cooking functions
where a temperature probe is used, touch PROBE.
2.
Touch the number keys to enter a probe temperature, if other
than 160°F (75°C). The probe temperature is the desired
internal temperature of the food when it is done. The
temperature can be set between 130°F and 180°F (55°C and
82°C).
NOTE:
When using the probe, the Cook Time function may
not be used.
3.
If the probe is set and connected to the oven, the probe icon
is displayed in the oven cavity icon.
If the probe is set and not connected to the oven, a “Probe
Not Connected” message will be displayed. The probe icon
will be displayed and the icon will blink until the probe is
connected.
4.
Once the Start key is touched, the probe display appears. If
the current probe temperature is below 130°F (54°C), the
display shows “Below 130°F (54°C)”.
The display shows the current probe temperature once it
reaches 130°F (54°C).
5.
During cooking cycle an Adjust Settings key appears on the
lower right hand corner of the display. Touch ADJUST
SETTINGS to change the desired probe temperature. Touch
START to enter new settings.
6.
When the set probe temperature is reached, the Check Food
message appears on the oven display, the probe temperature
begins to blink.
If enabled, end-of-cycle tones will sound, then reminder
tones will sound every minute. Touch OK to clear the
message, stop reminder tones, and continue the current
cooking cycle.
7.
Touch OFF, UPPER OVEN OFF or LOWER OVEN OFF when
finished cooking.
8.
Always unplug and remove the temperature probe from the
oven when removing food. The probe symbol will remain lit in
the display until the probe is unplugged.
WARNING
Burn Hazard
Use an oven mitt to remove temperature probe.
Do not touch broil element.
Failure to follow these instructions can result in burns.
A. Temperature probe jack
B. Temperature probe
A
B

