PT6500 SERVICE MANUAL
4.1.13 PC Programming
You can program the radio functions and adjust some parameters
by PC programming software KSP6500.
4.1.14
Wi
red Clone
The radio can transfer the stored data to another radio of the same
mode by a specified cable.
4.1.15 Squelch Level Selection
The purpose of the squelch is to mute the speaker noise when no
signals are received or the signals are weak. When the squelch is
activated, you can hear noise from the speaker; when the squelch
is inactivated, you will not hear noise form the speaker. Selecting
the squelch level is to select which the signal strength level is
strong enough to enable the squelch or weak enough to disable the
squelch. Over high squelch level will make the radio unable to
receive signals efficiently when signals are weak; over low squelch
level will make the radio communication affected by noise or other
irrelevant signals. The squelch level has 0-9 options.
4.1.16 Beep Tone
This option controls power on tone, channel busy tone and TOT
tone.
4.2
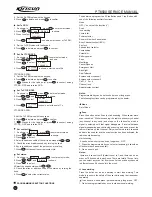
The operations are as follows:
Set scanning:
1. As shown: in CH 1 , press , then Utilities
is shown;
2. Press , then Scan is shown;
3. Press , then enter selecting Scan ;
P
4
P
4
P
4
4. Select Scan On or Scan OFF with / , then press to
confirm it.
If can not enter that way, you have to set in PC communications;
Set back light:
1. As shown: in CH 1 , press , Utilities is shown.
2. Press to enter select mode,
3. Press / , and Back Light is shown,
4. Press to select On or OFF ,
5. Select On or OFF with / , press to confirm.
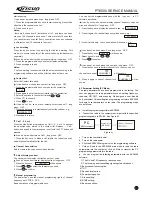
Set the squelch level:
1. As shown: in CH 1 , press , Utilities is shown.
2. Press to enter select mode,
3. Press / , then Squelch Level is shown,
4. Press to select squelch level, e.g., Level 0
5. Change the squelch level with / , then press to
confirm.
Set power level (high/middle/low):
1. As shown: in CH 1 , press , utilities is shown.
2. Press to enter select mode,
3. Press / , then Power Level is shown,
4. Press to select, e.g., Power Low ,
5. Change the power level with / , then press to
confirm.
Set Companding
1
As shown: in CH 1 , press , Utilities is shown.
2. Press to enter select mode,
3. Press / , and Companding is shown,
4. Press to select Companding ,
5. Select On or OFF by / , press to confirm.
P
4
P
2
P
3
P
4
P
4
P
2
P
3
P
2
P
3
P
4
P
4
P
4
P
4
P
2
P
3
P
2
P
3
P
4
P
4
P
4
P
4
P
2
P
3
P
2
P
3
P
4
P
4
P
4
P
4
P
2
P
3
P
2
P
3
P
4
P
4
Set saving
1
As shown: in CH 1 , press , Utilities is shown.
2. Press to enter select mode,
3. Press / , and Save is shown,
4. Press to select Save 1
4 ,
5. Chang the save percentage with / , press to
confirm.
Set scrambler
1
As shown: in CH 1 , press , Utilities is
shown.
2. Press to enter select mode,
3. Press / , and Scrambler is shown,
4. Press to select, e.g., Scrambler OFF ,
5. Select On or OFF by / , press to confirm.
Set key tone
1
As shown: in CH 1 , press , Utilities is shown.
2. Press to enter select mode,
3. Press / , and Key Tone is shown,
4. Press to select OFF or On ,
5. Select On or OFF with / , press to confirm.
Set Rptr/Talkarnd
1
As shown: in CH 1 , press to enter select mode,
2. Press / , and Rptr/Talkarnd is shown,
3. Press to select the mode,
4. Select Repeater Mode or Talkarnd mode with / ,
Press to confirm.
Set speak On mode
1
As shown: in CH 1 , press to enter select mode,
2. Press / , and Speak Mode is shown,
P
4
P
2
P
3
P
2
P
3
P
4
P
4
P
4
P
4
P
2
P
3
P
2
P
3
P
4
P
4
P
4
P
4
P
2
P
3
P
2
P
3
P
4
P
4
P
4
P
2
P
3
P
2
P
3
P
4
P
4
P
4
P
2
P
3
P
4
3. Press to select the speak on mode,
4. Select with / , press to confirm.
Set zone mode
1
As shown: in CH 1 , press to enter select mode,
2. Press / , and Zone Edit is shown,
3. Press to select the zone mode,
4. Select Zone No with / , press to confirm.
Set call list
1
As shown: in CH 1 , press to enter select mode,
2. Press / , and Call is shown,
3. Press to select the call list,
4. Select with / , press PTT to transmit.
Set Rx FRQ
1
As shown: in CH 1 , press to enter select mode,
2. Press / , and Ch Edit is shown,
3. Press to select
4. Press , is shown, enter the set of Rx FRQ,
P
4
P
2
P
3
P
4
P
4
P
2
P
3
P
4
P
2
P
3
P
4
P
4
P
2
P
3
P
4
P
2
P
3
P
4
P
2
P
3
P
4
P
3
Rx FRQ
401.660000
Ch alias
CHANNEL 1
9
Summary of Contents for PT6500
Page 1: ...PROFESSIONAL TWO WAY RADIO PT6500 V071208 FM PORTABLE RADIO SERVICE MANOAL Welcome ...
Page 33: ...PT6500 SERVICE MANUAL Figure 1 PT6500 Top Main Board Position Number Diagram 136 174MHz 32 ...
Page 34: ...PT6500 SERVICE MANUAL Figure2 PT6500 Bottom Main Board Position Number Diagram 136 174MHz 33 ...
Page 35: ...Figure 3 400 470MHz PT6500 Top Main Board Position Number Diagram 34 PT6500 SERVICE MANUAL ...
Page 36: ...35 PT6500 SERVICE MANUAL Figure 4 400 470MHz PT6500 Bottom Main Board Position Number Diagram ...
Page 37: ...Figure 5 PT6500 PTT Top Board Position Number Diagram 36 PT6500 SERVICE MANUAL ...
Page 38: ...37 PT6500 SERVICE MANUAL Figure 6 PT6500 PTT BOTTOM Board Position Number Diagram ...


