background image


Setup (Windows Environment) 
 

1. Insert the DTL+ into an available USB port on 

your notebook or desktop and wait for Windows 
to detect it. 


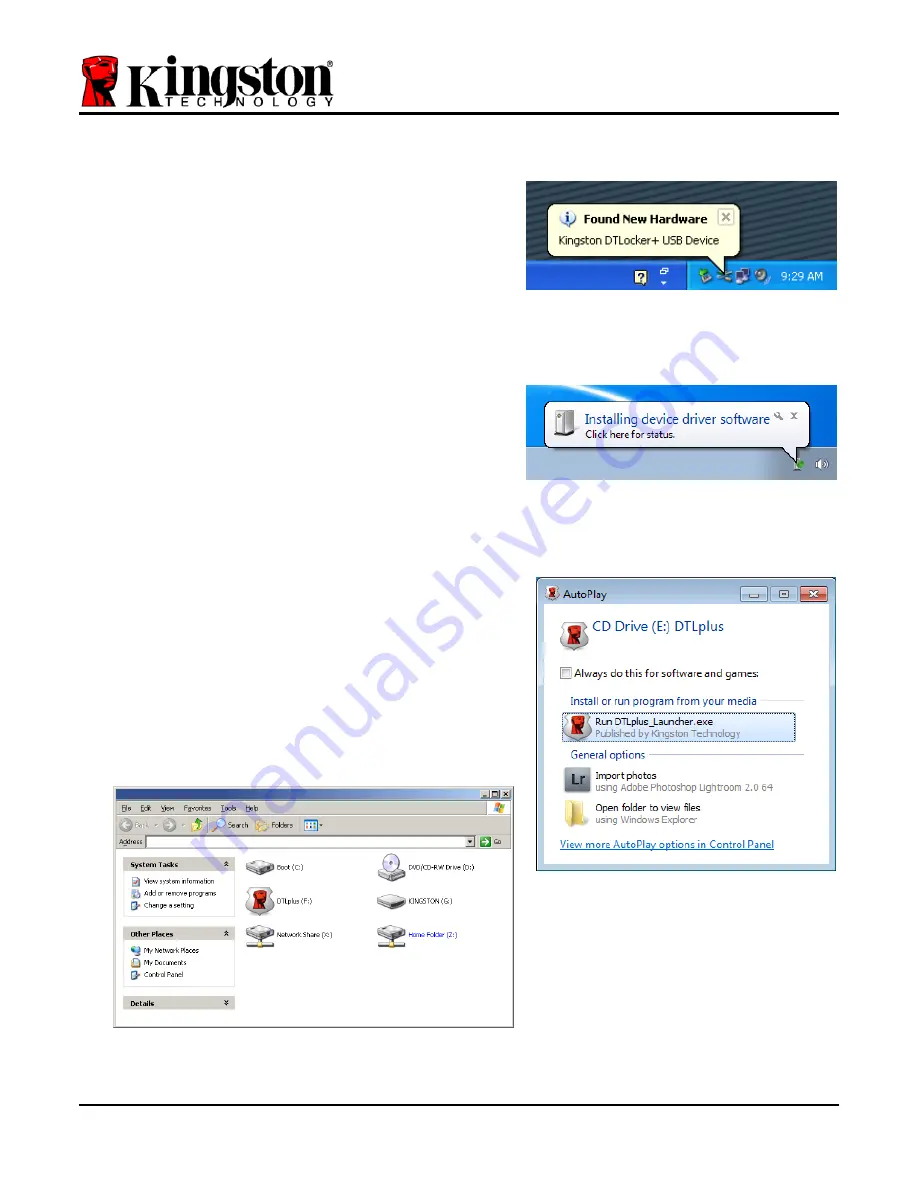
  Windows XP users will receive a ‘

Found New 

Hardware

’ notification as seen in 

Figure 2.1


  Windows Vista/7 users will receive a device 

driver notification as seen in 

Figure 2.2


Once the new hardware detection is complete, 
Windows will prompt you to begin the initialization 
process. 
 

 Windows


XP users can skip step 2 and go to 

page 5 – 

Device Initialization


  Windows Vista/7 users will see an AutoPlay 

window similar to the one in 

Figure 2.3


2.  Select the option ‘

Run DTLplus_Launcher.exe

’. 


If Windows does not AutoPlay, you can browse to 
the CD-ROM partition (

Figure 2.4

) and manually 

execute the DTLplus_Launcher program.  This will 
also start the initialization process. 


Figure 2.4 – DTL+ Contents


Figure 2.1 – Found New Hardware 

(Windows XP)


Figure 2.2 – Device Driver Installation 

(Windows Vista/7)


Figure 2.3 – AutoPlay Window 

(Windows Vista/7)


(

Note: Menu options in the AutoPlay 

window may vary depending on what 
programs are currently installed on 
your computer

.

  AutoRun will start the 

initialization process automatically.

Document No.  48008071-001.A02 

DataTraveler

®


Page 4 of 22 


Summary of Contents for DataTraveler Locker+

Page 1: ...DataTraveler Locker User Manual Document No 48008071 001 A02 DataTraveler Locker Page 1 of 22...

Page 2: ...4 Device Initialization Windows Environment 5 Device Usage Windows Environment 9 Device Options Windows Environment 10 Setup Mac Environment 12 Device Initialization Mac Environment 13 Device Usage Ma...

Page 3: ...Vista SP1 SP2 Windows XP SP2 SP3 Mac Platform 15MB free disk space USB 2 0 Operating System Support Mac OS X 10 5 x Mac OS X 10 6 x Recommendations To ensure there is ample power provided to the DTL d...

Page 4: ...7 users will see an AutoPlay window similar to the one in Figure 2 3 2 Select the option Run DTLplus_Launcher exe If Windows does not AutoPlay you can browse to the CD ROM partition Figure 2 4 and ma...

Page 5: ...ick Next Figure 3 1 Figure 3 1 Language Selection 2 Review the license agreement and click Next Figure 3 2 Note You must accept the license agreement before continuing otherwise the Next button will r...

Page 6: ...ontain 6 characters or more up to 16 characters 2 Passwords must contain three 3 of the following criteria options UPPER CASE lower case numeric and or special characters etc You may also enter a pass...

Page 7: ...ank if so desired The Name field may contain up to 32 characters but cannot contain the exact password The Company field may contain up to 32 characters but cannot contain the exact password The Detai...

Page 8: ...ng under Windows XP in Non Admin mode the Format routine can take up to a minute 6 Click OK to continue Figure 3 5 Formatting DTL Figure 3 6 Format Complete Initialization complete Note Times may vary...

Page 9: ...Hint field indicating a login failure see Figure 4 2 Figure 4 1 Login Window During the login process if a bad password is entered you will be given another opportunity to enter the correct password...

Page 10: ...menu Figure 5 1 DTL icon in taskbar Figure 5 2 DTL icon in taskbar Windows 7 users DTL Settings Allows you to change your password and or hint Figure 5 3 Allows you to add view change your contact inf...

Page 11: ...w kingston com support where you can access additional support information Figure 5 6 Format Warning About DTL Provides specific details about the DTL including Application and Firmware version inform...

Page 12: ...esktop as seen in Figure 6 1 1 Double click the DTL CD ROM icon 2 Double click the Mac folder found in the window displayed in Figure 6 2 Figure 6 1 DTLplus 3 Double click the DTLplus application icon...

Page 13: ...k Next Figure 7 1 Figure 7 1 Language Selection 2 Review the license agreement and click Next Figure 7 2 Note You must accept the license agreement before continuing otherwise the Next button will rem...

Page 14: ...ontain 6 characters or more up to 16 characters 2 Passwords must contain three 3 of the following criteria options UPPER CASE lower case numeric and or special characters etc You may also enter a pass...

Page 15: ...ank if so desired The Name field may contain up to 32 characters but cannot contain the exact password The Company field may contain up to 32 characters but cannot contain the exact password The Detai...

Page 16: ...ta partition Figure 7 5 and notify you when it is complete Figure 7 6 6 Click OK to continue Figure 7 5 Formatting DTLocker Figure 7 6 Format Complete Initialization complete Document No 48008071 001...

Page 17: ...int field indicating a login failure see Figure 8 2 Figure 8 1 Login Window During the login process if a bad password is entered you will be given another opportunity to enter the correct password ho...

Page 18: ...nu shown in Figure 9 2 to the right DTL Settings Allows you to change your password and or hint Figure 9 3 Allows you to add view change your contact information Figure 9 4 Allows you to change your l...

Page 19: ...ternet browser and navigates to http www kingston com support where you can access additional support information Figure 9 6 Format Warning About DTL Provides specific details about the DTL including...

Page 20: ...ge indicating you have 3 attempts left before reaching MaxNoA which is set to 10 by default See Figure 10 2 After a 10th failed login attempt the DTL will permanently block the data partition and requ...

Page 21: ...enter a new password prior to executing the format At this point you can either 1 click OK to confirm or 2 click Cancel to return to the login window Figure 10 3 Forgot Password If you opt to continu...

Page 22: ...In this example the DTL uses drive F which is the first available drive letter after drive E the last physical disk before the drive letter gap Because letter G is a network share and not part of the...

Reviews: