


I33LK and I43LK
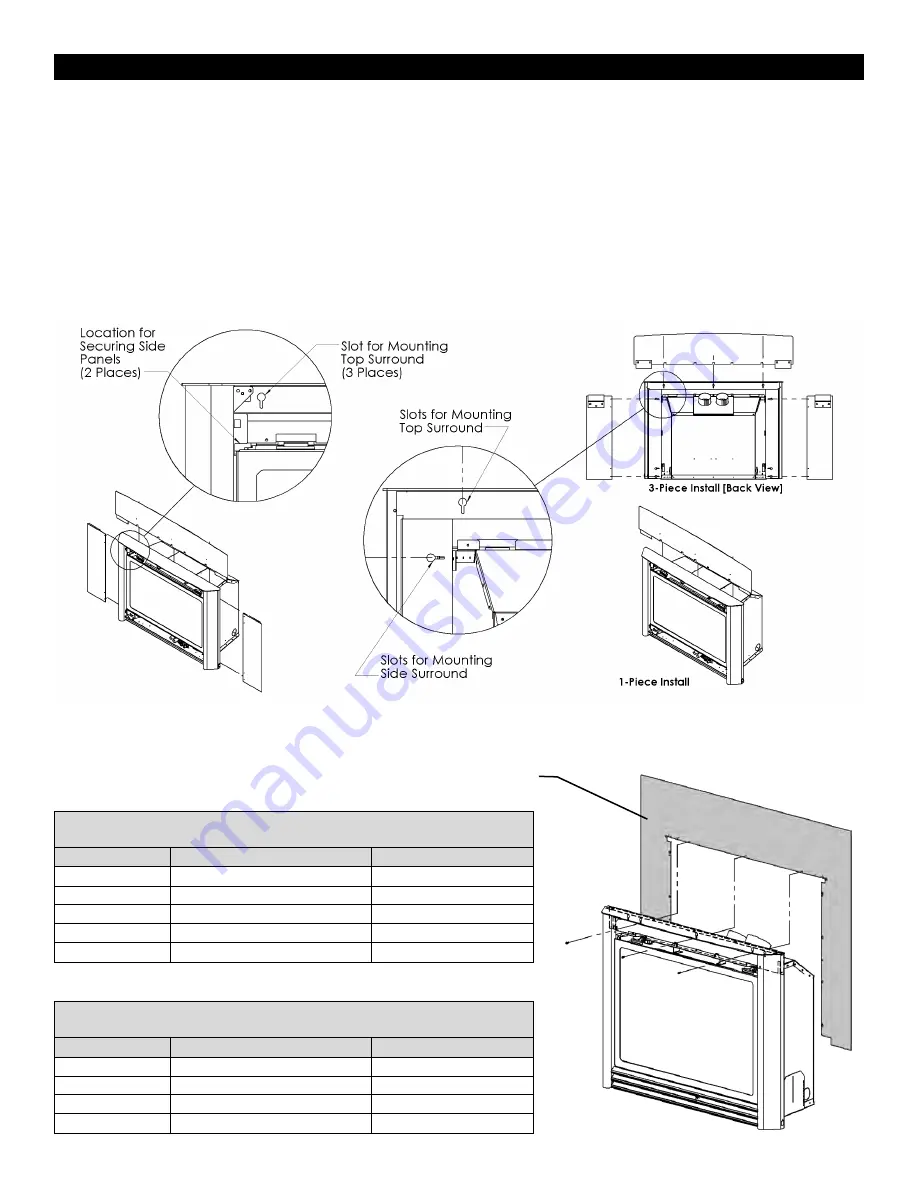
Surround Installation
1. Ensure that the LK Front is installed before continuing with these steps.
2. When installing a 3-piece surround, please note that the side panels must go first. When installing a 1-piece surround,
simply skip the instructions for the side panel installation.
3. Slide side panels in place. Make sure the pre-set screws slide into the slots located behind the side columns. Do not
tighten these screws yet. You will need to line up the top panel first.
4. Slide the top panel into place. The top panel lines up with the three [3] slots behind the top grill. Secure the top panel
in place with the three [3] pre-set screws.
5. Once the top panel is secured, line up the sides with the top and then tightens the pre-set screws. There are two
locations for these pre-set screws on each side panel.
IDV43
Part No.
Description
Dimensions
I43LKS1BL
1 Piece Top Surround
39" x 32-3/8"
43S4432
1 Piece Surround
44” x 32” x 5/8” Thick
I43LKS2BL
3 Piece Small Surround
44" x 33-1/8"
I43US4736
1 Piece Universal Surround 47" x 36"
IDV33
Part No.
Description
Dimensions
I33S3426B
1 Piece Top Surround
34-1/2" x 26-5/8"
I33SR2
1 Piece Surround
39” x 27” x 5/8” Thick
I33S4028B
3 Piece Small Surround
40" x 28"
I33S4430B
3 Piece Large Surround
44" x 30-1/2"
I33USR4
1 Piece Universal Surround 45" x 35"
1 Piece Universal Surround
-To be custom cut and bent-
59
Summary of Contents for Marquis IDV26
Page 15: ...I26SU UNIVERSAL SURROUND I26CVPF1 or I26CVPF3 I26CVPF2 or I26CVPF4 BOTTOM OF UNIT 15 ...
Page 45: ...I43CV I43CV3 I43US4736 Flat Custom Surround TO BE CUSTOM CUT AND BENT I43CV I43CV3 7 1 4 45 ...
Page 89: ...Gas Conversion for Modulator PART C 89 ...
Page 100: ...Proflame 2 Remote Control 100 ...
Page 102: ...102 ...


