Sanding guidelines and set-up
Under most sanding conditions, a normal sanding pass is no more than 1⁄64” deep. This depth can be achieved by approximately 1⁄4 turn of the
conveyor crank handwheel. Attempts to remove too much can cause jamming, wood burning, rapid sanding belt wear or tearing, poor finish and
conveyor belt slippage. We recommend that wide stock be sent through two to three times without adjusting the conveyor height. Turn the stock
180° to ensure an even sanding pass.
Steps to follow for test run;
Start the dust collector, make thickness adjustment by placing test workpiece on the conveyor and turn the conveyor crank handwheel until the
test workpiece comes in contact with the pressure rollers and sanding drum. Remove the test workpiece from the conveyor and start the
sanding drum and the conveyor motors, set the appropriate sanding feed speed and feed
your test workpiece.
Retrieve the test workpiece at the outfeed end of the conveyor and inspect it. Make
necessary adjustments until you gain more experience and produce an even sanding finish.
Appropriate conveyor feed speed
The correct speed to use depends on the type of stock you are using (hardwood vs.
softwood). As a general rule, a slower feed rate will sand the surface smoother, but runs the
risk of burning the wood; a faster feed rate will remove material faster, but runs the risk of
overloading the motor. Use trial-and-error to determine the best settings for your specific
applications.
Selecting the appropriate grit of sanding belt
There are many types of sanding belts to choose from. As a general rule, sand a workpiece
with progressively higher grit numbers, with no one grit increase of more than 50. Ultimately,
the type of wood you use and your desired finish will determine the best grit type to install on
your drum sander. Here is a standard guideline, 60 Grit/coarse, 80-100 grit/medium, 120-180
grit/fine and 220 grit/very fine.
Maintenance
NOTE: Disconnect machine from power source, before performing any maintenance
or lubrication.
The table height adjustment screw shafts, located at either end of the machine must be well
lubricated with gear grease at all times. Verify that all nuts and screws are properly tightened
before sanding. Verify that the sanding belt is installed properly and has not become loose
or torn. Remove any dust or particles from machine; never allow dust to accumulate on or in
the machine.
Replacing the coveyor belt
If the conveyor belt gets too worn out, the operations will not produce satisfactory results. The
conveyor belt will need to be replaced for perfect results. It is recommended to remove both
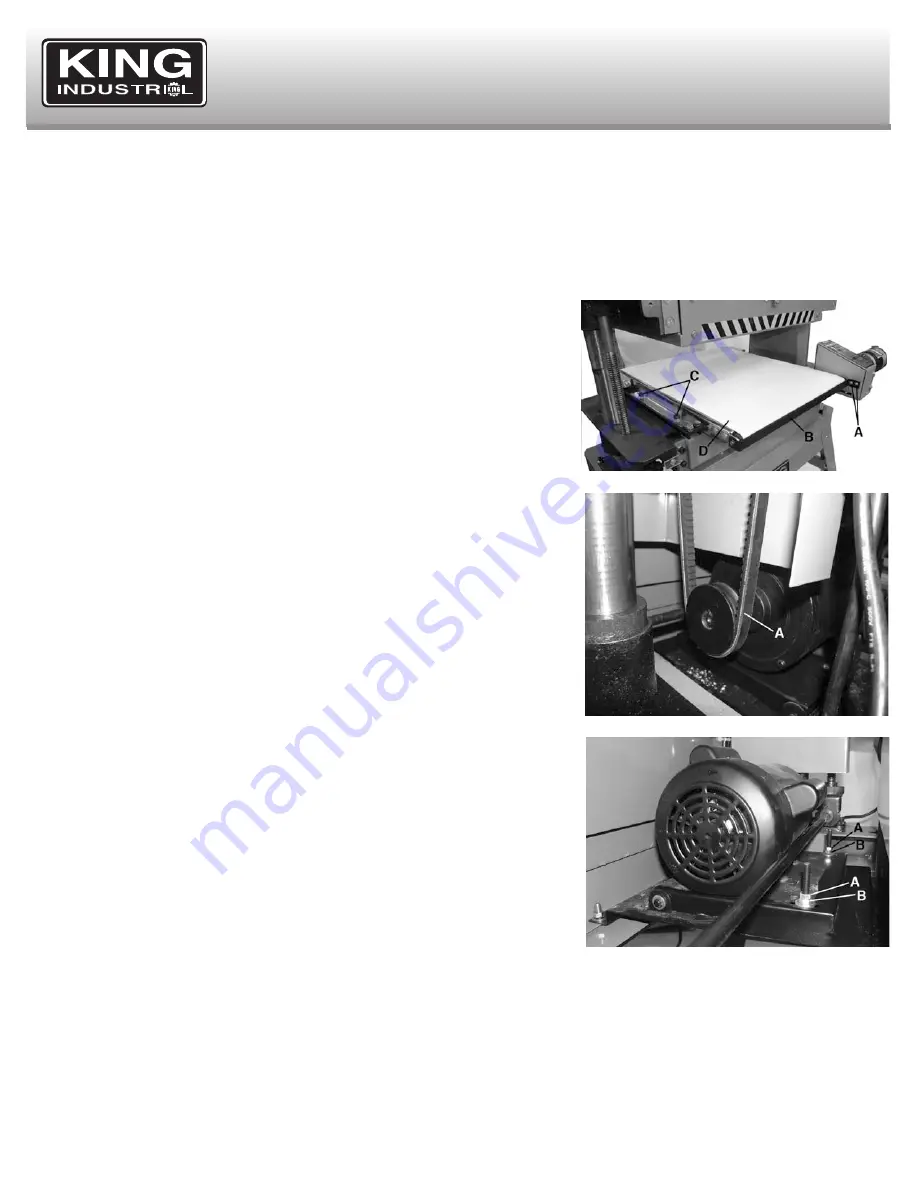
side covers. To replace the conveyor belt, first remove the 2 pan head screws (A) Fig.17
which secure the front nip guard (B). Remove the nip guard (B). Then remove the four cap
screws (C) Fig.17 (two on each side) which hold the conveyor belt and motor to the frame.
Tilt the entire conveyor table and slide it out from the sander frame. Release the conveyor
belt tension (see Conveyor Belt Tension and Tracking section-Fig.9). Slide the used
conveyor belt (D) off and replace it with an identical one. Reinstall the conveyor table and
make sure to follow all the conveyor belt adjustments found in this manual.
Tensioning or replacing the drive belt
The sanding drum is driven by a belt (A) Fig.18 and powered by a motor. If the belt becomes
too loose or needs to be replaced, follow these procedures;
Remove the right and left side covers by removing pan hd screws. To tension the belt, loosen the upper hex. nuts (A) Fig.19 and then tighten
the two lower hex. nuts (B). Proper tension is achieved when the belt can be deflected about 3⁄4” with moderate finger pressure at the midpoint.
Once belt is tensioned properly, retighten the upper hex. nuts against the lower hex. nuts.
To replace worn belt, release the belt tension by loosening the upper and lower hex. nuts (A & B) Fig.19 and pivot the motor upwards until you
are able to remove the belt. Reposition new indentical belt around the sanding drum pulley and the motor pulley and retension the belt as
described in the above step.
OPERATION & MAINTENANCE
Figure 17
Figure 18
Figure 19


