


KD-PC2 Operating Instructions
Page 0
KD-PC2 Operating Instructions
Page
So easy to control and operate:
With so many features and versatility, you may be wondering: Is the KD-PC2 card easy to control
and operate? Installing and using your KD-PC2 card couldn’t be simpler. KD-PC2:
Plugs right into the Pioneer Plasma Expansion Solutions Slot
Has an all-digital internal connection to the Pioneer Plasma Display
Has its own On-screen Display (OSD) and IR Remote Control that is easy to operate
Uses the RS-232 port on your Pioneer Plasma Display (optional Pioneer Plasma Display
Expansion Solutions Slot Communications Card must be installed in your display to support this
feature)
Is Firmware Upgradeable
Does not interfere with the operation of your Pioneer Plasma Display
Does not interfere with A/V sources connected directly to your Pioneer Plasma Display
Getting Started
Follow these instructions to quickly and easily install and set-up your KD-PC2 Pioneer Plasma
Display video plug-in card.
Open the package and you will find the following contents:
One (1) KD-PC2 Card with installation warning label
IR Remote Control with batteries included
Two (2) Audio Cables
One (1) Cable for Firmware Upgrades
Operating Instructions Manual
Warranty card
Installing your KD-PC2 Pioneer Plasma Display video plug-in card:
Your Key Digital KD-PC2 video processor card is easy to install, configure, and operate. Follow the
directions below to install the KD-PC2 video processor card in your Pioneer Plasma Display.
1. Install the KD-PC2 video processor card in your Pioneer Plasma Display, models listed
below
›
›
›
›
›
›
›
1.
2.
3.
4.
5.
6.
Be sure you have a model of Pioneer Plasma Display that supports the KD-PC2 video
card. See the list of supported Pioneer models, above.
The Pioneer Plasma display must be turned OFF and the power cord must be
UNPLUGGED before attempting to insert the KD-PC2 video card in your display.
Lay the Pioneer Plasma Display face down on a sturdy and smooth work surface. Use care
not to scratch the face of the display, and follow any precautions provided in your Pioneer
Plasma Display Operating Instructions Guide.
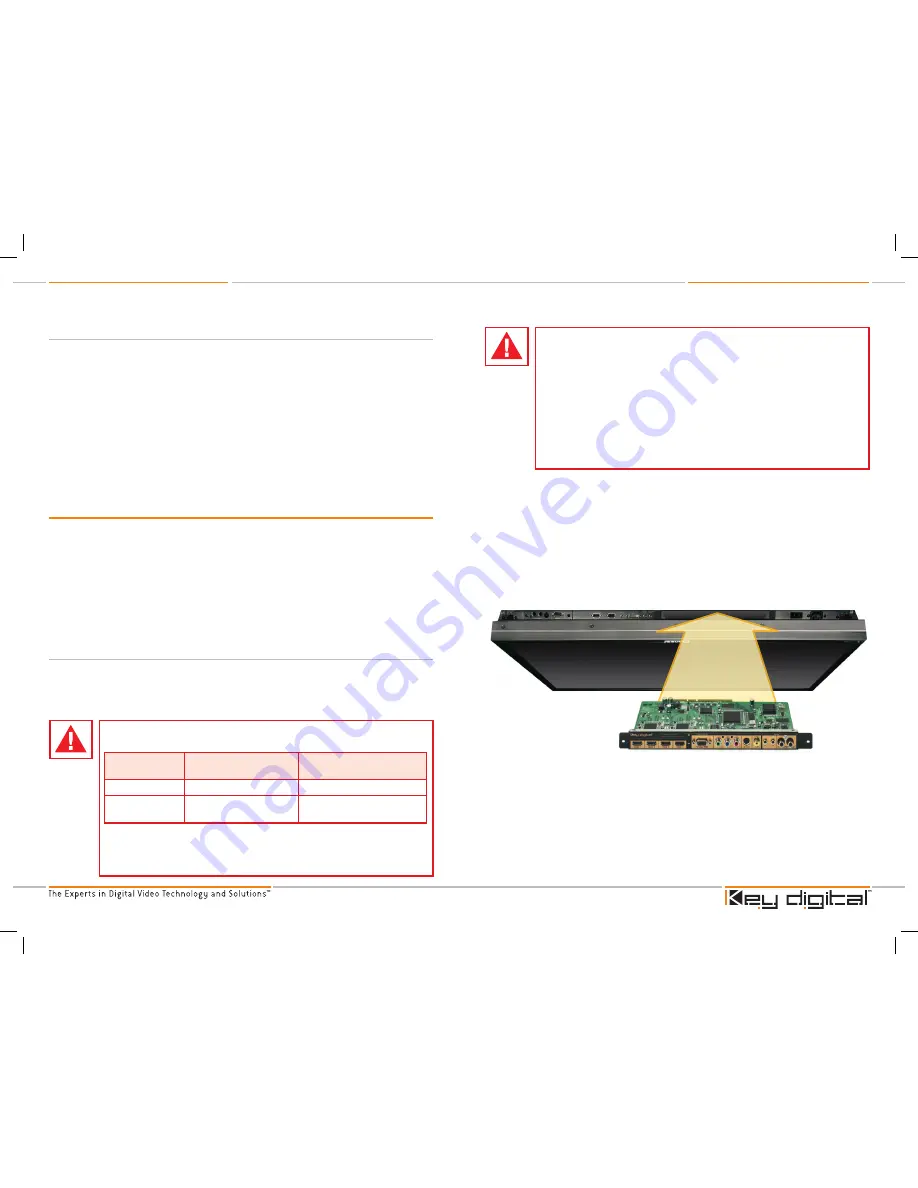
Locate the Expansions Solutions (“ES”) Slot on the underside of your Pioneer Plasma Display,
as shown below.
Orient your KD-PC2 video card as shown above and insert in the appropriate Expansions
Solutions (“ES”) Slot of your Pioneer Plasma Display. Using care not to damage the card, be
sure it is properly seated within the Pioneer Plasma Display and fully inserted, so the outer
flanges of the KD-PC2 video card are flush with the display case. You may need to “wobble”
the card slightly left and right, up and down, before the card is properly aligned with the
connector inside the Pioneer Plasma Display.
Note: If while installing the KD-PC2 video card it gets jammed or stuck in the slot, or
if you ever need to remove the KD-PC2 video card from your Pioneer Plasma
display, it is suggested you use the pull ring on the card. This pull ring can also be
used to facilitate installation of the card in the slot in the Pioneer Plasma Display.
a.
b.
c.
d.
e.
The KD-PC2 video processor card is currently intended for use ONLY WITH THE
FOLLOWING PIONEER PLASMA DISPLAYS:
Market
Pioneer
™
Plasma Display
Models Supported by the
Key Digital
™
KD-PC2
USA
PDP-___CMX models
425, 434, 504, 505, 507 & 607
Europe &
International
PDP-__MXE1 &
PDP-__MXE1-S
43 & 50
The KD-PC2 video processor card should ONLY BE INSERTED AS INSTRUCTED
HERE IN THE APPROPRIATE EXPANSIONS SOLUTIONS (“ES”) SLOT of these
Pioneer Plasma Displays. See the Pioneer Plasma Display Operating Instructions
Guide for more details.
Proper handling of the KD-PC2 card ensures a safe installation. The KD-PC2 card
is STATIC SENSITIVE. Please use EXTREME CAUTION when installing the KD-PC2
card inside the Pioneer Plasma Displays that support this card. The Pioneer
Plasma Display must be turned OFF and the power cord must be UNPLUGGED
before inserting the KD-PC2 card inside the Pioneer Plasma Display, or else
damage may occur to the products. Do not reapply power to the Pioneer Plasma
Display until the KD-PC2 card is properly installed in the display.
Key Digital will not be held liable or responsible for any damages, nor will Key
Digital honor the warranty, if proper set-up procedures are not followed when
installing the Key Digital KD-PC2 card. Key Digital reserves the right to inspect
the products for proper set up procedures.
ES Slot to use for installing
your KD-PC2 video card
Use care and fully insert the
KD-PC2 video card in the
Pioneer Plasma ES Slot
KD-PC2_Manual.indd 10-11
10/18/06 1:52:38 PM


