background image

English


|


35

Models of iPods/iPhones that can be 

connected to this unit

Made for 
• iPod nano (6th generation)  • iPod nano (5th generation)

• iPod nano (4th generation)  • iPod nano (3rd generation)

• iPod nano (2nd generation)  • iPod nano (1st generation)

• iPod with video 

• iPod classic

• iPod touch (4th generation)  • iPod touch (3rd generation)

• iPod touch (2nd generation)  • iPod touch (1st generation)

• iPhone 4S 

• iPhone 4

• iPhone 3GS 

• iPhone 3G

• iPhone

•  For information on the compatibility with iPod/

iPhone software, visit 

www.kenwood.com/cs/ce/

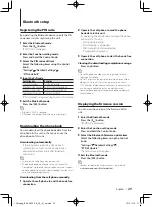
ipod/

.

•  Types of available control vary depending 

on the type of connected iPod. Visit 

www.kenwood.com/cs/ce/ipod/

 for further details.

•  The word “iPod” appearing in this manual indicates 

the iPod or the iPhone connected with the iPod 

connection cable (optional accessory).

•  Refer to the web site for connectable iPods and iPod 

connection cables.

  www.kenwood.com/cs/ce/ipod/

• 

If you start playback after connecting the iPod, the music 
that was playing on the iPod is played first.  
In this case, “RESUMING” is displayed without displaying a 
folder name, etc. Changing the browse item will display a 
correct title, etc.

• 

You cannot operate the iPod if “KENWOOD” or “

” is 

displayed on the iPod.

About “KENWOOD Music Editor”

•  This unit supports the PC application “KENWOOD 

Music Editor Light ver1.1” or later.

•  When you use the audio file with database 

information added by the “KENWOOD Music Editor 

Light ver1.1”, you can search for a file by title, album 

or artist name using the function mentioned in 

<Music search> (page 12).

•  In the Instruction manual, the term “Music Editor 

media” indicates the device that contains audio files 

with database information added with KENWOOD 

Music Editor.

•  “KENWOOD Music Editor Light ver1.1” is available 

from the following web site: 

www.kenwood.com/cs/ce/

•  For further information on “KENWOOD Music 

Editor Light ver1.1”, refer to the site above or the 

application help.

About the Bluetooth module

This unit conforms to the following Bluetooth 

specifications:

Version

Bluetooth Ver. 3.0 Certified

Profile

HFP (Hands Free Profile)

HSP (Headset Profile)

SPP (Serial Port Profile)

A2DP (Advanced Audio Distribution Profile)

AVRCP (Audio/Video Remote Control Profile)

PBAP (Phonebook Access Profile)

OPP (Object Push Profile)

For the cell-phones verified for compatibility, access 

the following URL:

http://www.kenwood.com/cs/ce/bt/

• 

The units supporting the Bluetooth function have been 
certified for conformity with the Bluetooth Standard 
following the procedure prescribed by Bluetooth 
SIG. However, it may be impossible for such units to 
communicate with your cell-phone depending on its type. 

• 

HFP is a profile used to make a hands-free call.

• 

OPP is a profile used to transfer data such as a phone book 
between units.

12Stepup_B64-4922-00_02_M_en.indd   35

12/01/30   11:08

Summary of Contents for KDC-U7053BT

Page 1: ...B64 4922 00 02 2011 JVC KENWOOD Corporation KDC U7053BT KDC U7053BTL CD RECEIVER INSTRUCTION MANUAL 12Stepup_B64 4922 00_02_M_en indd 1 12 01 30 11 08 ...

Page 2: ...a Bluetooth device by operating it Registering a Bluetooth device by operating this unit Registering a special Bluetooth device Simple Bluetooth device selection Selecting the Bluetooth device you wish to connect Deleting a registered Bluetooth device Bluetooth device registration test Operation for hands free phoning 25 Receiving a call Calling a number in the phone book Dialing a number Calling ...

Page 3: ...English 3 Appendix 34 Troubleshooting guide 36 Specifications 38 12Stepup_B64 4922 00_02_M_en indd 3 12 01 30 11 08 ...

Page 4: ...racters in the following language additional setting is required KDC U7053BT Chinese Refer to Chinese of Initial settings page 21 KDC U7053BTL Arabic Persian Thai Refer to TAG Language of Initial settings page 21 The illustrations of the display and panel appearing in this manual are examples used to explain more clearly how the controls are used Therefore what appears on the display in the illust...

Page 5: ...e Control knob Next turn the Control knob to select DISP ILLUMI and then press the Control knob Finally turn the Control knob to select Contrast and then press the Control knob In this manual the above operational procedure is described as follows 2 Select the Contrast function item Select the following items using the Control knob Settings DISP ILLUMI Contrast Press the button to return to the pr...

Page 6: ...ames 1 button 2 Release button 3 SRC button 4 Control knob 5 PRESET button 6 0 button 7 USB terminal 8 Auxiliary input 9 button p iPod button q DISP button w button 1 3 2 4 5 6 7 8 9 p q w 12Stepup_B64 4922 00_02_M_en indd 6 12 01 30 11 08 ...

Page 7: ...ubWoofer Level Subwoofer level 15 15 dB Bass Level Bass level 8 8 dB Middle Level Middle level 8 8 dB Treble Level Treble level 8 8 dB Equalizer PRO Bass Adjust Bass Center FRQ Bass Center Frequency 60 80 100 200 Hz Bass Level Bass level 8 8 dB Bass Q Factor Bass Q Factor 1 00 1 25 1 50 2 00 Bass EXT Bass Extend OFF ON Middle Adjust Middle Center FRQ Middle Center Frequency 0 5 1 0 1 5 2 5 kHz Mid...

Page 8: ...et up the Audio control page 7 2 Enter the Audio control mode Press the Control knob 3 Select the Audio preset memory mode Select the following items using the Control knob Detailed Settings Audio Preset 4 Select the Audio preset memory Turn the Control knob to select Memory and then press the Control knob 5 Determine the selection Turn the Control knob to select YES and then press the Control kno...

Page 9: ...se item artist album etc currently selected 1 Enter the Music search mode Press the button MUSICSEARCH is displayed 2 Enter the Search select mode Press the button 3 Select the Alphabet search mode Turn the Control knob to select Alphabet Search and then press the Control knob 4 Search for characters Operation type Operation Selection of characters Turn the Control knob Determination of the select...

Page 10: ...Podcasts GENRES Genres COMPOSERS Composers 5 Select the character s to be searched for Turn the Control knob to select a character s and then press the Control knob You can select up to three characters 6 Search for music Turn the Control knob to select DONE and then press the Control knob A search result list is displayed 7 Select the music Turn the Control knob to select music and then press the...

Page 11: ...Pod source Press the SRC button Select the iPod display 2 Enter the Function setting mode Press and hold the Control knob 3 Select the Play mode Turn the Control knob to select Play Mode and then press the Control knob 4 Select a desired playback function Turn the Control knob to select playback function and then press the Control knob Display Description Play Mode APP iPod Mode When set to ON all...

Page 12: ...basic operations to play Music disc Audio file contents refer to the Quick Start Guide Music Editor media Skip search You can search for a song by skipping songs at the set skip search ratio the ratio of the number of songs to skip to the total number of songs in the selected list 1 Enter the Music search mode Press the button MUSICSEARCH is displayed 2 Enter the Search select mode Press the butto...

Page 13: ... to ON plays the songs in the folder randomly ON OFF All Random Audio file When set to ON plays all songs in the disc USB randomly ON OFF Track Repeat CD File Repeat Audio file When set to ON plays the selected song repeatedly ON OFF Folder Repeat Audio file When set to ON plays the songs in the folder repeatedly ON OFF Factory setting 5 Exit the Function setting mode Press and hold the button Fun...

Page 14: ...setting 5 Select a setting and determine it Turn the Control knob to select a desired value and then press the Control knob The previous item is displayed 6 Exit the Function setting mode Press and hold the button Tuner operation Auto memory You can register 18 FM 6 AM stations with good reception automatically 1 Select the Tuner source Press the SRC button Select the TUNER display 2 Enter the Fun...

Page 15: ...ct access mode Press the button on the remote control Frequency Step Setting Changing the tuning frequency step The original setting is FM band 50 kHz and AM band 9 kHz 1 Turn the power OFF Press and hold the SRC button 2 Switch the frequency step While pressing the PRESET button and button press the SRC button Release your fingers from the button after the display appears The frequency step chang...

Page 16: ...isplay type page 16 Some items cannot be selected depending on the display type and row If you select Folder name while playing music on the Selecting a display type Shown below are examples of display types Display type Display information Type A Displays 3 lines of text Type B Displays 2 line of text Type C Displays the clock Type D Displays the Motion graphics Type E Turn off the display 5 seco...

Page 17: ...s item is displayed 5 Exit the Function setting mode Press and hold the button Illumination color selection You can select the illumination color of the panel 1 Enter the Function setting mode Press and hold the Control knob 2 Select the Color select item Select the following items using the Control knob Settings DISP ILLUMI Color Select 3 Select the part for which you want to set the illumination...

Page 18: ...ative mode when the interior light is on the text is displayed in the positive mode POSI1 Displays the text in the positive mode POSI2 When the interior light is off the text is displayed in the positive mode when the interior light is on the text is displayed in the negative mode Text Scroll Sets the method of scrolling to view hidden texts Auto Scrolls Once Scrolls once OFF Does not scroll BT DV...

Page 19: ...he Control knob to adjust the month and then press the Control knob 5 Set the day Turn the Control knob to adjust the day and then press the Control knob 6 Exit the Function setting mode Press and hold the button Dual clock display You can set the time for two different cities 1 Enter the Function setting mode Press and hold the Control knob 2 Select the City Select item Select the following items...

Page 20: ...utton Auxiliary input display setting You can set the display when switched the AUX source 1 Select the AUX source Press the SRC button Select the AUX display 2 Enter the Function setting mode Press and hold the Control knob 3 Select the AUX name set item Select the following items using the Control knob Settings AUX Name Set 4 Select the display connected as an AUX source and determine it Turn th...

Page 21: ...KDC U7053BTL only English Arabic Persian Thai FunctionLanguage Changes the display language of items displayed in the Function setting mode KDC U7053BTL only English Persian Built in AUX Sets whether to display AUX during source selection ON OFF CD Read Sets the method for reading CD When unable to play a special format CD set this setting to 2 to force playing Note that some music CDs may be unpl...

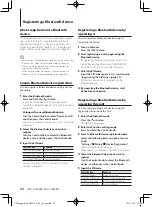
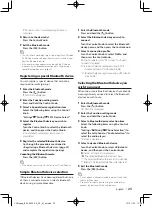
Page 22: ...ol knob leftward Transmission of PIN code Press the Control knob Pairing completes with HF Connect or Audio Connect displayed Registering a Bluetooth device by operating it You can register a Bluetooth device using its registration function 1 Turn on this unit Press the SRC button 2 Start registering a unit by operating the Bluetooth device By operating the Bluetooth device register the hands free...

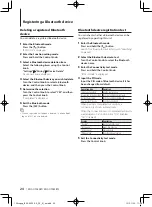
Page 23: ...Control knob to select the Bluetooth device name and then press the Control knob 3 Select a connection profile Turn the Control knob to select Profile and then press the Control knob Pairing completes with HF Connect or Audio Connect displayed A Bluetooth device registered using A2DP Advanced Audio Distribution Profile H Bluetooth device registered using HFP Hands Free Profile Selecting the Blueto...

Page 24: ...tered by operating this unit 1 Enter the Bluetooth mode Press and hold the button Search for a Bluetooth device starts with Searching displayed 2 Select the Bluetooth device to test Turn the Control knob to select the Bluetooth device name 3 Enter the Connectivity test mode Press and hold the Control knob BT Test Mode is displayed 4 Input the PIN code Input the PIN code of Bluetooth device if it h...

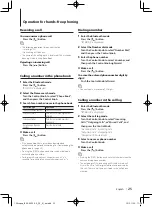
Page 25: ... search a non accent character such as u is searched for instead of an accent character such as ü Dialing a number 1 Enter the Bluetooth mode Press the button BT MODE is displayed 2 Select the Number dial mode Turn the Control knob to select Number Dial and then press the Control knob 3 Enter the phone number Turn the Control knob to select a number and then push the Control knob rightward 4 Make ...

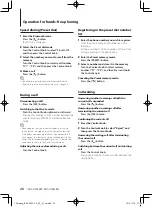
Page 26: ...utton During a call Disconnecting a Call Press the SRC button Switching to the Private mode Push the Control knob rightward or leftward Pressing this knob each time switches between the private talk mode PRIVATE and hands free talk mode Depending on the type of your cell phone switching to the private talk mode may select the source that was used before commencing the hands free connection If this...

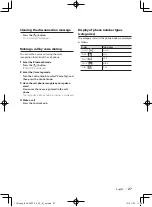
Page 27: ...Turn the Control knob to select Voice Tag and then press the Control knob 3 Have the cell phone recognize your spoken word Pronounce the name registered in the cell phone The recognized phone number name is displayed 4 Make a call Press the Control knob Display of phone number types categories The category items in the phone book are displayed as follows Display Information General General Home Ho...

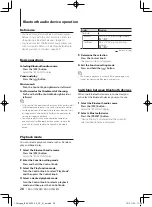
Page 28: ...ob rightward or leftward All or some of the operations above cannot be performed if the Bluetooth audio player is not ready for remote control Switching between Bluetooth audio sources does not start or stop playback automatically Perform the operation for starting or stopping playback Some audio players cannot be controlled remotely or reconnected after Bluetooth disconnection Operate the main un...

Page 29: ...gits can be registered for each phone number along with up to 50 characters representing a name 50 Number of alphabetical characters Fewer characters can be input depending on the type of characters To cancel downloading of the phone book data operate the cell phone Downloading the phone book You can download the phone book data from the cell phone to this unit so that you can use the phone book o...

Page 30: ...oth device automatically when it becomes unpaired ON OFF Bluetooth HF Audio Specifies the output speakers for hands free voice communication and Bluetooth audio sound Front Outputs sound from the front speakers All Outputs sound from the front and rear speakers Call Beep Sets whether to output a beep from the speaker when a call comes in ON Outputs a beep OFF Does not output a beep MIC Gain Adjust...

Page 31: ...at is received when the cell phone is not linked with Bluetooth cannot be displayed You need to download it The short message cannot be displayed during downloading the SMS Downloading the SMS Download the short message SMS received by the cell phone so that it can be read on this unit 1 Enter the Bluetooth mode Press the button BT MODE is displayed 2 Enter the Function setting mode Press and hold...

Page 32: ...ess and hold the Control knob 3 Select the SMS Message select item Select the following items using the Control knob Settings SMS SMS Message 4 Select a desired message language Turn the Control knob to select a message language and then press the Control knob 5 Exit the Function setting mode Press and hold the button If you select User from the message the previously created original message will...

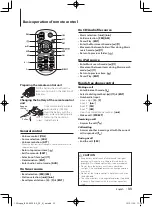
Page 33: ...ding Pull out CR2025 side Use a commercially available button battery CR2025 Insert the battery with the and poles aligned properly following the illustration inside the case ATT 0 9 SRC VOL FM AM EXIT 5 AUD ENT DIRECT General control Volume control VOL Source selection SRC Volume reduction ATT When the button is pressed again the volume returns to the previous level Return to previous item Exit f...

Page 34: ... read through the online manual as well In this manual the term USB device indicates a flash memory or digital audio player which has a USB terminal About the USB device When the USB device is connected to this unit it is charged when this unit is powered Install the USB device in the place where it will not prevent you from driving your vehicle properly You cannot connect a USB device via a USB h...

Page 35: ... 1 or later When you use the audio file with database information added by the KENWOOD Music Editor Light ver1 1 you can search for a file by title album or artist name using the function mentioned in Music search page 12 In the Instruction manual the term Music Editor media indicates the device that contains audio files with database information added with KENWOOD Music Editor KENWOOD Music Edito...

Page 36: ...g error Before calling for service first check the following table for possible problems General The key beep does not sound The Preout jack is in use The key beep cannot be output from the Preout jack Sound cannot be heard The unit does not turn on Information shown on the display is incorrect The connectors are dirty Clean the connectors Refer to Cleaning the connector page 4 Tuner source Radio ...

Page 37: ...ce contains no playable audio file A medium that does not have playable data has been played iPod Error Connection to the iPod has failed Remove the USB device and then reconnect it Reset iPod iPhone No Number The calling party does not notify a caller ID There is no phone number data No Data There is no outgoing call list There is no incoming call list There is no missed call list There is no pho...

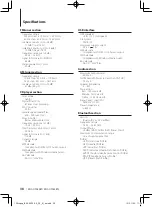
Page 38: ... WMA decode Compliant with Windows Media Audio AAC decode AAC LC m4a files USB interface USB Standard USB1 1 2 0 Full speed File System FAT16 32 Maximum Supply current DC 5 V 1 A MP3 decode Compliant with MPEG 1 2 Audio Layer 3 WMA decode Compliant with Windows Media Audio AAC decode AAC LC m4a files Audio section Maximum output power 50 W x 4 Full Bandwidth Power at less than 1 THD 22 W x 4 Speak...

Page 39: ...os are owned by the Bluetooth SIG Inc and any use of such marks by JVC KENWOOD Corporation is under license Other trademarks and trade names are those of their respective owners The AAC logo is a trademark of Dolby Laboratories iTunes is a trademark of Apple Inc Made for iPod and Made for iPhone mean that an electronic accessory has been designed to connect specifically to iPod or iPhone respectiv...

Page 40: ...12Stepup_B64 4922 00_02_M_en indd 40 12 01 30 11 08 ...

Reviews: