background image

EN

 30 

Quick Start Guide

NOTE

• Install the microphone as far as possible 

from the cell-phone.

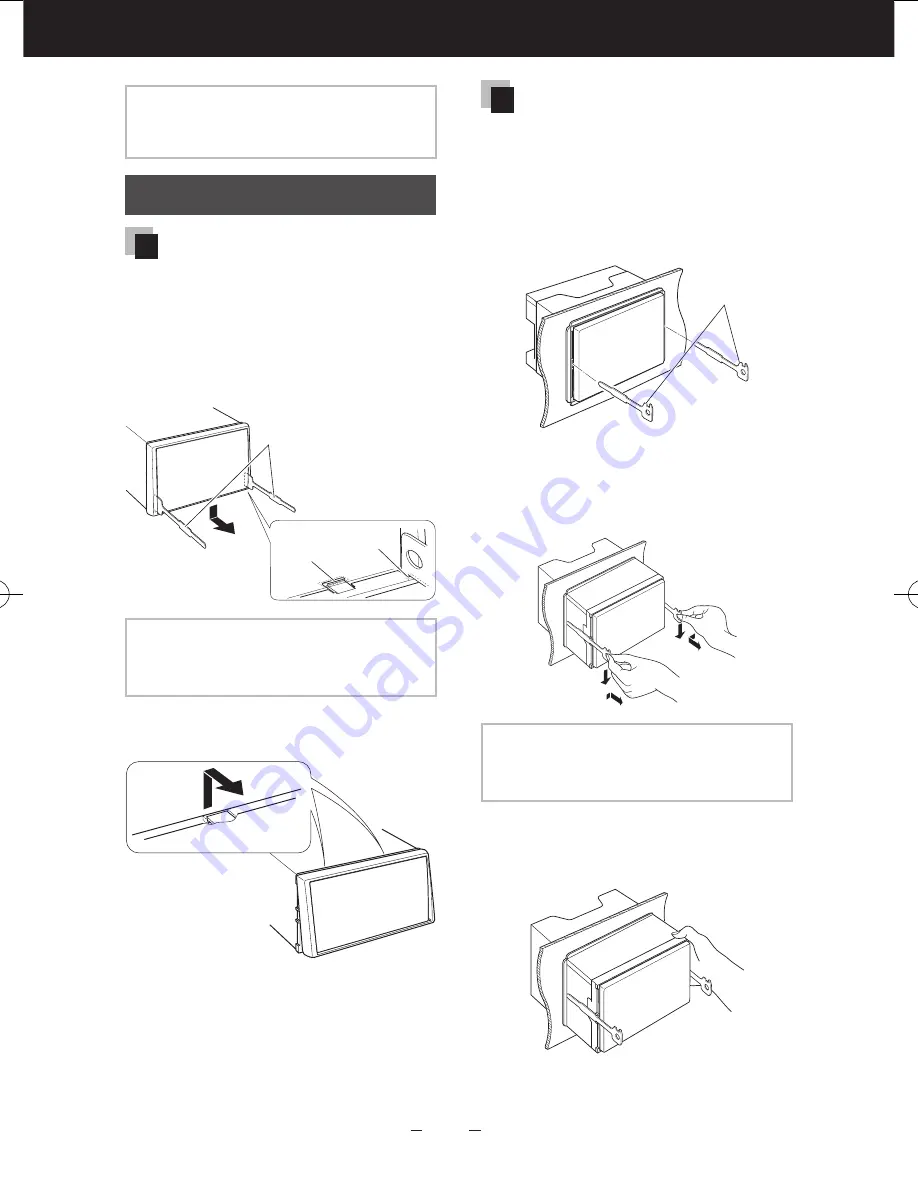
Removing Procedure

Removing the trim plate

1)  Engage the catch pins on the 

extraction key (accessory

3

) and 

remove the two locks on the 

lower level.  

Lower the frame and pull it 

forward as shown in the figure.

3

Lock

Catch

NOTE

• The trim plate can be removed from the 

top side in the same manner.

2)  When the lower level is removed, 

remove the upper two locations.

Removing the unit

1)  Remove the trim plate by 

referring to step 1 in “Removing 

the trim plate”.

2)  Insert the two extraction keys 

(accessory

3

) deeply into the slots 

on each side, as shown.

3

3)  Lower the extraction key toward 

the bottom, and pull out the unit 

halfway while pressing towards 

the inside.

NOTE

• Be careful to avoid injury from the catch 

pins on the extraction key.

4)  Pull the unit all the way out with 

your hands, being careful not to 

drop it.

B59-2163-00_00_QSG_K.indb   30

13/01/18   13:51

Summary of Contents for DNN770HD

Page 1: ...and operation procedures will help you obtain the best performance from your new Navigation System For your records Record the serial number found on the back of the unit in the spaces designated on the warranty card and in the space provided below Refer to the model and serial numbers whenever you call upon your Kenwood dealer for information or service on the product Model DNN990HD DNN770HD Seri...

Page 2: ...hape indicates the key or button you should control indicates the name of panel buttons indicates the name of touch keys Contents Precautions 3 2WARNING________________________ 3 Cleaning The Unit____________________ 4 How To Reset Your Unit_______________ 4 Safety Precautions and Important Information 5 2WARNINGS_______________________ 5 2CAUTIONS________________________ 5 IMPORTANT INFORMATION__...

Page 3: ...e condensation to evaporate If the unit still does not operate normally after a while consult your Kenwood dealer Precautions on handling discs Do not touch the recording surface of the disc Do not stick tape etc on the disc or use a disc with tape stuck on it Do not use disc type accessories Clean from the center of the disc and move outward When removing discs from this unit pull them out horizo...

Page 4: ...g 1 Fig 2 Cleaning The Unit If the faceplate of this unit is stained wipe it with a dry soft cloth such as a silicon cloth If the faceplate is stained badly wipe the stain off with a cloth moistened with neutral cleaner then wipe it again with a clean soft dry cloth Applying spray cleaner directly to the unit may affect its mechanical parts Wiping the faceplate with a hard cloth or using a volatil...

Page 5: ...treme temperatures can lead to malfunction or damage Also note that the unit can be damaged by strong vibration by metal objects or by water getting inside the unit 2CAUTIONS Failure to avoid the following potentially hazardous situations may result in injury or property damage The navigation system is designed to provide you with route suggestions It does not reflect road closures or road conditi...

Page 6: ...nect to Internet using the tethering function of your smartphone or an Internet device About the account To use internet services via this system you need to create an account in the Route Collector site In addition to the owner account you can register up to four user accounts You can use a guest account as well By switching among accounts you can secure the privacy when using the mail feature or...

Page 7: ...g key and set the item Language Setup Select the language used for the GUI and input methods Default is English United States 1 Touch Language Setup 2 Select a language from the list After setting press the 6 button twice WiFi Setup Configure settings for connection to Wi Fi 1 Touch WiFi Setup 2 Slide Wi Fi to ON 3 Select the Wi Fi access point to register from the list 4 Input the Password 5 Touc...

Page 8: ...his step may be skipped if you have already registered yourself in the Route Collector site 1 Touch Create Account 2 Enter account information You cannot register an account which has already been used Register another account name 3 Touch OK The account is temporarily registered in the Route Collector site 4 Activate the account A confirmation mail is sent to the registered mail address Open the ...

Page 9: ... controller in a place where it will not move during braking or other operations A dangerous situation could result if the remote controller falls down and gets wedged under the pedals while driving Do not leave the battery near fire or under direct sunlight A fire explosion or excessive heat generation may result Do not recharge short break up or heat the battery or place it in an open fire Such ...

Page 10: ...nsert an SD card 1 Press 8 0 button for 1 second The panel fully opens 2 Hold the SD card as the illustration in the right and insert it into the slot until it clicks To eject the card Push the card until it clicks and then remove your finger from the card The card pops up so that you can pull it out with your fingers 0 Labelled side ...

Page 11: ...for 1 second switches camera view display on off 5 MENU Displays the option menu screen Pressing for 1 second switches AV out sources 6 HOME Displays the Home screen P 15 Pressing for 1 second turns the power off When the power off turns the power on 7 6 Back Return to the previously viewed screen Pressing for 1 second displays the Hands Free screen Instruction Manual P 118 8 0 Eject Ejects the di...

Page 12: ...slot cover as the illustration in the right 2 Hold the microSD card with the label facing up and the notched section right and insert it into the slot until it clicks To eject the card Push the card until it clicks and then remove your finger from the card The card pops up so that you can pull it out with your fingers ...

Page 13: ...ng for 1 second turns the power off When the power off turns the power on 6 MENU Displays the option menu screen Pressing for 1 second switches AV out sources 7 Volume Knob Turning adjusts volume up or down Displays the Tone Control screen Instruction Manual P 144 Pressing for 1 second stores the tag data of the current music from HD Radio broadcast or SIRIUS XM Instruction Manual P 94 8 6 Back Re...

Page 14: ...udio Control Menu screen Displays the control screen of current source Icon feature differs depending on the source RETURN Returns to previous screen List screen There are some common function keys in the list screens of most sources Scroll Touch to scroll through texts on the display etc Touch keys with various functions are displayed here Displayed keys differ depending on the current audio sour...

Page 15: ...tor com Operation on the Home Screen 1 Press the HOME button to display the Home screen 2 Select the Service panel Media panel Source launcher panel or Network contents panel Panel Description 1 Service panel Weather widget Displays the weather forecast for the selected region Network widget Displays the schedule SNS or RSS 2 Media panel Now playing Displays the title of the song being played or t...

Page 16: ...ys all sources All source list All source list You can scroll the list screen by flicking the screen up down Home Returns to the Source launcher panel Moving or deleting of an icon on the Source launcher panel 1 Touch and hold the icon 2 Drag the icon to the desired position or Recycle Bin Adding of a shortcut icon to Source launcher panel 1 Touch in Source launcher panel 2 Touching the icon conti...

Page 17: ... such as ecoRoute and Help 5 Adjusts the settings NOTE You can get additional information about using the navigation system from Help To display Help touch Apps and then touch Help For more information about your navigation system download the latest version of the Owner s Manual from manual kenwood com edition im365 3 Enter your destination and start the guidance Finding points of interest 1 Touc...

Page 18: ...top of the map If you depart from the original route your navigation system recalculates the route 1 2 3 4 5 6 8 9 7 1 Views the Next Turn page or the junction view page when available 2 Views the Turn List page 3 Views the Where Am I page 4 Stops the currents route 5 Displays traffic information on the route 6 Returns to the Main Menu 7 Displays a different data field 8 Views the Trip Computer 9 ...

Page 19: ...c information The traffic subscription activates automatically after your navigation system acquires satellite signals while receiving traffic signals from the service provider You can add other subscriptions at any time For information about traffic receivers and coverage areas go to www garmin com kenwood Updating the software To update the navigation system software you must have a USB mass sto...

Page 20: ...ject the disc Press the 0 button 1 Connect the device with each cable Playbackstarts To disconnect the device Touch on the screen and then touch 0 Disconnect the device from the cable DNN990HD 1 Press the 0 button for 1 second to open the front panel 2 Hold the SD card as the diagram below and insert it into the slot until it clicks Playbackstarts DNN770HD 1 Open the microSD card slot cover as the...

Page 21: ...r bar Repeats current content Plays all content in random order NOTE For other operations refer to the Instruction Manual If desired key is not displayed in the multi function bar touch the to switch the menu 3 Search the track file you want to listen to List search 1 Touch center of the screen The content list of the media being played is displayed If the information of the current track only is ...

Page 22: ...screen Each area on the screen has a separate function 1 2 3 3 1 2 3 Displays the movie control screen Displays the Source Control screen Searches the next previous content or file Scrolling from center of display to left or right performs fast backward or fast forward To stop fast backward forward touch center of the display 1 1 For iPod USB this function may be unavailable depending on the playi...

Page 23: ...ect the band HD Radio tuner only 3 HD Radio reception Touch 4 or to tune in the desired station SiriusXM Touch CH or CH 5 to tune in the desired channel Auto memory HD Radio tuner only 1 Touch Sub function menu appears 2 Touch AM or FM to select the band 3 Touch 4 Touch AME 5 Touch 4 or in the sub function menu Auto memory starts Recalling the preset station 1 Touch P You can also display the pres...

Page 24: ...5 Select your cell phone from the displayed list in the Searched Device List screen Registering is completed 2 Connect your cell phone to the unit 1 Touch the desired device from the list and touch TEL HFP The selected device is connected to the unit NOTE Touch Audio A2DP if you want to connect the device as an audio player Touch Pandora SPP if you want to connect the Bluetooth device 3 Download y...

Page 25: ... the phone number from the list 3Touch Call using the phonebook 1Touch 2Select the name from the list 3Select the number from the list 4Touch Call using the preset number 1Touch Preset to start calling the corresponding phone number Call by voice You can make a voice call using the voice recognition function of the cell phone 1Touch 2Pronounce the name registered in the cell phone NOTE For detaile...

Page 26: ...ery wires the battery may be drained If the console has a lid make sure to install the unit so that the faceplate will not hit the lid when closing and opening If the fuse blows first make sure the wires aren t touching to cause a short circuit then replace the old fuse with one with the same rating Insulate unconnected wires with vinyl tape or other similar material To prevent a short circuit do ...

Page 27: ...tery 2 Make the proper input and output wire connections for each unit 3 Connect the speaker wires of the wiring harness 4 Connect the wiring harness wires in the following order ground battery ignition 5 Connect the wiring harness connector to the unit 6 Install the unit in your car 7 Reconnect the terminal of the battery 8 Press the Reset button P 4 9 Perform the Initial Setup See First Step P 7...

Page 28: ...neral Motors cars 1 Cut out accessory 4 to meet the shape of the opening of the center console 2 Attach accessory 4 to the unit 4 Cut out to meet the shape of the opening in the vehicle Toyota Scion cars 1 Cut out accessory 4 as illustrated Cutting line 4 2 Fold double sided adhesive accessory 5 along the slit and attach it to accessory 4 cut out against the center rib as illustrated Use 2 pieces ...

Page 29: ...ls might not be possible with an inside installation The GPS antenna should be installed at a position that is spaced at least 12 inch 30 cm from cellular phone or other transmitting antennas Signals from the GPS satellite may be interfered with by these types of communication Painting the GPS antenna with metallic paint may cause a drop in performance Microphone unit and Push To Talk Switch 1 Che...

Page 30: ...from the top side in the same manner 2 When the lower level is removed remove the upper two locations Removing the unit 1 Remove the trim plate by referring to step 1 in Removing the trim plate 2 Insert the two extraction keys accessory3 deeply into the slots on each side as shown 3 3 Lower the extraction key toward the bottom and pull out the unit halfway while pressing towards the inside NOTE Be...

Page 31: ...hicle s parking brake detection switch harness For best safety be sure to connect the parking sensor Light Green Parking sensor wire Purple White Reverse sensor wire Cooling fan Cooling fan Accessory Voice Control Switch DNN990HD only Fuse 10A Fuse 10A Connect to vehicle s reverse lamp harness when using the optional rear view camera Accessory 2 FM AM antenna input Accessory Bluetooth Microphone A...

Page 32: ...e Power control wire Connect to the terminal that is grounded when either the telephone rings or during conversation To use the Mute feature you need to hook up this wire to your telephone by using a commercial telephone accessory Depending on what antenna you are using connect either to the control terminal of the motor antenna or to the power terminal for the booster amplifier of the film type a...

Page 33: ...10 CMOS 300 Optional Accessory camera control terminal AV IN1 input Yellow Visual input Red Audio Right input White Audio Left input Rear view camera input Front view camera input AV OUT Output Visual Output Rear View Camera Input AV OUT Output Visual Output 1 VIDEO AV OUT R CAM Rear Preout Red Audio Right Output White Audio Left Output Front Preout Red Audio Right Output White Audio Left Output S...

Page 34: ...USE 10A USB iPod iPhone KCA iP202 Optional Accessory KCA iP102 Optional Accessory USB device commercially available USB terminal 0 8m USB terminal 0 8m USB terminal 0 8m USB terminal 0 8m USB terminal 0 8m AV Output 1 8m SiriusXM Connect Vehicle Tuner iDatalink connector iPod Music commercially available iPod Video and Music commercially available USB maximum power supply current 5 V 500 mA USB ma...

Page 35: ...ter Inc Facebook is a registered trademark of Facebook Inc INRIX is a registered trademark of INRIX Inc Nuance is a registered trademark of Nuance Communications Inc aupeo is a trade mark of Aupeo Ltd Dropbox is a trademark of Dropbox Inc BlackBerry RIM Research In Motion and related trademarks names and logos are the property of Research In Motion Limited and are registered and or used in the U S...

Page 36: ...issemination or distribution of false information 9 Obstruction or acts that may likely constitute obstruction of the operation of the Service 10 Acts that cause or that may likely cause trouble disadvantages or damages to us or third parties 11 Use of the Service for illegal purposes 12 Other acts deemed inappropriate by us 5 Compensation Claim Should any complaints lawsuits or similar claims be ...

Page 37: ...ofiles must be supported SPP Serial Port Profile A2DP Advanced Audio Distribution Profile BlackBerry Visit www pandora com from the built in browser to download the Pandora application Bluetooth must be built in and the following profiles must be supported SPP Serial Port Profile A2DP Advanced Audio Distribution Profile NOTE The Pandora service is available only in the U S Australia and New Zealan...

Page 38: ......

Page 39: ...i Alliance W02 5613 USB Wi Fi adapter Specifications IEEE Standard 802 11b g n Security Support 64 128 bit WEP WPA WPA2 Frequency Range 2 401 GHz 2 473 GHz Transfer rates MAX 802 11n 150 Mbps 802 11g 54 Mbps 802 11b 11 Mbps Output Power 16 18dBm CCK 13 15dBm OFDM Power Consumption 5 V 100 mA MAX Dimensions L W H 15 mm 19 mm 5 6 mm 5 8 3 4 1 4 Design and specifications are subject to change without...

Page 40: ... dBm OFDM Consommation 5 V 100 mA MAX Dimensions L l H 15 mm 19 mm 5 6 mm 5 8 3 4 1 4 MANUAL DE INSTRUCCIONES 2PRECAUCIÓN Los cambios o modificaciones no aprobados por nosotros podrían anular la autoridad del usuario para utilizar el equipo Este adaptador ha sido diseñado exclusivamente para utilizarse en los receptores para automóvil de Kenwood No lo utilice en ningún otro receptor para automóvil...

Page 41: ...be determined by turning the equipment off and on the user is encouraged to try to correct the interference by one or more of the following measures Reorient or relocate the receiving antenna Increase the separation between the equipment and receiver Connect the equipment into an outlet on a circuit different from that to which the receiver is connected Consult the dealer or an experienced radio T...

Page 42: ...eurs il faut choisir le type d antenne et son gain de sorte que la puissance isotrope rayonnée équivalente p i r e ne dépasse pas l intensité nécessaire à l établissement d une communication satisfaisante IC Industry Canada Notice This device complies with Industry Canada licence exempt RSS 210 standard s Operation is subject to the following two conditions 1 This device may not cause interference...

Page 43: ...e to read through this instruction manual Familiarity with installation and operation procedures will help you obtain the best performance from your new Navigation System For your records Record the serial number found on the back of the unit in the spaces designated on the warranty card and in the space provided below Refer to the model and serial numbers whenever you call upon your Kenwood deale...

Page 44: ...ration 88 About HD Radio Technology__________ 88 HD Radio tuner Basic Operation________ 89 Memory Operation___________________ 91 Selecting Operation__________________ 91 Traffic Information___________________ 93 Receive Mode_______________________ 94 iTunes Tagging______________________ 94 Bookmark__________________________ 95 SiriusXM Satellite Radio Operation 98 SiriusXM Basic Operation________...

Page 45: ...sharp tip Ñ ÑCleaning the unit If the faceplate of this unit is stained wipe it with a dry soft cloth such as a silicon cloth If the faceplate is stained badly wipe the stain off with a cloth moistened with neutral cleaner then wipe it again with a clean soft dry cloth Applying spray cleaner directly to the unit may affect its mechanical parts Wiping the faceplate with a hard cloth or using a vola...

Page 46: ...usic CD is the current source 1 Touch in the control screen The search type screen appears 2 Touch desired search way ñ ñ How to Read this Manual NOTE The screens and panels shown in this manual are examples used to provide clear explanations of the operations For this reason they may be different from the actual screens or panels used or some display patterns may be different Link header You can ...

Page 47: ...gy and SiriusXM Satellite Radio Navigation Wi Fi access point Connect to Internet using the tethering function of your smartphone or an Internet device Wi Fi 11n g b 3G LTE or EDGE HOME 6 HOME 6 TEL Notes You can use following feature for 2 years after registration of the owner account To use it continuously a usage fee is required For details see web site of Route Collector http www route collect...

Page 48: ... the tag data of the current music from HD Radio broadcast P 94 or SiriusXM P 103 3 S R Vol Adjusts volume 4 NAV Displays the navigation screen Pressing for 1 second switches camera view display on off 5 MENU Displays the option menu screen Pressing for 1 second switches AV out sources 6 HOME Displays the Home screen P 22 Pressing for 1 second turns the power off When the power off turns the power...

Page 49: ...f turns the power on 6 MENU Displays the option menu screen Pressing for 1 second switches AV out sources 7 Volume Knob Turning adjusts volume up or down Displays the Tone Control screen P 144 Pressing for 1 second stores the tag data of the current music from HD Radio broadcast P 94 or SiriusXM P 103 8 6 Back Return to the previously viewed screen Pressing for 1 second displays the Hands Free scr...

Page 50: ...off the navigation system Press the HOME button for 1 second If it is your first time turning the navigation system on after installation it will be necessary to perform Initial setup P 16 1 1 Login Select the login user When the owner has not been registered When the owner has been registered Enter the password When you selected Administrator or Guest you do not need to enter a password Auto Logi...

Page 51: ...st time or when you reset the unit See Resetting the Navigation System P 157 Set each item as follows Language Setup Select the language used for the GUI and input methods Default is English United States 1 Touch Language Setup 2 Select a language from the list 3 After setting press the 6 button twice WiFi Setup Configure settings for connection to Wi Fi 1 Touch WiFi Setup 2 Slide Wi Fi to ON 3 Se...

Page 52: ...Touch your desired color and For details on operation see Panel color coordinate P 133 EXT SW DNN990HD only Control the external devices 1 Touch SET 2 Set device name output pattern and pulse set for device Then touch For details on operation see EXT SW setup P 131 Camera Set the parameters for the camera 1 Touch SET 2 Set each item and touch For details on operation see Camera Setup P 135 Demo mo...

Page 53: ...s ö ö To remove Push the microSD card until it clicks and then remove your finger from the card The card pops up so that you can pull it out with your fingers 1 2 1 2 ññHow to Play Media Music CD and disc media DNN990HD Press the G button HOME 6 The panel opens Insert the disc into the slot The panel closes automatically The unit loads the disc and playback starts ö ö To eject the disc Press the G...

Page 54: ... all audio function Touch STANDBY Vehicle information display Touch OEM ññOperation on the Home Screen Most functions can be operated on the Home screen Press the HOME button DNN990HD HOME 6 DNN770HD HOME 6 TEL Home screen appears Select the Service panel Media panel Source launcher panel or Network contents panel Panel Description 1 Service panel Weather widget Displays the weather forecast for t...

Page 55: ...anel 2 1 1 Now playing widget Displays the title of the song being played or the name of the station you are listening to and allows you to perform simple operations See Now playing Widget P 52 2 Media widget Touching allows you to switch among Network media history and photo frame See Network Media History Widget P 54 Photo Frame Widget P 54 Service panel 2 1 1 Weather widget Displays the today s...

Page 56: ...io Control Menu screen Displays the control screen of current source Icon feature differs depending on the source List screen There are some common function keys in the list screens of most sources Scroll Touch to scroll through texts on the display etc Touch keys with various functions are displayed here Displayed keys differ depending on the current audio source status etc For examples of functi...

Page 57: ... in the navigation screen Touching this area displays the audio screen Displays the navigation and control keys of the current source Displays the navigation and current video picture playback display NOTE The screen switches between playback screen and camera view each time the viewing area is touched Touching the source icon in the bottom of the screen displays the full audio screen ö ö To retur...

Page 58: ...alink com ññOEM Feature Operation By connecting this navigation system to the bus system of the vehicle using an ADS commercially available this navigation system can access the satellite radio source provided for the vehicle and vehicle information can be displayed on this navigation system Press the HOME button Touch in the Source launcher panel Touch OEM OEM Features screen appears Displays the...

Page 59: ...ton to display the Home screen Note To display the Network contents panel Press the HOME button again 2 Press the MENU button 3 Touch Setting 4 Slide Wi Fi to ON 5 Touch Wi Fi 6 Select the Wi Fi access point to register from the list 7 Input the Password 8 Touch Connect ñ ñ Wi Fi Setup Register the Wi Fi access point manually 1 Touch ADD NETWORK 2 Input the SSID code 3 Select the security 4 Input ...

Page 60: ...nel Press the HOME button again 2 Press the MENU button 3 Touch Setting 4 Touch Date time 5 Set each item as follows 6 Press the 6 button ñ ñ Clock and Date Setup Adjust the date and time manually 1 Touch Automatic date time to remove the check 2 Touch Set date 3 Adjust the date 4 Touch Set 5 Touch Set time 6 Adjust the time 7 Touch Set 8 Touch Select time zone 9 Select a time zone 10 Press the 6 ...

Page 61: ...User Account P 38 3 Switch between login accounts See Switch the User Login P 38 Create User Account To use this unit you need to create an account in the Route Collector site Preparation To register yourself in the Route Collector site as a user you need a mail address You can register yourself via the Web http www route collector com This step may be skipped if you have already registered yourse...

Page 62: ...Home screen 2 Press the MENU button 3 Touch Account 4 Touch Login User select 5 Select an account 6 Enter the password Delete User Account You can delete a previously registered user account Preparation You can set a user account when you have logged in the Owner 1 Press the HOME button to display the Home screen 2 Press the MENU button 3 Touch Account 4 Touch Delete Account 5 Select an account 6 ...

Page 63: ...Displays the weather forecast for the selected region Preparation You must have a connection with the internet using Wi Fi See Wi Fi Setup P 32 You can use this feature for 2 years after registration of the owner account To use it continuously a usage fee is required For details see web site of Route Collector http www route collector com 1 Press the HOME button 2 Touch in the Network contents pan...

Page 64: ...tons Starts the schedule application Reads out all schedules in an auditory fashion Switches to RSS or SNS 2 Schedule list Displays the today s schedule registered in Google Calendar Touching it displays the event view Reads out the schedule in an auditory fashion SNS Widget You can use Facebook Twitter Gmail and email IMAP Preparation To use each service the email Google Facebook or Twitter accou...

Page 65: ...r User Ñ ÑRegister an account Register account information for synchronization with the Google account 1 Press the HOME button 2 Touch in the Network contents panel 3 Touch Schedule 4 Touch Gmail 5 Input the Email address and Password 6 Touch Next 7 Change the server name to m google com 8 Touch Next thrice Ñ ÑSchedule Operation 1 Press the HOME button 2 Touch in the Network contents panel 3 Touch...

Page 66: ...ired You can use a user account when you have logged in the Owner or User Ñ ÑStart the SNS Application 1 Press the HOME button 2 Touch in the Network contents panel 3 Touch SNS Ñ ÑRegister an account Facebook 1 Touch Facebook 2 Touch Sign in 3 Input the Email address Phone and Password 4 Touch Log in Twitter 1 Touch Twitter 2 Touch Sign in 3 Input the Username email and Password 4 Touch Authorize ...

Page 67: ...tion function When Speak now appears speak the comment Add Cc Bcc Displays cc and Bcc 5 Detailed article or message view Facebook 2 1 1 Buttons Votes as Like Posts a comment 2 Buttons Deletes an article When the confirmation screen appears touch Ok Reads the content of the comment by voice Twitter 2 1 1 Buttons Create a reply Create a ReTweet Adds to Favorites 2 Buttons Delete the Tweet Reads the ...

Page 68: ...ng Wi Fi See Wi Fi Setup P 32 You can use a user account when you have logged in the Owner or User 1 Press the HOME button 2 Touch in the Network contents panel 3 Touch RSS 4 Perform desired operation as follows 2 1 3 1 Buttons Adds an RSS feed See Add RSS feed P 51 Reads out all articles by voice Terminates the application 2 Category Select the RSS feed to be displayed 3 Article list Display the ...

Page 69: ...ion about the song or station you are listening to and allows you to perform simple operations 1 Press the HOME button 2 Select the Media panel Media source such as CD or USB 4 3 2 1 1 I m listening You can post the information about the song you are listening to on twitter Fecebook See Posting the information about the song you are listening to P 53 2 Album art Touching Album art displays the Sou...

Page 70: ...n You must have a connection with the internet using Wi Fi See Wi Fi Setup P 32 You can use a user account when you have logged in the Owner or User When the Trip log function is turned on information about the played content is displayed 1 Press the HOME button 2 Select the Media panel 3 Touch 4 Select the Network media history Widget 5 Touch desired item 1 2 1 Buttons Update the history informat...

Page 71: ...pe 1 Touch 2 Input the Artist or Album Enter the keyword using the voice recognition function When Speak now is displayed pronounce the keyword You can use a user account when you have logged in the Owner or User Category Determine whether to search for the song by artist name or album name 3 Select a song from the list Playback starts Ñ ÑPlays screen L Plays or pauses E F Searches the previous ne...

Page 72: ... fast backward Touch A or B Each time you touch the key the speed changes standard 2 times 3 times For confirmation of play time See DVD You can switch the time display between title play time chapter play time and title remaining time Each time you touch the display switches between T title play time display C chapter play time display and R title remaining time display As well as the time displa...

Page 73: ...ntrol screen appears 2 Touch Disc CTRL Menu Control screen appears 3 Perform desired operation as follows Displays the top menu Touch Top Displays the menu Touch Menu Displays the previous menu Touch Return Enters selected item Touch Enter Enables direct operation Touch Highlight to enter the highlight control mode See Highlight control P 61 Moves the cursor Touch R S C D These keys may not functi...

Page 74: ...f 2 times 3 times 4 times For VCD changes the zoom ratio at 2 levels Off 2 times Scrolls the screen Touch R S C or D to scroll the screen in the direction you touch Exits menu control Touch Exit Displays the previous menu Touch Return This function may not be performed depending on the disc NOTE You cannot touch the menu keys directly on the screen when zooming DVD Setup You can set up the DVD pla...

Page 75: ...he parental code and touch Enter Parental Level screen appears NOTE To cancel the setup and return to the previous screen touch Cancel To clear the entered code touch Clear Current parental lock level appears as Level 3 Touch C or D to select a parental lock level NOTE If a disc has higher parental lock level you need to enter the code number The parental lock level varies depending on a loaded di...

Page 76: ... the Simple Control and List Control screen Only for Music file Touch to display Video screen Only for Video file ñ ñ CD Audio and Visual Files iPod Operation 3 Multi function key Touch to switch the multi function menu For details on the menu see Multi function menu P 70 4 Multi function menu Various functions can be performed by using keys in this area For details on the menu see Multi function ...

Page 77: ...e Multi function menu P 70 5 Sub function key Touch to display Sub function menu 7 in this table 6 Content list Displays the list and content The content of the list differ depending on the playback status and source 7 Sub function menu Various functions can be performed by using keys in this area For details on the keys see Sub function menu P 71 8 Sub function List switching key Touch to display...

Page 78: ...ing functions can be performed by using keys in this area Repeats the current track folder Each time you touch the key repeat mode switches in the following sequence CD iPod track repeat repeat off Disc media USB device SD card file repeat folder repeat repeat off Only for iPod USB device and SD card Searches track from the album artwork list For details on search operation see Search from album a...

Page 79: ...k Search You can search a file of same artist album genre composer as the current track P 73 Folder List You can search a file according to hierarchy P 74 NOTE For disc media you can display the folder list directly by touching Category search Only for iPod USB device and SD card 1 Touch the desired category from the left part of the screen 2 The list is sorted by selected category 3 Touch desired...

Page 80: ... For details see Favorite list P 75 NOTE After all tracks in the album are played the same album is played again from the first track The albums with no photo are not displayed Favorite list You can create an original playlist of your favorite 10 albums by selecting album artworks 1 Touch and drag the desired album artwork in the upper line to the lower line Selected album is registered to the fav...

Page 81: ...he Pandora application For how to register the Bluetooth device Android or BlackBerry see Registering the Bluetooth Unit P 115 2 6 2 7 Simple Control screen List Control screen 1 7 3 3 4 4 5 8 1 Information display Displays text information of current content that is being played 2 Artwork Control switching area The artwork is displayed if available from current content When the artwork is not ava...

Page 82: ... select You can display a Device select screen for device selection 1 Touch in the control screen The Device select screen appears Device selection Bluetooth Uses the Android BlackBerry connected via Bluetooth for Pandora Internet radio reception Wired Uses the iPhone connected via the KCA iP202 KCA iP102 optional accessory for Pandora Internet radio reception NOTE If you touch when no device has ...

Page 83: ... iPod Set how to display the information of the iPod Auto Default Information appears for 5 seconds when updated OFF Does not display any information This setting is not available when an iPod is connected Ñ ÑDivX VOD DNN990HD This feature is available only for Central and South America sales area 1 Set each item as follows DivX R Registration Code Checks the registration code This code is needed ...

Page 84: ...ed in the Owner or User To use this service a Dropbox account is required 1 Upload music files to Dropbox 2 In the Route Collector site create a folder and playlist of the files to be played For how to set the folder and playlist of the files to be played refer to the website http www route collector com Available content Content that can be delivered or played by this unit are as follows Audio fi...

Page 85: ...derer function Plays the content being operated on another media controller thorugh this unit Available content Content that can be delivered or played by this unit are as follows Audio file MP3 mp3 AAC LC m4a aac WMA wma WAV wav Video file MPEG 1 2 mpg mpeg m2p MPEG 4 mp4 m4v WMV wmv m2ts Copyrighted content cannot be played ñ ñ Kenwood Wireless Link Operation Media Server function Plays the cont...

Page 86: ...ther network media player client device 1 Press the HOME button 2 Touch in the Source launcher panel 3 Touch Wireless Link 4 Connect to the media server A list of detected media servers is displayed Touch the server name of the server to connect 5 Select a network media player to be used for playback A list of detected network media players is displayed Touch the name of the network media player t...

Page 87: ...creen NOTE Set the remote controller mode switch to AUD mode before starting operation see Switching the operation mode P 151 Simple Control screen List Control screen 2 6 2 7 1 7 3 3 4 4 5 8 1 PS Station name display Displays the PS name or station name 2 Information display Control switching area Displays the following information Picture The picture data or station Logo data is displayed if ava...

Page 88: ... in memory one after another MANUAL Switches to the next frequency manually AME Selects the auto memory mode For details see Auto memory P 91 RCV Switches the receive mode in the following sequence AUTO DIGITAL ANALOG For details see Receive Mode P 94 PTY Searches a program by setting program type For details see Search by program type P 92 Memory Operation Ñ ÑAuto memory You can automatically sto...

Page 89: ...nnel 1 Touch in the control screen The multi function menu appears 2 Touch in the multi function menu The list type screen appears 3 Touch Preset List or Channel List The previously used category or channel list appears 4 Select the desired content from the list NOTE Each time you touch Info Change in the channel list switches the sequence of the list Song title artist name album name Traffic Info...

Page 90: ...clicking them Ñ ÑRegistering a tag NOTE TAG will be indicated on the display when song information can be registered 1 Press the button instructed in each diagram for 1 second during listening to the song from HD Radio station DNN990HD HOME 6 DNN770HD HOME 6 TEL Ñ ÑChecking the memory usage 1 Touch illustrated area List control screen appears 2 Touch and hold Information list appears 3 Scroll down...

Page 91: ...ark The Bookmark List appears 4 Select the desired bookmark from the list The bookmark infomation appears Deletes the bookmarks being displayed Ñ ÑBookmark delete Deleting a bookmark 1 Touch in the control screen The multi function menu appears 2 Touch in the multi function menu The list type screen appears 3 Touch Bookmark The Bookmark List appears 4 Touch Delete List The Bookmark Delete List app...

Page 92: ...rol screen Before use SiriusXM Satellite Radio operation requires the connection of the optional SiriusXM Connect Vehicle Tuner To activate the SiriusXM Vehicle Connect tuner you will need the Radio ID Make a note of your Radio ID To confirm your Radio ID tune to channel 0 The letters I O S and F are not used in any Radio ID The Radio ID is also located on the label of the SiriusXM Connect Vehicle...

Page 93: ...eset channel list You can also select your desired channel from the list Ñ ÑMulti function menu The functions of each key are as follows P1 P6 Select the preset channel Touch for 2 seconds to store the current station into the preset memory Select search method from preset channel selection or category channel search For details on search operation see Selecting Operation P 101 L Plays or pauses S...

Page 94: ...e button instructed in each diagram for 1 second during listening to the song from SiriusXM station DNN990HD DNN770HD HOME 6 TEL Ñ ÑDirect search You can tune in by entering the desired frequency or channel number 1 Touch 10Key Direct screen appears 2 Enter the frequency channel number and touch Enter NOTE To cancel the direct search touch Cancel To clear the number you entered touch Clear Ñ ÑCate...

Page 95: ...ated area List control screen appears 2 Touch and hold Information list appears 3 Scroll down the list and confirm Tagging Information NOTE Up to 50 tags can be registered to this unit When iPod is connected the tag information registered to this unit is transferred to the connected iPod Song Artist and Game Alerts When a broadcast program related to the registered artist song team or city starts ...

Page 96: ...l for which Parental Lock is not turned on when the channel is deemed inappropriate 1 Touch ON or OFF of Parental Lock Mature in the SIRIUS XM SETUP screen Turns the Mature on or off Default is OFF NOTE When this function is turned on Mature channels are indicated forced on in the function which is described in Parental lock P 107 SiriusXM Setup 1 Touch Quick menu appears 2 Touch SETUP SETUP Menu ...

Page 97: ...TE Operations in each list screen are same as Parental lock P 107 Ñ ÑContent alerts setup You can turn on or off the Content alerts function 1 Touch ON or OFF of Content alerts in the SIRIUS XM SETUP screen Turns the Content alerts on or off Default is ON Ñ ÑContent alerts Content Set You can set a content for Content alerts 1 Touch SET of Content alerts Content Set in the SIRIUS XM SETUP screen A...

Page 98: ...sired operation as follows A B Fast forward or fast backward H D Plays or pauses Status bar For confirmation of current playing position You can drag the circle left or right to change the playing position ñ ñ Streaming Service Application Ñ ÑKeyword Search 1 Touch Keyword Search 2 Perform desired operation as follows 1 2 1 Enter a Keyword for search Enter a keyword using the voice recognition fun...

Page 99: ...Play screen Plays or pauses Love I like this song Skip Play the next song Ban I do not like this song Select a sub genre Mood Music matching your mood Select a new genre FEATURED Select a Featured Stations GENRE STATIONS Select a Genre Stations ARTIST STATIONS Create a station of your type by searching stations by the artist name Favorites Edit the titles registered in Loves and Bans You can use t...

Page 100: ...ETUP screen appears See the following section for each setting Registering the Bluetooth Unit P 115 Connecting the Bluetooth unit P 116 ñ ñ Bluetooth Control Ñ ÑRegistering the Bluetooth Unit 1 Touch Search Searched Device List screen appears NOTE A new device cannot be registered if there are 5 registered Bluetooth units Delete unnecessary registration See Connecting the Bluetooth unit P 116 The ...

Page 101: ...Remove Confirm removes registration information After you touch the key a confirmation message appears Follow the message and complete the operation Playing Bluetooth Audio Device Ñ ÑBluetooth basic operation 2 2 4 Simple Control screen List Control screen 1 3 1 Information display Displays the name of the track information If the information is not available Bluetooth unit name is displayed 2 Mul...

Page 102: ... button DNN990HD HOME 6 DNN770HD HOME 6 TEL Hands Free screen appears 2 Select a dialing method See the following table for each method Call by entering a phone number 1Touch 2Enter a phone number with number keys 3Touch Call using call records 1 Touch Incoming Calls Outgoing Calls or Missed Calls 2Select the phone number from the list 3Touch Call using the phonebook 1Touch 2Select the name from t...

Page 103: ...a call Adjust the receiver volume DNN990HD Press the S or R button HOME 6 DNN770HD Turn the volume knob HOME 6 TEL Switch the voice output Touch to switch the voice output between phone and speaker Sending DTMF tone signal Touch DTMF to display the tone input screen You can send tones by touching desired keys on the screen Call waiting You can answer a second call while talking with the first call...

Page 104: ... function OFF Not uses Apple Auto Pairing function Call Beep Select whether or not to beep upon receiving a call ON Default Beeps OFF Not beeps SMS Receive Beep Select whether or not to beep upon receiving SMS message ON Default Beeps OFF Not beeps Phone Information Use Set whether to download phonebook for outgoing incoming and missed calls list ON Default Yes OFF No SMS Use Select whether to use...

Page 105: ...3 Touch SMS SMS Create Menu screen appears 4 Touch SET of Message in the SMS Create Menu screen Create SMS Message screen appears Template Displays the template list Draft Displays the newest draft message This key becomes active when any message has been created after turning power on 5 Enter a message using keys and touch Done 6 Touch Send The message is sent NOTE You can create a SMS message by...

Page 106: ...st of operable voice commands 1 Press and hold the Push To Talk switch The list of operable voice commands appears Pronounce a command NOTE To cancel the commands list display press Push To Talk switch or touch the screen When a CMOS 310 CMOS 300 optional accessory is connected the camera can be controlled from this navigation system Camera Control You can adjust the camera angle of the camera sys...

Page 107: ...for each source ñ ñ Setting Up System Setup NOTE Each operation in this section can be started from the multi function menu 1 Touch on any screen Quick Menu screen appears 2 Touch SETUP 3 Touch System System screen appears See the following section for each setting Set up the user interface P 129 Adjust touch panel P 130 Set up security P 130 Set up external switch P 131 Set up memory P 131 Ñ ÑUse...

Page 108: ...icle ignition is off 1 Touch Security in the System Menu screen Security screen appears 2 Touch ON or OFF of SI Ñ ÑEXT SW setup DNN990HD Set up the external switch power mode 1 Touch EXT SW in the System Menu screen EXT SW screen appears 2 Set each item as follows Output Pattern Set the power signal output mode among Pulse Level Default is Pulse You can set to turn output on off each time the butt...

Page 109: ...ore the current monitor angle as the angle during power off Touch Memory when the desired angle is selected Ñ ÑPanel color coordinate You can set the button illumination color The selectable items differ depending on the unit 1 Touch Color in the Display Menu screen Color screen appears 2 Touch SET of Panel Color Coordinate Panel Color Coordinate screen appears NOTE You can touch SET or Initialize...

Page 110: ... the type of rear camera to use CMOS 310 When the CMOS 310 CMOS 300 series with ID 1 set is connected Other Default When the other camera is connected R CAM Interruption Set a method for switching the display Setting values are ON and OFF ON Switches to the rear view camera video display when shifting to reverse or pressing the NAV button for 1 second OFF Default Switches to the rear view camera v...

Page 111: ...source You can also listen to audio or watch video output from a AV device as AV IN2 source AV IN1 Name AV IN2 Name 2 Set a name to be displayed when you select a system that is connected via the AV INPUT port Default is VIDEO 1 This item can be set when in STANDBY source and also the iPod is disconnected 2 AV IN2 Name becomes settable when AV IN2 is selected in iPod AV Interface Use AV Output Int...

Page 112: ...et the speaker crossover network is set automatically 1 Touch Speaker Select in the Audio SETUP screen Speaker Select screen appears 2 Touch the speaker you wish to adjust and set each item as follows Subwoofer DNN770HD Select if you are using a subwoofer Tweeter DNN990HD You can set the tweeter when you are selecting front speakers None Small Middle Large X over Displays the speaker crossover set...

Page 113: ...Speaker Setup 2 Only when Subwoofer is set to a mode other than None OFF in Speaker Setup 3 Only when LPF FREQ HPF FREQ is set to a mode other than Through in X over Ñ ÑCar type setup DNN990HD You can setup the car type and speaker network etc 1 Touch Car Type in the Audio SETUP screen Car Type screen appears 2 Select your car type from the list NOTE If your car type is selected the Delay Time Ali...

Page 114: ... switch to another source may be extremely loud Equalizer Control You can adjust equalizer by selecting the optimized setting for each category 1 Touch Equalizer Equalizer screen appears Ñ ÑDNN990HD operation Controlling EQ curves 1 Select EQ curve from Natural Rock Pops Easy Top40 Jazz Powerful iPod and User NOTE iPod is available only during iPod source Controlling equalizer manually The Graphic...

Page 115: ...tting value is within 8dB and 8dB and default is 0dB Q Factor Adjust Q value for bass and middle Setting values are as follows Bass 1 1 25 1 5 2 Default is 1 Middle 1 2 Default is 1 Bass DC EXT Turns Bass DC EXT on or off Default is OFF If you select ON the bass center frequency is extended to the low register by approximately 20 Flat Tone level becomes 0 flat Subwoofer Level Adjusts the subwoofer...

Page 116: ...ypass Control Speaker Setup Car Type Setup P 141 139 140 Ñ ÑHighway sound setting You can boost a certain range of sound that becomes hard to hear due to road noise 1 Touch Highway Sound in the Sound Effect screen Highway Sound screen appears 2 Select the boost level from among High Low and OFF Ñ ÑElevation You can raise the sound position heard from the speakers virtually 1 Touch Elevation in the...

Page 117: ...fferences calculated in step 3 for individual speakers 5 Adjust gain for individual speakers A sound image will be shifted to the speaker with increased gain Example When Front All is selected as the listening position 1 6feet 2 5feet 5feet 2 5feet 0feet 3 4feet Listening Position DNN990HD You can adjust the sound effects according to your listening position 1 Touch Position Position screen appear...

Page 118: ...se Ñ ÑSwitching the operation mode The functions operated from the remote controller differ depending on the position of the mode switch DVD T V NAV AUD AUD mode Switch to this mode when controlling a selected source or tuner source etc DVD mode Switch to this mode when playing a disc media including DVD VCD and CD NAV mode Switch to this mode when controlling navigation function NOTE When control...

Page 119: ...D map displays 11 MAP DIR AUD DVD Switches the display angle each time it is pressed NAV Switches between the heading up navigation and north up navigation map displays 12 R S AUD DVD Selects the folder to be played During HD Radio and SiriusXM source in AUD mode switches the bands to be received 13 C D AUD DVD Selects the track or file to be played During HD Radio and SiriusXM source in AUD mode ...

Page 120: ... ñ ñ Troubleshooting Problem Reason Solution The sound skips when an audio file is being played The disc is scratched or dirty Clean the disc See Precautions on handling discs P 4 The recording condition is bad Record the file again or use another disc Ñ ÑOther Problem Reason Solution The Touch Sensor Tone doesn t sound The preout jack is being used The Touch Sensor Tone cannot be output from the ...

Page 121: ...n after warming your car interior Network is disconnected Not connected to Wi Fi Connect to Wi Fi Account Error Logged in using Guest or Administrator account To link to the Route Collector site log in using Owner or User account and then use the Storage application Your Dropbox and Kenwood accounts are not linked Dropbox account information is not registered to the logged in Owner or User account...

Page 122: ...k may be impossible A DualDisc is a disc with one surface containing DVD standard signals and the other surface containing music CD signals ö öAbout disc format The disc format should be the one of the following ISO 9660 Level 1 2 Joliet Romeo Long file name Ñ ÑAbout files The following audio video and picture files are supported ö öAudio files AAC LC m4a MP3 mp3 WMA wma Linear PCM WAVE wav Mass s...

Page 123: ...onnected to this unit it can be charged through the USB cable Install the USB device in the place where it will not affect safe driving You cannot connect a USB device via a USB hub and Multi Card Reader Take backups of the audio files used with this unit The files can be erased depending on the operating conditions of the USB device We shall have no compensation for any damage arising from any er...

Page 124: ... with this mark can be played with any DVD player 8 Indicates the number of audio languages recorded Up to 8 languages can be recorded in a movie You can select a favorite language 32 Indicates the number of subtitled languages recorded Up to 32 languages can be recorded 9 If a DVD disc has scenes shot from multiple angles you can select a favorite angle 16 9 LB Indicates the type of screen for th...

Page 125: ...og tn Setswana to Tongan tr Turkish ts Tsonga tt Tatar tw Twi uk Ukrainian ur Urdu uz Uzbek vi Vietnamese vo Volapuk wo Wolof xh Xhosa yo Yoruba zh Chinese zu Zulu DVD Language Codes Specifications ö öMonitor section Picture Size DNN990HD 6 95 inches diagonal wide 156 6 mm W x 81 6 mm H DNN770HD 6 1 inches diagonal wide 136 2 mm W x 72 0 mm H Display System Transparent TN LCD panel Drive System TF...

Page 126: ...180 220 250 Hz Through Slope 6 12 18 24 dB Oct Position Front Rear Subwoofer Delay 0 20 0ft 0 07ft Step Gain 8 0 dB Subwoofer level 50 10 dB ö öFM tuner section Frequency Range 87 9 MHz 107 9 MHz 200 kHz Usable Sensitivity S N 30 dB 7 2 dBf 0 8 μV 75 Ω Quieting Sensitivity S N 50 dB 10 2 dBf 1 13 μV 75 Ω Frequency Response 3 0 dB 30 Hz 15 kHz S N Ratio dB 75 dB MONO Selectivity 400 kHz 80 dB Stere...

Page 127: ...boratories Dolby and the double D symbol are trademarks of Dolby Laboratories Manufactured under license under U S Patent Nos 5 956 674 5 974 380 6 487 535 other U S and worldwide patents issued pending DTS the Symbol DTS and the Symbol together are registered trademarks DTS 2 0 Channel is a trademark of DTS Inc Product includes software DTS Inc All Rights Reserved Sirius XM and all related marks ...

Page 128: ... communications if it is not installed and used in accordance with the instructions However there is no guarantee that interference will not occur in a particular installation If this equipment does cause harmful interference to radio or television reception which can be determined by turning the equipment off and on the user is encouraged to try to correct the interference by one or more of the f...

Page 129: ......

Page 130: ...CONNECTED NAVIGATION SYSTEM DNN990HD DNN770HD GPS NAVIGATION INSTRUCTION MANUAL IM365_Nav_K_En_00 ...

Page 131: ...2 Changing the Search Area 12 Finding Fuel Stations and Prices 13 Finding an Address 13 Finding a City 13 Finding an Intersection 13 Finding a Location Using Coordinates 14 Finding a Location by Browsing the Map 14 Finding a Location Using Quick Search 14 Saving a Home Location 14 Going Home 15 Editing Your Home Location Information 15 Finding Recently Found Places 15 Clearing the List of Recently...

Page 132: ...ute 25 Creating a Vehicle Profile 25 Resetting Your Vehicle Profile 25 Calibrating Fuel Economy 25 Taking the ecoChallenge 25 About ecoChallenge Scores 26 Hiding Your ecoChallenge Score 26 Resetting Your Score 26 Viewing Your Fuel Economy 26 About the Mileage Report 26 Viewing a Mileage Report 26 Exporting a Mileage Report 27 Setting Routes that Use Less Fuel 27 Planning a Trip 27 Editing a Trip I...

Page 133: ...owing license and are subject to the following terms and conditions which are agreed to by End User you or your on the one hand and Garmin and its licensors including their licensors and suppliers and affiliated companies on the other hand IMPORTANT CAREFULLY READ THIS LICENSE BEFORE USING THIS PRODUCT INSTALLING COPYING OR OTHERWISE USING THIS PRODUCT INDICATES YOUR ACKNOWLEDGMENT THAT YOU HAVE R...

Page 134: ...RACT OR TORT OR BASED ON A WARRANTY EVEN IF GARMIN OR ITS LICENSORS HAVE BEEN ADVISED OF THE POSSIBILITY OF SUCH DAMAGES GARMIN S AND ITS LICENSORS TOTAL AGGREGATE LIABILITY WITH RESPECT TO ITS OBLIGATIONS UNDER THIS AGREEMENT OR OTHERWISE WITH RESPECT TO THE GARMIN PRODUCT OR THE DATA SHALL NOT EXCEED 1 00 Some States Territories and Countries do not allow certain liability exclusions or damages ...

Page 135: ...l Content Pty Limited and Continental Pty Ltd If your Product uses RDS TMC Codes contained in the Map Data the traffic location codes are 2010 Telstra Corporation Limited and its licensors Term This Agreement is effective until such time as i if applicable your subscription term is either terminated by you or by Garmin or expires or ii Garmin terminates this Agreement for any reason including but ...

Page 136: ...2 227 14 Alternates I II and III JUN 1987 civilian agency technical data and noncommercial computer software clause and or FAR 12 211 and FAR 12 212 commercial item acquisitions as applicable In case of conflict between any of the FAR and DFARS provisions listed herein and this License the construction that provides greater limitations on the Government s rights shall control The contractor manufa...

Page 137: ...on NAVTEQ and its affiliates and Garmin Ltd and its subsidiaries make no warranty with regard to the reliability accuracy exhaustiveness and completeness of the Traffic Data which may contain inaccuracies and or errors from time to time To the maximum extent permitted by applicable law any and all warranties of any kind whatsoever with regard to the Traffic Data are hereby expressly waived and exc...

Page 138: ...nufacturer supplier Address 425 West Randolph Street Chicago Illinois 60606 This Data is a commercial item as defined in FAR 2 101 and is subject to the NAVTEQ Traffic End User License Agreement under which this Data was provided 2011 NAVTEQ 2011 Traffic com All rights reserved If the Contracting Officer federal government agency or any federal official refuses to use the legend provided herein th...

Page 139: ...t to access the navigation system When navigating displays Kenwood audio When using audio this displays navigation information Help When You Need It Select Apps Help to view information about using the device Searching Help Topics Select Apps Help Status Bar Icons The status bar is located at the top of the main menu The status bar icons display information about features on the device You can sel...

Page 140: ...the current screen Using the On Screen Keyboard See Language Settings to change the keyboard layout page 32 When an on screen keyboard appears select a letter or a number to enter it Select to add a space Select to delete a character Select to erase the entire entry Select to select the keyboard language mode Select to enter special characters such as punctuation marks Select to change character c...

Page 141: ... theaters To search for a business by name enter all or part of the name To search for an address near you enter the street number and street name To search for an address in another city enter the street number street name city and state To search for a city enter the city and state To search for coordinates enter latitude and longitude coordinates 5 Select an option To search using a suggested s...

Page 142: ...elect Next 4 If necessary select Searching In to change the city state or province 5 If necessary select the city the state or the province 6 If necessary select the address Finding a City Before you can find a city you must add a shortcut to the cities search tool page 11 1 Select Where To Cities 2 Select Enter Search 3 Enter a city name and select 4 Select a city Finding an Intersection Before y...

Page 143: ...Drag and zoom the map to display the area to search 3 If necessary select and select a category icon to view only a specific category of places Location markers or a blue dot appear on the map 4 Select an option Select a location marker Select a point such as a street intersection or address location 5 If necessary select the location description to view additional information Finding a Location U...

Page 144: ...ation Setting a Simulated Location If you are not receiving satellite signals you can use the GPS to set a simulated location 1 Select Settings Navigation 2 Select GPS Simulator 3 From the main menu select View Map 4 Select an area on the map The address of the location appears at the bottom of the screen 5 Select the location description 6 Select Set Location Saving a Location 1 Search for a loca...

Page 145: ... to mark the Favorite on a map select Change Map Symbol 7 Edit the information 8 Select Done Assigning Categories to a Saved Location You can add custom categories to organize your saved locations Categories appear in the saved locations menu after you have saved more than 12 locations 1 Select Where To Saved 2 Select a location 3 Select 4 Select Edit Categories 5 Enter one or more category names ...

Page 146: ...l Voice Command activation Listen for two tones to confirm when the device enters and exits Voice Command mode Starting a Route Using Voice Command You can say the names of popular well known locations 1 Press the Voice Command button 2 Say Find Place 3 Listen for the voice prompt and speak the name of the location A list of locations appears 4 Say the line number 5 Say Navigate Finding an Address...

Page 147: ...rovides new directions Using the Navigation Map 1 From the main menu select View Map 2 If the zoom controls are hidden select the map to display the zoom controls 3 Select the map to switch to browsing mode Map buttons appear 4 Select an option To zoom in or out select or To rotate the map view select To switch between North Up and 3 D views select To add or remove map layers select To view specif...

Page 148: ...at you may receive for failing to follow all applicable traffic laws and signs An icon displaying the current speed limit may appear as you travel on major roadways 1 From the map select Set Speed Limit 2 Select and to set the speed limit Using Suggested Routes Before you can use this feature you must save at least one location and enable the travel history feature page 15 Using the myTrends featu...

Page 149: ...tures to avoid on your routes and select Save Adding a Custom Avoidance Area Custom avoidances allow you to avoid specific areas and sections of road You can enable and disable custom avoidances as needed 1 Select Settings Navigation Custom Avoidances 2 If necessary select Add Avoidance 3 Select Add Avoid Area 4 Select the upper left corner of the area to avoid and select Next 5 Select the lower r...

Page 150: ...ng your route or detour around specific roads This is useful if you encounter construction zones closed roads or poor road conditions 1 Select a destination and select Go page 12 2 From the map select Detour 3 Select Next 5mi on Route Next 2mi on Route Next 5mi on Route or Detour by Road s on Route 4 If necessary select a road to detour around Navigating Off Road If you are not following roadways ...

Page 151: ... 1 From the map select the data field in the lower left hand corner 2 Select a type of data to display 3 Select Save Changing the Map Perspective 1 Select Settings Map Vehicle Driving Map View 2 Select an option Select Track Up to display the map in two dimensions 2 D with your direction of travel at the top Select North Up to display the map in 2 D with North at the top Select 3 D to display the ...

Page 152: ...e or other maneuver appears in the upper left corner of the map The preview includes the distance to the turn or maneuver and the lane in which you should be traveling if available From the map select to view the next turn on the map Viewing Junctions While navigating a route you can view the junctions on major roadways When you approach a junction in a route the image of that junction appears bri...

Page 153: ...set the odometer Viewing Current Location Information You can use the Where Am I page to view information about your current location This feature is helpful if you need to tell emergency personnel your location From the map select Where Am I Finding Nearby Services You can use the Where Am I page to find nearby services such as hospitals or police stations 1 From the map select Where Am I 2 Selec...

Page 154: ...ving habits calibrate the fuel economy Creating a Vehicle Profile The vehicle profile provides a basis for ecoRoute to calculate your vehicle fuel economy 1 Select Apps ecoRoute 2 Enter the required information and select Next 3 Select Done Resetting Your Vehicle Profile 1 Select Apps ecoRoute Vehicle Profile 2 Select Reset Calibrating Fuel Economy Use this feature when you refuel to maintain an a...

Page 155: ...can restart your current ecoChallenge 1 Select Apps ecoRoute ecoChallenge 2 Select Reset 3 Select Yes Viewing Your Fuel Economy 1 Select Apps ecoRoute Fuel Economy The graph along the bottom shows your average fuel economy for a period of driving time 2 Select a section of the graph to zoom in 3 Select Reset to clear the fuel economy data About the Mileage Report A mileage report tracks the distan...

Page 156: ... 7 Select Next 8 Enter a name and select Done Editing a Trip Itinerary 1 Select Apps Trip Planner 2 Select a saved trip 3 Select an option To change the arrival or departure time select a location in the trip To record how long you will stay at a location select a location in the trip and select Duration To view the trip on the map select Map Navigating to a Saved Trip 1 Select Apps Trip Planner 2...

Page 157: ... Dynamic Parking Before you can use this feature you must subscribe to the Dynamic Parking service and your device must be connected via W Fi to access connected services This feature is not available in all areas 1 Select Apps Dynamic Parking 2 Select a parking location About Real Time Traffic Camera Before you can use this feature you must subscribe to the Real Time Traffic Camera service and yo...

Page 158: ...ffic data to receive traffic information The traffic subscription activates automatically after your navigation system acquires satellite signals while receiving traffic signals from the service provider You can add other subscriptions at any time For information about traffic receivers and coverage areas go to www garmin com kenwood Traffic Data Using INRIX Traffic Service You can purchase a traf...

Page 159: ...f traffic events appears organized by their location on the route 3 Select an event Manually Avoiding Traffic on Your Route 1 From the map select 2 Select Traffic On Route 3 If necessary use the arrows to view other traffic delays on your route 4 Select Avoid Taking an Alternate Route 1 While navigating an automobile route select 2 Select Alternate Route 3 Select a route Viewing Traffic on the Map...

Page 160: ...avigation Settings Select Settings Navigation Calculation Mode sets route preference Avoidances sets road features to avoid on a route Custom Avoidances allows you to avoid specific roads or areas Advanced Detours sets the length of a detour Safe Mode disables all functions that require significant operator attention and could become a distraction while driving GPS Simulator stops the device from ...

Page 161: ... or off When your vehicle is moving safe mode disables all functions that require significant operator attention and could become a distraction while driving Device and Privacy Settings Select Settings Device About displays the software version number the unit ID number and information on several other software features You need this information when you update the system software or purchase addi...

Page 162: ...enter for details 1 Go to www garmin com Kenwood 2 Select Order Map Updates for your Kenwood unit 3 Follow the Web site instructions to update your map Safety Cameras WARNING Garmin and JVC KENWOOD are not responsible for the accuracy of or the consequences of using a safety camera database Safety camera information is available in some locations Go to http my garmin com for availability For these...

Page 163: ...WARNING Garmin and JVC KENWOOD are not responsible for the consequences of using custom POI databases or for the accuracy of custom POI databases After downloading your POI database use the Garmin POI Loader to install the POIs onto a USB mass storage device Use the USB mass storage device to load the POIs The POI Loader is available at www garmin com products poiloader Refer to the POI Loader Hel...

Page 164: ......

Page 165: ...00 Rev A Garmin and the Garmin logo are trademarks of Garmin Ltd or its subsidiaries registered in the USA and other countries ecoRoute myTrends and trafficTrends are trademarks of Garmin Ltd or its subsidiaries These trademarks may not be used without the express permission of Garmin NAVTEQ is a trademark of NAVTEQ Inc or its affiliates and is registered in one or more countries including the U S...

Page 166: ...om the FrontView camera Front camera Front camera Caméra avant Frontkamera Vooruitzicht camera Telecamera frontale Cámara delantera Displays the view from the RearView camera Rear camera Rear camera Caméra arrière Rückfahrkamera Camera achter Retrocamera Cámara trasera Displays Current Source Control screen Control screen Control screen Écran de commande Steuerbildschirm Scherm besturen Scherm di ...

Page 167: ...KENWOOD Ver 1 0 W01 2055 05 ...

Page 168: ...laws and regulations by applying whole or a part of the Licensed Software 859 2171 00 1 When the User transfers the Product it may also transfer the license to use the Licensed Software embedded in the Product including any related materials updates and upgrades on condition that no original copies or related materials continue in the possession of the User and that the User shall cause the transf...

Page 169: ...country of the User including transmission thereof outside the country of the User via Internet of other communication tools 2 The User shall understand that the Licensed Software shall be subject to the export restrictions adopted by the country of User and any other countries 3 The User shall agree that the software will be subject to any and all applicable international and domestic laws includ...

Page 170: ...Law any international treaties and other applicable laws As to matters concerning the handling of JVC KENWOOD software components please refer to the Software License Agreement attached hereto Please note that any software component licensed under EULA which is not subject to GPULGPL and those developed or created independently by JVC KENWOOD shall not be subject to the requirement for provision o...

Page 171: ...r LIMITATION OF IMPLIED WARRANTIES Any and all implied warranties including warranties ol merchantability and fitnessfor aparticular purpose shall be limited in duration to the lengthofthis warranty EXCLUSION OF CERTAIN DAMAGES KENWOOD s liability for any defective product is limited to the repair or replacement ol saidproduct at our potion and shall not include damages of any kind whether inciden...

Page 172: ...ps which do not disclose any defe cts coveredbythis warranty GARANTIE KENWOOD K E N WOOD ELECTR ONICS CANADA INC ci apr s a ppel e KENWOOD donneparecrillagaranliesuiventeal a cheteur original dechaque nouveau produit Kenwood distribu au CanadaparK E NWOODetachet aunconcessionnaireautorise parK ENWOOD KENWOODgarantit sousreservedestermes e tdesconditions nonc s cHJessous que chaque nouveauproduit K...

Reviews: