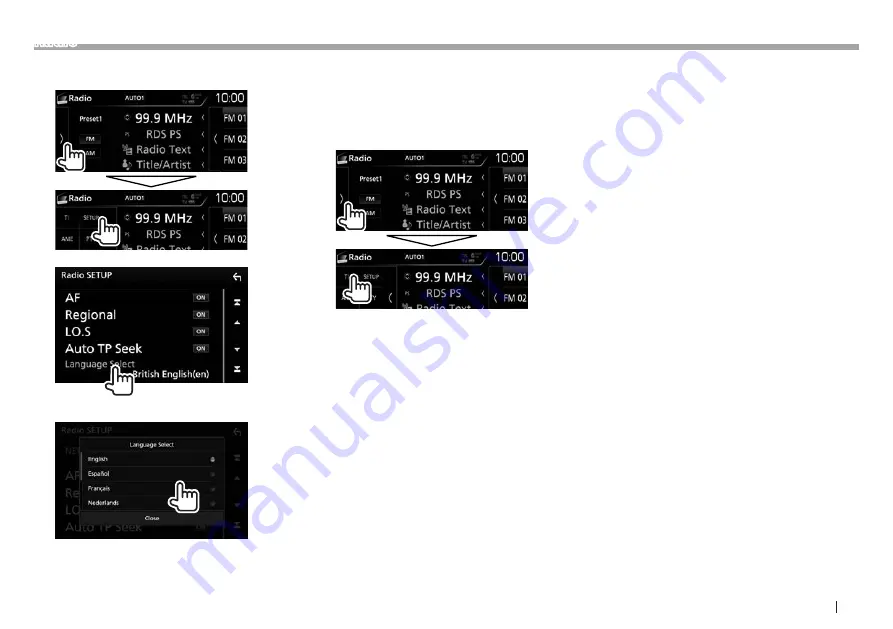
Kenwood DDX8016DABS Instruction Manual Download Page 29

ENGLISH

29

Radio

Selecting a language for the PTY search

1

  Display the <Radio SETUP> screen.

2


3

  Select a language.


•  Scroll the page to show more items.

•  To close the window, touch [Close].


Activating/deactivating TI/News 

Standby Reception

TI Standby Reception

You can receive traffic information even while 

listening to another source by activating TI Standby 

Reception.

The unit is in standby to switch to Traffic Information 

(TI) if available.

•  The TI indicator lights up in the following cases:


– Lights in white: Receives the Traffic Information.


– Lights in orange: On standby for traffic 

information reception.

•  If the TI indicator is lit in orange, tune into another 

station providing Radio Data System signals.

•  When traffic information is received, the screen 

switches to the Traffic Information screen 

automatically.

To deactivate TI Standby Reception: Touch [TI]

(The TI indicator turns off.)

•  The volume adjustment for Traffic Information is 

automatically memorized. The next time the unit 

switches to Traffic Information, the volume is set 

to the previous level.

•  For DDX8016DABS: The TI Standby Reception 

can also be activated or deactivated from “DAB” 

source control screen. (Page 33)

Continued on the next page...

Summary of Contents for DDX8016DABS

Page 1: ...B5A 1049 10 b EN QN 2016 JVC KENWOOD Corporation DDX9716BTS DDX9716BTSR DDX8016DABS MONITOR WITH DVD RECEIVER INSTRUCTION MANUAL ...

Page 2: ... For this reason they may be different from the actual displays or panels This manual mainly explains operations using the buttons on the monitor panel and touch panel For operations using the remote controller KNA RCDV331 separately purchased see page 65 indicates the various screens menus settings that appear on the touch panel indicates the buttons selectable items on the touch panel Indication...

Page 3: ... The sign Pb below the symbol for batteries indicates that this battery contains lead For Israel Cautions on the monitor The monitor built into this unit has been produced with high precision but it may have some ineffective dots This is inevitable and is not considered defective Do not expose the monitor to direct sunlight Do not operate the touch panel using a ball point pen or similar tool with...

Page 4: ...nformation Page 63 Touch Language Select then select the desired language Clock Adjust the calendar clock Page 6 Colour Select the color of the buttons on the monitor panel Page 59 Touch Panel Colour then select the desired color Camera Configure settings for the connected camera Page 36 DEMO Activate ON or deactivate OFF the display demonstration Page 64 2 Finish the procedure The Home screen is ...

Page 5: ...irm the entry To change the security code Touch Security Code Change on the Security screen then repeat steps 5 and 6 To clear the security code Touch Security Code Cancellation on the Security screen Activating the security function You can activate the security function to protect your receiver system against theft 1 Display the Security screen Page 4 2 Activate the security function Each time y...

Page 6: ...ith the GPS Manual Sets the clock manually See the right column To close the window touch Close 5 Select the appropriate time zone for Time Zone To return to the Home screen press HOME on the monitor panel or touch to return to the previous screen To adjust the clock manually when selecting Manual on the Clock window 1 Display the Clock Adjust screen On the User Interface screen see the far left c...

Page 7: ...ol Page 24 When iPod iPhone compatible with Apple CarPlay is connected Activates Siri Page 25 9 M Eject button Displays the Angle Adjust screen Press Page 8 Forcibly ejects the disc Hold You can change the color of the buttons on the monitor panel Page 59 DDX8016DABS 1 Power indicator Security indicator Lights up while the unit is turned on Flashes when the security function is activated Page 5 2 ...

Page 8: ...t to decrease Turning off the screen On the touch panel Select Display OFF on the pop up short cut menu Page 13 On the monitor panel DDX8016DABS Hold To turn on the screen Press and hold the same button or touch the display Monitor panel operations Angle Adjust Only for DDX9716BTS DDX9716BTSR 1 Display the Angle Adjust screen 2 Exits the Angle Adjust screen 0 6 Selects a monitor angle MDISC EJECT ...

Page 9: ...the screen to change the page Swipe Slide your finger up or down on the screen to scroll the screen Home screen descriptions You can select playback sources display setting screens or display information on the Home screen To display the Home screen press HOME on the monitor panel 5 6 7 4 3 2 1 Common operation buttons and indications 1 Displays the control screen of current source 2 Widget Touchi...

Page 10: ...ending on the selected source 6 7 5 4 2 3 1 Common operation buttons and indications 1 Current source or media 2 Connected Bluetooth device information Page 40 3 Battery charge indication Lights up when quick charging battery of the connected iPod iPhone Smartphone 4 Displays the other operation button window 5 Displays the source option selection screen See the left column 6 Short cut source sele...

Page 11: ...ia being played back 1 Displays list type selection window 2 Selects the file type audio video 3 Returns to the previous screen 4 Scrolls the text if not all of the text is shown 5 Searches for a folder track I Play Plays all tracks in the folder containing the current track A Z Enters the initial search mode Top Returns to the top layer Up Returns to the upper layer 6 Changes the page J K Scrolls...

Page 12: ...on a USB device Page 18 DAB 3 Switches to the digital audio broadcast DAB Page 31 AV IN1 3 Switches to an external component connected to the AV IN1 input terminal Page 37 AV IN 4 or AV IN2 3 Switches to an external component connected to the AV IN 4 or AV IN2 3 input terminal Page 37 Audio Displays the sound adjustment screen Page 53 STANDBY Puts the unit in standby Page 9 Displays the SETUP menu...

Page 13: ...urce option selection screen You can arrange the items to display on the source option selection screen Touch and hold the item you want to move until boxes appear around the icons then drag it to the position you want to move it to Hold Using the pop up short cut menu While displaying the source control screen you can jump to another screen from the pop up short cut menu 1 Display the pop up shor...

Page 14: ...en DDX8016DABS When removing a disc pull it horizontally You can eject a disc when playing another AV source If the ejected disc is not removed within 15 seconds the disc is automatically inserted again into the loading slot to protect it from dust To eject a disc forcibly Press and hold M on the monitor panel A confirmation message appears Touch Yes To close the monitor panel Only for DDX9716BTS ...

Page 15: ...tons touch to display the other operation button window For audio playback 5 4 6 3 2 1 Playback information The information displayed on the screen differs depending on the type of disc file being played back 1 Media type 2 Playback mode Page 17 3 Track file information Touching scrolls the text if not all of the text is shown 4 Jacket picture Shown while playing if the file has tag data that incl...

Page 16: ... see page 11 To search in the folder containing the current track Scroll the page to show more items To hide the list touch Activating PBC Playback Control function for VCD only While playing a VCD with PBC The PBC indicator lights up To select a track directly while PBC is activated operate from the remote controller Page 65 To deactivate PBC Touch PBC The PBC indicator turns off Purchase KNA RCD...

Page 17: ...urns to the playback screen Angle Selects the view angle Subtitle Selects the subtitle type Audio Selects the audio type J K H I Selects an item Selecting playback mode Selects Repeat playback mode Selects Random playback mode Available playback modes differ depending on the type of disc file being played back Each time you touch the button the playback mode changes The current playback mode is sh...

Page 18: ... dynamic range Normal Select this to reduce the dynamic range a little Dialog Initial Select this to reproduce movie dialog more clearly Screen Ratio Select the monitor type to watch a wide screen picture on the external monitor 16 9 Initial 4 3 LB 4 3 PS You can change these settings only while DVD is not inserted USB Connecting a USB device You can connect a USB mass storage class device such as...

Page 19: ...ns on the screen and operations differ depending on the type of file being played back Hide Hides the indicators and buttons Displays the other operation button window To hide the window touch Displays the track list of the folder containing the current track To hide the list touch Selects Repeat playback mode Repeats the current track file Repeats all tracks files in the current folder or specifi...

Page 20: ...ory List 1 Select the file type 2 Select a category then the item in the selected category From Link Search 1 Select the file type 2 Select the tag type to display a list of content that contains the same tag as the track file currently being played then select the item From Folder List Select the folder then the item in the selected folder To search in the folder containing the current track Scro...

Page 21: ...tning connector models You cannot watch the video Bluetooth connection Pair the iPod iPhone through Bluetooth Page 40 You cannot watch video with a Bluetooth connection Selecting the connection method 1 Display the source option selection screen On the Home screen or the source control screen 2 Display the SETUP screen 3 Display the AV screen 4 Set Automotive Mirroring to OFF 5 Display the APP iPo...

Page 22: ...e Operation buttons Available buttons on the screen and operations differ depending on the type of file being played back Displays the track list of the category containing the current track To hide the list touch Selects Repeat playback mode Functions the same as Repeat One ALL Functions the same as Repeat All Selects random playback mode Functions the same as Shuffle Songs Functions the same as ...

Page 23: ...st operation see page 11 From Category List Select a category then the item in the selected category Available categories differ depending on the type of your iPod iPhone From Link Search Select the tag type to display a list of content that contains the same tag as the track file currently being played then select the item To search in the folder containing the current track Scroll the page to sh...

Page 24: ...unction of Google Maps connect a GPS antenna Page 73 1 Set Automotive Mirroring to ON Page 25 2 Connect an Android device using a Micro USB to USB cable commercially available Page 72 To use the hands free function connect the Android device via Bluetooth Page 40 When an Android device compatible with Android Auto is connected to the USB input terminal the device is connected via Bluetooth automat...

Page 25: ... com ios featureavailability applecarplay applecarplay Preparation To use the navigation function of the maps App connect a GPS antenna Page 73 1 Configure the settings to use Apple CarPlay on the AV screen On the Home screen or the source control screen CarPlay Connection Select ON to use Apple CarPlay CarPlay Sidebar Select the position of the control bar left or right shown on the touch panel 2...

Page 26: ...ion buttons Starts the application 2 button On the App screen Displays the home screen of CarPlay Touch On the home screen of CarPlay Activates Siri Hold Page 25 3 HOME button Exits the CarPlay screen and displays the Home screen To exit the CarPlay screen Press HOME on the monitor panel Switching to the Apple CarPlay screen while listening to another source DDX9716BTS DDX9716BTSR DDX8016DABS To r...

Page 27: ...ow To hide the window touch Displays the preset list To hide the list touch AM Selects the AM band FM Selects the FM band Displays the Graphic Equalizer screen Page 54 S T Searches for a station The search method differs according to the selected seek mode See above TI Activates deactivates TI standby reception mode Page 29 SETUP Changes the settings for radio reception on the Radio SETUP screen P...

Page 28: ...d The station selected in step 1 is stored Scroll the page to show more items To hide the list touch Selecting a preset station from the list Scroll the page to show more items To hide the list touch FM Radio Data System features Searching for FM Radio Data System programs PTY Search You can search for your favorite programs being broadcast by selecting the PTY code 1 Display the PTY Search screen...

Page 29: ...in white Receives the Traffic Information Lights in orange On standby for traffic information reception If the TI indicator is lit in orange tune into another station providing Radio Data System signals When traffic information is received the screen switches to the Traffic Information screen automatically To deactivate TI Standby Reception Touch TI The TI indicator turns off The volume adjustment...

Page 30: ...hen shipped from the factory Network Tracking Reception is activated To change the Network Tracking Reception setting 1 Display the Radio SETUP screen See the left column 2 AF ON Switches to another station The program may differ from the one currently received the AF indicator lights up OFF Cancels Regional ON Switches to another station broadcasting the same program the AF indicator lights up OF...

Page 31: ...n category name channel description and similar channels 5 Signal strength 6 Preset list Page 32 7 The DAB indicator Lights up when receiving an DAB broadcast 8 The MC indicator Lights up when receiving an DAB multi component 9 TI indicator Page 33 p RDS indicator Lights up when receiving an Radio Data System station Operation buttons AUTO1 AUTO2 MANUAL Changes the seek mode Each time you touch th...

Page 32: ... to update the Service List Presetting services Storing services in the memory You can preset 15 services 1 Select a service you want to preset Page 31 2 Display the preset list 3 Select a preset number to store Hold The station selected in step 1 is stored Scroll the page to show more items To hide the list touch Selecting a preset station from the list Scroll the page to show more items To hide ...

Page 33: ...ption The unit is in standby to switch to Traffic Information TI if available The TI indicator lights up in the following cases Lights in white Receives the Traffic Information Lights in orange On standby for traffic information reception If the TI indicator is lit in orange tune into another station providing Radio Data System signals When traffic information is received the screen switches to th...

Page 34: ...t will be lost Indications on the Replay mode screen 3 2 1 1 Replay time bar Shows the remaining capacity gray and the amount of buffered content blue If the Replay buffer is full the entire bar becomes blue Updated every second 2 Playback status I play W pause O rewind N fast forward 3 Time code Shows you the point in the Replay buffer you are listening to Example 5 00 You are listening to audio ...

Page 35: ...announcement items you need News flash Transport flash Warning Service Area weather flash Event announcement Special event Programme information Sport report Financial report To deactivate all announcements select All OFF Seamless Blend ON Initial Prevents audio break when switching from Digital Radio to Analog Radio OFF Cancels Antenna Power 2 ON Initial Supplies power to the DAB aerial OFF Cance...

Page 36: ...he size of the car parking space and so on See the right column Front Camera ON Activates the front view camera Select this to use the front view camera OFF Initial Select this when no camera is connected Front Camera Mirror Image ON Displays the picture from the front view camera horizontally reversed OFF Initial Displays the picture from the front view camera as it is Adjusting the parking guide...

Page 37: ...n the front view camera and the rear view camera Each time you touch the button the screen is switched between the rear view screen and the front view screen To exit the camera screen Using external audio video players AV IN When the operation buttons are not displayed on the screen touch the area shown on the illustration To change settings for video playback see page 58 Starting playback 1 Conne...

Page 38: ... AV IN1 input terminal and TV tuner remote control output terminal Page 72 Select ON for TV Tuner Control Page 63 Displaying the TV screen 1 Select AV IN1 as the source Page 12 2 Turn on the TV Hide Hides the indicators and buttons Displays the Graphic Equalizer screen Page 54 TV Ctrl Displays the TV control screen J K Displays the TV List screen H I Displays the Radio List screen Menu OK Displays...

Page 39: ...ENGLISH 39 ...

Page 40: ...Bluetooth function on the unit 1 Display the source option selection screen On the Home screen or the source control screen 2 Display the SETUP screen 3 Display the Bluetooth Setup screen 4 Activate ON or deactivate OFF the Bluetooth function Registering and connecting a new Bluetooth device When you connect a Bluetooth device to the unit for the first time pair the unit and the device Pairing all...

Page 41: ...nitial 0000 To change PIN code see page 43 2 Determine usage as a mobile phone To use the Bluetooth device as a mobile phone select the hands free number Hands Free1 or Hands Free2 to connect the device for When you do not want to use the Bluetooth device as a mobile phone select No Connection To close the window touch Close 3 When your Bluetooth device is compatible with A2DP or SPP Determine usa...

Page 42: ... phone Connected as an audio player 6 Select the usage of the device Each time you touch the selection the usage is selected appears or deselected disappears Select to connect and deselect to disconnect the device TEL HFP 1 TEL HFP 2 Mobile phone Audio A2DP App SPP Audio player device with Apps installed To close the window touch Close Deleting a paired Bluetooth device 1 Display the Select Device...

Page 43: ...ouch to delete the last entry Touch H I to move the entry position Using a Bluetooth mobile phone Receiving a call When a call comes in Call information is displayed if acquired The call incoming screen is not displayed while the camera screen is displayed To display the call incoming screen shift the gear to the drive position Only for DDX8016DABS You can also display the call incoming screen whi...

Page 44: ...volume level 10 to 10 initial 0 Echo Cancel Level Adjusts the echo volume 5 to 5 initial 0 Noise Reduction Level Adjusts the noise reduction volume 5 to 5 initial 0 To close the window touch Close You can also adjust these items on the TEL SETUP screen Page 49 Switching between handsfree mode and phone mode While talking Each time you touch the button the talking method is switched handsfree mode ...

Page 45: ...Tone Multi Frequency function 1 Display the tone input window While talking 2 Input the tone to send To close the window touch Close Making a call 1 Display the phone control screen On the Home screen or the source control screen Only for DDX8016DABS You can also display the phone control screen by pressing and holding the Volume MENU TEL knob on the monitor panel 2 Select a method to make a call ...

Page 46: ... the alphabetical order If the initial character is a number touch 1 and then select the number Touch to delete the last entry Touch to hide the keyboard 3 Select a contact to call Scroll the page to show more items 4 Select the phone number from the list to make a call Scroll the page to show more items You can select a first name or last name to use when sorting the list in alphabetical order on...

Page 47: ... Select a position to store into 4 Select a method to add a phone number to preset list then register the number to the preset list Add number from phonebook Select a phone number from the phonebook Page 46 Add number direct Enter a phone number on the direct number entry screen then touch Set to add to the preset list To close the window touch Close To display the preset list touch on the phone c...

Page 48: ...g the phonebook To close the Edit Phonebook window touch Close To cancel the transferring the phonebook touch Cancel To delete contact from the phonebook 1 Display the Edit Phonebook window See the far left column 2 Display the Delete Phonebook screen To close the window touch Close 3 Select contacts to delete 1 then delete them 2 appears beside the selected bookmarks Touch All to select all bookm...

Page 49: ...ork for some devices depending on the iOS version OFF Cancels Sort Order Select a first name or last name to use when sorting the list in alphabetical order First Sorts the list in the order of first name Last Initial Sorts the list in the order of last name Echo Cancel Level Adjusts the echo volume 5 to 5 initial 0 Noise Reduction Level Adjusts the noise reduction volume 5 to 5 initial 0 Using th...

Page 50: ...erse forward search 3 Hold I Starts playback W Pauses playback BT DEVICE CHANGE Switches the Bluetooth audio player To display all available operation buttons touch to display the other operation button window 1 To cancel random mode touch the button repeatedly until it is grayed out 2 Available only for devices compatible with AVRCP 1 5 3 Available only for devices compatible with AVRCP 1 3 Selec...

Page 51: ...Phone with a cable via Bluetooth or both with a cable and via Bluetooth Page 21 1 Display the source option selection screen On the Home screen or the source control screen 2 Display the SETUP screen 3 Display the AV screen 4 Set Automotive Mirroring to OFF 5 Display the APP iPod SETUP screen 6 Select the device and connection method for APP Connection select Android Bluetooth Select this to use A...

Page 52: ...r lights up Single Zone Selects the same source Front Source Selects the source for the front monitor Rear Source Selects the source for the rear monitor Rear VOL Adjusts the volume for the rear source When the rear speaker sound is switched the audio source that is output at the AV OUT AUDIO terminal is also switched to the same source When Zone Control is set to Dual Zone the following operation...

Page 53: ...selection window appears for location and speaker tweeter setting Select an item then touch Close to close the window Repeat steps 1 and 2 to set all speakers When a speaker is not connected select None When setting the front speakers also select the speaker size for Tweeter 6 Display the X over screen 1 select the speaker type 2 then adjust the crossover frequency of the selected speaker 3 HPF FR...

Page 54: ...Display the Graphic Equalizer screen See the left column 2 Select a band and adjust the level of the selected band You can adjust the level by dragging the slider or using J K Repeat this step to adjust the level of other bands 3 Activate ON or deactivate OFF the bass Bass EXT 1 and then adjust the subwoofer level SW Level 2 Touch H I to adjust SW Level When Bass Ext is set to ON a frequency lower...

Page 55: ... speaker output to create a more suitable environment for your vehicle 1 Display the Position DTA screen See the left column 2 Display the DTA adjustment screen 3 Touch Delay 1 then adjust the Digital Time Alignment DTA value for each speaker 2 Touch H I to adjust the value To return to the initial setting of Delay and Level touch Initialize and YES in the confirmation screen 4 Touch Level 1 then ...

Page 56: ... precisely 2 Sound Image LR Front Adjusts the sound image to set on the front position Sound Image LR Rear Adjusts the sound image to set on the rear position Size of the Virtual Sound Field Adjusts the virtual sound field to the desired field size If the sound image moves out of the front position adjust Sound Image LR Front Sound Image LR Rear Subwoofer Delay Adjusts the time alignment of the su...

Page 57: ... volume output according to different sources You can adjust and store the auto adjustment volume level for each source The volume level will automatically increase or decrease when you change the source 1 Display the Audio screen Page 53 2 Display the Volume Offset screen 3 Adjust the volume output level for each source Scroll the page to show more items To initialize the setting value touch Init...

Page 58: ...cessor DSP system Select the enhance level OFF Initial Small Medium Large Supreme Restores the sound lost due to audio compression to a realistic sound OFF ON Initial Realizer Virtually makes the sound more realistic using the Digital Signal Processor DSP system Select the sound level OFF Initial 1 2 3 Stage EQ You can move the center of the sound to the lower or higher point Select the height OFF...

Page 59: ...ully in the original aspect ratio USB Adjustable items are different depending on the current source The image quality can be set for each source Backlight and Black are common to all sources Changing the display design Customizing the panel color 1 Display the source option selection screen On the Home screen or the source control screen 2 Display the SETUP screen 3 Display the Display screen 4 D...

Page 60: ...red on the connected USB device Use a JPEG file with a resolution of 800 x 480 pixels The color of the captured image may look different from that of the actual scene 1 Connect the USB device on which the image is stored Page 71 2 Display the Background screen See the left column 3 Select User1 Select or User2 Select to store the image for 4 Select the folder then the file for the background image...

Page 61: ... Home screen or the source control screen 2 Display the SETUP screen 3 Display the Special screen 4 Select an option Audio SETUP Memory Memorizes the current audio setting Audio SETUP Recall Recalls the memorized audio setting Audio SETUP Clear Clears the AUDIO SETUP Memory and the currently memorized audio setting A confirmation message appears Touch Yes Locking the settings You can lock the sett...

Page 62: ...Interface screen 4 Display the Touch Panel Adjust screen 5 Touch the center of the marks at the lower left and at the upper right as instructed To reset the touch position press Reset To cancel the current operation press Cancel Setting menu items SETUP Displaying the SETUP menu screen 1 Display the source option selection screen On the Home screen or the source control screen 2 Display the SETUP ...

Page 63: ...oller of the steering wheel Page 67 Beep ON Initial Activates the key touch tone OFF Cancels Vehicle Adaptor Information 2 ON Initial Activates the vehicle information display function OFF Cancels Beep for parking distance control 2 ON Activates a warning tone when the onboard proximity sensor detects a human or object in the vehicle s path while parking OFF Initial Cancels Parking Distance Displa...

Page 64: ... setting Page 61 Audio SETUP Recall Recalls the memorized audio setting Page 61 Audio SETUP Clear Clears the AUDIO SETUP Memory and the currently memorized audio setting Page 61 Software Information Display the version information of the software You can update the software Open Source Licenses Show the Open Source Licenses Initialize Touch Initialize and then touch Yes to set all the settings to ...

Page 65: ... Controller operates only over shorter distances or does not operate at all it is possible that the batteries are depleted In such instances replace both batteries with new ones Remote Controller mode switch The functions operated from the remote controller differ depending on the position of the mode switch DVD T V AUD AUD mode Switch to this mode when controlling a selected source or radio sourc...

Page 66: ... S T Selects a track file I W Starts pauses playback 0 9 Music Disc Specifies the number to search for in direct search DIRECT Music Disc Enters direct search mode See the right column Radio AUD mode AM FM Selects the band S T Searches for stations I W Changes the seek mode AUTO1 AUTO2 MANU 0 9 Specifies the frequency of the station to receive to search for in direct search DIRECT Enters direct se...

Page 67: ... hold a steering remote controller button for about 2 seconds to register change Refer to the message displayed to confirm whether the unit ready before proceeding 6 Select a function to assign Scroll the page to show more items To close the window touch Close 7 Repeat steps 5 and 6 as necessary 8 Finish the procedure The unit can register change all of the buttons functions at the same time To do...

Page 68: ...nly for DDX9716BTS DDX9716BTSR If the console has a lid make sure to install the unit so that the monitor panel will not hit the lid when closing and opening If the fuse blows first make sure the wires are not touching to cause a short circuit then replace the old fuse with one with the same rating Insulate unconnected wires with vinyl tape or other similar material To prevent a short circuit do n...

Page 69: ...ake Connector B on the wiring harness and connect it to the speaker connector in your vehicle 5 Take Connector A on the wiring harness and connect it to the external power connector in your vehicle 6 Connect the wiring harness connector to the unit 7 Install the unit in your car Make sure that the unit is installed securely in place If the unit is unstable it may malfunction e g the sound may skip...

Page 70: ... ACC A8 Black Ground connection Pin Color and functions of Connector B B1 B2 Purple Purple Black Right speaker rear B3 B4 Gray Gray Black Right speaker front B5 B6 White White Black Left speaker front B7 B8 Green Green Black Left speaker rear Connecting the ISO connectors on some VW Audi or Opel Vauxhall automobiles You may need to modify the wiring of the supplied wiring harness as illustrated be...

Page 71: ...xtension cable 4 beforehand See above USB device commercially available 1 0 m 4 Use CA U1EX to extend the cable if necessary Max 500 mA 5V Connecting an iPod iPhone Connect the USB extension cable 4 beforehand See the left column iPod iPhone 30 pin connector models commercially available 1 0 m 4 KCA iP102 optional accessory 0 8 m KCA iP103 optional accessory 0 8 m 1 0 m iPod iPhone Lightning conne...

Page 72: ...Audio Video input For DDX9716BTS DDX9716BTSR AV IN For DDX8016DABS AV IN2 7 DAB aerial input 1 8 AV OUT Audio output ø3 5 mini jack Resistance free stereo type mini plug 9 Front preout 2 Audio left output White Audio right output Red p Subwoofer preout monaural output 2 Subwoofer left output White Subwoofer right output Red q Rear preout 2 Audio left output White Audio right output Red w Direct st...

Page 73: ...n the metal plate 6 Clean the dashboard or other surface beforehand Install the GPS antenna 5 inside of the car as horizontally as possible to allow easy reception of the GPS satellite signals You can bend the metal plate 6 to conform to a curved surface if necessary 5 5 6 Depending on the type of car reception of the GPS satellite signals might not be possible with an internal installation Instal...

Page 74: ...er the frame and pull it forward 3 2 2 Remove from the upper two catches The frame can be removed from the top side in the same manner Removing the unit 1 Remove the trim plate See the left column 2 Insert the two extraction keys 3 then pull them as illustrated so that the unit can be removed 3 Be careful to avoid injury from the catch pins on the extraction key ...

Page 75: ...fter use To keep discs clean Dirty discs may not play correctly If a disc does become dirty wipe it with a soft cloth in a straight line from the center to the edge Do not use any solvents for example conventional record cleaner spray thinner benzine etc to clean discs To play new discs New discs may have some rough spots around the inner and outer edges If such a disc is used this unit may reject...

Page 76: ...er application than iTunes AAC files copy protected with FairPlay except those stored on an iPod Files which have data such as AIFF ATRAC3 etc This unit can display jacket pictures that meet the conditions below Picture size 32 x 32 to 1 232 x 672 PNG 800 x 480 resolution Data size less than 650 KB File type JPEG Disc playback Playable disc types Disc type Recording format file type etc DVD DTS so...

Page 77: ... H 264 WMV MKV This unit can recognize a maximum of 9 999 files and a maximum of 9 999 folders in a folder Make sure all important data has been backed up to avoid losing the data Notes on using a USB device This unit may not play back files in a USB device properly when using a USB extension cable USB devices equipped with special functions such as data security functions cannot be used with the ...

Page 78: ...BE Byelorussian IE Interlingue NA Nauru TG Tajik BG Bulgarian IK Inupiak NE Nepali TH Thai BH Bihari IN Indonesian NO Norwegian TI Tigrinya BI Bislama IS Icelandic OC Occitan TK Turkmen BN Bengali Bangla IW Hebrew OM Afan Oromo TL Tagalog BO Tibetan JA Japanese OR Oriya TN Setswana BR Breton JI Yiddish PA Panjabi TO Tonga CA Catalan JW Javanese PL Polish TR Turkish CO Corsican KA Georgian PS Pasht...

Page 79: ...nnect the paired device Page 42 Please Wait The unit is preparing to use the Bluetooth function If the message does not disappear turn off and turn on the unit then connect the device again Voice Recognition is not available The connected mobile phone does not have a voice recognition system No Contents No phone book data is contained in the connected Bluetooth phone Antenna Error The aerial has a...

Page 80: ...t played back as you have intended them to play Playback order may differ from the one played back using other players iPod iPhone No sound comes out of the speakers Disconnect the iPod iPhone then connect it again Select another source then reselect iPod The iPod iPhone does not turn on or does not work Check the connecting cable and its connection Update the firmware version Charge the battery R...

Page 81: ... a better signal reception The sound is interrupted or skipped while using a Bluetooth audio player Reduce the distance between the unit and the Bluetooth audio player Disconnect the device connected for Bluetooth phone Turn off then turn on the unit When the sound is not yet restored connect the player again The connected audio player cannot be controlled Check whether the connected audio player ...

Page 82: ...Hz Total Harmonic Distortion 0 010 1 kHz Signal to Noise Ratio 98 dB DVD Video 96 kHz Dynamic Range 98 dB DVD Video 96 kHz Disc Format DVD Video VIDEO CD CD DA Sampling Frequency 44 1 kHz 48 kHz 96 kHz Quantifying Bit Number 16 20 24 bit USB interface section USB Standard USB 2 0 High Speed File System FAT 16 32 NTFS Maximum Power Supply Current DC 5 V 1 5 A 1 D A Converter 24 32 bit Audio Decoder...

Page 83: ...y Range 50 kHz 87 5 MHz to 108 0 MHz Usable Sensitivity S N 26 dB 9 3 dBf 0 8 μV 75 Ω Quieting Sensitivity S N 46 dB 15 2 dBf 1 6 μV 75 Ω Frequency Response 3 0 dB 30 Hz to 15 kHz Signal to Noise Ratio 75 dB MONO Selectivity 400 kHz 80 dB Stereo Separation 45 dB 1 kHz LW tuner section Frequency Range 9 kHz 153 kHz to 279 kHz Usable Sensitivity 45 μV MW tuner section Frequency Range 9 kHz 531 kHz t...

Page 84: ...ation registered in the US Japan and other countries The AAC logo is a trademark of Dolby Laboratories Microsoft and Windows Media are either registered trademarks or trademarks of Microsoft Corporation in the United States and or other countries Made for iPod and Made for iPhone mean that an electronic accessory has been designed to connect specifically to iPod or iPhone respectively and has been...

Page 85: ...NONCOMMERCIAL USE OF A CONSUMER TO i ENCODE VIDEO IN COMPLIANCE WITH THE VC 1 STANDARD VC 1 VIDEO AND OR ii DECODE VC 1 VIDEO THAT WAS ENCODED BY A CONSUMER ENGAGED IN A PERSONAL AND NON COMMERCIAL ACTIVITY AND OR WAS OBTAINED FROM A VIDEO PROVIDER LICENSED TO PROVIDE VC 1 VIDEO NO LICENSE IS GRANTED OR SHALL BE IMPLIED FOR ANY OTHER USE ADDITIONAL INFORMATION MAY BE OBTAINED FROM MPEG LA L L C SE...

Page 86: ...ARISING IN ANY WAY OUT OF THE USE OF THIS SOFTWARE EVEN IF ADVISED OF THE POSSIBILITY OF SUCH DAMAGE libogg Copyright c 2002 Xiph org Foundation Redistribution and use in source and binary forms with or without modification are permitted provided that the following conditions are met Redistributions of source code must retain the above copyright notice this list of conditions and the following dis...

Page 87: ...venska Härmed intygar JVC KENWOOD att denna DDX9716BTS DDX9716BTSR DDX8016DABS stär l överensstämelse med de väsentliga egenskapskrav och övriga relevanta bestämmelser som framgår av direktiv 1999 5 EC Suomi JVC KENWOOD vakuuttaa täten että DDX9716BTS DDX9716BTSR DDX8016DABS tyyppinen laite on direktiivin 1999 5 EC oleellisten vaatimusten ja sitä koskevien direktiivin muiden ehtojen mukainen Slove...

Page 88: ......

Reviews: