background image

Installation and Configuration   3

Man-1453 Rev.01

Sigma ZXT SI Product Manual

8

Power and Data Connections

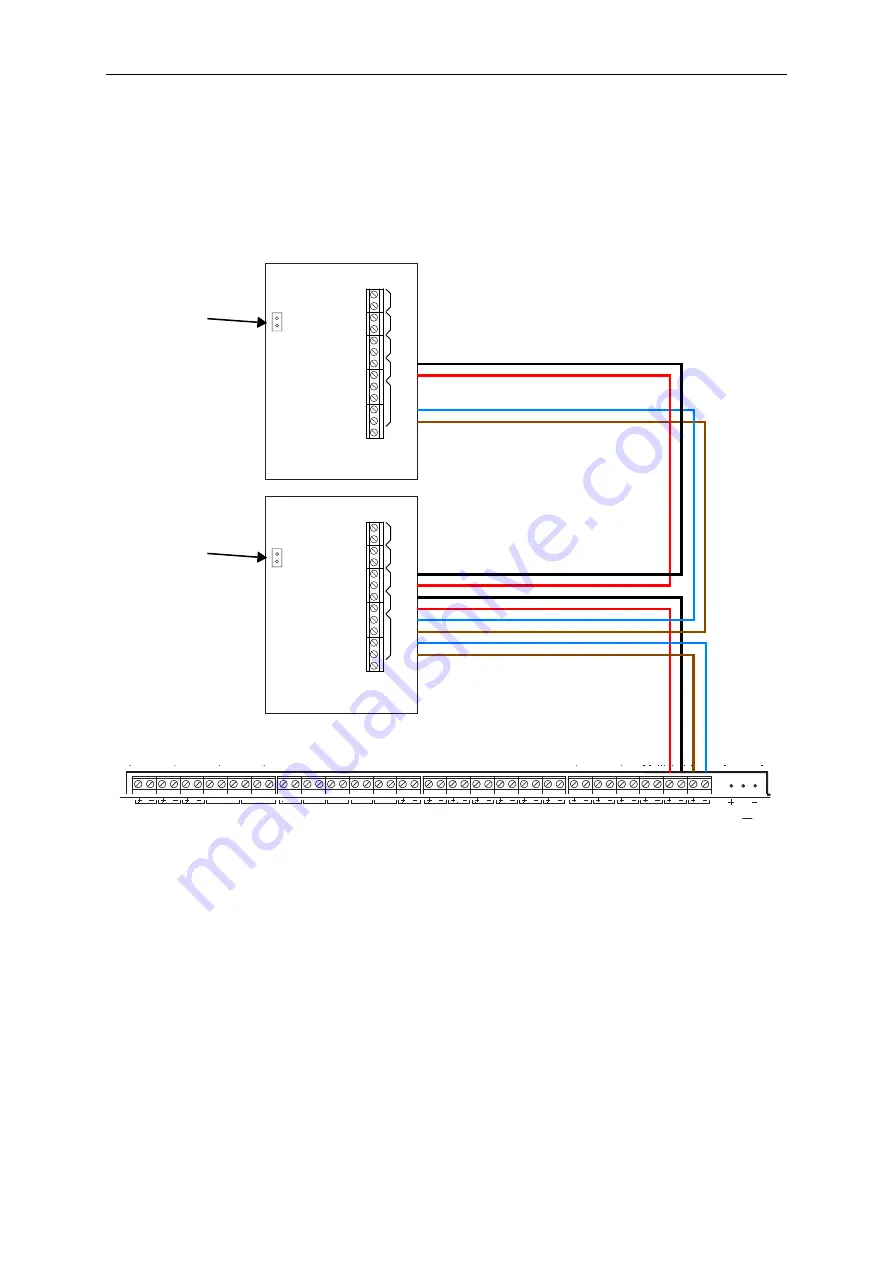
Each status unit requires two cores for power and two cores for data transmission to and from the control panel. A 
four core cable may be used for these connections. All of these connections are polarity conscious and care should 
be taken to match the polarity with the corresponding terminals at the control panel. 

Figure 3-6
Example Connection

Data Termination

Up to seven status units can be connected to an extinguishant control panel. In and out terminals for data and 24V 
DC are provided on each unit. 

All status units are supplied with a push on jumper fitted at position J2 on the left hand side of the PCB. This jumper 
connects a terminating resistor which needs to be in place at the last status unit on the data line. If more than one 
status unit is to be fitted then the jumpers must be removed from all status units except the last one.

If there is only one status unit fitted then the jumper should be left in place.

E

+-+-+-+-

MODE

24V DC

RS485

RS485

HOLD

E

+-+-+-+-

MODE

24V DC

RS485

RS485

HOLD

E

24V DC

RELEASE

RELAY

RELAY

MAN.

S3

FIRE

C

NO

RELEASED

C

NO

MODE

C

NO

HOLD

C

NO

ABORT

C

NO

HOLD

ABORT

MODE

SWITCH

REL PRES.

SWITCH

LOW PRES. DIS EXTG. EXTING.

RS485

AUX24

FAULT

NO C NC

PROG I/P

0V

P2

P1

ZONE 3

ZONE 1

ZONE 2

S2

S1

Leave jumper fitted 
to last Status Unit 
connected.

Remove jumper un-
less Status Unit is 
the only or last one 
connected.

Status Unit

Status Unit

Sigma ZXT Panel

Summary of Contents for K921000M8

Page 1: ...Man 1453 Rev 01 Extinguishant Control Sigma ZXT SI Product Manual Man 1428...

Page 2: ...extreme care in the handling or use of the equipment are essential to avoid or minimise the chance of personal injury or damage to the equip ment The information figures illustrations tables specific...

Page 3: ...Manual Release 10 Processor and Watchdog Reset Switches 10 Section 4 Status Indicator LED Indications 11 Manual Only 11 Auto Manual 11 Hold Activated 11 Disabled 11 Imminent 11 Released 11 Fire Zone n...

Page 4: ...s The Sigma ZXT SI range consists of Supporting Documentation In conjunction with this manual it is strongly advised that Sigma ZXT Product Manual is read and understood Sigma ZXT Installation Manual...

Page 5: ...9 Auto Manual 1 9 Hold Activated 1 9 Disabled 1 9 Imminent 1 9 Released 1 9 Fire Zone 1 5 9 Fire Zone 2 5 9 Fire Zone 3 5 9 Fault 5 9 2 Numeric countdown Seconds Until Discharge All items 3 Key switc...

Page 6: ...ture Function Items 1 Printed Circuit Board All items 2 DIP switch Binary address setting All items 3 Push buttons Processor and Watchdog Reset All items 4 Status Indicators COM HOLD MOD CPU FUSE All...

Page 7: ...klist The installation must be performed by qualified personnel familiar with electronic components Electronic components within the Control Panel are vulnerable to damage from electronic discharge Gr...

Page 8: ...at all fixing points such that the unit is securely mounted and is not liable to move once fixed The unit should not be mounted in another enclosure or near sources of excessive heat Cables should be...

Page 9: ...rent address The switch settings for each of the addresses are shown below Figure 3 3 DIL Switch Address Numbering Electrical Connections All connections for wiring are to a single row of screw termin...

Page 10: ...must not exceed 25 ohms The shield of the cable must be bonded securely to the enclosure via the metal gland Wiring should enter the enclosure at the top bottom or back of the unit using the knock out...

Page 11: ...d with a push on jumper fitted at position J2 on the left hand side of the PCB This jumper connects a terminating resistor which needs to be in place at the last status unit on the data line If more t...

Page 12: ...o allow connection of remote Mode Select keys witches or to connect to door interlock contacts The system is designed such that any Manual Only mode input on the system that is active input oper ated...

Page 13: ...cation if the Manual Release has been tampered with Processor and Watchdog Reset Switches The status unit is controlled by a microprocessor which will re start itself and continue to run if it stops T...

Page 14: ...tion of the hold circuit during the gas release countdown will temporary HOLD the release countdown timer the release countdown timer will continue counting down once the hold input has deactivated Di...

Page 15: ...on Figure 5 1 Mode Select Key Switch Manual Release Some models of the status units are fitted with a Manual Release push button This replicates the action of the man ual release control at the main C...

Page 16: ...indications are located along the bottom of the PCB and are as follows COM This LED indicates that the data communications connection to the control panel is not present This may be be cause the data...

Page 17: ...rs are supported and these instructions apply for both variants 1 Check wiring and address switch settings on each unit connected to the ZXT Important Double addressing of Status Indicators can cause...

Page 18: ...Ancillary Boards s ANC Status will be shown as OPERATIONAL NONE UNEXPECTED or MISSING A symbol will be displayed for each device beneath its corresponding address number The table below provides an ov...

Page 19: ...evice to add in the device status line and press the enter key INSTALL This will log the device onto the panel and the unexpected device fault will clear The status will change to OPERATIONAL in the s...

Page 20: ...6 6 Missing Status Indicator 3 Enter the Engineering Menu Access Level 3 and select the DEVICES CONNECTED option and then select the REMOTE BUS option to open the REMOTE BUS STATUS screen 4 The REMOTE...

Page 21: ...on the ZXT LCD as shown in the screen shot below Note An unexpected device is one detected by the Panel which has not been registered onto the configuration Figure 6 7 Unexpected Ancillary Board 3 To...

Page 22: ...device use the left and right arrows to select the unexpected device to add in the device status line and press the enter key INSTALL This will log the device onto the Panel and the unexpected device...

Page 23: ...dress that is missing see screen shot below Figure 6 11 Missing Ancillary Board 2 Enter the Engineering Menu Access Level 3 and select the DEVICES CONNECTED option and then select the REMOTE BUS optio...

Page 24: ...nd what materials to use Product Code Method K921000M8 Gently clean using a soft dry cloth to remove dust and dirt If the enclosure is heavily contaminated moisten the cloth and gently clean using a l...

Page 25: ...terminals Monitored inputs normal threshold 8K to 1K Monitored inputs trigger threshold 700 to 100 Monitored input short circuit threshold 99 to 0 Data connection Two wire RS485 Maximum 1200m Maximum...

Reviews: