background image

2

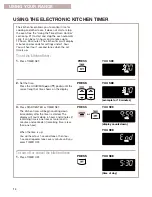
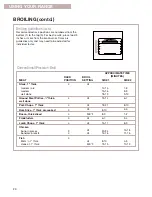
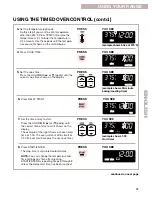
Press BAKE.

3.

Set the temperature (optional).

Do this step if you want to set a temperature 
other than 350°F. Press TEMP (

) or (

) pad(s) 

to raise or lower the temperature in 5°F amounts. 
Use these pads until the desired temperature 
shows on the small display.

Your oven is designed with the ULTRABAKE™ 
enhanced baking system to constantly monitor
oven temperature. The bake burner will cycle, as
needed, to maintain the desired temperature. This
feature is automatically activated when the oven is
in operation.

ULTRABAKE™ BAKING/ROASTING

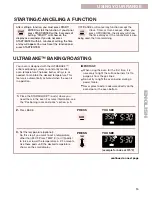
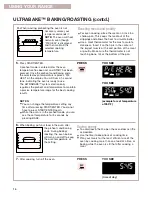
PRESS

YOU SEE

F

BAKE

PRESS

YOU SEE

F

BAKE

(example for bake at 375°F) 

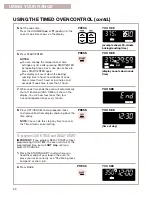
1. 

Place the STURDIGLIDE™ rack(s) where you
need them in the oven. For more information, see
the “Positioning racks and pans” section, p. 9.

After setting a function, you must press START/

ENTER to start the function. If you do not
press START/ENTER within 5 seconds of
setting, “START?” will show on the 

display as a reminder. If you do not press
START/ENTER within 5 minutes of setting, the time
of day will appear. You must reset the function and
press START/ENTER.

STARTING/CANCELING A FUNCTION

OFF/CANCEL will cancel any function except the

Clock, Timer, or Oven Lockout. When you
press OFF/CANCEL, the display will show
the time of day or, if the minute timer is also

being used, the time remaining.

IMPORTANT: 

When using the oven for the first time, it is
necessary to light the surface burners first to
purge air from the gas lines.

Do not try to light the oven burner during a
power failure. 

Never place food or cookware directly on the
oven door or the oven bottom.

15

EN

GL

IS

H

USING YOUR RANGE

continued on next page

Summary of Contents for SELECT CLEAN 665.75822

Page 1: ...ad extra con el Sistema ULTRABAKE Sears Roebuck and Co Hoffman Estates IL 60179 U S A ENGLISH ESPAÑOL SELECT CLEAN Self Cleaning Gas Range Use Care Guide Cocina de gas de auto limpieza SELECT CLEAN Guía para el uso y cuidado Models Modelos 665 75822 665 75824 665 75829 ...

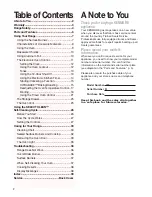
Page 2: ... Oven Light 35 Troubleshooting 36 Range Does Not Work 36 Oven Broiler Burner 36 Surface Burners 37 When Self Cleaning Your Oven 37 Cooking Results 38 Display Messages 38 Index 39 Service Back Cover 2 A Note to You Thank you for buying a KENMORE appliance Your KENMORE gas range takes on a new value when you discover that Sears has service centers around the country Trained Sears Service Professiona...

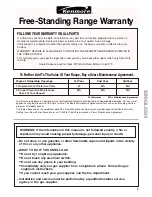
Page 3: ...harge If this product is subjected to other than private family use the above warranty is effective for only 90 days WARRANTY SERVICE IS AVAILABLE BY CONTACTING THE NEAREST SEARS SERVICE CENTER IN THE UNITED STATES This warranty gives you specific legal rights and you may also have other rights which vary from state to state Sears Roebuck and Co Dept 817WA Hoffman Estates IL 60179 To Further Add T...

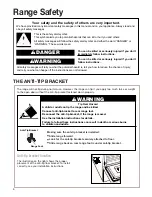
Page 4: ...KET The range will not tip during normal use However the range can tip if you apply too much force or weight to the open door without the anti tip bracket fastened down properly Your safety and the safety of others are very important wDANGER wWARNING You can be killed or seriously injured if you don t immediately follow instructions You can be killed or seriously injured if you don t follow instru...

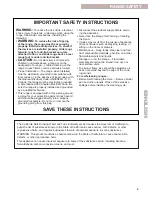
Page 5: ...ded receptacle Do not cut or remove the grounding prong from this plug IMPORTANT SAFETY INSTRUCTIONS Disconnect the electrical supply before servic ing the appliance Never Use the Range for Warming or Heating the Room Injuries may result from the misuse of appliance doors or drawers such as stepping leaning or sitting on the doors or drawers Maintenance Keep range area clear and free from combusti...

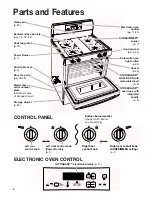
Page 6: ...4 SURESIMMER burner p 7 Control panel pp 6 30 Automatic oven light switch p 35 Gasket p 26 STURDIGLIDE HALF RACK with removable insert p 9 STURDIGLIDE oven rack with integrated handle p 9 OFF L I T E H I 8 6 4 2 L O OFF L I T E H I 8 6 4 2 L O Pow er Burn e r Left front control knob Power Burner p 7 Left rear control knob Surface burner marker shows which burner you are setting CONTROL PANEL Right...

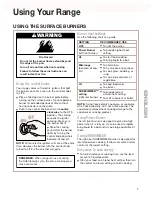
Page 7: ...r To provide lowest simmer heat setting To melt chocolate or butter SETTING LITE Power Burner left front burner HI Mid range between HI and LO LO SURESIMMER setting right rear burner Burner heat settings Use the following chart as a guide Using the control knobs Your range comes with electric ignitors that light the burners each time you turn the control knobs to LITE Place a filled pan on the bur...

Page 8: ... pans are centered on the grates In case of a prolonged power failure You can manually light surface burners Hold a lit match near a burner and turn the control knob to the LITE position After the burner lights turn the control knob to the setting you want The pan material affects how fast heat transfers from the surface cooking area through the pan material and how evenly heat spreads over the pa...

Page 9: ... Two sheets of cookies may be baked if sheets are switched at approximately three quarters of the total bake time Increase baking time if necessary USING THE OVEN Where to place pans WHEN YOU HAVE 1 pan 2 pans 3 or 4 pans PLACE In center of the oven rack Side by side or slightly staggered In opposite corners on each oven rack Stagger pans so no pan is directly over another Rack placement for speci...

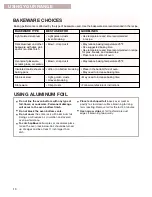
Page 10: ...ven May need to increase baking time Stainless steel May need to increase baking time Crisp crusts Stoneware Follow manufacturer s instructions Light golden crusts Uneven browning BEST USED FOR GUIDELINES BAKEWARE CHOICES USING ALUMINUM FOIL Do not line the oven bottom with any type of foil liners or cookware Permanent damage will occur to the oven bottom finish Do not block the oven bottom vents ...

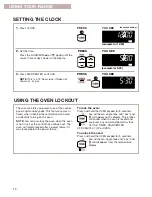
Page 11: ...ing to turn on when the display is active by pressing DELAY START When showing the time of day the display will show the hour and minutes When you are using the kitchen timer the display will show minutes and seconds in the following sequence For settings from 1 to 59 minutes the display will count down each second For settings one hour or over the display will count down each minute When you are ...

Page 12: ...pear on the display Three tones will sound when the oven is locked and you press any command pad other than CLOCK TIMER START ENTER OFF CANCEL TOP or OVEN To unlock the oven Press and hold the OVEN keypad for 5 seconds You will hear a single tone and Loc and will disappear from the temperature display 1 Press CLOCK 2 Set the time Press the HOUR MIN s or t pad s until the correct time of day shows ...

Page 13: ...and low To adjust Press and hold the DELAY START keypad for 5 seconds You will hear a short tone and see either Snd HI or Snd Lo Press and hold the DELAY START keypad again for 5 seconds to change to desired setting NOTE You can remove Snd on Snd OFF rEP on rEP OFF Snd HI or Snd Lo from the display and bring back the time of day by pressing any key 13 ENGLISH USING YOUR RANGE The oven control is s...

Page 14: ... SEE R TIME display counts down YOU SEE R TIME PRESS YOU SEE time of day The kitchen timer allows you to monitor time for cooking and other tasks It does not start or stop the oven See the Using the Timed Oven Control section p 21 to start and stop the oven automati cally It can be set in hours and minutes up to 12 hours 59 minutes The kitchen timer will display minutes and seconds for settings un...

Page 15: ...g racks and pans section p 9 After setting a function you must press START ENTER to start the function If you do not press START ENTER within 5 seconds of setting START will show on the display as a reminder If you do not press START ENTER within 5 minutes of setting the time of day will appear You must reset the function and press START ENTER STARTING CANCELING A FUNCTION OFF CANCEL will cancel a...

Page 16: ...ng baking roasting the oven burner will turn on and off to keep the oven temperature at the setting 7 After cooking turn off the oven PRESS YOU SEE time of day Saving energy To avoid loss of heat open the oven door as little as possible Use the timer to keep track of cooking time Plan your meals for the most efficient use of the oven by cooking more than one food at a time or baking while the oven...

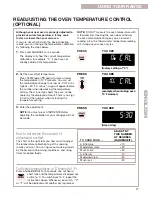
Page 17: ...ll not be made How to determine the amount of adjustment needed The chart at the right tells you how much to adjust the temperature calibration to get the cooking results you want You can figure out cooking results by the amount of browning moistness and rising times for baked foods To display temperatures in C instead of F Press and hold BROIL for 5 seconds You will hear a short tone and the temp...

Page 18: ...rner See Broiling guidelines pp 19 20 2 Put your food on the broiler pan and place the pan in the center of the oven rack Close the door 3 Press BROIL 4 Press START ENTER You can change the temperature setting any time before or after pressing START ENTER To change the temperature see Precision broiling later in this section 5 After broiling turn off the oven PRESS YOU SEE PRESS YOU SEE ON BROIL H...

Page 19: ... Use only the broiler pan and grid provided They are designed to drain extra juices from the cooking surface This drainage helps prevent spatter and smoke To make sure the juices drain well do not cover the grid with foil Trim excess fat to reduce spattering Slit the fat on the edges to prevent curling Use tongs to turn meat to avoid losing juices Pull out oven rack to stop position before turning...

Page 20: ...3 4 8 9 15 18 11 16 4 5 10 13 MEAT Steak 1 thick medium rare medium well done Ground Meat Patties 3 4 thick well done Pork Chops 1 thick Ham Slice 1 2 thick precooked Bacon thick sliced Frankfurters Lamb Chops 1 thick Chicken bone in pieces boneless breasts Fish fillets 1 4 1 2 thick steaks 3 4 1 thick RACK POSITION 4 4 4 4 4 4 4 3 4 4 SIDE 1 14 15 15 16 18 19 13 14 18 21 8 10 8 9 6 7 15 17 20 24 ...

Page 21: ...g the COOK TIME and DELAY START Before using the Timed Oven control make sure the clock is set to the correct time of day See Setting the clock p 12 21 ENGLISH USING YOUR RANGE 2 Press BAKE 3 Set the temperature optional Do this step if you want to set a temperature other than 350 F Press TEMP or pad s to raise or lower the temperature in 5 F amounts Use these pads until the desired temperature sh...

Page 22: ...K TIME will show in the display You will hear four tones then four 1 second repeater tones every minute 8 Press OFF CANCEL to stop repeater tones and remove End from display and bring back the time of day NOTE You can do this step any time to cancel the Timed Oven control setting To program COOK TIME and DELAY START IMPORTANT If you program DELAY START without programming COOK TIME the oven will s...

Page 23: ...ple at the right shows a chosen start time of 1 00 The oven will shut off by itself at 1 30 the set start time plus the set cook time 8 Press START ENTER The stop time is calculated automatically NOTE You can change the temperature and time settings any time after pressing START ENTER by repeating Steps 3 through 8 unless the delay start time has been reached PRESS YOU SEE F BAKE example shows bak...

Page 24: ... YOU SEE time of day USING THE TIMED OVEN CONTROL contd 24 USING YOUR RANGE To change the programmed timed settings To recall set Cook Time Delay Start Temperature Press COOK TIME DELAY START BAKE You see for 5 seconds set length of cook time set delay start time set temperature To recall the programmed timed settings Press the desired pad The information will be displayed for 5 seconds If cook ti...

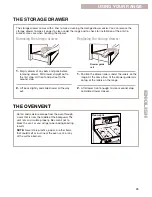
Page 25: ...stop and slide drawer closed Drawer guide rail The storage drawer comes with a liner to make cleaning the storage drawer easier You can remove the storage drawer to make it easier to clean under the range and to check for installation of the anti tip bracket Use care when handling the drawer THE STORAGE DRAWER THE OVEN VENT Hot air and moisture escape from the oven through a vent that is near the ...

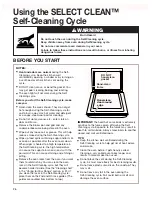
Page 26: ...o remain shiny You can clean the oven racks in the Self Cleaning cycle but they will become harder to slide See the Cleaning chart in the Caring for Your Range section p 31 If you clean the racks in the Self Cleaning cycle place them on the 2nd and 4th rack guides The guides are counted from bottom to top DO NOT hand clean gasket Hand clean frame Hand clean door around edge IMPORTANT The health of...

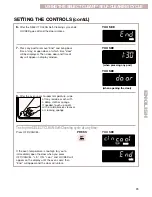
Page 27: ...OU SEE ON HEAT CLEAN LOCKED CLEAN YOU SEE PRESS YOU SEE SELECT CLEAN CLEAN example shows light soil setting The SELECT CLEAN Self Cleaning cycle uses temperatures much hotter than normal oven use to break up and burn away soil and grease SELECT CLEAN will set the clean time automatically once you choose the soil level You can choose SoilL light soil SoilA average soil or SoilH heavy soil SoilL wil...

Page 28: ...avy soil will replace SoilA NOTE You can scroll through all 3 settings SoilL SoilA and SoilH continuously by pressing SELECT CLEAN 2 Press DELAY START 3 Set the start time Press the HOUR MIN s or t pad s until the correct time of day to start the SELECT CLEAN Self Cleaning cycle shows on the display 4 Press START ENTER 5 Once Delay Start time has been reached the oven begins the SELECT CLEAN Self ...

Page 29: ...en cools to room temperature wipe off any residue or ash with a damp cloth or sponge If needed touch up spots with a mild abrasive cleanser or cleaning sponge To stop the SELECT CLEAN Self Cleaning cycle at any time Press OFF CANCEL If the oven temperature is too high for you to immediately open the door when you press OFF CANCEL cln ON cool and LOCKED will appear on the display until the oven coo...

Page 30: ...coated cooktop grates and surface burner caps Light to moderate soil Soap and water Non abrasive plastic scrubbing pad Sears Grate Cleaner Clean as soon as they become dirty Wash rinse and dry well Repeat steps of cleaning process with items at left as needed until soil is completely removed Rinse thoroughly and dry NOTE Do not reassemble caps on burners while wet Do not wash caps in dishwasher No...

Page 31: ...on 2nd and 4th rack guides Racks will discolor and become harder to slide After cleaning apply vegetable oil to rack guides for easier sliding Solution of 1 2 cup ammonia to 1 gallon water Mild abrasive cleanser or commercial oven cleaner Soak for 20 minutes then scrub with plastic scrubbing pad Oven door glass Soap and water Non abrasive plastic scrubbing pad Wash rinse and dry with soft cloth Sp...

Page 32: ...urner to light properly Keep this area free of any soil and protect it from boilovers or spillovers Always keep the burner cap in place whenever a surface burner is in use Let the cooktop cool before cleaning Do not use oven cleaners bleach or rust removers Do not obstruct the flow of combustion and ventilation air around the burner grate edges Occasionally check the burner flames for proper size ...

Page 33: ...sponge You can also clean it with a mildly abrasive scrubbing pad or cleanser Do not clean the burner cap in a dishwasher or self cleaning oven 3 If the gas tube opening has become soiled or clogged use a damp cloth to clean the area 4 If the burner ports are clogged clean them with a straight pin Do not enlarge or distort the port Do not use a wooden toothpick If the burner needs to be adjusted c...

Page 34: ...n the front of the door and your thumbs on the inside surface 2 Carefully close the door until it rests against the door removal pins To replace NOTE The door removal pins you inserted must still be in both door hinges 1 Grasp the door on the sides with your fingers on the front of the door and your thumbs on the inside surface 4 Pull door straight up then toward you Hinge hangers will slide out o...

Page 35: ...door 7 Check for alignment to make sure door is installed evenly Door removal pin hole Hinge hanger Door stop clip Angular surface of door stop clip Door removal pin hole Support pins REMOVING THE OVEN DOOR contd 35 ENGLISH CARING FOR YOUR RANGE THE OVEN LIGHT The oven light will come on when you open the oven door The oven light will not work during the Self Cleaning cycle To turn the light on or...

Page 36: ...ts are yellow or are noisy CAUSE SOLUTION When using the oven for the first time it is necessary to light the surface burners first to purge air from the gas lines The electronic control is not set correctly Refer to setting the electronic oven control section See pp 11 24 A delay start has been set Wait for the start time to be reached or cancel and reset the control The main or regulator gas shu...

Page 37: ...s not set correctly Push in the control knobs before turning them Make sure the control knob is turned to the LITE position See p 7 A household fuse has blown or a circuit breaker has been tripped The burner ports may be clogged Clean them with a straight pin See p 33 The burner ports may be clogged Clean them with a straight pin See p 33 The burner caps may not be positioned properly See p 33 The...

Page 38: ...burner flame The oven temperature seems too low or too high Adjust the oven temperature control See Readjusting the oven temperature control p 17 Slow baking or roasting Preheat oven to selected temperature before placing food in oven Choose bakeware that will allow 2 inches of air space around all sides Position rack higher in oven Decrease oven temperature 15 to 25 F Increase baking or roasting ...

Page 39: ...ND SERIAL NUMBER 2 OVEN DOOR 33 35 OVEN LIGHT 35 OVEN TEMPERATURE Readjusting 17 Setting 15 19 TOPIC PAGE OVEN VENT 25 PANS 8 9 PARTS 6 ROASTING Pans 8 9 Setting cycle 15 Oven rack positions 9 Tips 16 SAFETY 4 5 SELECT CLEAN SELF CLEANING CYCLE Before you start 26 Delay start 28 How the cycle works 27 Setting the controls 27 Starting immediately 27 Stopping the cycle 29 SERVICE Back Cover STORAGE ...

Page 40: ...NOTES 40 ...

Page 41: ...l horno 75 La luz del horno 77 Diagnóstico y solución de problemas 78 La cocina no funciona 78 El quemador para hornear asar 78 Los quemadores exteriores 79 Cuando se usa el ciclo de auto limpieza del horno 79 Resultados de cocción 80 Mensajes en la pantalla luminosa 80 Índice 83 Servicio Forro trasero Un mensaje para usted Le agradecemos su compra de un artefacto electrodoméstico KENMORE Su cocin...

Page 42: ...neficios adicionales que un Contrato de Mantenimiento de Sears le ofrece sobre la garantía de Sears Póngase en contacto con su vendedor de Sears o llame al 1 888 784 6427 y compre un Contrato de Mantenimiento de Sears G Garantía CM Contrato de Mantenimiento ADVERTENCIA Para su seguridad la información en este manual debe ser observada para minimizar el riesgo de incendio o explosión o para preveni...

Page 43: ... adelante Verifique que el soporte anti vuelco esté bien asegurado al piso Deslice la cocina para colocarla de nuevo en su lugar asegurándose de que la pata trasera quede debajo del soporte anti vuelco La pata trasera Si no sigue las instrucciones de inmediato Si no sigue las instrucciones usted puede morir o sufrir una lesión grave Todos los mensajes de seguridad le dirán el peligro potencial le ...

Page 44: ...onexión a tierra No corte ni quite la punta para conexión a tierra de este enchufe Desconecte la energía eléctrica antes de hacer una revisión al artefacto Nunca use la cocina de gas como calefacción del cuarto El mal uso de las puertas o gavetas del artefacto tales como pisar recostarse o sentarse en las puertas o gavetas puede ocasionar heridas Mantenimiento Mantenga el área de la cocina de gas ...

Page 45: ... 51 66 Quemador a fuego lento SURESIMMER p 46 Tablero de controles pp 45 72 Interruptor automáti co de luz del horno p 77 Junta de la puerta p 68 MEDIA PARRILLA STURDIGLIDE con inserto desmontable p 49 Parrillas del horno STURDIGLIDE con agarradera integrada p 49 OFF L I T E H I 8 6 4 2 L O OFF L I T E H I 8 6 4 2 L O Pow er Burn e r Perilla de control izquierda delantera quemador principal Power ...

Page 46: ...rretir chocolate o mantequilla POSICIÓN LITE Quemador principal Power Burner quemador delantero izquierdo HI Alcance medio entre HI y LO LO Posición SURESIMMER quemador posterior derecho Posiciones de intensidad de calor de los quemadores Use la siguiente tabla como guía Cómo usar las perillas de control Su cocina viene con encendedores eléctricos que prenden automáticamente los quemadores cada ve...

Page 47: ...specto la preparación de conservas póngase en contacto con la agencia local de la Oficina de Extensión del Departamento Agrícola del Gobierno de EE UU o empresas que fabrican productos para enlatado doméstico El uso de utensilios de cocina apropiados da excelentes resultados La cacerola debe tener un asiento liso lados rectos y una tapa que encaje bien Elija utensilios de cocina de un espesor medi...

Page 48: ...do con esmalte de porcelana Cerámica o cerámica vitrificada Calienta lentamente y sin uniformidad Use en intensidades de fuego lento a mediano Siga las instrucciones del fabricante Cobre Calienta muy rápida y uniformemente Usado como núcleo o base en utensilios de cocina para proporcionar calor uniforme Loza de barro Puede usarse para cocción en la superficie de cocción si así lo recomienda el fab...

Page 49: ...olas a aproximadamente tres cuartos del tiempo total de horn ear Aumente el tiempo de hornear si fuera necesario Para mejores resultados deje 2 pulgadas de espacio alrededor de cada molde y entre los moldes y las paredes del horno El aire caliente debe circular alrededor de los moldes en el horno para uniformizar el calor y permitir que llegue a todas las partes del horno Esto da como resultado un...

Page 50: ...entar el tiempo de horneado Acero inoxidable Puede necesitar aumentar el tiempo de horneado Cortezas crujientes Cerámica de gres Siga las instrucciones del fabricante Cortezas doradas claras Dorado no uniforme MEJOR USADO PARA INSTRUCCIONES SELECCIÓN DE UTENSILIOS PARA HORNEAR CÓMO USAR EL PAPEL DE ALUMINIO No forre utensilios para hornear el fondo del horno con papel de aluminio u otros forros Po...

Page 51: ...ue por un apagón no hubo electricidad por un buen rato Vuelva a poner el reloj a la hora si fuera necesario Cuando no está usando el horno la pantalla luminosa le muestra la hora del día Cuando está usando el horno o el temporizador de la cocina la pantalla mostrará horas programaciones de temperatura y qué botones de comando se han presionado Cuando la pantalla esté activa y si presiona DELAY STA...

Page 52: ...á en la pantalla Cuando el horno esté bloqueado se escucharán 3 señales audibles si usted presiona cualquier botón de comando que no sea CLOCK TIMER START ENTER OFF CANCEL TOP u OVEN Para quitar el bloqueo del horno Presione y sostenga el botón OVEN por 5 segun dos Usted escuchará una sola señal audi ble y Loc y desaparecerán de la pan talla de temperatura CÓMO USAR SU COCINA 1 Presione CLOCK 2 Po...

Page 53: ...udibles recordatorias Presione y sostenga SET por 5 segundos Un sonido corto se escuchará y usted verá rEP OFF cuando las señales audibles se apaguen Para restituir las señales audibles recordatorias Presione y sostenga SET por 5 segundos Un sonido corto se escuchará y usted verá rEP ON cuando las señales audibles se enciendan Las señales audibles de error indican un problema con el control electr...

Page 54: ...botón CLOCK por 5 segundos Usted escuchará una sola señal audible y verá 12H on cuándo la característica esté activada El horno se apagará automáticamente después de 12 horas CÓMO USAR EL INTERRUPTOR DE 12 HORAS CÓMO USAR SU COCINA CÓMO USAR EL TEMPORIZADOR ELECTRÓNICO DE LA COCINA El temporizador de cocina le permite vigilar el tiempo de cocción y de otras tareas No pone en fucnion amiento el hor...

Page 55: ...segundos si el tiempo restante es menos de una hora Cuando el tiempo ha expirado Usted escuchará cuatro señales audibles de 1 segundo luego cuatro señales audibles recorda torias de 1 segundo cada minuto hasta que usted presione TIMER OFF Para cancelar la operación del temporizador de cocina 1 Presione TIMER OFF PRESIONE USTED VE R TIME la pantalla hace el conteo regresivo USTED VE R TIME PRESIONE...

Page 56: ...as y cacerolas en la sección Cómo usar el horno p 49 Luego de programar una función usted debe presionar START ENTER para iniciar la función Si usted no presiona START ENTER dentro de 5 segundos de haber programado START aparecerá en la pantalla como recordatorio Si usted no presiona START ENTER dentro de 5 minutos de haber programado la hora del día aparecerá en pantalla Usted debe programar de n...

Page 57: ... contd PRESIONE USTED VE ON BAKE BROIL HEAT ON F BAKE BROIL HEAT USTED VE ejemplo para temperatura fijada en 350ºF 6 Para hornear ponga su comida en el horno luego que el tiempo de preparación de precalen tamiento haya terminado Mientras hornea asa el quemador del horno se encenderá y apagará para mantener la temperatura al nivel programado 7 Luego de cocinar apague el horno PRESIONE USTED VE hora...

Page 58: ... no serán activados Cómo determinar la cantidad de ajuste necesario El cuadro a la derecha le dice cuánto tiene que regular la temperatura para obtener los resultados de cocción deseados Usted puede determinar los resultados de cocción por la cantidad de dorado humedad y tiempos de levantamiento de masa para comidas horneadas Para indicar la temperatura en ºC en vez de ºF Presione y sostenga BROIL...

Page 59: ...1 2 Ponga su comida en la charola de asar y coloque la charola en el centro de la parrilla del horno Cierre la puerta del horno 3 Presione BROIL 4 Presione START ENTER Usted puede cambiar la temperatura programa da en cualquier momento antes o después de presionar START ENTER Para cambiar la pro gramación vea Cómo asar con precisión más adelante en esta sección 5 Después de asar apague el horno PR...

Page 60: ... asar y la parrilla provistas Éstas están diseñadas para drenar los jugos extras de la superficie de cocción Este drenaje ayuda a evitar salpicaduras y humo Para asegurarse de que los jugos se drenen bien no cubra la parrilla con aluminio Quite el exceso de grasa para reducir las salpica duras Corte la grasa en los bordes para evitar que se ondulen Use tenazas para voltear la carne a fin de evitar...

Page 61: ...ontd Las posiciones recomendadas de las parrillas están enumeradas de abajo 1 hacia arriba 5 Para resulta dos óptimos coloque la comida a una distancia de 3 pulgadas o más del quemador para asar Los minutos indicados son sólo a manera de guía y pueden necesi tar ser regulados a gusto del individuo TIEMPO APROXIMADO MINUTOS LADO 2 7 8 8 9 9 10 6 7 8 10 4 5 1 2 3 4 8 9 15 18 11 16 4 5 10 13 POSICIÓN...

Page 62: ... START CÓMO USAR SU COCINA 2 Presione BAKE 3 Programe la temperatura opcional Siga este paso si desea programar la temperatura diferente a 350ºF Presione el los botón es TEMP o para aumentar o para bajar la temperatura en cantidades de 5ºF Use estos botones hasta que la temperatura que usted desea aparezca en la pantalla pequeña 4 Presione COOK TIME PRESIONE USTED VE F BAKE F BAKE el ejemplo muest...

Page 63: ...as de 1 segundo cada minuto 8 Para detener las señales audibles recordatorias y eliminar End de la pantalla y que vuelva a aparecer la hora del día presione OFF CANCEL o abra la puerta del horno NOTA Usted puede realizar este procedimiento en cualquier momento para cancelar la función de control del horno con tiempo programado Para programar COOK TIME y DELAY START IMPORTANTE Si usted programa DEL...

Page 64: ...e comienzo Presione el los botón es HOUR MIN s o t hasta que la hora correcta aparezca en la pantalla El ejemplo dado a mano derecha muestra una hora de comienzo seleccionada de 1 00 El horno se apagará automáticamente a la 1 30 el tiempo de inicio programado más el tiempo de cocción programado PRESIONE USTED VE F BAKE PRESIONE USTED VE F BAKE el ejemplo muestra horneado a 375ºF PRESIONE USTED VE ...

Page 65: ...tomáticamente cuando se termine el tiempo de cocción En la pantalla aparecerá End y COOK TIME Usted escuchará cuatro señales audibles luego cuatro señales audibles recordatorias de 1 segundo cada minuto 11 Para detener las señales audibles recordatorias y eliminar End de la pantalla y que vuelva a aparecer la hora del día presione OFF CANCEL NOTA Usted puede efectuar este paso en cualquier momento...

Page 66: ...ción cuando presione DELAY START la pantalla mostrará la hora a la que comenzó Si presiona COOK TIME se eliminarán de la pantalla los segundos sobrantes de la hora de conteo regresivo Para cambiar el programa Cook Time Delay Start Temperature 1 Presione COOK TIME DELAY START BAKE 2 Mientras el programa esté visible presione botón es HOUR MIN o botón es HOUR MIN o botón es TEMP o 3 Presione START E...

Page 67: ...lmacenaje viene con un revestimiento que facilita la limpieza de la gaveta de almacenaje Usted puede quitar la gaveta de almacenaje para facilitar la limpieza debajo de la estufa y para comprobar la instalación del soporte de antivolteo Tenga mucho cuidado cuando manipule la gaveta LA GAVETA DE ALMACENAJE EL CONDUCTO DE VENTILACIÓN DEL HORNO El aire caliente y la humedad escapan del horno a través...

Page 68: ...de la puerta Limpie a mano el marco Limpie a mano los bordes alrededor de la puerta Quite las parrillas del horno si quiere que se mantengan brillantes Usted puede limpiar las parrillas del horno en el ciclo de auto limpieza pero será más difícil deslizarlas Vea el Cuadro de limpieza en la sección El cuidado de su cocina p 73 Si usted limpia las parrillas en el ciclo de auto limpieza colóquelas en...

Page 69: ...RESIONE USTED VE ON HEAT CLEAN LOCKED CLEAN USTED VE PRESIONE USTED VE SELECT CLEAN CLEAN el ejemplo muestra el pro grama para poca suciedad El ciclo de auto limpieza SELECT CLEAN usa una temperatura mucho más alta que la normal para quitar y calcinar la suciedad y la grasa SELECT CLEAN fija el tiempo de limpieza automáticamente una vez que usted elige el nivel de suciedad Usted podrá elegir SoiIL...

Page 70: ... veces SoilA para suciedad promedio reemplazará a SoilL Presione el botón tres veces SoilH para suciedad profunda reemplazará a SoilA NOTA Usted podrá examinar las tres alternativas SoiIL SoilA y SoilH si mantiene presionado continuamente el botón SELECT CLEAN 2 Presione DELAY START 3 Programe la hora de comienzo Presione el los botón es HOUR MIN s o t hasta que la hora en que se desea iniciar el ...

Page 71: ...friado a temperatura ambiental limpie con una esponja o paño húmedo cualquier residuo o ceniza Si fuera necesario dé un retoque de limpieza a las manchas con un producto de limpieza abrasivo suave o una esponja de limpieza Para detener el ciclo de auto limpieza SELECT CLEAN en cualquier momento Presione OFF CANCEL Si la temperatura del horno está demasiado alta no podrá usted abrir la puerta despu...

Page 72: ...s quemadores exteriores recubiertos de porcelana Suciedad ligera a moderada Jabón y agua Estropajo plástico de fregar no abrasivo Quemada Limpiador de parillas Sears Limpie tan pronto se ensucien Lave enjuague y seque bien Lavavajillas parrillas solamente NOTA Para evitar dañar el producto no quite la superficie de cocción Cuando la superficie de cocción esté fría quite todas las salpicaduras y li...

Page 73: ...ave limpie y seque con un paño suave Limpiador de vidrios en atomizador Seque con una toalla de papel NO limpie la charola y parrilla en el ciclo de auto limpieza Cavidad de la gaveta almacenaje Derrames de comidas que contiene leche o azúcar Todos los otros derrames Jabón y agua Limpiador liquido suave Cuando la gaveta se enfríe lave enjuague y seque con un paño suave Lave enjuague y seque con un...

Page 74: ...se encienda adecuadamente Usted debe mantener esta área libre de cualquier suciedad y protegerla de der rames o salpicaduras de comidas Siempre man tenga la tapa del quemador en su lugar mientras el quemador exterior esté en uso Deje que la superficie de cocción se enfríe antes de limpiarla No use limpiadores de horno blanqueadores o productos para quitar óxido No obstruya el flujo de aire de vent...

Page 75: ...a También puede limpiarlo con un estropajo o un producto de limpieza ligera mente abrasivo No limpie la tapa del quemador en un lavavajillas o en un horno de auto limpieza 3 Si la abertura del tubo de gas se ensucia o se obstruye use un paño húmedo para limpiar el área 4 Si los orificios están obstruidos límpielos con un alfiler recto No agrande ni distor sione el orificio No use un palillo de die...

Page 76: ...en la superficie interior 2 Cierre la puerta cuidadosamente hasta que descanse sobre los pernos para quitar la puerta Para reinstalaria NOTA Los pernos para quitar la puerta que usted insertó todavía tienen que estar en ambas bisagras de la puerta 1 Sujete la puerta por ambos lados con sus dedos hacia la parte delantera de la puerta y sus pul gares en superficie interior 4 Tire de la puerta en sen...

Page 77: ... las ranuras de las bisagras del marco delantero 3 Incline la parte superior de la puerta hacia la cocina Haga deslizar los ganchos de las bis agras hasta encajar en los pernos de apoyo del marco delantero NOTA Asegúrese de que los ganchos de las bisagras descansen por completo y hayan encajado en los pernos de apoyo 4 Inserte el gancho de tope de la puerta con la superficie angular en la parte su...

Page 78: ...os orificios y son amarillas o hacen ruido CAUSA SOLUCIÓN Al usar el horno por primera vez es necesario encender los quemadores de superficie primero con el fin de purgar el aire de las tuberías de gas Usted no ha programado el control electrónico correctamente Remítase a la sección de cómo programar el control electrónico del horno Vea pp 51 66 Usted ha programado un tiempo de comienzo diferido E...

Page 79: ...o las perillas de control antes de hacerlas girar Asegúrese de que la perilla de control esté en la posición LITE Vea p 46 Tiene un fusible quemado en casa o un disyuntor desconectado Los orificios del quemador pueden estar obstruidos Límpielos con un alfiler recto Vea p 75 Los orificios del quemador pueden estar obstruidos Límpielos con un alfiler recto Vea p 75 Las tapas del quemador pueden esta...

Page 80: ...del horno parece muy baja o muy alta Regule el control de temperatura del horno Vea Cómo regular el control de temperatura del horno p 58 Horneado o asado lento Precaliente el horno a la temperatura seleccionada antes de colocar la comida en el horno Elija utensilios de hornear que permitan 2 pulgadas de espacio aéreo por todos los lados Coloque la parrilla en posición más alta en el horno Disminu...

Page 81: ...81 ESPAÑOL NOTAS ...

Page 82: ...82 NOTAS ...

Page 83: ... de precalentamiento 57 Programación del ciclo 56 Sistema ULTRABAKE 56 57 Utensilios para hornear 50 Índice TÓPICO PÁGINA TÓPICO PÁGINA LIMPIEZA Auto limpieza SELECT CLEAN 68 71 Cavidad de la gaveta almacenaje 73 Cavidad del horno 73 Charola y parrilla para asar 73 Parrillas del horno 73 Perillas de control 72 Quemadores de superficie 74 75 Las parrillas y tapas de los quemadores exteriores recubi...

Page 84: ... Sears Roebuck and Co Registered Trademark TM Trademark of Sears Roebuck and Co Printed in the U S A Marca Registrada TM marca de fábrica de Sears Roebuck and Co Impreso en EE UU 8273135A 1 00 ...

Reviews: