33
Raise
Lower
OPTIONAL ACCESSORIES
PEDESTAL INSTALLATION
List of Parts
The following parts are included with the pedestal.
• 18 screws for mounting
• 4 dryer brackets
• 1 adjusting wrench for leveling feet
• 1 Phillips-head screwdriver
• Installation instructions
Tools Needed
The following tools are needed for installation.
• 1 #2 Phillips screwdriver
• 1 adjusting wrench for leveling feet (included)
To ensure safe and secure installation, please thoroughly
follow the instructions below.
WARNING:
•
Incorrect installation can cause serious accidents.
•
The appliances are heavy. Two or more people are
required when installing the pedestal.
There is a risk
of serious back injury or other injuries.
•
Do not allow children to play in or on the drawer.
There is a risk of suffocation or injury.
•
Do not step on the handle.
There is a risk of serious
injury.
•
If appliances are already installed, disconnect them
from all power, water, or gas lines and from drain
ing or venting connections.
Failure to do so can
result in electrical shock, fire, explosion, or death.
•
Wear gloves to protect hands when installing
pedestal.
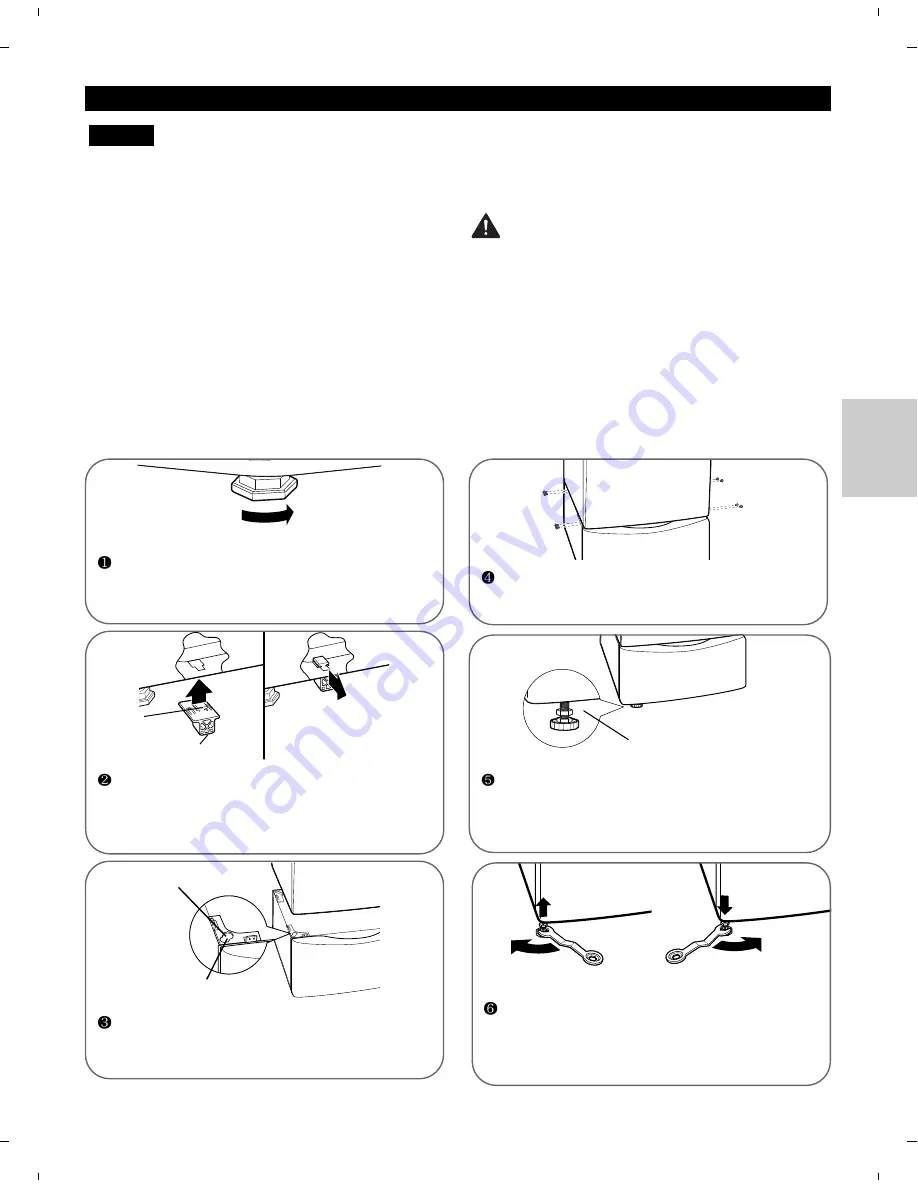
Make sure the leveling feet of the dryer are fully
retracted.
NOTE:
The dryer and pedestal must be located on
a solid, sturdy, level floor for proper operation.
Retract fully
Set the dryer in place on the pedestal. The dryer
feet will align with the inner-most cut-outs in the
pedestal brackets as shown. Dryers are large and
heavy, so have someone help you lift it.
Loosen the locknuts on the pedestal feet with the
wrench, then adjust the feet as shown above to
level the dryer. Use a level, and make sure all 4
feet are solid and even on the floor.
For washer
For dryer
Insert the T-clip of the 4 retainers into the slots on
the dryer base with the raised bracket toward the
outside of the dryer. Press the back of the retainer
upward while sliding the retainer toward the outside
of the dryer to lock it in place.
Make sure the holes in the pedestal brackets align
with the holes in the dryer retainers, then install two
screws in each bracket.
Once the pedestal is adjusted and level, use the
wrench to tighten the locknuts against the base of
the pedestal to prevent the feet from vibrating out
of adjustment.
T-clip
Retainer
Locknut
ENGLISH
Summary of Contents for 796.8102
Page 36: ...NOTES ENGLISH 36 ...
Page 37: ...NOTES 37 ENGLISH ...
Page 72: ...NOTES 72 ESPAÑOL ...
Page 73: ...NOTES 73 ESPAÑOL ...
Page 108: ......


