KEMPER ProfiMaster Instruction Manual -
EN
Product number: 150 2464
- 62 -
rev.:
2
Technical changes and errors reserved.
Status as of: 05/2015
•
Use only genuine spare filters because these are only able to guarantee the
necessary degree of separation and are adapted to the filtration device and
the performance parameters. Switch off the ProfiMaster device with the switch
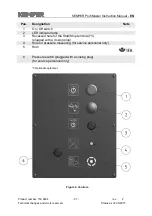
(Fig. 4, item 1).
•
Avoid unintentional reactivation of the unit by unplugging the unit from the
socket.
•
Open the service door (fig. 1, item 3).
a) Pre-filter mat replacement
•
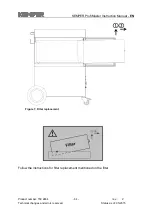
Remove the plug-in pre-filter module (Fig. 6, item 4.1) out of the filter so as to
avoid dust whirling and put it on a working bench.
•
Now you can easily remove the bracket clamp fixing the pre-filter mat in place.
•
Carefully, without stirring up the dust, remove the dirty pre-filter mat from the
pre-filter frame and fold it so that the side with the dust particles is located
inside.
•
Insert the changed filter in a plastic bag and seal it with cable ties. Suitable
plastic bags are available at KEMPER, under Order No. 119 0746.
•
Insert a new pre-filter mat into the pre-filter frame and attach it again with the
bracket clamp.
•
Insert the plug-in module of the pre-filter back into the device.
b) Main filter replacement
•
Lift the main filter (Fig. 6, pos. 4.2) at the front slightly using the lugs to release
the seal from the mating surface and remove it from about two -thirds from the
filter housing so that the filter pins remain lying on the side guide rails.
•
In the rear part the main filter slides with side pins on guide rails and thus it
lifts. This will thus prevent damage to the seals in the rear part (Fig. 7).
•
Now insert one hand from the side underneath the filter.
Then insert your other hand as well. Remove the filter from the device with
both hands and place it on a clean, flat workbench.
•
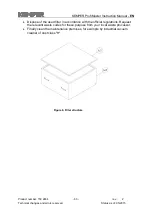
Insert the changed filter in a plastic bag and seal it with cable ties. Suitable
plastic bags are available at KEMPER, under Order No. 119 0746.
•
From each side from the bottom, use once again one and then the other hand,
to lift the new main filter and attach it with the side pins to the guide rails of the
filtration device. Then use one and then the other hand to grip the lugs on the
front side.
•
While lifting the front side, insert the filter back into the device until it clicks
audibly at the end.
•
Now slide the frame of the pre-filter over the embedded new main filter.
After replacing the appropriate filter media perform the following steps:
•
Close the door of the casing until it clicks in place.
•
Slide the mains plug in the socket again and switch on the device. The green
operating light on the switch (Fig. 4, item 1) should be lit to indicate a trouble-
free operation.


