background image

47

● ● ● ● ● ● ● ● ● ● ● ● ● ● ● ● ● ● ● ● ●

Address Book

Addre

ss

 Book

2

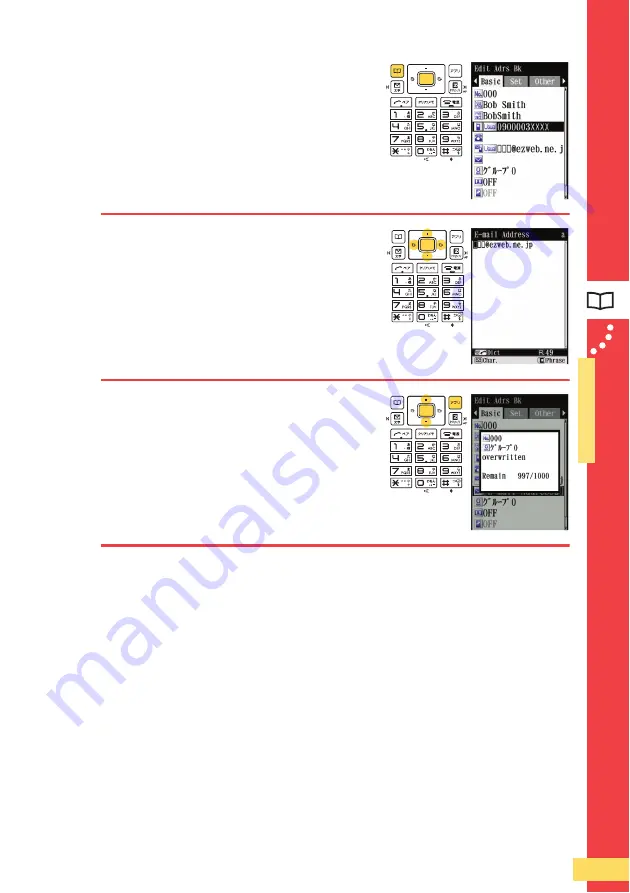
Press 

A

 [Detail], and press 

a


[Edit].

3

Use 

H

 to select the item to be 

edited, and press 

A

.

.

The selected item can now be edited.

.

For details on how to edit the registered data, see 
Step 

2

 of P.43 to Step 

7

 of P.44.

4

When you finish editing, press 

c

 [Reg], use 

F

 to select 

“Overwrite”, and press 

A

.

.

The edited address book entry is registered and 
overwrites the old data.

Summary of Contents for AQUOS

Page 1: ...d battery chargers at stores bearing the logo regardless of brand and manufacturer to protect the environment and reuse valuable resources Sales KDDI Corporation Okinawa Cellular Telephone Company Manufactured by SHARP Corporation Novemver 2008 Edition Contents Before Use Phone Call Global Function Entering Characters Address Book Pair Function Mail Camera EZweb EZ News Flash au one Gadget EZ Navi...

Page 2: ...vice au trouble kosho index html Fonts or indications shown in this PDF manual may be different from those on the actual screen or may be partly omitted for better readability Note that this PDF manual may not reproduce actual screen color tones exactly The W64SH comes with ǚȢǮȢɦɓɭȪɳ Basic Manual and ۄ ཟ ᅽሤ Instruction Manual W64SH ǚȢǮȢɦɓɭȪɳ W64SH ۄ ཟ ᅽሤ Equivalent to this English PDF manual Engli...

Page 3: ...ail On a crowded street use your cellphone in places where you will not prevent others from passing On a Shinkansen train or in a hotel lobby move to a location where you will not disturb anyone Take care not to talk too loudly during conversations When you take photos or record movies of others with the camera on your cellphone ask them for permission on beforehand Do not use the camera on your c...

Page 4: ...ou can even use call mail and other functions overseas EZweb You can download Chaku UtaR Chaku Uta FullR and wallpaper etc EZ Navi You can search for various location information with the EZ Navi Walk Passenger Seat Navi Evacuate Navi and Security Navi functions For information about other features of your W64SH see P 83 J What You Can Do with Your W64SH K AP 51 AP 78 AP 63 AP 36 AP 69 AP 76 ...

Page 5: ...one if the signal is too weak It is sometimes difficult to receive a signal in some places even within a service area indicates the signal state Take note of the amount of remaining battery power If the remaining battery power is too low you may not be able to use the cellphone properly indicates the amount of remaining battery power J Manner Mode and Answer Memo K AP 30 Press r for more than one ...

Page 6: ...may result in a fine or other penalty Drive Mode Setting Drive Mode enables the caller to hear the answer message ただいま 移動中です I m driving now and to leave a message with Answer Memo Press the r key below display while the stand by screen is displayed use F to select Drive and press A J Use of Your W64SH While Driving is Prohibited by Law K J Turn the Power Off or Set Drive Mode While Driving K View...

Page 7: ... Unsolicited Ad in the title Reject mail from specific addresses Reject spoof e mail If you receive a call from an unknown phone number It may be a One ring call intended to trick you into returning a call to an unwanted service with very high charges For a call that rings for no more than 3 seconds appears in the incoming history Be careful about calling phone numbers you do not know J Beware of ...

Page 8: ...Information You can enter the phone numbers of the people you want to find out about in order to check the information about their safety from EZweb or the Internet Safety information can be accessed at http dengon ezweb ne jp from the cellphone PHS of another carrier or a personal computer How to Access Press b F to select au one Top A F to select 災害用伝言板 Disaster Message Board A http dengon ezweb...

Page 9: ... in the open position The illustrations screen layouts and display content appearing in this manual are just examples and are subject to change Each of the keys is indicated as follows in the explanations of this manual J About the Operating Instructions K Indication of Side Keys 1 2 3 4 5 6 7 8 9 0 c b a d E A D C B t q s r ...

Page 10: ...2 Turning the Power On 14 Switching the Display Language to English 15 Various Codes and Passwords 16 Key Operations 17 Open Position and Closed Position 18 Viewing the Indicators 19 Viewing the Main Menu 21 Initial Settings for E mail and EZweb 23 Confirming Your Phone Number and E mail Address 24 Changing Your E mail Address 25 Phone Call Making a Call 27 Making an International Call 27 Answerin...

Page 11: ...r 50 Mail Using E mail 51 Using C mail 59 Camera Before Using the Camera 63 Taking Photos 66 Viewing Photos 67 Attaching Photos to E mail 68 EZweb EZweb 69 Bookmarking Frequently Viewed Sites 71 Checking Your Charges 72 Downloading Chaku UtaR and Chaku Uta FullR 73 EZ News Flash au one Gadget Setting EZ News Flash 75 EZ Navi What You Can Do with EZ Navi 76 TV Initializing au Media Tuner 80 Watchin...

Page 12: ... Guide JIBUN BANK Launcher Operation Guide 取扱説明書 Only the Japanese versions of documentation are included in the package An AC adapter is not included in the package Please purchase a common AC adapter 01 02 The common AC adapter 01 is for use in Japan To charge your W64SH overseas be sure to use the common AC adapter 02 The earphone conversion adapter 01 for the Sharp external connection jack is ...

Page 13: ...Keys Application Key Mail Character Key Call Pair Key Address Book Key EZ Key Clear Memo Key Power End Key Earpiece Light Sensor FeliCa Mark Internal au IC Card Mobile Light Flash External Connection Jack Cover Strap Eyelet Charging Terminals Internal Antennas 2 Infrared Port Battery Pack Cover Up Key Side Number Keys Shutter Key Speaker Incoming Charge Indicator Main Display Multi Key TOUCH CRUIS...

Page 14: ...r 1Hold the connector of the common AC adapter 01 02 sold separately so that the protruding part is at the bottom and insert it into the connection terminal of the desktop holder 2Raise up the prongs of the power plug of the common AC adapter 01 02 sold separately and insert the power plug into a 100V AC outlet J Charging the Battery Pack K Incoming Charge Indicator Insert the connector into the c...

Page 15: ...isconnect the power plug from the 100V AC outlet Do not use other than a designated adapter for charging Use one of the following adapters Using other than a designated adapter for charging may result in malfunction Common AC adapter 01 0202PQA USB charging cable 01 0201HAA Common AC adapter 02 0203PQA Portable charger 01 0201PDA Common DC adapter 01 0201PEA You can directly connect the common AC ...

Page 16: ... Strong Medium Weak Very weak Out of service area High Low Requires charging Zero Charging flashes If you become unsure of an operation or you make a mistake press to return to the previous screen You can also press for more than one second to return to the stand by screen The indicators for the signal state and battery level differ depending on the color of the W64SH you purchased and the Keitai ...

Page 17: ...guage for function names and other items to English 1Press A35 while the stand by screen is displayed The Set Language screen appears 2Use F to select English and press A 設定 The screen display is set to English J Switching the Display Language to English K ...

Page 18: ... various settings from Other of the e mail settings Initial Value The 4 digit number that you wrote on the subscription form at the time of purchase Usage Examples For operations such as modifying various settings of the W64SH Initial Value 1234 4 to 8 digits Usage Examples For subscribing to and canceling subscriptions to EZweb fee based content Initial Value The 4 digit number that you wrote on ...

Page 19: ...sses information displayed on the stand by screen Accesses the incoming history Accesses the address book Accesses the E mail C mail menu Deletes phone numbers and characters and redisplays the previous screen Makes calls and accesses the Pair menu Accesses the main menu performs operations and takes photos and records videos with the camera Accesses the outgoing history Turns the power on off end...

Page 20: ...Position Open position 1Slide the display to the open position Closed position 1Slide the display to the closed position J Open Position and Closed Position K Carry the cellphone when it is in the closed state closed position Carrying around the cellphone in the open position may result in it being damaged ...

Page 21: ... packet communication is possible when you use your cellphone overseas 4 4 4 4 microSD Card inserted 5 5 5 5 Call in progress Running au Media Tuner 6 6 6 6 Running EZ apps 7 7 7 7 Using EZweb 8 8 8 8 New VeilView set Receiving multicast delivery 9 9 9 9 Indicates a missed call a a a a Displayed when you have received E mail C mail or have unread mail b b b b Date Day Time c c c c EZ News Flash ti...

Page 22: ...his appears on the stand by screen to notify you of for example received mail and missed calls You can check the information by pressing C while the stand by screen is displayed When there is more than one notification you can use G to select an item Indicates the operation you can perform with d Indicates the operation you can perform with A Indicates the operation you can perform with c Indicate...

Page 23: ...creens and operating procedures in this manual are for when the main menu is Standard Music Lover main menu This is the main menu that is preset when you purchase an Earth Green cellphone SH MURA bitter main menu This is the main menu that is preset when you purchase a Mars Red cellphone Standard main menu This is the main menu that is preset when you purchase a Galaxy Black cellphone J Viewing th...

Page 24: ...main menu From SH MURA bitter main menu From Standard main menu Press A while the stand by screen is displayed Use G to select TOOLS Use F to select CALCULATOR and press A Press A while the stand by screen is displayed Use H to select Tools and press A Use F to select Calculator and press A Press A while the stand by screen is displayed Use H to select Tools and press A Use F to select Calculator ...

Page 25: ...t apply at the time of purchase Set the initial settings before using these services If you set the initial settings your e mail address is decided automatically 1Press b while the stand by screen is displayed Alternatively press d or c 2Press A A connection is made to the server to set the initial settings and then a screen appears after a while to notify you of your e mail address J Initial Sett...

Page 26: ...24 Before Use Before Use 3Press A 1Press A and 0 in order while the stand by screen is displayed Your phone number and e mail address appear J Confirming Your Phone Number and E mail Address K ...

Page 27: ...enu screen appears 2Use F to select E mail Setup and press A The E mail Setup screen appears 3Use F to select Other and press A A connection is made to the server and the other settings screen appears 4Use F to select Eメールアドレ スの変更 Change E mail Address and press A J Changing Your E mail Address K ezweb ne jp E mail address Customizable Domain name Not customizable ...

Page 28: ... A The e mail address appears 8Use F to select OK and press A Your security code is the 4 digit number that you wrote on the subscription form at the time of purchase If you enter the security code incorrectly 3 times in a row within the same day you will not be able to perform the setup operation until the following day For the e mail address you can enter up to 30 characters including single byt...

Page 29: ...vice are added to monthly au calling charges and billed together Check the Country code at the au Customer Service Center For charges refer to au MOBILE PHONE SERVICE GUIDE or contact the au Customer Service Center J Making a Call K When you want to specify whether or not to notify the other party of your phone number enter 184 not notify or 186 notify before the phone number Alternatively you can...

Page 30: ... the au Customer Service Center 1Press to answer a call Press to hang up Screen indication for incoming calls 001 010 1 212 123 KDDI International access code Area code Country code USA Phone number J Answering a Call K Caller s phone number name When the caller has set to notify of his or her phone number the phone number is displayed When the phone number is stored in your address book the calle...

Page 31: ...ne number in the incoming history It is intended to trick you into returning a call to a service such as a dating service with very high charges Be careful when calling phone numbers you do not know How to tell an incoming call is a One ring call When you were unable to answer a call red missed call indicator appears in the incoming history list For a call that rings for no more than 3 seconds blu...

Page 32: ...vibration only 1Press r for more than one second while the stand by screen is displayed Manner Mode is set and appears at the bottom of the stand by screen Z Z Z ZTo cancel Manner Mode Press r for more than one second while the stand by screen is displayed J RedialingandReturningCalls OutgoingHistory IncomingHistory K Up to 50 items can be stored for each outgoing history and incoming history J Se...

Page 33: ...sages from Answer Memo When a message is recorded the Answer Memo alert window appears 1Press while the stand by screen is displayed Z Z Z ZWhen is displayed on the stand by screen Use C to select press A and proceed to Step 4 2Use F to select Answer Memo and press A J Setting Answer Memo K The cellphone can record a total of 10 messages in combination with Voice Memo each up to 60 seconds long Us...

Page 34: ...lays Z Z Z ZTo stop playback Press A during playback Z Z Z ZTo delete a message of Answer Memo Use F to select the message you want to delete press c SubMenu and then select Delete Next select Delete One and press A 1Press A while the stand by screen is displayed 2Use H to select Settings and press A J Changing Ringtone Type and Volume K ...

Page 35: ...33 Phone Call Phone Call 3Use F to select Sound Vib Lamp and press A 4Use F to select Incoming Setup and press A 5Use F to select Incoming Call and press A ...

Page 36: ...Ringtone and press A 7Use F to select Original and press A When setting a downloaded Chaku UtaR or other sound select Data Folder 8Use F to select a ringtone and press A The ringtone is set To listen to a ringtone before setting it press a Play ...

Page 37: ...ll ringtone is set The ringtone volume increases gradually The ringtone volume decreases gradually Level1 to Level5 The ringtone sounds at the set volume level The ringtone does not sound Since the earpiece and speaker of your W64SH are close together the ringtone begins playing at a low level and then increases gradually until it reaches the set volume level so as not to have an adverse effect up...

Page 38: ...ing you can even use your W64SH overseas 1Press A while the stand by screen is displayed 2Use H to select Global Function press A check the precautions and press A 3Use F to select Area Setting and press A 4Use F to select Overseas and press A J Setting the Area K ...

Page 39: ...Call J Calling Japan from Overseas K Some functions are restricted in overseas mode Although the preferred roaming list PRL is already stored in the phone at the time of purchase the list may be updated several times a year Update it before departure When you make an overseas call from Japan to a cellphone compatible with Global Passport CDMA you can use the normal procedure Subscribe to EZweb and...

Page 40: ...kanji mode Double byte katakana mode Single byte katakana mode Double byte alphanumeric mode Single byte alphanumeric mode Single byte number mode Code input mode The entry modes available for selection differ depending on the function being used To enter a double byte number select Double byte alphanumeric mode and press the corresponding number key until the number appears Entry Modes ...

Page 41: ... 1 _ 1 2 a b c 2 3 d e f 3 4 g h i 4 5 j k l 5 6 m n o 6 7 p q r s 7 8 t u v 8 9 w x y z 9 0 0 Period Hyphen Underscore _ Uppercase Lowercase Reverse function Line break When you change your e mail address AP 25 up to 30 characters including single byte alphanumeric characters and some symbols can be entered for the part before However be careful with regards to the following points The characters...

Page 42: ...te one character at a time Press for more than one second to delete all characters When the cursor is positioned within the text the characters from the cursor position are deleted Inserting line breaks Press after confirming characters When using C mail and some other functions line breaks may not be able to be inserted Switching between uppercase and lowercase Press after entering a character to...

Page 43: ... 3 times Enters r Press 6 3 times Enters o Press 1 8 times Enters 1 Press 2 4 times Enters 2 Press 3 4 times Enters 3 Press A Since can be any characters input is omitted here Z Z Z ZTo enter a number easily Press a number key and then press reverse function Example To enter 1 press 1 2Press 1 twice Candidates with at the beginning are displayed in the list of conversion candidates 3Use H to selec...

Page 44: ...am list screen appears Z Z Z ZTo enter a symbol or emoticon Press a repeatedly 2Use H to select the pictogram you want to enter and press A The pictogram is entered and the mode returns to the previous input mode Z Z Z ZTo enter pictograms consecutively After you select a pictogram press c Cont J Entering Pictograms K ...

Page 45: ...played The registration screen of the address book appears 2Use F to select Name and press A The Name entry screen appears 3Enter a name and press A The reading is entered automatically 4Use F to select Phone No 1 and press A The Phone No entry screen appears J Registering Data in the Address Book K ...

Page 46: ...umber enter the phone number starting with the area code The Phone No Type screen appears Select the phone number type and press A 6Use F to select E mail Address1 and press A The E mail Address entry screen appears 7Enter an e mail address and press A The E mail Type screen appears Select the e mail address type and press A ...

Page 47: ...E to use Outgoing History or D to use Incoming History while the stand by screen is displayed and use F to select the phone number you want to register 2Press c SubMenu use F to select Reg to Adrs Book and press A You can register up to 1 000 entries in the address book In addition you can also register items such as images groups postal addresses and birthdays ...

Page 48: ...ers in the history have been already entered For the subsequent procedure see Step 2 of P 43 to Step 8 of P 45 Editing the address book entries 1Press a while the stand by screen is displayed and use H to select the address book entry to be edited Z Z Z ZTo delete an address book entry Select the address book entry to be deleted press c SubMenu select Delete and press A ...

Page 49: ...o be edited and press A The selected item can now be edited For details on how to edit the registered data see Step 2 of P 43 to Step 7 of P 44 4When you finish editing press c Reg use F to select Overwrite and press A The edited address book entry is registered and overwrites the old data ...

Page 50: ...by screen is displayed A list of registered address book entries appears 2Use H to select the address book entry for the person you want to call and press A 3Use F to select a phone number and press Press to hang up J Making a Call from the Address Book K ...

Page 51: ...ect Reg Can press A use F to select YES and press A 3Use H to select the address book entry to register for the Pair Partner press A Detail and press A When registering an address book entry with more than one phone number or e mail address to a Pair Partner select the phone number or e mail address to use with the Pair Function J Registering a Person as a Pair Partner K If the address book entry ...

Page 52: ... F to select Call and press A Sending mail 1Press while the stand by screen is displayed The registered Pair Partners appear 2Use G to select a Pair Partner use F to select E mail or C mail and press A For the subsequent procedure see Step 6 on P 53 to Step a on P 54 for sending e mail and Step 6 to Step 8 on P 61 for sending C mail J Contacting a Pair Partner K ...

Page 53: ...tial settings before using the E mail service AP 23 J Using E mail K Packet communication charges based on the size of the data included will be incurred when receiving and sending e mail You can send an e mail to up to 30 addresses up to 64 single byte characters per address including addresses set for To Cc Bcc at one time You can send up to 1 000 e mail messages total includes multiple addresse...

Page 54: ...d press A The Create Mail screen appears 3Use F to select Address and press A The address entry method selection screen appears 4Use F to select Quote Adrs Book and press A A list of registered address book entries appears You can also select an address from the history for previously sent and received mail or directly enter an e mail address ...

Page 55: ...ject and press A The Subject entry screen appears You can enter up to 50 double byte 100 single byte characters for the subject A line break cannot be entered 7Enter a subject and press A 8Use F to select Text and press A The Text entry screen appears You can enter up to 5 000 double byte 10 000 single byte characters for the text ...

Page 56: ...54 Mail Mail 9Enter text and press A If you then select Attachment Wrapping and press A you can attach a photo and or movie and then send the e mail aPress a Send The e mail is sent ...

Page 57: ...a folder and press A The received mail list screen appears appears for unread mail 3Use F to select the mail you want to read and press A The content of the mail appears Reading previously received e mail Previously received e mail is stored in the Inbox 1Press d while the stand by screen is displayed use F to select Inbox and press A For the subsequent procedure see Steps 2 to 3 of Reading receiv...

Page 58: ...See Steps 1 to 3 on P 55 2Use F to select the file name of the file attachment and press A The Attachment Details screen is displayed 3Use F to select the file you want to receive and press A Receiving starts 4Press A The file is displayed played Depending on the type and size of the file attachment it may be displayed or played within the text in Step 1 It may take a while to send and receive mai...

Page 59: ...he mail to which you want to reply See Steps 1 to 3 on P 55 2Press a The Create Mail screen appears Re is inserted in the subject field and the text of the original e mail is quoted 3Enter the text and send the mail See Step 8 on P 53 to Step a on P 54 ...

Page 60: ...t サポート設定 Support settings and press A For the subsequent procedure follow the instructions on the screen Simple settings サポート設定 Support settings Allows you to set a filter by answering questions For users who want to check the conditions while setting the filter フィルターレベル 高 Filter level Strict Rejects mail from a personal computer For users who only want to receive mail from cellphones フィルターレベル 中 F...

Page 61: ...ction for rejecting C mail that includes an URL link http https or phone number in the message text C mail Safety Block is enabled by default If you want to receive mail that includes an URL or phone number link you can cancel this setting J Using C mail K C mail charges will be incurred when sending C mail Recipient au cellphone Address Phone number of au cellphone What you can send Text up to 50...

Page 62: ... Create New and press A The Create Mail screen appears 3Use F to select Address and press A The address entry method selection screen appears 4Use F to select Quote Adrs Book and press A A list of registered address book entries appears You can also select an address from the history for previously sent and received mail or directly enter a phone number ...

Page 63: ...o send mail press A use F to select a phone number and press A 6Use F to select Text and press A The Text entry screen appears You can enter up to 50 double byte 100 single byte characters for the text A line break cannot be entered 7Enter text and press A 8Press a Send The C mail is sent ...

Page 64: ...press A The received mail list screen appears appears for unread mail 3Use F to select the mail you want to read and press A The content of the mail appears Reading previously received C mail Previously received C mail is stored in the Inbox 1Press d for more than one second while the stand by screen is displayed use F to select Inbox and press A For the subsequent procedure see Steps 2 to 3 of Re...

Page 65: ...to display the photos you take on the stand by screen and when you receive calls and mail and register photos to address book entries Sending photos and movies to cellphones and personal computers by e mail You can send not only photos but also movies J Before Using the Camera K Photos and movies may not be able to be sent depending on their size It may take a while to send and receive mail depend...

Page 66: ...ures and recording movies As shown in the illustrations below hold your W64SH firmly and keep it steady Check the positions of the built in camera lens and mobile light flash and take care not to cover them with the strap or a finger Open Position Vertical Closed Position Horizontal Closed Position ...

Page 67: ... can take photos of the following sizes If a microSD Card is not inserted the photos are saved to Photo Folder in the data folder of the cellphone Photo Mode Photo Size Save Location Photo W paper Mode W paper Normal Photo Folder in the data folder of the cellphone W paper Wide Photo DSC Mode 0 3 M DSC Folder in the microSD Card 1 M Full Hi Vision 2 M 3 M 5 M ...

Page 68: ... of focus appears 2Display the subject you want to take in the display and press A The focus is adjusted automatically and then the shutter sounds and the photo is taken Z Z Z ZTo use q to take a photo Display the subject in the display half press q to adjust the focus and then fully press q to take the photo Z Z Z ZTo retake the photo Press while the preview screen is displayed and then perform S...

Page 69: ...o select Data Folder and press A The Data Folder screen appears The photos you take are stored in the Photo Folder Some photos are stored in the DSC Folder of the microSD Card 3Use F to select Photo Folder and press A 4Use F to select a folder and press A J Viewing Photos K ...

Page 70: ...s A The Create Mail screen appears The photo is already attached A confirmation screen may appear depending on the photo size or data size In such a case follow the instructions on the screen Next perform Step 3 on P 52 to Step a on P 54 to send the e mail J Attaching Photos to E mail K It may take a while to send and receive mail depending on the signal state in the area you are using your cellph...

Page 71: ...eb sites you can obtain information such as news and weather forecasts and download wallpaper images Downloading Chaku UtaR and Chaku Uta FullR You can find a song to download by selecting from genres or searching for an artist name J EZweb K When you connect to EZweb a packet communication charge will be incurred based on the size of the data you send and receive and not on the length of time you...

Page 72: ...ides the latest information on games music books and other items and information on topics such as hobbies and entertainment trends 暮らす Lifestyle Provides useful lifestyle information such as gourmet and travel information 集まる Community Provides interesting convenient and fun information on SNS blogs etc メール Mail Provides another e mail address that you can also use from a personal computer マイページ ...

Page 73: ... access them easily You can bookmark up to 100 sites Some sites cannot be bookmarked 1Display the site you want to bookmark and press c Browser Menu 2Use F to select New bookmark and press A 3Press c Reg The site is bookmarked J Bookmarking Frequently Viewed Sites K ...

Page 74: ... you want to view and press A The site is displayed You can view an estimate of charges for calls communication and other items 1Press A11 in order while the stand by screen is displayed The EZweb connection confirmation screen appears Use F to select YES and press A 2Use F to select the item you want to check and press A J Checking Your Charges K ...

Page 75: ... Chaku Uta Full Video Clips and press A Next select a genre and then an item and select the Chaku UtaR or Chaku Uta FullR to download 4Follow the instructions on the screen to download the Chaku UtaR or Chaku Uta FullR Z Z Z ZTo use a site that charges for providing information Your EZ Password or Premium EZ Password needs to be entered Follow the instructions on the screen and enter one of the pa...

Page 76: ...ges may be incurred for EZ News Flash when you perform a manual update or when you connect to an EZweb site If packet communication charges do apply a confirmation screen appears When you use an au one Gadget that updates the information via communication with the au server packet communication charges may be incurred when the information is updated The information is updated at regular time inter...

Page 77: ...the ticker Z Z Z ZTo cancel the setting Press B while the stand by screen is displayed select the ticker and press A Press c Menu select サービス設定解除 Cancel Service Setting press A select YES and press A Then select 解除する Cancel press A select OK and press A Z Z Z ZTo change the setting for reception notification You can change the sound vibration incoming indicator and other settings for notifying of ...

Page 78: ...e no monthly charge and 位置確認メール Position Search Mail no monthly charge With these functions you can use your W64SH to check the location of an au cellphone that supports Security Navi position searches and to send a mail notification automatically to a specified au cellphone when you enter or are in or leave or are out of a pre determined area during a preregistered time period Navigation engine b...

Page 79: ... Check real time traffic information on roads throughout Japan もっとナビウォーク EZ Navi Walk Set various settings and receive guidance on the PC link service インフォメーション Information Register as a member or make inquiries This displays various menus that are useful when you are out The display is switched to a 3D image at the guidance point or a point near the destination Checking Your Position The first po...

Page 80: ...ttp www dpa or jp for PC http www dpa or jp 1seg k for cellphones EZ Channel Plus You can watch programs registered with EZ Channel Plus and EZ Channel Television antenna When you watch TV 1Seg extend the television antenna to ensure you can receive an adequate signal The television antenna can be extended in 3 stages Pull it out as far as it will go The television antenna can also be rotated 360 ...

Page 81: ... use the interactive content services provided for data broadcasts or access the information sites of EZweb When the battery level is the message 電池残量が残り少ないですが 起動し ますか There is very little battery power remaining Do you want start appears You can start au Media Tuner if you select YES and press A We recommend charging the battery pack as soon as possible because au Media Tuner consumes a lot of ba...

Page 82: ...ress A If you select OK 以後表示しない Do not display again the precautions are not displayed again A screen for initializing the settings for using au Media Tuner appears If you set each of the settings according to the instructions on the screen the TV 1Seg channel setting screen appears 3Use F to select オート設定 放送波 Auto Setup Broadcast Signal and press A To set the area manually select マニュアル設定 Manual Se...

Page 83: ...ernatively you can change the channel by pressing d b When the first or last channel of each mode is displayed press d b to change the mode J Watching TV 1Seg K After the first time au Media Tuner is started the last selected channel is displayed However if you are in a different area from the last time or unable to receive a signal perform the channel setup again b d b d TV 1Seg EZ Channel Plus ...

Page 84: ... 1Seg during charging For details on the closed position see P 18 The basic key operations for the closed position are shown below 1Press while au Media Tuner is running use F to select は い YES and press A Key Description G TOUCH CRUISER Changes the channel s t F TOUCH CRUISER Adjusts the volume r Shows hides the information on the screen Use the desktop holder on a level surface Your cellphone ma...

Page 85: ...ata folder can be exchanged between Touch Message compatible models using the FeliCa function BluetoothR Function Wireless communication can be performed with personal computers printers handsfree devices and other devices that support BluetoothR Infrared Communication Data such as address book entries and files in the data folder can be exchanged with other devices that are compatible with infrar...

Page 86: ...6 Is the power turned on Press for more than one second to turn the power on P 14 The battery pack runs out of power in a short time Are you using functions like au Media Tuner and LISMO Player for a long time Some EZ apps BREWR may consume the power of the battery pack quickly Also the power of the battery pack is consumed quickly when you use au Media Tuner and LISMO Player and when the Counter ...

Page 87: ...ock Set the phone number of the phone that will set Remote Ctrl Lock and set the duration and the number of incoming calls for activating Auto Lock FeliCa Lock and Address Book Lock 1Press A415 in order while the stand by screen is displayed The setting screen of Remote Ctrl Lock appears 2Enter your Lock No and press A Lock No is set to 1234 at the time of purchase 3Use F to select Valid No press ...

Page 88: ...in press A use F to select the duration to specify and press A Z Z Z Z Duration is the Time limit for the period ranging from the reception of the first incoming call until the number of incoming calls specified for No of Incm has been received You can specify between 1 and 10 minutes 6Use F to select No of Incm press A use F to select the number of incoming calls to set and press A Z Z Z Z No of ...

Page 89: ...personal computer You can use the Security Lock Service free of charge Procedure for the Security Lock Service Turning Remote Ctrl Lock on off by calling the au Customer Service Center From an au cellphone 113 without area code toll free From a non au cellphone or regular phone 0077 7 113 toll free Hours 24 hours a day Follow the voice guidance instructions Turning Remote Ctrl Lock on off from a p...

Page 90: ...g the Battery 12 Closed Position 18 C mail 59 C mail Safety Block 59 Creating and Sending 60 Reading 62 D Decoration Mail 83 Disaster Message Board Service 6 Display Indicators 19 E E mail 51 Creating and Sending 52 Initial Settings 23 New Mail 55 Reading 55 Replying 57 Viewing Photos and Movies Attached to E mail 56 E mail Address Changing 25 Confirming 24 Entering 41 Entering Characters 38 Chara...

Page 91: ... Making a Call 50 Registering 49 Sending Mail 50 Phone Number 24 Photos 66 Attaching to E mail 68 Taking 66 Viewing 67 Playback Answer Memo 31 Photos 67 Power 14 Turning Off 14 Turning On 14 R Remote Control Lock 85 Ringtone 32 S Security Code 16 Security Lock Service 87 Signal Strength 14 Sites Viewing Bookmarked 72 Soft Keys 20 Stand by Screen 14 Sub Menus 23 T Television Antenna 78 Text Reader ...

Page 92: ...d battery chargers at stores bearing the logo regardless of brand and manufacturer to protect the environment and reuse valuable resources Sales KDDI Corporation Okinawa Cellular Telephone Company Manufactured by SHARP Corporation Novemver 2008 Edition Contents Before Use Phone Call Global Function Entering Characters Address Book Pair Function Mail Camera EZweb EZ News Flash au one Gadget EZ Navi...

Reviews: