background image

Using the Notification/Status Panel

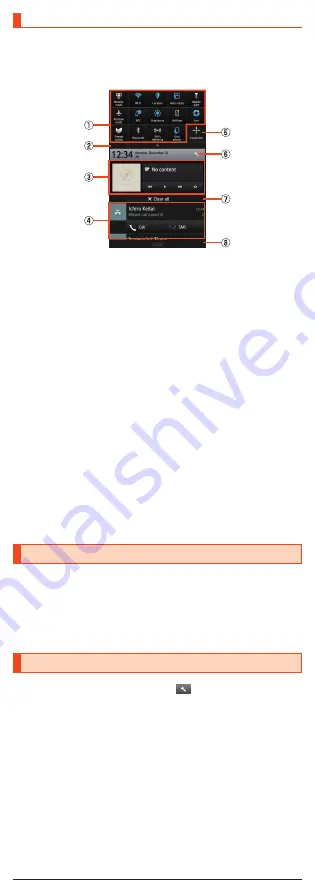
In the notification/status panel, you can check the details on notification icons 
and status icons or activate an application corresponding to the icon.
You can also set the manner mode, VeilView, etc.

1

  Slide the status bar down.

Notification/Status panel

 Function buttons

Switch settings of the frequently used function by one touch.

 Function button displaying/hiding bar

Tap it to display/hide function buttons on the second and subsequent 
row.

 Music controller

Play music with LISMO.

 Notification area

Check the status of the product and contents of notifications. 
Depending on the information, you can pinch out/pinch in to enlarge/
shrink notifications or tap notifications/functions to activate a 
corresponding application.


Flick a notification to the left/right to delete it. You may not be able to 
delete a notification depending on the notification.

 Customize key

Change or rearrange the displayed function buttons.

 Settings key

Tap it to make various settings for the product.

 Clear all

Tap it to clear all the notifications. You may not be able to delete a 
notification depending on the notification.

 Close bar

Slide it up to hide the notification/status panel.

Switching Input Methods

You can switch input methods for character entry.


Following operation explanations use “Japanese - iWnn IME - SH edition”.

1

  While the keyboard is displayed, open the notification 

panel.

2

  [Choose input method] 

 [English (US)]/[Japanese].

Switching Software Keyboards

1

  On the character entry screen, [

 [Change input UI] 

 [Set QWERTY keyboard]/[Set 12 keyboard].

18

Summary of Contents for aquos shl25

Page 1: ...ION Customer Service Center For inquiries call For general information charges and operation assistance toll free From fixed line phones From au cell phones area code not required area code not required From fixed line phones From au cell phones In case above numbers are not available call toll free 0120 977 033 except Okinawa 0120 977 699 Okinawa For service cancelation procedure in case of loss or...

Page 2: ...g on screen instructions Safety Precautions Before you start using the product be sure to read the Notes on Usage available on the au homepage to ensure correct use Before you assume that the product is malfunctioning check for possible remedies in the following au Customer Support site of au homepage http www au kddi com english support When Using the Product Communication is not possible even in...

Page 3: ...ng a cell phone screen while walking is a serious hazard Do not suddenly stop to talk on operate the cell phone or do so while walking Move to areas where you will not inconvenience others on bullet trains in hotel lobbies etc Refrain from talking in a loud voice Obtain the permission of other people before you take their photos with the cell phone s camera Be considerate of people around you Some...

Page 4: ...the damage ruination etc of safety information or any loss arising from registered safety information Using Emergency Rapid Mail Emergency Rapid Mail is a service to collectively deliver Earthquake Early Warning and Tsunami Warning provided by the Japan Meteorological Agency and Disaster and Evacuation Information provided by the national government or the local governments to au phones in the spe...

Page 5: ... earthquake whose maximum Japan seismic scale is predicted of 5 lower or more has been detected This service detects an earthquake P wave preliminary tremors near the seismic center immediately after the earthquake occurs and automatically calculates its location scale and predicted strength of the shaking After that you will be notified of the earthquake as soon as possible within a few seconds t...

Page 6: ...scription of Operations for Selecting Item Icon Key etc In this manual operation procedures are described as below Description Explanation On the home screen Apps Sheet Phone Enter 141 Call Slide flick the Feel UX home screen to switch to the Apps Sheet and then tap Phone Continue by tapping and and finally f hold down for at least 2 seconds Hold f down for at least 2 seconds Tapping is to select ...

Page 7: ...e sensor areas on both sides at the same time to turn the screen on or to minimize the volume and make the product vibrate when a call is arriving the alarm is ringing or for an incoming call or notification Even if you release your hand from the sensor areas the screen is kept turned on and it is not turned off Strap eyelet Proximity sensor Light sensor Proximity sensor prevents inadvertent opera...

Page 8: ...ed Removing it forcibly may cause damage or a fault The battery is built into the product and cannot be removed by the customer To force the power off refer to Turning the Power Off Forcibly P 14 Grip sensor Grip sensor may not work properly in the following cases which may cause malfunction Operation with gloved hands Operation while the product is equipped with a case cover etc Operation while t...

Page 9: ...he au Nano IC Card LTE microSD memory card cover 2 Slowly pull the au Nano IC Card LTE tray straight out by hooking a finger on it au Nano IC Card LTE tray 3 Put the au Nano IC Card LTE on the au Nano IC Card LTE tray Make sure the notches on the au Nano IC Card LTE and au Nano IC Card LTE tray face the proper orientation and put the card slowly on the tray au Nano IC Card LTE tray au Nano IC Card...

Page 10: ... the au Nano IC Card LTE tray straight out by hooking a finger on it au Nano IC Card LTE tray 3 Remove the au Nano IC Card LTE from the au Nano IC Card LTE tray 4 Slowly insert the au Nano IC Card LTE tray into the au Nano IC Card LTE tray slot taking care not to let the tray be caught on the metal parts on both sides of the slot Confirm the position of the au Nano IC Card LTE tray slot and the or...

Page 11: ...ing to force a wrongly oriented card into the slot could make it impossible to remove the card or result in damage Do not touch the terminal part of a microSD memory card Removing the microSD Memory Card Before removing the microSD memory card turn the product off 1 Open the au Nano IC Card LTE microSD memory card cover 2 Slowly push the microSD memory card in all the way After it clicks let the m...

Page 12: ...ery While charging the charging incoming indicator illuminates in red and the battery icon is displayed with superimposed When the battery is charged to approximately 95 the charging incoming indicator illuminates in green When charging is finished the charging incoming indicator goes out Depending on the operation procedure and usage environment the temperature inside the product may get high and...

Page 13: ...ion jack Protruding edges Common AC adapter 05 sold separately Common DC adapter 03 sold separately 2 Plug the common AC adapter 05 sold separately power plug into a 100 V AC power outlet Plug the common DC adapter 03 sold separately plug into a cigarette lighter socket Common DC adapter 03 sold separately Common AC adapter 05 sold separately 3 When charging is finished pull the microUSB plug of t...

Page 14: ...the product If you use the microUSB cable to charge the internal battery it may take the internal battery longer to be fully charged than if you use the specified AC adapter sold separately Turn the protruding side of the microUSB plug up and insert the microUSB plug to the external connection jack of the product straightly Inserting the microUSB plug in the wrong direction may result in damage to...

Page 15: ...ration of the product is unstable it may be due to applications installed after purchasing the product If symptoms improve when booted in safe mode uninstalling the applications you installed may remedy symptoms 1 f hold down for at least 2 seconds 2 Long touch Power off OK Safe mode is displayed at the bottom of the screen when the product is booted in safe mode To end safe mode reboot the produc...

Page 16: ... Wallpaper Owner info key Tap to display texts according to items set for Owner info in Lock Security Info Area Flick to the left right to switch the weather stock prices information Clock information and widgets Switching the Display Language to English You can switch the display language for function names and other items to English 1 On the home screen Apps Sheet 2 設定 Settings 3 言語と文字入力 Languag...

Page 17: ...s bar Desktop Sheet Apps Sheet Dock You can register a shortcut for the application in the dock to start quickly Navigation Bar Guide Tab When you switch the Desktop Sheet Apps Sheet the sheet name will be displayed Page Indicator The current position of the Desktop Sheet Apps Sheet will be displayed Slide flick the Desktop and Apps Sheets up down to switch pages Slide the navigation bar up to acc...

Page 18: ...e displayed with their number superimposed on them Main Status Icons Icon Description Time Battery level Battery level display No battery While charging the battery icon is displayed with superimposed Airplane mode set Signal strength Receiving electric field Level display Out of service area The icon indicating network is displayed at the upper left LTE WiMAX 2 available 3G available Roaming Duri...

Page 19: ...fications or tap notifications functions to activate a corresponding application Flick a notification to the left right to delete it You may not be able to delete a notification depending on the notification Customize key Change or rearrange the displayed function buttons Settings key Tap it to make various settings for the product Clear all Tap it to clear all the notifications You may not be abl...

Page 20: ...old separately Common AC adapter 05 Illustrations and forms may not match depending on the AC adapter you use Common DC adapter 03 0301PEA sold separately Portable charger 02 0301PFA sold separately microUSB cable 01 0301HVA sold separately microUSB cable 01 Navy 0301HBA sold separately microUSB cable 01 Green 0301HGA sold separately microUSB cable 01 Pink 0301HPA sold separately microUSB cable 01...

Page 21: ... turn off the power You can force the power off by holding down f for at least 8 seconds and releasing your finger after the product vibrates Turn the product on again after a while P 14 Cannot operate the touch panel as intended Make sure you are not operating with hands wearing gloves etc Make sure you are not operating with the tip of a fingernail or with foreign object between the screen and y...

Page 22: ...n If the software update fails it may become impossible to operate the product If this happens bring it to an au shop or PiPit not accepted by some shops Charge the battery sufficiently before starting update If the battery level is insufficient or the battery runs out during the update the software update will fail Check out the signal reception status The software update may fail if the product ...

Page 23: ... retailer date of purchase and other necessary details filled in on the warranty card and be sure to keep it in a safe place Keitai Guarantee Service Plus LTE An after sales service membership program on a monthly basis called Keitai Guarantee Service Plus LTE monthly fee 380 yen tax excluded is available for using your au cell phone for a long time without worries This service expands coverage fo...

Page 24: ...theft and loss Customer charge 1st 5 000 yen 2nd 8 000 yen N A Holding over and repair spontaneous failure 1st year Free Free Holding over and repair spontaneous failure 2nd year and later Free three year warranty Actual cost Holding over and repair partial damage Customer charge Upper limit 5 000 yen Actual cost Holding over and repair water soak and irreparable damage Customer charge 10 000 yen ...

Page 25: ...cles in the range Compatible Bluetooth profiles 3 HSP Headset Profile HFP Hands Free Profile A2DP Advanced Audio Distribution Profile AVRCP Audio Video Remote Control Profile OPP Object Push Profile SPP Serial Port Profile PBAP Phone Book Access Profile 4 HID Human Interface Device Profile HDP Health Device Profile PAN Personal Area Networking Profile PXP Proximity Profile 5 FMP Find Me Profile 5 ...

Page 26: ...s cell phone while talking on the phone can be well below that indicated above This is due to the cell phone being designed to only output the minimum power required to communicate with a base station Therefore in general the closer you are to a base station the lower the power output of the cell phone This cell phone can be used in positions other than against your ear Use a carrying case or simi...

Page 27: ...isten at high volume levels for long periods Headphone Signal Level The maximum output voltage for the music player function measured in accordance with EN 50332 2 is 131 mV European RF Exposure Information Your mobile device is a radio transmitter and receiver It is designed not to exceed the limits for exposure to radio waves recommended by international guidelines These guidelines were develope...

Page 28: ... Mobile Satellite Services MSS operations FCC RF Exposure Information Your handset is a radio transmitter and receiver It is designed and manufactured not to exceed the emission limits for exposure to radio frequency RF energy set by the Federal Communications Commission of the U S Government The guidelines are based on standards that were developed by independent scientific organizations through ...

Reviews: