9
T E M P E R A T U R E R E G U L A T I O N
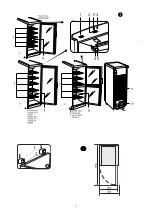
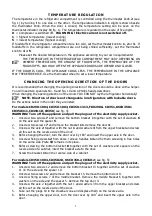
The temperature in the refrigerator compartment is controlled using the thermostat knob
2
(see
fig. 1) by turning it to one side or the other. The temperature indication in digits is shown beside
the thermostat knob. When the door is closed, the temperature setting can be seen on the
thermostat indicator display
3
(fig. 1). The temperature is regulated on the scale of five digits.
0
= Compressor is switched off.
W A R N I N G ! Electric current is not switched off.
1
= highest temperature (lowest cooling)
5
= lowest temperature (highest cooling)
If foodstuffs in the refrigerator compartment are too cold, set the thermostat knob to
1
,
2
or
3
. If
foodstuffs in the refrigerator compartment are not being chilled sufficiently, set the thermostat
knob to
4
or
5
.
Please set the desired temperature in the appliance according to your own requirements!
THE TEMPERATURE IN THE REFRIGERATOR COMPARTMENT MAY VARY DEPENDING ON
AMBIENT TEMPERATURE, THE AMOUNT OF FOODSTUFFS, THE TEMPERATURE OF THE
FOODSTUFFS, AND HOW OFTEN THE APPLIANCE DOORS ARE OPENED AND CLOSED.
IF THE ROOM IS COOL, THE APPLIANCE COOLS LESS. THE TEMPERATURE IN THE APPLIANCE
MAY THEREFORE RISE. Use the thermostat wheel to set a lower temperature.
C H A N G I N G T H E O P E N I N G D I R E C T I O N O F T H E D O O R S
It is recommended that changing the opening direction of the doors should be done with a helper.
You will need two spanners No. 8 and No. 10 and a Philips head screwdriver.
When changing the opening direction of the doors YOU CAN NOT lay the refrigerator horizontally!
NOTE. Direction of door is not changeable in refrigerators with lockable doors.
Do the actions below in the order they are listed:
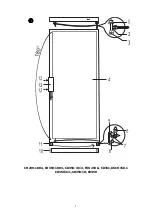
For models CD290-1004, CD350-1003, CD350-1313, FKU 290 G
,
CD351, KSCD 350.1
CD350-311, CD350-1D, CD350
(see fig. 3):
WARNING! Turn off the appliance and pull the plug out of the electricity supply socket.
1.
Unscrew two screws
7
and remove the bottom bracket 8 together with the set of washers
6
on the axle and the spacer
5
.
2.
Unscrew two screws
7
and remove the bracket
11
. Remove the door
4
.
3.
Unscrew the axle
2
together with the nut
1
and washers
3
from the upper bracket and screw
all this set on the reverse side of the door;
4.
Before hanging the door, turn the door over by 180
0
and insert the upper axle in the door.
5.
Unscrew fixing screws
12
from doors, remove handles
13
and fix them screwing in free holes
on the same side. Plate
10
remains in its place.
6.
Before screwing the bottom bracket
8
together with the set of washers and spacers on the
reverse side of a cabinet, insert the bracket axle to the door.
7.
Screw the bracket
11
on the reverse side of a cabinet.
For models
CD350-1004, CD350-2D, KS CD 350.2, CD350-2
(see fig. 5):
WARNING! Turn off the appliance and pull the plug out of the electricity supply socket.
1.
Unscrew two screws 12 and remove the bottom bracket 13 together with the set of washers
11 on the axle and the spacer 10.
2.
Unscrew two screws 12 and remove the bracket 15. Remove the bottom door 9.
3.
Unscrew fixing screws 7 of the middle bracket. Remove the middle bracket 6 together with
washers on the axle and the spacer 5. Remove the top door 4.
4.
Unscrew the axle 2 together with the nut 1 and washers 3 from the upper bracket and screw
all this set on the reverse side of the door.
5.
Take out the plugs 18 in the crossbar zone and displace them on the reverse side.
6.
Before hanging the upper door, turn the door over by 180
0
and insert the upper axle in the
door.


