background image

ST

O

RE

 B

ut

to

&

 S

ET

U

Ps

After using the EDIT menu and control knobs to adjust the parameters for the selected sound/zone, the STORE 
button is used to memorise the settings, and ensure the changes are not lost when turning the instrument OFF or 
selecting other sounds.

The  STORE  button  has  three  different  functions:  to  store  individual  sounds  (SOUND),  to  store  the  entire  panel 
configuration (SETUP), and to store the current panel configuration as the default (POWERON).


STORE button functions

STORE function Description

SOUND

Store the selected sound’s EDIT menu parameters* to the variation button.

SETUP

Store all EDIT menu parameters, all sound section panel settings, and EQ section settings to a SETUP memory.

POWERON

Store all EDIT menu parameters, all sound section panel settings, and EQ section settings as the default.

* Common parameters are not stored to SOUND memory.  For more information about common parameters, please refer to page 38.

1

 Storing a SOUND

This function will store the selected sound’s EDIT menu parameters to the variation button, thus overwriting the 
existing preset sound.

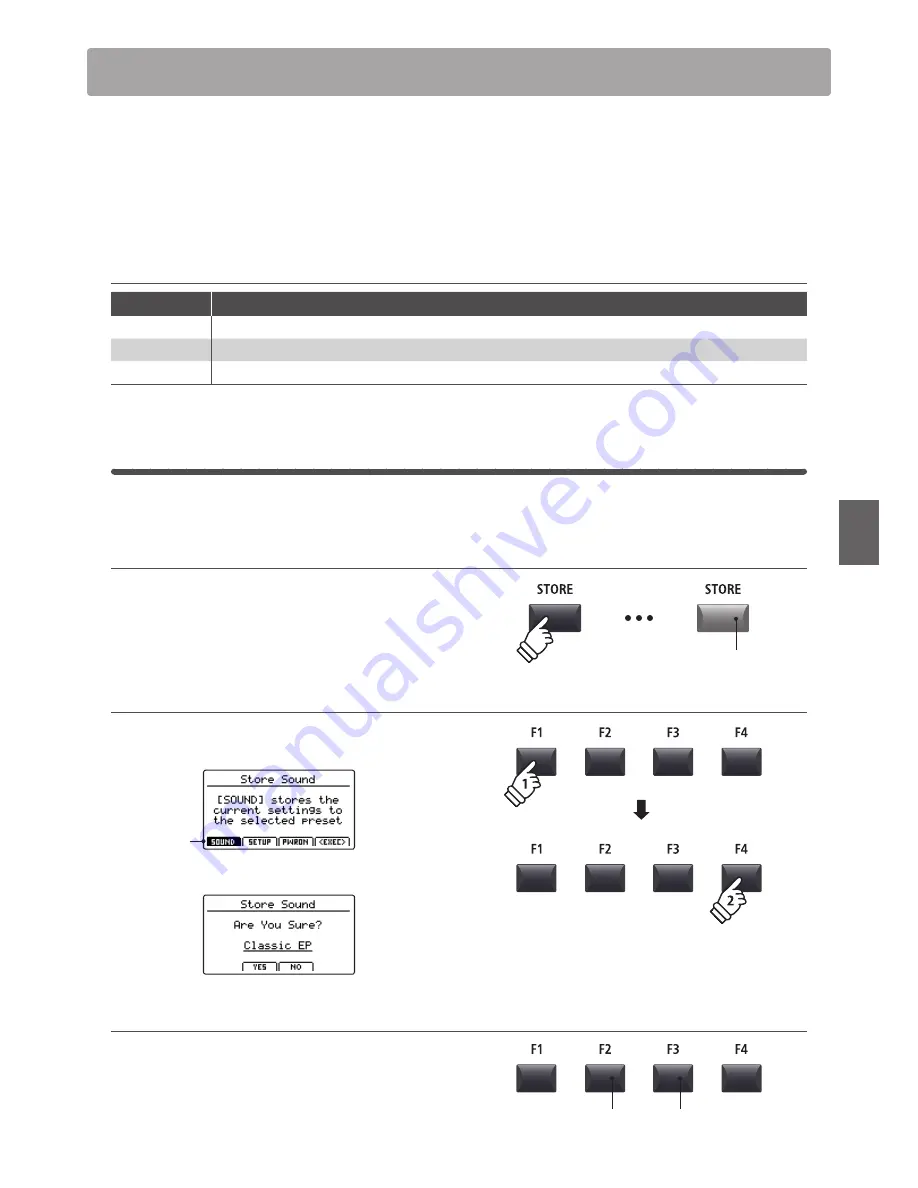
1. Entering the STORE screen

Press the STORE button.

The LED indicator for the STORE button will turn ON, and the 
store selection screen will be shown in the LCD display.

2. Selecting the Store Sound function

Press the F1 button (SOUND) to select the Store Sound function, 
then press the F4 button (EXEC).

SOUND 

selected

The Store Sound confirmation screen will be shown in the LCD display.

3. Confirming the Store Sound operation

Press the F2 button (YES) to confirm the Store Sound operation, 
or the F3 button (NO) to return to the store selection screen.

* The existing sound will be overwritten with the adjusted sound.

* The +/YES and –/NO buttons can also be used to confirm or cancel the 

store operation.

LED indicator ON:

STORE mode is selected

F3 button:

NO: Cancel

F2 button:

YES: Confirm  

Overview of the STORE Button

Summary of Contents for MP7

Page 1: ...Introduction Recorder Appendix SYSTEM Menu USB Menu STORE Button SETUPs EDIT Menu Main Operation Owner s Manual v1 02...

Page 2: ......

Page 3: ...outlined explaining how to adjust drawbar positions using zone faders and control knobs and change the organ s percussion characteristics The chapter closes with an explanation of the instrument s glo...

Page 4: ...nstructions 3 Heed all warnings 4 Follow all instructions 5 Do not use this apparatus near water 6 Clean only with dry cloth 7 Do not block any ventilation openings Install in accordance with the manu...

Page 5: ...nforms to the specified power voltage Failure to do so may result in fire 120V 240V 230V The product is not completely disconnected from the power supply even when the power switch is turned off If th...

Page 6: ...fall over resulting in fire Do not place naked flame such as lighted candles on the product CAUTION Indicates a potential hazard that could result in injury or damage to the product or other property...

Page 7: ...health which could otherwise arise due to inappropriate waste handling For further details please contact your local authority European Union only FCC Information U S A CAUTION Changes or modificatio...

Page 8: ...onewheel Organ Mode 32 Global Section 32 1 EQ 34 2 Transpose 36 3 Local Off 37 EDIT Menu Overview of the EDIT Menu INT mode 38 EDIT Menu Parameters INT mode 40 1 Reverb 40 2 1 EFX 40 2 2 Amp Simulator...

Page 9: ...Load 99 2 Save 100 3 Delete 101 4 Rename 102 5 Format 103 SYSTEM Menu Overview of the SYSTEM Menu 104 SYSTEM Menu Parameters Functions 105 1 Utility 105 2 Pedal 106 Expression Damper pedal calibration...

Page 10: ...eristics Enjoy their natural organic sound or pass the signal through a wide variety of classic effects stomp boxes before plugging into one of the five classic amp and speaker cabinets complete with...

Page 11: ...emailing to band members casual listening away from the keyboard or further editing using an audio workstation 2Owner s Manual Conventions This owner s manual utilises a number of illustrative convent...

Page 12: ...buttons turn user assigned functions ON or OFF Various different functions can be assigned to these buttons allowing immediate control during performances Press and hold either button to show the resp...

Page 13: ...he organ GLOBAL Section EQ button This button turns the global EQ ON or OFF Press and hold this button to show the EQ settings in the LCD display TRANSPOSE button This button turns the TRANSPOSE funct...

Page 14: ...tton This button stores edited SOUNDS or full panel settings to the SETUP and POWERON memories EXIT button This button exits the current mode or page EDIT button This button enters the EDIT menu When...

Page 15: ...s button activates the MP7 s A B Loop function allowing passages of a recorder song or MP3 WAV SMF file to be played back repeatedly REW and FWD buttons These buttons are used to move the playing posi...

Page 16: ...rmation please refer to page 105 MIDI Section MIDI THRU OUT IN jacks These jacks are used to connect the MP7 to external MIDI devices and also to a computer with a MIDI interface as an alternative to...

Page 17: ...ned to each foot controller in the Controllers page of the EDIT menu For more information please refer to page 48 OUTPUT Section OUTPUT jacks These jacks are used to connect the MP7 to a musical instr...

Page 18: ...ect to a computer to exchange MIDI data and use DAW software Connect the F 30 triple pedal unit accessory USB type A USB type B Connect an expression pedal Connect to amplifiers speakers etc Connect t...

Page 19: ...wheel organ mode can only be used with the MAIN zone is selected thus the SUB zones are limited to using the standard PCM organ sounds All sounds are adjusted using the various parameters in the EDIT...

Page 20: ...page 26 2 Adjusting the MAIN zone volume Move the MAIN zone volume fader to the top most position For more information about adjusting the volume of zones please refer to page 22 3 Adjusting the MP7...

Page 21: ...e middle row of sound buttons The LED indicator for the button will turn ON to indicate that the sub category is selected and a sound variation pop up list will briefly be shown in the LCD display 3 S...

Page 22: ...e other zones When playing with just a single zone e g MAIN it is recommended to set the volume fader to the maximum position and use the MASTER volume fader to adjust the overal volume of the instrum...

Page 23: ...ress the F1 F4 function buttons located below the LCD display to select the desired zone The selected zone will be shown in the LCD display SUB2 zone selected Changing the zone mode Press and hold the...

Page 24: ...he process is identical for all four zones 1 Selecting sounds for the MAIN and SUB1 zones First turn the MAIN zone ON then select a piano sound Next turn the SUB1 zone ON and select a bass sound Play...

Page 25: ...ng the MAIN and SUB1 zone key ranges Test the new zone key ranges by playing a chromatic scale from the bottom most note of the keyboard The bass sound will be heard from the bottom most key to the C2...

Page 26: ...LCD display to select the desired zone The bottom tab representing the zone will become highlighted and the name of the selected sound and primary group of knob parameters will be shown in the LCD di...

Page 27: ...N or OFF Press the REVERB button for the desired zone to turn reverb for that zone ON or OFF The LED indicator for the zone s REVERB button will turn ON or OFF to indicate the current status of the re...

Page 28: ...X category M S EFX category M S EFX category M S EFX category M S 1 Chorus 8 2 7 Delay Rev 8 2 13 Groove 4 1 19 Enhancer 8 2 Flanger 5 2 8 PitchShift 3 1 14 Misc 2 20 P Shift 6 3 Phaser 6 1 9 Compress...

Page 29: ...above the total number of effect types available for the MAIN zone is much larger than that of the SUB zones Therefore when assigning a sound to a SUB zone that was prepared using an effect only avai...

Page 30: ...to produce a distinctive shimmering sound Turning the Amp Simulator ON or OFF Press the MAIN zone s AMP button to turn the amp simulator ON or OFF The LED indicator for the AMP button will turn ON or...

Page 31: ...ser Dynamic B Mic Position Change the position of the microphone used for the amplifier OnAxis OffAxis C Ambience Adjusts the mixing ratio of additional ambient microphones 0 127 Adjusting additional...

Page 32: ...screen will be shown in the LCD display The tonewheel edit screen can also be shown by selecting the Sound page of the EDIT menu when tonewheel mode is activated Tonewheel edit screen The tonewheel o...

Page 33: ...drawbars are adjusted by the zone faders 2 drawbar group selected drawbars adjusted by zone faders Changing organ percussion settings and rotary effect speed While the tonewheel edit screen is shown...

Page 34: ...uency band 200 3150 Hz 10 dB 10 dB D Mid2 Gain Adjusts the gain of the Mid2 frequency band 200 3150 Hz 10 dB 10 dB 2 A Mid1 Q Adjusts the bandwidth of the Mid1 band 0 5 4 0 B Mid2 Q Adjusts the bandwi...

Page 35: ...ow a baseline EQ to be applied independently of the EQ function and therefore independently of the selected SETUP EQ Offset must be enabled in the SYSTEM menu for this shortcut to function For more in...

Page 36: ...tomatically however the transpose ON OFF state will not be stored Setting the Transpose value Method 2 Press and hold the TRANSPOSE button then press a key on the keyboard to the left or right of midd...

Page 37: ...s the connection between the MP7 s keyboard and tone generator to be disabled This may be useful when using the MP7 to control an external MIDI device without the keyboard triggering the instrument s...

Page 38: ...A Touch Depth Vibrate Depth Vibrate Rate Vibrate Delay Octave Layer Switch Octave Layer Level Octave Layer Range Octave Layer Detune Portamento Porta Time Porta Mode tonewheel Drawbar Position Percuss...

Page 39: ...ound will be lost upon selecting another sound To store the adjusted sound use the STORE button page 63 Quick Compare function The Quick Compare function allows any sound being adjusted to be compared...

Page 40: ...four zones This parameter is not stored to SOUND but to SETUP only 4 Depth This parameter adjusts the reverb depth For more information about reverb please refer to page 27 2 1 EFX 1 Category This pa...

Page 41: ...of the simulated amplifier levelled by the Amp EQ Mid parameter For more information about the Amp Simulator please refer to page 30 This parameter functions independently of the global EQ 8 Mic Type...

Page 42: ...adjusts the amount of time required for the sound to fade out after the keys are released for the selected sound 9 DCF Attack Time This parameter adjusts the length of the filter s attack Higher valu...

Page 43: ...rameter adjusts the time required for the portamento i e the speed of the slide between notes 25 Portamento Mode This parameter changes the portamento mode Portamento Mode Description Rate The time re...

Page 44: ...ne This parameter adjusts the tuning of the selected sound for values smaller than a semi tone 2 Stretch Tuning This parameter selects the level of stretch tuning The human ear typically detects high...

Page 45: ...n the Baroque era to revive the original characteristics User Temperament Sys User1 2 User defined temperament created by raising or lowering the pitch for each semi tone For information about creatin...

Page 46: ...ud volume Off constant A constant volume is produced regardless of how hard the keys are struck This touch curve is intended for playing sounds of instruments that have a fixed dynamic range e g harps...

Page 47: ...is normal As the value decreases the keyboard response gradually becomes less dynamic and when set to OFF becomes completely flat i e fixed touch response For more information about dynamics please re...

Page 48: ...effectiveness i e depth strength of the soft pedal 7 Modulation Wheel This parameter determines whether or not the modulation wheel is active for the selected sound 8 Modulation Wheel Assign This para...

Page 49: ...rmation about connecting pedals please refer to page 17 19 Left Pedal Assign This parameter selects the function assigned to the left pedal of the optional F 30 pedal unit This parameter is common for...

Page 50: ...placeholder names EFX Para1 10 SomeEFXofferawiderangeofavailableparameters whileothersarelessflexibleandfeaturefeweradjustableparameters Whenassigning EFX parameters to the four control knobs the name...

Page 51: ...pt DCA TchDpt Vib Depth Vib Rate Vib Delay Octave Oct Level Oct Range Oct Detune Portament Porta Time Porta Mode Parameter Name Sound Type Piano E Piano T Wheel Others 4 Tuning Fine Tune Stretch Tempe...

Page 52: ...note or chord is played on the piano with the sustain pedal depressed not only will the strings of the notes played vibrate but also the strings of other notes vibrating in sympathetic resonance 5 Ke...

Page 53: ...oise for harpsichord and bass sounds 2 Key off Delay This parameter adjusts the delay time before the Key off Noise is heard Virtual Technician DRAWBAR sounds 1 Key Click Level This parameter adjusts...

Page 54: ...Program MIDI Transmitting Channel Program Bank MSB Bank LSB 2 SETUP Send Program Send Bank Send Volume Send Knobs 3 Transmit Transmit System Exclusive Transmit Recorder 4 MMC Transmit MMC MMC Device I...

Page 55: ...r category Turn the four control knobs A B C D to adjust the parameters assigned to those knob Parameters can also be adjusted by using the CURSOR buttons to move the selection cursor and YES or NO bu...

Page 56: ...To change sounds on external MIDI devices when recalling a SETUP set this parameter to ON 2 Send Bank This parameter determines whether or not Program Bank Numbers MSB LSB will be transmitted when a S...

Page 57: ...Transmit MMC This parameter determines whether or not the MP7 s recorder control buttons will transmit MMC MIDI Machine Control data 2 MMC Dev ID This parameter determines the device ID of the MMC MI...

Page 58: ...the zone key range please refer to page 24 6 Key Range Zone Hi This parameter defines the top key of the selected zone For more information about adjusting the zone key range please refer to page 24 7...

Page 59: ...etermines whether or not playing will be restricted to single notes even when more than one note is played simultaneously This parameters can be used to effectively simulate the performance characteri...

Page 60: ...ther or not the pitch bend wheel is active for the selected zone 6 Pitch Bend Range This parameter sets the range of the pitch bend wheel in semi tone steps The range differs for INT mode 0 7 and EXT...

Page 61: ...screen is used to assign MIDI Control Change or Aftertouch messages to the four main control knobs A B C and D for direct real time adjustment in Play Mode Two groups of knob parameters primary and s...

Page 62: ...e DCF Attack Time DCF Attack Level DCF Decay Time DCF Sustain Level DCF Release Time DCF Touch Depth DCA Touch Depth Vibrate Depth Vibrate Rate Vibrate Delay Octave Layer Switch Octave Layer Level Oct...

Page 63: ...tored to SOUND memory For more information about common parameters please refer to page 38 1Storing a SOUND This function will store the selected sound s EDIT menu parameters to the variation button t...

Page 64: ...elect the characters for the SETUP name Press the SETUP memory buttons to select the memory location for the new SETUP SETUP memory SETUP name Press the F4 function button EXEC The Store Setup confirm...

Page 65: ...lecting the Store PowerOn function Press the F3 function button PWRON to select the Store PowerOn function then press the F4 button EXEC POWERON selected The Store PowerOn confirmation screen will be...

Page 66: ...e The LED indicator for the SETUP button will turn on to indicate that SETUP mode is selected The LED indicators for the currently selected SETUP memory buttons will also turn on and the name of the S...

Page 67: ...erted to MP3 WAV Cannot be converted to SMF MIDI Turning Recorder mode ON or OFF Press the RECORDER section s ON OFF button to turn Recorder mode ON or OFF The LED indicator for the RECORDER section s...

Page 68: ...ing tempo beat Turn control knob C to select the song memory to be used for the new recording There are 10 internal song recorder memories If the selected song memory already contains recording data i...

Page 69: ...ecorder control button The LED indicators for the and buttons will turn OFF and recording will stop The F4 function button STOP can also be used to stop recording After a brief pause the MIDI player s...

Page 70: ...lect the MIDI recorder function 2 Selecting the song to playback Turn control knob C to select the song memory to be played back Song selection is not possible during playback 3 Starting song playback...

Page 71: ...set the start point of the loop The LED indicator for the A B button will start to flash Press the A B button again to set the end point of the loop The LED indicator for the A B button will turn ON a...

Page 72: ...the SAVE function will appear at the bottom of the LCD display The SAVE function will appear only when the selected song memory has been recorded to Save function 3 Selecting the Save SMF function Pr...

Page 73: ...corder song memory Preparing the USB memory device Prepare a selection of SMF MIDI files copying the data to a USB memory device 1 Selecting an empty song memory After turning Recorder mode ON Turn co...

Page 74: ...root of the USB device Previous folder Folder File Selection cursor Press the CURSOR buttons to move the selection cursor Control knob A can also be used to move the selection cursor Press the F4 func...

Page 75: ...on button EXEC to load the selected SMF file into the song memory The Load SMF confirmation screen will be shown in the LCD display 6 Confirming the Load SMF operation Press the F2 button YES to confi...

Page 76: ...move the selection cursor Press the YES button to select the Erase Song function The Erase Song confirmation screen will be shown in the LCD display 4 Confirming the Erase Song operation Press the F2...

Page 77: ...nt keyboard settings Panel Mode types Panel Mode Description Normal default Panel settings will not change during song playback and will not influence the current keyboard settings Play Panel settings...

Page 78: ...selected SMF file After selecting the Direct Play function the player screen will be shown in the LCD display For more information about playing the loaded MIDI file and using the Chain Play feature...

Page 79: ...sual representation of each track s volume Track number Select the track to adjust Track mute ON OFF Play or mute the selected track Track volume Adjust the volume of the selected track Muted track Re...

Page 80: ...s Copyright c 1995 2007 SPIRIT 1 Connecting a USB memory device Connect a USB memory device to the USB to Device port USB devices should be formatted to use the FAT or FAT32 filesystems The USB device...

Page 81: ...on the USB memory device connected there may be a brief delay before standby mode is engaged Standby mode 4 Starting the audio recorder record Press a key on the keyboard The LED indicators for the a...

Page 82: ...the audio file name Audio file name 7 Saving the audio file Press the F4 function button EXEC The save audio confirmation screen will be shown in the LCD display Press the F2 button YES to confirm the...

Page 83: ...ection of MP3 or WAV audio files copying the data to a USB memory device USB devices should be formatted to use the FAT or FAT32 filesystems 1 Connecting a USB memory device Connect the USB memory dev...

Page 84: ...n button EXEC or YES button to select the file or enter the selected folder 4 Selecting the audio file to load Press the CURSOR buttons to select the desired audio file Press the F4 function button EX...

Page 85: ...ol button once to set the start point of the loop The LED indicator for the A B button will start to flash Press the A B button again to set the end point of the loop The LED indicator for the A B but...

Page 86: ...ER section s ON OFF button to turn Recorder mode ON The LED indicator for the RECORDER section s ON OFF button will turn ON and the Audio recorder screen will be shown in the LCD display Audio recorde...

Page 87: ...ust the gain level of the overdub Increasing the audio recorder gain level parameter may be useful when recording quieter passages Overdub Gain level Audio recorder input The gain level can be set wit...

Page 88: ...op overdubbing After a brief pause the Audio player screen will be shown in the LCD display Audition overdub Press the F4 function button PLAY to audition the overdub before saving 9 Selecting the sav...

Page 89: ...udio file to a USB device in either MP3 or WAV format 1 Connecting a USB memory device Connect the USB memory device to the USB to Device port USB devices should be formatted to use the FAT or FAT32 f...

Page 90: ...ing the audio recorder gain level parameter may be useful when recording quieter passages MIDI to Audio Gain level Audio recorder input The gain level can be set within the range of 18 dB 18 dB 4 Star...

Page 91: ...ile name Audio file name 7 Saving the converted audio file Press the F4 function button EXEC The save confirmation screen will be shown in the LCD display Press the F2 button YES to confirm the save a...

Page 92: ...g the metronome Press the F3 function button LISTEN The LISTEN icon will become highlighted and the metronome will start counting a 4 4 beat at 120 bpm beats per minute Tempo Time signature Metronome...

Page 93: ...le grouped into 13 categories For a full listing of available drum patterns please refer to page 95 Activating the metronome function Press the METRONOME button The LED indicator for the METRONOME but...

Page 94: ...tempo Turn control knobs C and D to select the drum rhythm category and variation The metronome tempo can be adjusted within the range of 30 300 bpm For a full listing of available drum patterns pleas...

Page 95: ...Ballad 3 43 Ballad 4 44 Ballad 5 45 Light Ride 2 46 Electro Pop 1 47 Electro Pop 2 48 16 Shuffle 4 8 Ballad 49 Slow Jam 50 50 s Triplet 51 R B Triplet 8 Straight 52 8 Beat 1 53 8 Beat 2 54 Smooth Bea...

Page 96: ...tion Press the METRONOME button The LED indicator for the METRONOME button will turn ON to indicate that the metronome function is in use and the Metronome screen will be shown in the LCD display Clic...

Page 97: ...t immediately and the one bar count in will not be played 7 Stopping the song recorder Press the recorder control button The LED indicators for the and buttons will turn OFF and recording will stop Th...

Page 98: ...B devices should be formatted to use the FAT or FAT32 filesystems Press the USB button The LED indicator for the USB button will turn ON and the USB Menu will be shown in the LCD display Selecting USB...

Page 99: ...fter selecting this function select the desired SMF file from the file folder listing screen Then use the control knobs A C and D to specify the destination song memory and keyboard drum channels Drum...

Page 100: ...USB memory device After selecting this function a confirmation screen will be shown in the LCD display Press the BANK and SETUP memory buttons to specify the destination SETUP memory then press the F4...

Page 101: ...4 function button EXEC 3Delete These functions allow data stored on a USB memory device to be deleted Delete functions will erase data from the connected USB memory device Exercise caution when using...

Page 102: ...OR buttons to move the selection cursor Then press the YES button or F4 function button EXEC to rename the file Press the NO or F1 function button BACK to return to the previous screen 3 Renaming the...

Page 103: ...ction Press the NO or F1 function button BACK to return to the previous screen 2 First confirmation prompt The first confirmation prompt will be shown in the LCD display Press the YES button or F4 fun...

Page 104: ...EQ Offset Low EQ Offset High EQ Offset Mid1 EQ Offset Mid2 User Edit User Touch Curve User Temperament User Key Volume User Stretch Tuning Reset One Sound All Sound One Setup All Setup System Power O...

Page 105: ...ameter adjusts the gain of the MP7 s LINE IN jacks Iftheoutputleveloftheexternaldeviceistoohigh reducethevalue of this parameter Alternatively if the output is too low increase the value of this param...

Page 106: ...t their right foot on the damper sustain pedal but do not necessarily wish to sustain the sound The default setting is 5 5 Right Pedal Polarity This parameter changes the polarity for the right pedal...

Page 107: ...complete the expression pedal calibration The full range of operation for the connected expression pedal will be calculated automatically Right damper pedal calibration As with the expression pedal it...

Page 108: ...d For more information about the Send Volume parameter please refer to page 56 The default setting is OFF 10 SETUP Knobs This parameter determines whether or not the Send Knobs parameter in the EDIT m...

Page 109: ...adjusts the EQ Offset gain for the low range frequency band The default setting is 0 dB 4 EQ Offset High This parameter adjusts the EQ Offset gain for the high range frequency band The default setting...

Page 110: ...Play the piano to check the newly created touch curve then press the F4 function button SAVE to store it to user memory 4 Storing the User Touch Curve Press the F2 button YES to confirm the store ope...

Page 111: ...ts One semi tone 100 cents 3 Saving the User Temperament After adjusting the note pitches Press the F2 function button SAVE to save the adjusted User Temperament A store confirmation screen will be sh...

Page 112: ...ving the User Key Volume After adjusting the key volumes Press the F2 function button SAVE to save the adjusted User Key Volume A store confirmation screen will be shown in the LCD display 4 Confirmin...

Page 113: ...ents One semi tone 100 cents 3 Saving the User Stretch Tuning After adjusting the key pitches Press the F2 function button SAVE to save the adjusted User Stretch Tuning A store confirmation screen wil...

Page 114: ...l Setup This function resets all SETUP memories to the factory default 5 Reset System This function resets all SYSTEM parameters including Utility Pedal Offset and MIDI parameters in the SYSTEM menu a...

Page 115: ...rs will not be locked The keyboard will also remain active Press the LOCK button again to deactivate the lock Changing the Lock mode Press and hold the LOCK button then press the YES or NO buttons to...

Page 116: ...driver will be installed automatically when the instrument is connected to the computer Mac OS 9 USB MIDI is not supported Please use the standard MIDI IN OUT connectors USB MIDI information Disconne...

Page 117: ...device USB devices should be formatted to use the FAT or FAT32 filesystems 2 Connect the USB memory device While the instrument is turned off Connect the prepared USB memory device to the USB port 3 S...

Page 118: ...arpsi Octave Steel Drums Drawbar Organ5 Harmonica D Harpsi Clavi Bells Screamin Kenban Harmo STRINGS VOCAL BRASS WIND PAD SYNTH BASS GUITAR 1 A String Pad Exp Brass Pad 1 Acc Bass B Warm Strings Exp S...

Page 119: ...ad 5 45 Light Ride 2 46 Electro Pop 1 47 Electro Pop 2 48 16 Shuffle 4 8 Ballad 49 Slow Jam 50 50 s Triplet 51 R B Triplet 8 Straight 52 8 Beat 1 53 8 Beat 2 54 Smooth Beat 55 Pop 1 56 Pop 2 57 Ride B...

Page 120: ...3 Phaser Variation SUB Parameter 1 Parameter 2 Parameter 3 Parameter 4 Parameter 5 Parameter 6 Parameter 7 Parameter 8 Parameter 9 Parameter 10 Warm DryWet Speed Depth Resonance LowEQ HighEQ Classic D...

Page 121: ...rameter 6 Parameter 7 Parameter 8 Parameter 9 Parameter 10 Detune DryWet Fine FeedBack DryWet Fine Coarse DelayTime Feedback HighDamp Standard DryWet Fine Coarse 9 Compressor Variation SUB Parameter 1...

Page 122: ...Parameter 5 Parameter 6 Parameter 7 Parameter 8 Parameter 9 Parameter 10 Flanger Cho DryWet Flg DryWet Cho Speed Cho Depth Cho PreDly Cho Phase Flg Speed Flg Depth Flg F Back Flg PreDly Phaser Cho Dr...

Page 123: ...ryWet EQ Low EQ Mid EQ High EQ MidFrq Dly Time Dly F Back Compressor EQ Gain Cmp Gain EQ Low EQ Mid EQ High EQ MidFrq Cmp Ratio Cmp Thresh Cmp Attack Cmp Rls 19 Enhancer Variation Parameter 1 Paramete...

Page 124: ...Cho PreDly Cho Phase Flanger Ovd DryWet Flg DryWet Ovd Drive Ovd Gain Flg Speed Flg Depth Flg F Back Flg PreDly Phaser Ovd DryWet Pha DryWet Ovd Drive Ovd Gain Pha Speed Pha Depth Pha Manual Pha Phase...

Page 125: ...Major Minor Pythagorean Meantone Werkmeister Kirnberger User1 2 Fine Tune Stretch Tuning Key of Temperament EQ 4 band equaliser Low Gain Mid1 Gain Mid1 Q Mid1 Freq Mid2 Gain Mid2 Q Mid2 Freq High Gai...

Page 126: ...altime Message 3 Exclusive data 3 1 MMC Commands 3 2 Parameter Send 3 3 Setup Address Global Section 3 4 Setup Address Internal Section 3 5 Setup Address MIDI Section 3 6 Internal Section s Assignable...

Page 127: ...er 0H fH ch 1 ch 16 mm Bank Number MSB 00H 7fH 0 127 ll BankNumber LSB 00H 7fH 0 127 Modulation Status 2nd Byte 3rd Byte BnH 01H vvH n MIDI channel number 0H fH ch 1 ch 16 vv Modulation depth 00H 7fH...

Page 128: ...FF 64 127 ON Soft Pedal Status 2nd Byte 3rd Byte BnH 43H vvH n MIDI channel number 0H fH ch 1 ch 16 vv Control Value 00H 7fH 0 127 Default 00H 0 63 OFF 64 127 ON Sound controllers 1 9 Status 2nd Byte...

Page 129: ...Ignoring the LSB of data Entry It is not affected in case of modifying cutoff if tone does not use the DCF RPN MSB LSB Status 2nd Byte 3rd Byte BnH 65H mmH BnH 64H llH n MIDI channel number 0H fH ch 1...

Page 130: ...I channel number 0H fH ch 1 ch 16 Reset All Controller Status 2nd Byte 3rd Byte BnH 79H 00H n MIDI channel number 0H fH ch 1 ch 16 All Note Off Status 2nd Byte 3rd Byte BnH 7bH 00H n MIDI channel numb...

Page 131: ...city 00H 7fH 0 127 Control Change Status 2nd Byte 3rd Byte BnH ccH vvH Sending by Assignable Control Knobs Program Change Status 2nd Byte CnH ppH n MIDI channel number 0H fH ch 1 ch 16 pp Program numb...

Page 132: ...d Byte BnH 7bH 00H n MIDI channel number 0H fH ch 1 ch 16 Sending by PANIC function MONO Status 2nd Byte 3rd Byte BnH 7eH mmH n MIDI channel number 0H fH ch 1 ch 16 mm mono number 01H M 1 POLY Status...

Page 133: ...ta1 40H Setup Parameter 8 data2 0 7fH Address MSB 9 data3 0 7fH Address LSB 10 data4 0 7fH data size byte max 128 byte 11 data5 data max 128byte 12 EOX F7H 3 3 Setup Address Global Section Category Pa...

Page 134: ...03 5E 05 02 1 depend on EFX Type EFX Parameter 8 01 17 02 3B 03 5F 05 03 1 depend on EFX Type EFX Parameter 9 01 18 02 3C 03 60 05 04 1 depend on EFX Type EFX Parameter 10 01 19 02 3D 03 61 05 05 1 d...

Page 135: ...00 01 Off On Portament Time 01 4E 02 72 04 16 05 3A 1 0 7F Portament Mode 01 4F 02 73 04 17 05 3B 1 00 01 Rate Equal Drawbar 16 Level 01 50 1 0 7F Drawbar 5 1 3 Level 01 51 1 0 7F Drawbar 8 Level 01...

Page 136: ...bC Assign 1 2 01 62 02 06 04 2A 05 4E 2 see 3 6 Internal Section s Assignable Knob Data KnobD Assign 1 2 01 63 02 07 04 2B 05 4F 2 see 3 6 Internal Section s Assignable Knob Data KnobA Assign 2 2 01 6...

Page 137: ...On Off 04 50 05 08 05 40 05 78 1 00 01 Off On Damper Pedal Assign 00 34 1 00 77 78 CC 0 119 AfterTouch Half Pedal Value 04 6B 05 23 05 5B 06 13 1 00 7F PitchBend Wheel On Off 04 57 05 0F 05 47 05 7F 1...

Page 138: ...32 Vib Rate 00 33 Vib Delay 00 34 Octave 00 35 Oct Level 00 36 Oct Range 00 37 Oct Detune 00 38 Portament 00 39 Porta Time 00 3A Porta Mode 00 3B Parameter Name Data HEX Sound Type 1st 2nd Piano E Pi...

Page 139: ...MP7 can be received to each internal sound sections individually 4 1 SETUP Program Number Table Upper Second Third Prog MSB LSB 1 1 A 001 000 002 1 1 B 002 000 002 1 1 C 003 000 002 1 1 D 004 000 002...

Page 140: ...1 0 Steel Drums 63 0 0 115 121 0 Bells 64 0 0 15 95 3 Name Program Mode Panel Program Mode GM Prg MSB LSB Prg MSB LSB DRAWBAR T Wheel A 1 65 0 0 18 95 112 T Wheel A 2 66 0 0 18 95 113 T Wheel A 3 67 0...

Page 141: ...1 74 95 10 Oboe 61 0 1 69 121 0 Bassoon 62 0 1 71 121 0 Jazz Clarinet 63 0 1 72 121 0 Pan Flute 64 0 1 76 121 0 Name Program Mode Panel Program Mode GM Prg MSB LSB Prg MSB LSB PAD SYNTH Pad 1 65 0 1 9...

Page 142: ...121 0 Wire Lead 85 121 1 Voice 86 121 0 Fifth 87 121 0 Bass Lead 88 121 0 Soft Wire Lead 88 121 1 New Age Pad 89 121 0 Warm Pad 90 121 0 Sine Pad 90 121 1 Polysynth 91 121 0 Itopia 92 121 0 Bowed Pad...

Page 143: ...Controller1 Sound Variation 71 47 Sound Controller2 Filter Resonance Harmonic Intensity 72 48 Sound Controller3 Release Time 73 49 Sound Controller4 Attack Time 74 4A Sound Controller5 Brightness Cuto...

Page 144: ...Panpot Expression EXP Hold1 Damper Sostenuto FootSW Soft Sustain Resonance RLS ATK CTF DCY Vibrato Rate Depth Delay Reverb Depth NRPN LSB MSB RPN LSB MSB Program Change O O O True 0 127 0 127 System E...

Page 145: ......

Page 146: ......

Page 147: ...Hello to Jason Isaacs Joep snijd je baard David thank you for your sharp eyesight...

Page 148: ...MP7 Owner s Manual KPSZ 0687 OW1077E J1404 Printed in Indonesia Copyright 2014 Kawai Musical Instruments Mfg Co Ltd All Rights Reserved 817961 R101...

Reviews: