background image

110

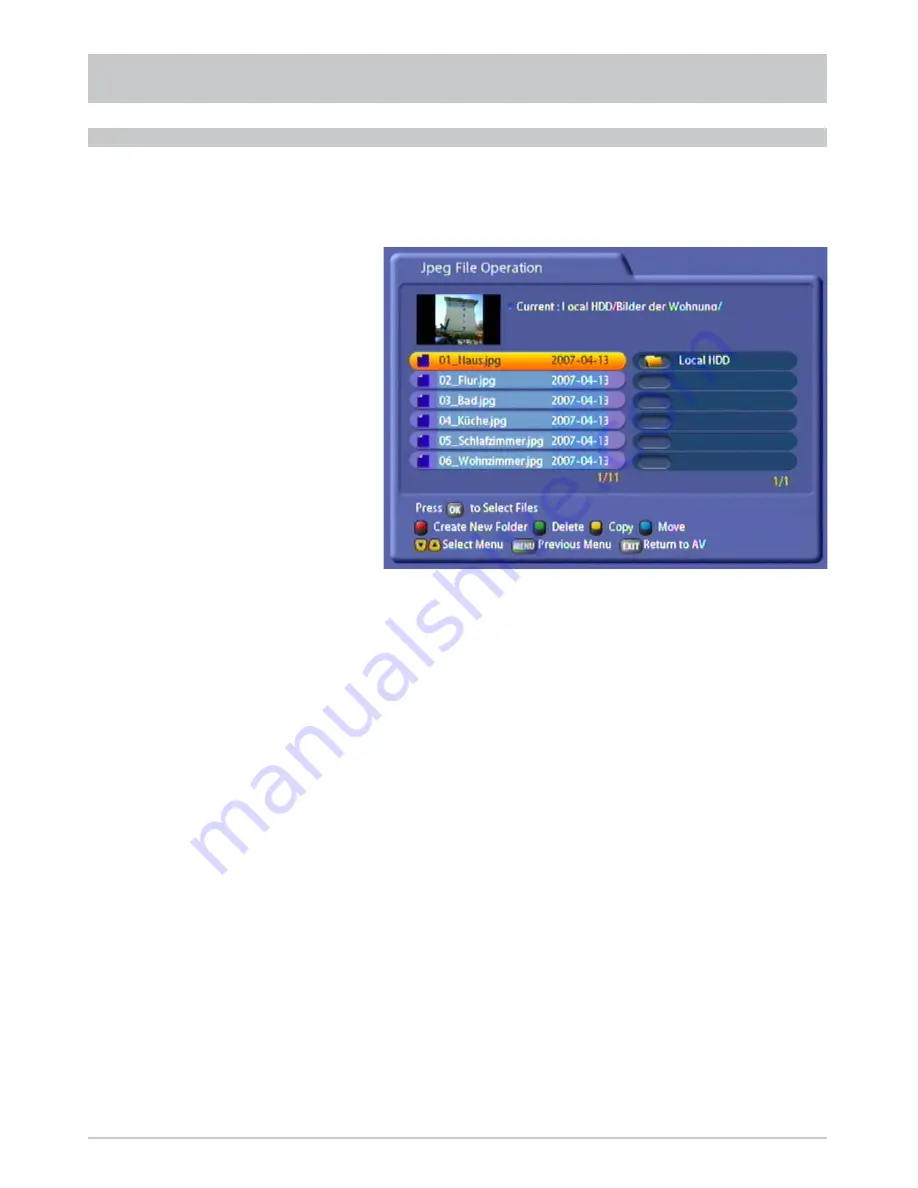
You can organise the fi les on the “JPEG Files” menu. For this, press the 

"

 (yellow) button. The following 

display appears (example):

Select the folder or fi le you want by pressing the 

 button. Your selection is marked by a “+” sign at 

the end. You now have the following options:

- Press 

the 

!

 (green) button to delete the folder/fi le you selected

- Press 

the 

#

 (blue) button to move the fi les (such as from the hard disk to an external storage device 

or vice versa). The receiver automatically jumps to the drive selection listings (selected using the 

 buttons). Press the 


 (red) button to start the move operation or press the 

!

 (green) button 

to cancel it

- Press 

the 


 (red) button to create a new folder in the selected directory (for how to input the name using 

the on-screen keypad see “Alphanumeric Inputs”)

- Press the 

"

 (yellow) button to copy the selected fi le/folder (e.g. from the hard disk to an external 

storage device or vice versa). The receiver automatically jumps to the drive selection listings 

(selected using the 

 buttons). Press the 


 (red) button to start the copy operation or press 

the 

!

 (green) button to cancel it.

MULTIMEDIA/GAMES

ORGANISING PHOTO FILES

Summary of Contents for UFS 822si

Page 1: ...Operating manual Twin PVR Satellite Receiver UFS 822sw 822si with hard disk and Ethernet ...

Page 2: ...ecialist terms that cannot be translated we have added a short glossary at the end of the manual The power switch is an environmentally friendly feature If you will not be using your receiver for a longer period you should use the power switch to disconnect it from the power supply and save energy For shorter breaks you can use the remote control to switch the receiver to standby which uses only a...

Page 3: ... COMMON INTERFACE 34 SYSTEM SETUP 37 USER PREFERENCES 50 VIDEOTEXT TELETEXT 58 ORGANIZE CHANNELS 59 TWIN FUNCTIONS 65 TIMESHIFT 67 TVTV EPG AND TIMER 68 AUDIO SETTINGS 81 RECORDING 83 RECORDING LIST 87 MULTIMEDIA GAMES 104 INSTALLATION MENU 114 CONNECTING UP THE VIDEO PVR 127 SOFTWARE AND PROGRAMME LIST UPDATE 128 PVR MANAGER 132 USING THE FRONT PANEL 133 RECEIVER TO RECEIVER DATA TRANSFER 134 TEC...

Page 4: ...adequately protected within the receiver only when it is in its original packaging If the product is not properly packed the warranty on the hard disk is invalidated Any modifications to the receiver software or the use of applications not provided by Kathrein will invalidate the warranty You will have to bear the costs yourself for dispatching and repairing any receiver that requires attention du...

Page 5: ...logies applica tion of reversible procedures as well as dismantling of the device are both not permitted Please observe that the receiver only transmits a current of 500mA on the USB 2 0 socket For some hard disks this is not sufficient to guarantee flawless operation To guarantee optimal power supply to the hard disk use an external hard disk with its own power supply or insert a USB 2 0 hub with...

Page 6: ...6 SAFETY INSTRUCTIONS IMPORTANT NOTES ...

Page 7: ...ed The receiver is fitted with an optical audio output so that the Dolby Digital data stream AC 3 can be transmitted to a Dolby Digital stereo system USB 2 0 host Playback of MP3 files JPEG files and recordings recording on external storage medium formatting of external USB devices use for service purposes updating software Ethernet port Playback of MP3 files JPEG files and recordings VLC streamin...

Page 8: ...playback recording manually or exit the menus 7 Multifunction control Rear panel controls and displays 1 On Off switch with mains disconnect 2 Mains supply cable 3 Data interface only for service 4 Video output composite colour 5 USB 2 0 host port 6 Audio outputs L R cinch sockets 7 Scart socket for TV connection 8 Scart socket for VCR AUX connection 9 Network connection Ethernet 10 HDMI connectio...

Page 9: ...C Switch must be changed Refer to the Installation Menu section on this under Antenna Setup Tuner 1 and Tuner 2 Be sure to follow the operating instructions for the matrix used CONNECTING THE UNIT SAT IF CONNECTIONS RECEPTION REQUIREMENTS RECEPTION SYSTEM PRESETS Connect the Sat IF inputs on the receiver to the satellite reception system Use coaxial cable with a standard F connector If the F stand...

Page 10: ...ailable we recommend you interconnect the output of tuner 1 and the input of tuner 2 using the loop through cable supplied For this in First Installation for tuner input 2 select Loop through mode see First Installation section Press the button to access the Tuner Input menu option then choose Installation and First Installation Go through step by step until you get to Tuner Setup you can make the...

Page 11: ...le For system reasons the same video signals are to be found on the Scart outputs and on the video cinch output If you want to play the sound on your hi fi system connect the audio cinch sockets to the input sockets on the hi fi system with an appropriate cable see Connection Example The fibre optic output is intended for the connection of a Dolby Digital system see Connection Example TV AND VIDEO...

Page 12: ...are special waste Do not throw spent batteries into your domestic waste take them to a collection point for old batteries Electronic equipment is not domestic waste in accordance with directive 2002 96 EC OF THE EUROPEAN PARLIAMENT AND THE COUNCIL dated 27th January 2003 on used electrical and electronic appliances it must be disposed of properly At the end of its service life take this unit for d...

Page 13: ... Playback Hard disk contents Pause freeze frame Timeshift red One touch recording Power standby Videotext Teletext yellow Access channel options Sound subtitles selection blue Switch between TV radio Access channel notification Programme info AV mode Channel selection up down Confirm input Access channel list Cursor buttons Access TVTV EPG Electronic Programme Guide Fast forward Display recordings...

Page 14: ...y the receiver 2 Manual setting only possible if the software version is older than 1 01 Switch on the relevant receiver On the remote control simultaneously press Address 1 Then switch the receiver off again at the power switch and do the same for the other units for the second receiver for the third receiver and for the fourth receiver Make sure only one receiver is on at a time To switch the re...

Page 15: ...nu Before using your unit for the first time read the Safety Instructions and Connection and Setup sections The Connection Examples section provides a sample configuration Do not connect the unit to the power supply until all installation work has been properly carried out The guidance given in the First Installation section assumes that the receiver has been properly connected as per the Safety I...

Page 16: ...the TV s picture format Either 4 3 format 16 9 format or HDMI Display Format Select the screen display mode here for TV type 4 3 Pan Scan or Letter Box for TV type 16 9 Automatic or Always 16 9 for TV type HDMI Automatic or Always 16 9 Rear fan Here you can select whether the rear fan always runs whilst the unit is switched on On or whether the fan will be switched on and off again at pre programm...

Page 17: ... tuner 1 loop through output is looped through to tuner 2 input Refer also to the section headed Operation on one Antenna Connection Signal configuration for tuner 2 only in Separated connection type As for tuner 1 Both tuners are connected to the same signal source same cable from LNB Different from tuner 1 The two tuners are connected to different signal sources separate cables from LNB Press th...

Page 18: ...on the chosen satellite is then moved into the tuner satellite list on the right If you have unintentionally transferred a satellite into the list on the right you can press the yellow button to switch between the lists and then press the button to remove the satellite concerned When you have selected all the satellites you want press the green button FIRST INSTALLATION Signal configuration As for...

Page 19: ...LNB Low frequency 9750 MHz Dual LNB Low frequency 9750 MHz and LNB High frequency 10 600 MHz Universal LNB Low frequency 9750 MHz and LNB High frequency 10 600 MHz and Limit frequency 11 700 MHz Press the buttons and the button to select the satellite configuration for each satellite you previously selected LNB Type Press the button to open the LNB settings menu Press the buttons to make your sele...

Page 20: ...mpatible Disable If your reception system is not DiSEqC compatible and only one satellite per tuner is selected 22kHz Control Press the buttons to make your selection On Off The 22kHz Control is needed to switch LNBs in multi feed reception and to switch between Low and High band DiSEqC input Press the buttons to make your selection 1 of 4 for the first satellite of the tuner 2 of 4 for the second...

Page 21: ...ed in yellow at the top of the display At the right you will see the signal strength of the transponder on the two tuners enabling you to check that the satellite configuration you just set up is OK When you have finished configuring the satellite press the green button If in the preceding Select Satellite menu you selected more than one satellite you will now see the configuration for the next of...

Page 22: ...ress the buttons to set the two single cable frequencies to be used by your receiver Then press the green button to obtain the next screen FIRST INSTALLATION Note If there already is a UFS 822 on the system and a second UFS 822 is to be added the first UFS 822 should be switched on and both tuners should be active so that the single cable frequencies for the first receiver remain reserved The two ...

Page 23: ...t be Universal LNB for this refer to the product information user instructions and manuals for the LNB and for the matrix For LNB Type perform here a suitable setting for your reception system Wideband or Universal The 22kHz Control must be set to Off and the DiSEqC Input must be set to Disable You can see whether the configuration is correct for your reception system by viewing the test transpond...

Page 24: ...llite into the list on the right you can press the yellow button to switch between the lists and then press the button to remove the satellite concerned When you have selected all the satellites you want press the green button FIRST INSTALLATION The 22kHz Control must be set to Off and the DiSEqC Input must be set to Disable You can see whether the configuration is correct for your reception syste...

Page 25: ...ou set the network search to Off only the factory stored transponders of the satellites you previously selected will be scanned for new as yet unlisted channels If you set the network scan to On the transponder network enables additional transponders that have not yet been stored to be located They are then stored and searched for new channels in the same way as the existing transponders Press the...

Page 26: ...e press the buttons to select the time mode Manual or Auto receiver takes time from preset channel Manual time setting Auto time setting FIRST INSTALLATION Use the buttons to make the settings Use the buttons to make the settings Number of channels found If the search is successful you see the following message example ...

Page 27: ...button to set the variance from UMTC Universal Mean Time Coordinate formerly Greenwich Mean Time and Winter Summer time At the bottom of the screen you see a listing of major cities to provide an indication of which time zone you have just set Example For Berlin Germany you need to enter 1 hour Use the buttons to make the setting Time Setup Channel If the time mode is set to automatic enter the ch...

Page 28: ...nguage Setup MP3 Player Edit Radio Channels Time Setup Antenna Setup Sleep Timer Photo Album Edit TV Favorites Common Interface Channel search Parental Control Games Edit Radio Favorites STB Management Motorized Antenna Appearance Setup Applications HDD Management Edit Satellite PVR Setup VLC Streaming USB Devices Edit Transponder EPG Setup External Recordings Ethernet Setup On Air Download Dynami...

Page 29: ...ess the button to call up the main menu and press the buttons to call up the sub menus Press the button to access the sub menus Press the buttons to select items within the sub menus The settings under the various options are made either by pressing the buttons or by using the numeric pad You can exit the main menu and sub menus and the various options step by step by pressing the button the setti...

Page 30: ... is broadcast in HD Hard disk in receiver active Encrypted broadcast MP3 playback Radio operation Transmission is broadcast in Dolby Digital Mute Play Rewind Wind on Pause Recording in progress SYMBOL CODES FOR THE RECEIVER DISPLAY Various symbols are occasionally shown in the receiver display above the normal display channel name These are not shown permanently they are shown only for specific fu...

Page 31: ...al channels e g for football or Formula 1 broadcasts Press the yellow button once to view further soundtrack selection options if these are transmitted by the channel provider Use the buttons to scroll through the available channels and press the button to select them Pressing the yellow button a second time returns you to the normal options menu Pressing the yellow button again or pressing the bu...

Page 32: ...t the bottom of the next page Selection options Press the red button to switch between your own Favorites lists and the list containing all the channels Press the green button to view only the channels from a specific satellite e g ASTRA or from all the satellites being received corresponding to the All channels list No signal indicates that an error has occurred in the reception system or in the ...

Page 33: ...or buttons and are confirmed by pressing the button optional channels are displayed as Opt 01 Opt 02 etc in the channel list Press the button to view the following additional items of information on a channel see example screenshot at left Transmitting satellite Frequency MHz Symbol rate Polarisation Audio and video PID Packet Identification Number used to assign the data of a channel on the trans...

Page 34: ... insert the module the following message appears IMPORTANT INFORMATION INSERTING THE SMARTCARD AND THE CA MODULE Always follow the operating instructions from your Pay TV provider and the instructions supplied with the Smartcard and the CA module Smartcards and CA modules are not included with this product The cards and modules are issued by the respective Pay TV providers and contain the subscrib...

Page 35: ...as examples Pressing the button takes you to the menu generated by the CA module COMMON INTERFACE From this menu your card and your PIN code allow you to access various channels from your Pay TV provider Alphacrypt Light has been selected as an example here The details can be different for each CA module Always follow the instructions supplied by your pay TV provider Note The module displays may b...

Page 36: ...othing to do with the properties of the unit it is merely intended to assist you If your CA module is capable of decoding multiple channels you can press the buttons to select whether the module should always decode only one channel Off or multiple channels On If you select Off when making an unencrypted recording of an encrypted channel you cannot at the same time view an encrypted channel throug...

Page 37: ...ent self explanatory Use the buttons to select further options If there is another sub menu layer press the button to open it If there are no more sub menus make the settings using the or numeric pad Press the button to save your settings and return to the previous menu Press the button to return directly to the TV picture Also pay attention to the bars at the bottom of the on screen display These...

Page 38: ... signal luminance chrominance YUV component data VIDEO OUTPUT Select the type of audio signal at the Scart socket here Stereo Left and right side audio channel Mono left Left side audio channel only Mono right Right side audio channel only You will need to select further audio settings for the specific channel such as Dolby Digital playback directly on the TV screen using the yellow button AUDIO O...

Page 39: ...selection On SEPARATE CHANNEL VOLUME SYSTEM SETUP OSD POSITION SETUP You can use the cursor buttons to select and arrange the position where the menus are displayed on the TV screen The receiver displays are then positioned on screen as you specified Press the button to access the Time Setup menu Depending on the setting Manual or Auto you see the following TIME SETUP TV STANDARD Here select the T...

Page 40: ... you have just set SET LOCAL TIME TIME MODE MANUAL Select the time mode here Manual or Auto receiver takes time from preset channel TIME MODE If the time setting is Manual the time setting will be performed after an update in standby If the Astra satellite is installed the time setting will be performed from Das Erste If Astra is not installed the time setting will be performed from channel 1 of t...

Page 41: ...ton Next month green button Previous year yellow button Next year blue button Press the button to confirm your selection DAY Use the numeric pad to key in the current time here The position at which the number needs to be entered is automatically underlined CURRENT TIME TIME MODE AUTO If the time setting is Automatic the time setting will be performed after a TVTV update in standby You influence t...

Page 42: ... If you have selected automatic time mode set the channel here from which you want the receiver to get the time Press the button to call up a channel list from which you can select the channel you want using the buttons Press the button to confirm your selection TIME SETUP CHANNEL Confirm with the button to update the time immediately SETUP TIME NOW COMMON INTERFACE ...

Page 43: ...faults Use the buttons to select OK and start the reset by pressing the button Transfer the operating software from one UFS 822 to another UFS 822 Not yet available in this software version Transfer the channel list from one UFS 822 to another UFS 822 See Receiver to Receiver Data Transfer section SYSTEM SETUP STB MANAGEMENT SYSTEM INFORMATION FACTORY DEFAULT TRANSFER FIRMWARE TRANSFER CHANNEL DAT...

Page 44: ...ic Inputs section In the example shown here the ID UFS 822 has been assigned CHANGE PVR NAME SYSTEM SETUP Download satellite channel lists from the Internet at http www satcodx com See PVR Manager USB Tool section Use the buttons to select one of the four existing remote control codes Once you have selected one of the codes the following display appears REMOTE CONTROL CODE ...

Page 45: ...l keys EXIT and 2 for a period of two seconds The remote control code has now been switched to RCU 2 When you press the button you are asked whether you want to delete all recordings Use the buttons to select OK and start the reset by pressing the button When you press the button you are asked whether you want to delete all MP3 files Use the buttons to select OK and start the reset by pressing the...

Page 46: ... deleted If the button is pressed the receiver displays to you the leading data on the storage medium currently connected to the USB port The following display appears example USB HDD SETUP Pressing the button opens the selection field for formatting the storage medium The following screen appears Your external storage medium must be FAT 32 formatted If your external storage medium has not been fo...

Page 47: ...e of formatting FAT 32 three 32 GB partitions the remainder of the storage volume formatted as for option 2 for Windows 2000 and earlier Windows versions Use the buttons to select OK and start the reset by pressing the button The following message appears Use the buttons to select OK and start the reset by pressing the button Press the button For formatting the receiver switches briefly into stand...

Page 48: ... software version 1 2 RADIO TEXT SYSTEM SETUP If you wish to connect your receiver to a DHCP server use the buttons to select the On setting If you wish to connect your receiver to a PC or laptop the DHCP setting must be Off These settings should not be made unless the receiver is linked into a network or is linked to a PC laptop using a crossed over network cable The Ethernet interface used in th...

Page 49: ... completed all the settings press the buttons to switch back to the Save field and press the button to confirm Configuration example Receiver IP Address 192 168 0 11 Subnet Mask 255 255 255 0 PC Laptop IP Address 192 168 0 10 Subnet Mask 255 255 255 0 SYSTEM SETUP DHCP On DHCP Off Note Refer to our network function connection examples at the end of this manual and the instruc tions on this subject...

Page 50: ...nd Use the buttons to select further options If there is another sub menu layer press the button to open it If there are no more sub menus make the settings using the or numeric pad Press the button to save your settings and return to the previous menu Press the button to return directly to the TV picture ...

Page 51: ...by 15 minutes The calculated time at which the receiver will switch off is shown in the grey bar underneath This menu is password protected and can only be accessed by entering the password The factory default password is 0000 The following screen appears SLEEP TIMER PARENTAL CONTROL LANGUAGE SETTINGS See Operating Instructions section under Language Selection OSD In this menu you can select the l...

Page 52: ...der 18 Each press of the buttons increases or reduces the age rating by 2 years The channels concerned can then only be viewed by entering the PIN Use the buttons On Off to select whether settings changes on the STB Management menu a sub menu of the System Setup menu may be made without entering the PIN or not RECEIVER LOCK AGE RATING CONTROL STB MANAGEMENT LOCK This lock is only effective if the ...

Page 53: ... information are displayed on screen You can also specify whether the volume bar is displayed when adjusting the volume Use the buttons to select the time after which you want the on screen channel notification display to be automatically cancelled You can choose between 5 8 10 12 and 15 seconds or Hide DISPLAY SETTINGS INFOBOX DURATION Keep your password in a safe place so that you always have ac...

Page 54: ... notification This function allows you to move the channel notification further up the screen may be necessary if a channel notification is cut off by the bottom edge of the screen because of the zoom factors of the TV set INFOBOX POSITION Use the buttons 1 to 7 to select the desired brightness for the display of the receiver VFD DISPLAY CONTROL Use the buttons On Off to select whether the display...

Page 55: ...C TIMESHIFT USER PREFERENCES Use the buttons to select whether hard disk management is controlled by the receiver Automatic or by you Manual If you select Automatic the receiver automatically deletes older recordings when it reaches the maximum disk capacity so as to make room for planned recordings You can however protect recordings from being deleted by the receiver as described in the Recording...

Page 56: ...ffect this the receiver then carries out the update automatically later when recording is finished EPG GRABBING SETUP Use the buttons here to select whether to enable on screen display of the advanced recording settings on starting press the red button or not If you select Disable in manual recording mode timeshift recording is automatically started see Recording section Other recording modes are ...

Page 57: ...ons to select the number of minutes after the time set in the EPG for which the recording should run on You can choose a value between 1 minute and 30 minutes in 1 minute increments The recording will stop that number of minutes after the due time This allows a contingency for small variations in transmission times Unwanted parts of the recording can later be discarded as described in the Chapter ...

Page 58: ...ired pages Input with the numeric pad Scroll through using the buttons Select one of the links on the current page at the top of the screen e g pages 133 135 116 using the buttons and open by pressing the button Select the options shown at the bottom end by pressing the respective coloured button blue yellow green and red Scroll up and down in the sub pages e g 1 2 and 2 2 using the buttons Use th...

Page 59: ... and sort your preferred TV and radio channels such as all English language channels or those that broadcast with no commercial breaks Use the buttons to select further options If there is another sub menu layer press the button to open it Press the button to save your settings and return to the previous menu Press the button to return directly to the TV picture ORGANIZE CHANNELS Also pay attentio...

Page 60: ...low button by alphabetical or numerical sequence blue button Select the sort order you want to apply using the buttons and confirm with the button Select the channel you want to rename using the cursor buttons and press the button to open the keyboard You can now rename the channel as you want applying the method described in the Alphanumeric Inputs section You can also sort the channels first acc...

Page 61: ... again to insert it there Go to the channel you want to skip during zapping using the cursor buttons and press the button to select it The channel name is displayed in grey Press the button again to cancel the skip All the channels marked Skip will be omitted from the EPG and the channel list You can also sort the channels first according to the following criteria by satellite green button by favo...

Page 62: ...NELS EDIT RADIO CHANNELS You can also sort the channels first according to the following criteria by satellite green button by favorites list yellow button by alphabetical or numerical sequence blue button Select the sort order you want to apply using the buttons and confirm with the button You can also press the red button to select all channels at once or cancel the global selection Press the bu...

Page 63: ...TES CREATE FAVORITE LIST The functions on the Edit Radio Channels menu are controlled in the same way as those on the Edit TV Channels menu Press the button to access the menu Select the favorites list you want to rename using the buttons and confirm the selection with the button You can now use the on screen keypad operated as described under Alphanumeric Inputs to name or rename the favorites li...

Page 64: ...channels first according to the following criteria by satellite green button by alphabetical or numerical sequence blue button Select the sort order you want to apply using the buttons and confirm with the button Remove Press the red button to switch to the right hand list listing of channels in favorites list Use the buttons one channel up down or the buttons sideways to select the channel you wa...

Page 65: ...be used for control purposes and is thus not suitable for viewing complete broadcasts When you press the green button the first time a window opens up in the top right hand corner The channel is indicated underneath the picture You can still change channel in the main picture with the channel buttons in the usual way The channel in the PIP window can be changed using the buttons working in the seq...

Page 66: ... a second time to view a picture played back from the hard disk in the PIP window see screenshot example on the next page If the programme is currently being recorded the PIP is framed in red If the PIP a programme that was recorded previously it is framed in yellow The picture caption is prefixed by an H for hard disk and the serial number Press the green button again or the button to exit the PI...

Page 67: ...ber and name To start timeshifted playback press the button or button You can control the recorder fast forward to the point the broadcast has currently reached rewind to the point at which you started recording the programme pause and playback functions by the corresponding buttons If you press the button the TV picture freezes but the recording continues in the background Press the button or the...

Page 68: ...two options for updating the data To get the data immediately switch the receiver off by the button The receiver first displays the message Receiving tvtv then the download status as a percentage Downloading tvtv As soon as the display no longer indicates this message you can switch the receiver back on by pressing the button and begin using the EPG To download the data at a specific time when you...

Page 69: ...st green to view the Current display yellow to view the Programme list for the selected channel blue to view the Highlights one tip per day a week ahead button to view details of the selected programme and the red to access the Record menu the timer You can scroll line by line or page by page through the channels using the cursor buttons or access channels directly using the numeric pad With the b...

Page 70: ...el Press the buttons to switch channels and then view the new channel s programme list The symbol next to the programme title indicates programme details are available to view see Details Press the red button to place your selected programme in the Record menu see Record With the buttons you can scroll back and forth 24 hours at a time day by day CHANNEL LIST HIGHLIGHTS Press the blue blue button ...

Page 71: ... the Highlights menu by category e g Series Sport News Magazine Reportage Kids Within each category you can scroll line by line or page by page as usual using the cursor buttons Press the red button to place your selected programme in the Record menu see Record PROGRAMMES SORTED BY CATEGORY TVTV EPG AND TIMER ...

Page 72: ...eric pad buttons is displayed at the bottom of the screen as follows Use the buttons to enter a space or to delete the last letter entered Press the button to start the search The results found are displayed at the left in the main display box If the programmes found do not fit on one page you can scroll page by page as well as line by line as usual using the cursor buttons Press the button to sta...

Page 73: ...the buttons Press the button to load the term into the memory There are two ways of using a search term that is stored in the memory 1 You must have opened the search function Press the button to open the search memory Use the buttons to select the desired search term Start the search by pressing the button 2 Press the blue button you can then use the buttons to select the desired search term the ...

Page 74: ...te the tvtv EPG data immediately press the button to switch the receiver to standby mode Use the buttons to scroll up and down the various pages of detailed information The third page displays the upcoming episodes such as of a series see example TVTV EPG AND TIMER Press the button in the EPG to call up details on the selected programme The information is only available if the symbol is displayed ...

Page 75: ...hich you want to programme a recording in the Current view and press the red button As there is no EPG data you must enter the data date start end manually Enter the data using the cursor buttons and numeric pad Press the button to save your settings You can set the automatic lead in and run on times for your recordings in the User Preference EPG Setup menu see also the Chapters User Preference EP...

Page 76: ...following message example Note You can also change the data and settings of timer recordings you have programmed from the timer list by pressing the button Edit data by the same method used to input them Press the to return to the listing and edit your input accordingly The recordings in black are the ones already stored The one in white is the one you are currently programming which cannot be ent...

Page 77: ...VTV EPG AND TIMER DIRECT DECODING OF TVTV TIMERS If two timers are set for encrypted channels both with decoding set to On and the recording times overlap the first timer will record decoded and the second timer will record encrypted The unit cannot make two decoded recordings at the same time the first programme will be recorded decoded and the second programme will be recorded encrypted If two t...

Page 78: ...series recording you are additionally asked whether you want to delete all the programmed recordings of this series in the example below Discontinue daily recording or merely the specific recording selected No recording on this day only Press the button or press the red button to cancel The timer list recording schedule is accessed by pressing the red button The timer list shows all the programmed...

Page 79: ...chnisat DisiCon 4 LNB do not permit transmission of the EPG data because the necessary transponder 12 603 75 MHz symbol rate 22 MSymb s horizontal is not transmitted in that system This transponder must not be deleted as the EPG data is transmitted on it Symbol Explanation Widescreen format Programme broadcast in black and white Dolby Digital 5 1 is a sound transmission method enabling digital sur...

Page 80: ... BR Alpha ORF 2 VIVA BR3 Phoenix VIVA Plus CNN Internat l Premiere Start VOX Das Vierte ProSieben WDR Television DSF QVC GERMANY XXP TV Eins Plus RBB Television ZDF Eins Extra RNF PLUS ZDF dokukanal Eins Festival RTL 2 ZDF infokanal Euronews DE RTL shop ZDF theaterkanal Eurosport DtLand RTL Television hr fernsehen RTP Internac l HSE24 SAT 1 Kabel 1 SF1 Kika SF2 To receive the EPG data for the SF1 ...

Page 81: ...using the buttons and make the desired setting using the buttons Press the yellow button again to exit the menu Possible audio settings include Audio Track Auto oriented to menu setting or optionally the audio track transmitted by the channel e g Mono audio film Dolby Digital Dolby Digital 2 0 Dolby Digital 5 1 Audio Channel Selection from menu setting stereo mono left and mono right Subtitle Enab...

Page 82: ...e receiver has an optical audio output for AC3 format Dolby Digital This gives you the opportunity to bring cinema quality sound into your living room The AC 3 sound is recorded and can be selected during playback Connect the corresponding digital audio output to a Dolby Digital system If no AC3 signal is received you can only make the normal stereo or mono settings and choose the broadcast langua...

Page 83: ...cording begins again If after viewing the programme for a time you decide you want to record it you can do so as from the point you switched to the channel in question Pre requirement On the PVR Setup menu the Automatic Timeshift option must be set to On and the Timeshift Buffer Size entry must allow sufficient hard disk capacity for the timeshift recording Also refer to the User Preference sectio...

Page 84: ...s with another scheduled recording the end time of the current recording is matched to the start time of the one already scheduled To change the recording duration use the to move to the Duration field and use the to select the time after which you want recording to stop automatically Press the yellow button to shorten the recording by 10 minutes and the blue button to extend it by 10 minutes Deco...

Page 85: ...e setting to Immediate You can also start recording at a later time Use the buttons to move to the Start Record field and use the buttons to select the time after which you want recording to start You can choose a value between 1 minute and 119 minutes in 1 minute increments can only be effected if the setting Decoding on has been activated Once all settings have been made use the buttons to selec...

Page 86: ... 10 minutes Decoding only shown when recording an encrypted channel Here you can use the buttons to select whether the programme should be recorded on the hard disk uncoded selection On or encrypted selection No If you select On there is a possibility that you will not be able to view further encrypted channels decrypted by the CA module in use This will depend on the settings in the menu System s...

Page 87: ...G LIST Select the Recording List menu using the menu button the buttons on the main menu and You can also call up the Recording List directly from TV screen using the button The following display appears example You can use the button to call up a list of the available recordings from which by pressing the buttons you can select the desired recording and call it up by pressing the button The Recor...

Page 88: ...ers and how to save recordings to different folders see the section Edit recordings or consult the separate documentation available for the PVR manager Use the blue button to choose between TV and radio recordings within the recording list Select the desired folder using the buttons Press the button to open the folder and view all the recordings contained in it Select the desired recording with th...

Page 89: ... Duration of recording ascending Channel descending Channel ascending Name of recording descending Name of recording ascending Date of recording descending Select the desired recording with the buttons and press to start playback The recorded programme will be displayed full screen The next time the recording list is called up the last mode TV ra dio and sort type will automatically be displayed P...

Page 90: ... forward Rewind fast forward at up to 24 times normal replay speed recordings that have yet to be decoded can be fast forwarded at only 4 times normal replay speed and rewound at only 2 times normal replay speed During rewinding fast forwarding you can reduce the speed by one step for every press of the button for the opposite direction of winding REMOTE CONTROL BUTTONS AND THEIR FUNCTIONS IN PLAY...

Page 91: ... up down cursor buttons 10 jumps forwards and backwards red green blue buttons see Recording List Bookmarks Button Videotext Calling up the recorded Videotext Button Displaying a list of all recordings only TV recordings yellow button selection and changes are made using the buttons Selecting the sound track Selecting the audio channel sound options stereo mono left mono right menu setting possibl...

Page 92: ...ss of decoding is indicated on the display Wait for the decoding to complete before switching on the receiver The receiver saves both the decoded and the encrypted programmes on the hard disk If you wish you can delete the encrypted programme this is not deleted automatically by the receiver DECODING A RECORDING RECORDING LIST To view recordings that were made from a protected channel you must ent...

Page 93: ...h button Note Recordings in progress will be displayed in red print and cannot be edited until recording has been completed The following message will appear Function not possible To return to the recording list press the button Take notice of the bar sat the bottom of the on screen display It provides further infor mation on what to do next Editing options are displayed The selected editing funct...

Page 94: ...exited the menu with the red button you can cancel deleting by pressing the button Recordings will only be permanently deleted when you have left the menu by pressing the red button CREATE NEW FOLDER Press the button to create a new folder The following screen appears Use the on screen keypad with the number keys on your remote control to give the folder a name Press to confirm your entry A new fo...

Page 95: ...fer the file when you exit the menu with the red button Use the and buttons to select the destination and then press the red button to launch the procedure You will be asked Do you want to move the selected recordings Move to Folder name Use the buttons to select OK and confirm by pressing the button Make sure you have also selected Rename with the red button Use the to select the recording you wa...

Page 96: ...tedly pressing the button Use the buttons to jump forward or backwards in 30 second blocks Copy the range marked Start as follows Move to the end of the range you want to copy and press the button Then press the green button to set the start point marker of the range to be copied The receiver automatically marks the full range back to the start of recording Then press the red button to set the end...

Page 97: ...cates the selected recording range as a new recording When the copy operation is complete the recording list appears The copy is indicated by a C in front of the name RECORDING LIST You can use this function for example to remove ad breaks from your recorded programmes Make sure you have also selected Cut with the red button Use the to select the recording you want to cut then press the button The...

Page 98: ...green button to set the start point marker of the range to be cut The receiver automatically marks the full range back to the start of recording Then press the red button to set the end marker at the end of the recording range you want to cut Cut the range marked Middle as follows Move to the start of the range you want to cut and press the button Then press the red button to set the start marker ...

Page 99: ...ing the red button it is possible to unmark recordings that have been selected for transfer by pressing the button You will only be asked if you re ally want to transfer the file when you exit the menu with the red button Use the buttons to select OK and confirm by pressing the button The receiver will estimate the approximate duration of copying and will then launch the procedure The following me...

Page 100: ... the to select the recordings you want to merge then press the button The following display appears example When you have selected all the recordings you want to merge press the red button The receiver shows the following display example The merged recording adopts the name of the first recording selected You can however change the name after merging on the Rename menu ...

Page 101: ...The recording then has a in front of its name indicating that it is protected against being deleted Press the button again to cancel the deletion block the will disappear You can use this function to block recordings The recording can only be played back by entering the PIN Make sure you have also selected Lock with the red button This editing function is PIN protected When you select the lock fun...

Page 102: ...ed button A flag will appear at this point You can repeat this process as often as you like After you have set all you bookmarks switch to the Chapters menu by pressing the blue button Use the buttons to select the desired bookmark Pressing the button starts the playback You can press the green button at any time to during the playback to skip to the next bookmark Note You can set bookmarks even w...

Page 103: ...he buttons to select OK within the message that is displayed and confirm again by pressing the button To delete all bookmarks press the green button in the Chapters menu Use the buttons to select OK within the message that is displayed and confirm again by pressing the button RECORDING LIST DELETING BOOKMARKS ...

Page 104: ...Multimedia Games menu using the menu button the buttons on the main menu and The following display appears example Select the function you want using the buttons and confirm with the button The following displays appear examples only ...

Page 105: ...B port on the UFS 822 and open files on it without having to save them to the UFS 822 The third directory shown above is the File Sharing Folder on the hard disk of the PC laptop The following display appears example Use the buttons to select the file to play or select multiple files using the blue multiple selection button Press the button again to open the MP3 player The following display appear...

Page 106: ...utton to resume playback Use the button to cancel playback Use the blue button to access additional playback settings and use the buttons to select them Repeat On everything is repeated Current song Off Shuffle On Off Close Press the button to quit Settings Press the button to adjust the volume Press the button to return to the MP3 selection list MP3 Files You can organise the files on the MP3 Fil...

Page 107: ...lection listings selected using the buttons Press the red button to start the move operation or press the green button to cancel it Press the red button to create a new folder in the selected directory for how to input the name using the on screen keypad see Alphanumeric Inputs Press the yellow button to copy the selected file folder e g from the hard disk to an external storage device or vice ver...

Page 108: ...ave them to the UFS 822 The third directory shown above is the File Sharing Folder on the hard disk of the PC laptop The following display appears example Use the buttons to select the file you want to view Press the green button to open the preview Press the button to start a slide show The following display appears on the TV screen example PHOTO ALBUM MULTIMEDIA GAMES Also pay attention to the b...

Page 109: ... running the current selected channel Use the buttons to switch PIP channels Press the blue button again to cancel the PIP Press the yellow button to change the position of the PIP window on the TV screen Press the red button to open the slide show settings Perform the settings using the buttons You have the following options Picture effects picture layout You can switch between various picture la...

Page 110: ...omatically jumps to the drive selection listings selected using the buttons Press the red button to start the move operation or press the green button to cancel it Press the red button to create a new folder in the selected directory for how to input the name using the on screen keypad see Alphanumeric Inputs Press the yellow button to copy the selected file folder e g from the hard disk to an ext...

Page 111: ...111 Not yet available in the current software version MULTIMEDIA GAMES GAMES APPLICATIONS No games are currently available for the UFS 822 ...

Page 112: ...buttons to select the desired file and press the button to start playing it The UFS 822 then uses the VLC player installed on the PC laptop to open the file and plays the video and sound signal on the TV set The controls pause play back fast forward and rewind can be performed using either the remote control for the receiver or using the VLC player control list displayed on the PC laptop Streaming...

Page 113: ... stick on the USB 2 0 host output as the first directory and the enabled folder on the PC laptop as the second directory The following display appears example EXTERNAL RECORDINGS Use the buttons to select the desired recording and press the button to start playing it The controls pause play back fast forward and rewind are performed using the remote control for the receiver ...

Page 114: ...main menu and Use the buttons to select further options If there is another sub menu layer press the button to open it If there are no more sub menus make the settings using the or numeric pad Press the button or the button to save the settings and return to the previous menu or the TV picture ...

Page 115: ...al from tuner 1 is looped through to tuner 2 a SAT IF signal must be connected to both tuners See First Installation section FIRST INSTALLATION ANTENNA SETTINGS Only make changes to this menu when settings or circumstances on relating to your reception system have changed You made the settings for the antenna during first installation The settings should be made by a specialist engineer ...

Page 116: ...select the LNB frequency applicable to your reception system or press the button to view the same listing as on First installation containing the most common variants as follows Single LNB Low frequency 9750 MHz Dual LNB Low frequency 9750 MHz and LNB High frequency 10 600 MHz Universal LNB Low frequency 9750 MHz and LNB High frequency 10 600 MHz and Limit frequency 11 700 MHz Press the buttons to...

Page 117: ...lected Single cable system you can here manually select the single cable frequency for tuner 1 and tuner 2 see First installation Save Once you have made all the settings use the buttons to select Save and press the button to save the data Use the buttons to select whether you want the search to cover all satellites or only one specific one If you select All Satellites only Automatic Search mode i...

Page 118: ...ame way as the existing transponders If you set the network search to Off only the current stored transponders of the satellites you previously selected will be scanned for new as yet unlisted channels FTA CA Select Use the buttons to select whether you want to search through all channels or only FTA Free to Air or CA Conditional Access channels Common Interface encrypted channels Start Search Whe...

Page 119: ...der Frequency Input field only active if Enter New Transponders selected Use the numeric pad on your remote control to key in the frequency of the new transponder here Transponder Polarisation Input field only active if Enter New Transponders selected Use the buttons to select the polarisation of the new transponder here Symbol Rate Input field only active if Enter New Transponders selected Use th...

Page 120: ...A CA Select Use the buttons to select whether you want to search through all channels or only FTA Free to Air or CA Conditional Access channels Common Interface encrypted channels Start Search When you have made your selection use the buttons to select Start Search and press the button to start the search ADVANCED CHANNEL SEARCH Transponder Frequency Use the numeric pad on your remote control to k...

Page 121: ...sponder PCR PID Program Clock Reference Packet Identification Number Use the numeric pad on your remote control to enter the PCR PID of the desired new channel here It is normally identical to the video PID Start Search When you have made your selection use the buttons to select Start Search and press the button to start the search INSTALLATION MENU If the search is successful you see the followin...

Page 122: ...ansponder here Motorised Antenna Setup Use the buttons to select the control signal you want to use for the motorised antenna here DiSEqC 1 2 DiSEqC 1 3 USALS or Off for none Motor Control Use the buttons to select the command for the motorised antenna here You can choose between Stop Save Set East Limit Start rotation eastwards with the green button and step by step eastwards with the blue button...

Page 123: ...s or circumstances relating to the satellites have changed The settings should be made by a specialist engineer The optimum setup is shown by the signal strength and quality bar charts at the bottom With the East West limit you can set the extreme stop points limited by a wall or other obstacles in the westward and eastward directions Always read the operating manual supplied by the rotor antenna ...

Page 124: ...Longitude setting for this satellite Delete Satellite Press the button to delete the currently selected satellite Use the buttons to select OK on the on screen prompt and press the button to confirm deletion of the satellite with all its transponders and channels INSTALLATION MENU EDIT TRANSPONDERS Only make changes to this menu when settings or circumstances relating to the transponders have chan...

Page 125: ...c pad and the buttons When you have entered all the data and settings use the buttons to select OK and press the button to add the new transponder The new transponder is inserted into the list of available transponders on the satellite Delete Transponder Press the button to delete the currently selected transponder Use the buttons to select the OK button within the on screen prompt and confirm the...

Page 126: ...ATION MENU See Software and Programme List Update section ON AIR DOWNLOAD Edit Transponders Here you can input the Frequency Polarization and Symbol to edit the transponder Press the button to confirm the settings ...

Page 127: ...ceiver is in operation in order for your TV set to automatically play back the picture from the external recorder In this setting the picture from the external recorder is switched through to the TV set during playback Pressing the button again restores priority to the signal from the UFS 822 Note The system ensures that the same video and audio signal is present at the TV and VCR Scart sockets Th...

Page 128: ...te is that your satellite reception system is aligned with ASTRA 19 2 East Press to access the main menu and use the buttons and to select the Installation submenu Then move the cursor bar to the On Air Download menu item and select it by pressing Your receiver automatically searches for the ASTRA transponder which broadcasts the current software and programme list The following display appears ex...

Page 129: ...e one listed under Current Software Version If the version on the transponder is higher than the current version on the receiver use the buttons to select whether you want to download the latest software When you have made all the settings press the button here to start the download The following display appears see next page Note If you are not sure whether you want to download new software to yo...

Page 130: ...ou see the following The number of modules being downloaded The elapsed time The current operation The information text if previously selected When the software has been successfully downloaded the receiver asks you whether you want to upgrade the firmware Information UFS 822 as at 19 12 2007 ...

Page 131: ...eiver is re initialised and starts operation again Never turn off the receiver during the update process as otherwise you could lose the entire software If this happened the receiver would have to be re installed at a workshop or using a PC and USB cable On the STB Management System Information menu you can see whether the new software has been installed Use the buttons to select OK and launch upd...

Page 132: ...ta saved on the UFS 822 hard disk recordings MP3s JPEGs File sharing between PC and receiver MP3 JPEG recordings video files e g Divx Xvid Software and channel list updates You can download the PVR manager free of charge from our home page http www kathrein de under Service Software and Download Receiver UFS 822 A guide to the installation and use of the PVR manager is also available for downloadi...

Page 133: ...f the control to make your settings Press the Stop Exit button to exit the menu without recording the current programme Play button Press the Play button to access the recording list Select the programme you want to view by rotating the control and start playback by pressing the middle of the control Press the Stop Exit button to exit the menu without starting playback Stop Exit button Used to can...

Page 134: ...Press the button Use the buttons to select OK and start the download by pressing the button The master searches for the slave and once it has found it automatically begins downloading the channel list The following display appears Channel data being transmitted Slave The following display appears Receiving data Once all the data has been received first remove the zero modem cable and then switch t...

Page 135: ...el for software updates via USB stick Q A USB 2 0 port on the receiver back panel for connection of external devices Q Ethernet interface Q Multi function controller on the device Q Optical audio output for Dolby Digital data stream AC 3 Q Cinch sockets for AV signal Composite FBAS stereo audio Q Composite colour picture RGB and Y C signal output programmable on Scart socket Q Any number of timer ...

Page 136: ...5 Memory Flash RAM MB 4 32 Processor clock rate MHz 166 Hard disk recorder Capacity Recording time GByte Std 160 Ca 100 depending on data rate and changes of picture contents Power supply Mains voltage V Hz 100 240 50 60 Power consumption oper stand by mode W 35 1 LNB supply horiz vert V mA 14 18 Max 500 Control signal kHz 22 ToneBurst DiSEqCTM 1 2 SCR single cable system Connections Sat IF input ...

Page 137: ... 12 Red earth 13 X X Data earth 14 Red signal C 15 X Blanking signal 16 X X Video earth 17 X X Blanking signal earth 18 X X Video output FBAS Y 19 X X Video input 20 X Connector shield 21 X X The TV Scart socket is switchable between VHS and S VHS The switch is made by selecting System Setup TV Settings AV Settings from the Main Menu VHS RGB The red signal is connected to terminal 15 the composite...

Page 138: ...138 TECHNICAL APPENDIX CONNECTION EXAMPLES Conventional DiSEqC system Hi fi system Dolby Digital system Digital audio AC 3 optical ...

Page 139: ...z V 1 2 V high 22kHz H 1 2 1 SCR 0 1400 MHz 2 SCR 1 1516 MHz 1 SCR 0 1400 MHz 2 SCR 1 1516 MHz EXR 552 ESU 33 002 BAYERN RADIO Twin ERA 14 H low V EXR 501 20510029 V high H A KLASSE CLASS Made in EC terr 1 4 1 SCR 0 1400 MHz 2 SCR 1 1516 MHz 3 SCR 2 1632 MHz 4 SCR 3 1748 MHz DC EXR 501 NCF 18 ESU 33 Single RTL Television 712 ESU 33 Single RTL Television 712 ESU 33 002 BAYERN RADIO Twin EXAMPLES Si...

Page 140: ...to the tuner input 2 connect LNB 1 Loop through output to LNB 2 input Using this type of connection with the Single cable system in contract to the normal DiSEqC system allows you to exploit the complete twin capabilities of your UFS 822 This leaves two sockets unused which are not however available for another receiver without interference on reception TECHNICAL APPENDIX ...

Page 141: ...NICAL APPENDIX CONNECTION EXAMPLES FOR THE NETWORK FUNCTION PC Laptop Gekreuztes Netzwerkkabel IP Adresse 192 168 0 10 IP Adresse 192 168 0 11 DHCP Receiver OFF IP address IP address Crossed over network cable ...

Page 142: ...kabel Switch HUB TCP IP Adresse 192 168 0 12 PC Laptop Netzwerkkabel Netzwerkkabel TCP IP Adresse 192 168 0 10 TCP IP Adresse 192 168 0 11 DHCP Receiver OFF Network cable Network cable Network cable TCP IP address TCP IP address TCP IP address ...

Page 143: ...TCP IP Adresse 192 168 0 13 TCP IP Adresse 192 168 0 12 TCP IP Adresse 192 168 0 11 TCP IP Adresse 192 168 0 10 Netzwerkkabel Netzwerkkabel DHCP Receiver OFF TCP IP address TCP IP address Network cable Network cable Network cable Network cable TCP IP address TCP IP address DHCP sensor router e g Fritzbox ...

Page 144: ...ICAL APPENDIX DHCP Receiver ON PC Laptop Netzwerkkabel DHCP Server Router z B Fritzbox TCP IP Adresse automatisch Funkstrecke Network cable DHCP sensor router e g Fritzbox TCP IP address automatic Broadcast path ...

Page 145: ...APPENDIX PC Laptop Netzwerkkabel DHCP Server Router z B Fritzbox TCP IP Adresse automatisch PC Laptop Funkstrecke DHCP Receiver ON TCP IP address automatic Network cable Broadcast path DHCP sensor router e g Fritzbox ...

Page 146: ...rver Router z B Fritzbox PC Laptop Funkstrecke Netzwerkkabel TCP IP Adresse automatisch TCP IP Adresse automatisch DHCP Receiver ON TCP IP address automatic TCP IP address automatic Network cable Network cable DHCP sensor router e g Fritzbox Broadcast path ...

Page 147: ...ria are then ignored DVB MPEG 2 DVB is the abbreviation for Digital Video Broadcasting DVB S refers to the transmission method S satellite MPEG is the abbreviation for Moving Picture Experts Group a working group that formulates internationally applicable standards for the digital compression of video and audio MPEG 2 has established itself as the standard for compression of digital TV signals MPE...

Page 148: ...d in MSymbols s and is equal to the number of symbols received per second VIDEO BIT RATE The video bit rate describes the quantity of data from the digitised video signal that is transmitted per second VITERBI RATE The Viterbi rate code rate error rate characterises the error protection used by the programme provider The DVB standard provides the following values 1 2 2 3 3 4 5 6 7 8 TRANSPONDER A ...

Page 149: ...ption e g PREMIERE PCMCIA Standard for internal decoder interface for pay TV PID See Short technical guide PIN Personal Identification Number PIP See Short technical guide Receiver Satellite receiver RGB Video signal made up of three individual colour signals red green blue Satellite IF signal Receiver input signal Scart cable 21 pin connecting cable e g receiver TV Smartcard Card from Pay TV prov...

Page 150: ...cessary Connect tuner input LNB2 IN with second cable connect coaxial cable with F connection of satellite socket OR On Installation menu change LNB configuration tuner input to 1 if only one satellite being received Remote control no longer responding Receiver or remote control command set may have been unintentionally changed Set infrared code 1 as described in operating manual under Remote Cont...

Page 151: ...33 BLOCKED RECORDINGS 92 BOOKMARKS 102 DELETING BOOKMARKS 103 SETTING BOOKMARKS 102 CHANNEL INFORMATION 31 CHANNEL INFORMATION 31 RADIO CHANNEL INFORMATION 31 TV CHANNEL INFORMATION 31 CHANNEL LIST 70 CHANNEL LIST 80 CHANNEL LIST DOWNLOAD 134 CHANNEL LIST UPDATE 129 CHANNEL SEARCH 117 ADVANCED CHANNEL SEARCH 120 AUTOMATIC SEARCH 118 MANUAL SEARCH 119 CHANNEL SELECTION IN THE MAIN PICTURE 65 CHANNE...

Page 152: ...24 EDIT TV CHANNELS 60 DELETE CHANNELS 62 LOCK CHANNELS 60 REARRANGE CHANNELS 61 RENAME CHANNELS 60 SKIP CHANNELS 61 EDIT TV FAVORITES 63 ADD REMOVE CHANNELS FAVORITE LIST 64 CREATE FAVORITE LIST 63 DELETE FAVORITES LIST 63 RENAME FAVORITE LIST 63 EPG GRABBING SETUP 56 DYNAMIC SI HANDLING 57 INVALIDATE TVTV DATA 57 RECORDING FOLLOWING OFFSET 57 RECORDING LEADING OFFSET 57 ERROR SIGNALLING 32 ETHER...

Page 153: ...IO AND SUBTITLES 81 FOLDER VIEW 88 CREATE NEW FOLDER AND SAVE TO FOLDER 88 PARENTAL CONTROL 51 AGE RATING CONTROL 52 CHANGE PIN 53 INSTALLATION LOCK 52 RECEIVER LOCK 52 STB MANAGEMENT LOCK 52 PHOTO ALBUM 108 ORGANISING PHOTO FILES 110 PICTURE IN PICTURE PIP 65 PREPARATION 134 PRODUCT PACKAGE 7 PROGRAMMES SORTED BY CATEGORY 71 PROGRAMMING A RECORDING 75 DIRECT DECODING OF TVTV TIMERS 77 PVR SETUP 5...

Page 154: ...TEM INFORMATION 43 TRANSFER CHANNEL DATA 43 TRANSFER FIRMWARE 43 SYMBOL CODES FOR THE RECEIVER DISPLAY 30 TECHNICAL FEATURES 135 TIMER LIST 78 TIME SETUP 39 TIMESHIFT 66 TIMESHIFT 67 TRANSPONDER INFO 129 TV RADIO CHANNEL LIST 32 TV AND VIDEO RECORDER CONNECTION 11 TV SETTINGS 38 AV SETTINGS 38 HDMI MODE 39 OSD POSITION SETUP 39 TV STANDARD 39 UPDATE OPERATING SOFTWARE 129 VHS S VHS SWITCHING 137 V...

Page 155: ...5 SERVICE If despite studying this operating manual you still have questions about getting started with the unit or using it correctly or if unexpected problems occur please contact your specialist dealer ...

Page 156: ...Internet http www kathrein de KATHREIN Werke KG Anton Kathrein Straße 1 3 P O Box 100 444 83004 Rosenheim GERMANY 936 3283 A 0408 ZWT Technical data subject to change ...

Reviews: