background image

31

03

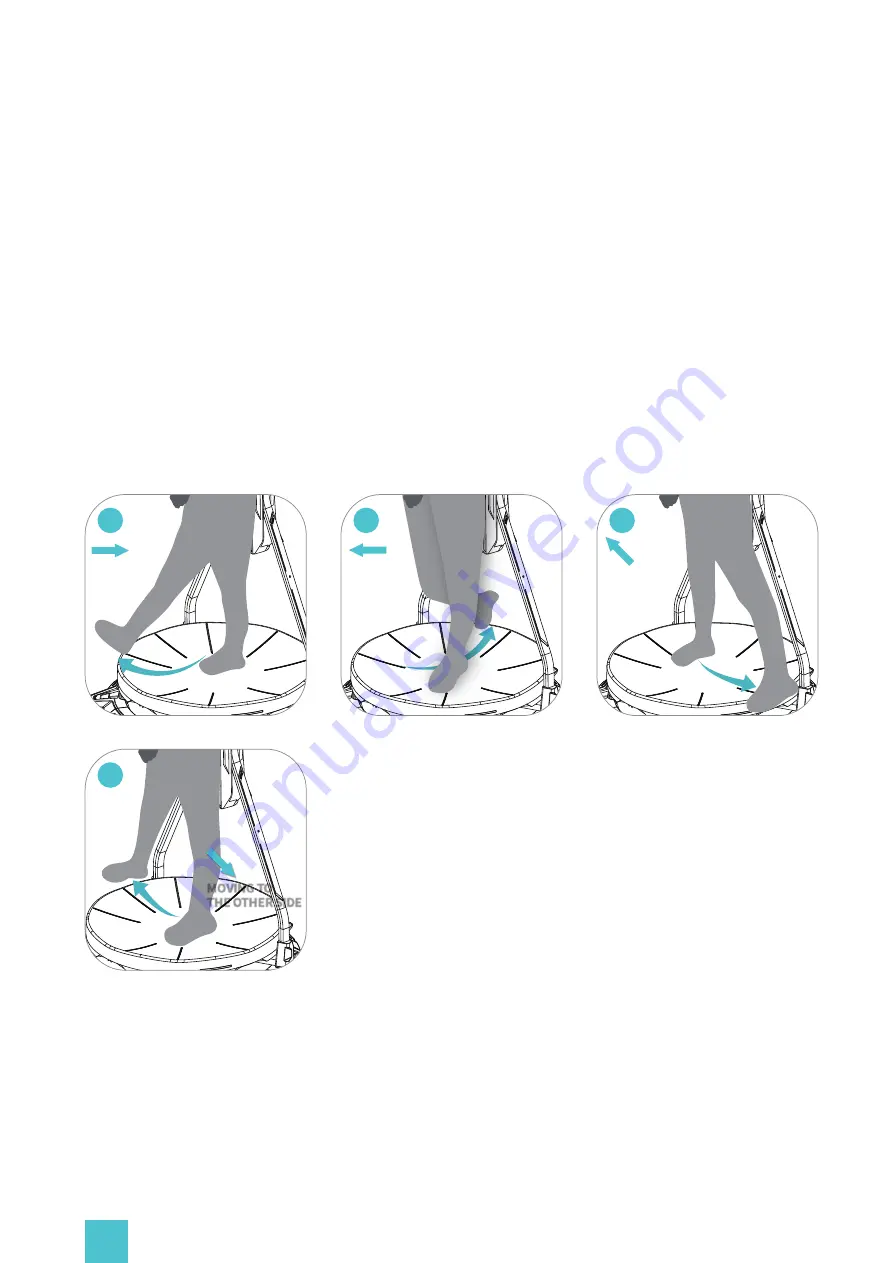
MOVING TO

THE OTHER SIDE

01

MOVING

BACKWARD

02

MOVING

BACKWARD

04

MOVING TO

THE OTHER SIDE

Controller:

 Options for device function

a. Walking Speed: Adjustment of the walking speed for the selected game.
b. Walking Accuracy: Adjustment of the walking accuracy for the selected game. Higher accuracy

provides more realistic locomotion with a feeling of moving forward step by step. Higher fluency

makes movement more smooth.

c. Default: Click  ′Default ′ to reset the game profile.
d.Cruise mode: Enables you to trigger smooth, continuous movement forward without

constantly walking.

You may turn on or off the cruise mode which allows you to move continuously without walking. 
When ′on ′, you can trigger strafing by putting your foot on the platform, sliding it forward or 
backward and keeping in a stable position. continuous strafing to the sides can be triggered in a 
similar way.

Game Config

Locomotion system differs in different games, KAT Device can only work when the settings are 
all correct based on the following instructions:

Summary of Contents for KAT Walk Coord 2

Page 1: ...KAT Walk Coord 2 OWNER S MANUAL This product is for personal use ONLY Any form of commercial application is prohibited...

Page 2: ...future use KATVR reserves the right to interpret and modify the manual Any amendments updates and interpretations to the manual will be published on the KATVR o cial website Read this manual in its en...

Page 3: ...ot Sensor Introduction Product Parameters 10 10 11 11 11 12 13 PRODUCT INSTALLATION Precautions Tools Preparation Finding a suitable place Unpacking Method Packing List Reminder Installation of the HM...

Page 4: ...Ranking Noti cation Feedback System Lab Functions Direction calibration Calibration button 30 30 31 33 34 35 35 36 36 37 37 38 38 39 40 41 04 Friction level Introduction Anti Slip Lock Introduction En...

Page 5: ...s of this manual are completely error free Statements information and recommendations provided in this manual do not constitute any warranty express or implied 05 First Foremost This owner s manual co...

Page 6: ...iduals under the age of 14 or over the age of 60 The product SHOULD NOT be stored in a room that children under the age of 14 or over the age of 60 or pets may access without supervision Any spectator...

Page 7: ...vice Avoid suddenly cutting o the power supply to avoid short circuits Always disconnect the device before thunderstorm comes When disconnecting the device always pull the USB connector and not the co...

Page 8: ...it pas produire de brouillage et 2 l utilisateur de l appareil doit accepter tout brouillage radio lectrique subi m me si le brouillage est susceptible d en compromettre le fonctionnement CAUTIONS POW...

Page 9: ...ce Due to di erent personal health predispositions and in order to avoid physical discomfort such as dazzling dizziness or headache we do not recommend prolonged use of the device If you experience an...

Page 10: ...r personal safety do not drive or operate machinery engage in any other activities that are visually or physically demanding or require body balance and hand eye coordination until full recovery Produ...

Page 11: ...ovides a highly immersive VR Walking experience The dedicated shoes contain two layers of insoles the upper layer is a sports functional insole and the lower layer is a size adjustable insole We recom...

Page 12: ...ery status will be only displayed after successful sensor pairing and connection 3 Charging Flashing Foot Sensor Light Dimming Inner Sensor Light indicates charging Charging State Detected Continuous...

Page 13: ...rint Charging time Battery life Voltage Operating temperature Working humidity Working altitude 14 60 years Below 130kg 286 lbs 1 55m 2 00m 5 1 6 7 1 60m 1 95m 5 3 6 5 KAT Walk Coord 2 54kg KAT Walk C...

Page 14: ...rniture or other household items that can be easily knocked within the device vicinity Finding a suitable place Unpacking method All screws must be tightened very rmly especially in the marked crucial...

Page 15: ...sors followtheinstructionsinKATGate way and fully charge page 20 04 Mount the inner sensor on the back support plate List No 19 screws Mount the storage hooks List No 19 screws and insert the supporti...

Page 16: ...zing feet on the bottom of the base and x them with screws List No 15 gaskets No 16 screws Note Tighten firmly to avoid safety hazards 16 15 Ensure the harness logo faces up remove the bolt heads alig...

Page 17: ...is missing contact our customer service at service kat vr com before you proceed Packing List 1 2 3 4 5 6 7 8 9 10 11 12 Base Stabilizing Feet Back Support Rod Back Support Plate Back Support Shell C...

Page 18: ...ch Phillips Screwdriver 8mm Gaskets M8 30 Hexagon Head Screws M8 20 Hexagon Round Head Screws M4 16 Cross Head Long Screws M4 8 Cross Head Short Screws M8X55 Hexagon Round Head Screws M8 Cap Nut 0 5m...

Page 19: ...1 Mount the hook into the expan sion screw sleeve and tighten Threadtheheadsetcordthrough theloopandthenhangthepulley onthehook 03 02 KAT Gateway is the dedicated software for running KAT VR devices I...

Page 20: ...team O cial Website http store steampowered com System Requirements For additional information please refer to the system requirements of your VR HMD 20 With KAT Gateway you can quickly connect the KA...

Page 21: ...KAT Gateway and install it on your PC Opening KAT Gateway Starting the software Once you ve installed the software double click the shortcut icon Select KAT Walk Coord 2 and proceed to the product re...

Page 22: ...currently connected KAT Devices but can only run one at a time If no device or multiple devices are detected KAT Gateway will inform the user about it and ask to connect only the intended device VR In...

Page 23: ...23 Third case Multiple devices of di erent type detected Please select the KAT Walk Coord 2 Second case Multiple devices of the same model detected...

Page 24: ...t to connect the direction sensors to your PC Follow the software instructions and click FINISH to complete the sensor pairing Connect the USB data cable of the KAT Walk Coord 2 to the PC USB port Onc...

Page 25: ...25 Having connected the KAT Walk Coord 2 to the computer follow the Gateway instructions Using the Micro USB cable connect the sensor to pair it There s only one direction sensor...

Page 26: ...he interface of KAT Gateway once KAT Walk Coord 2 is connected Having connected the KAT Walk Coord 2 to the computer follow the Gateway instructions Using the Micro USB cable connect the sensors one b...

Page 27: ...con device name connection status and Sensor Manager Connected Disconnected Sensors may enter the sleep mode Click the main button on the direction sensor and shake the shoe sensors to wake them up En...

Page 28: ...ver Sensor pairing status Paired Unpaired Ensure the sensors are paired If not click Pair the Sensors to initialize the pairing If you have already paired the sensors before click Quick Pairing to qui...

Page 29: ...try the Firmware Update manually via Gateway until it is successful ly completed If the progress indicating dots stop abnormally please unplug and re plug the USB cable of your KAT device and close th...

Page 30: ...or each individual game Game list shows the games you have installed You can scan for games add a game manually search games and view the current game For each of them you can set a custom controller...

Page 31: ...more smooth c Default Click Default to reset the game pro le d Cruise mode Enables you to trigger smooth continuous movement forward without constantly walking You may turn on or o the cruise mode wh...

Page 32: ...gs to Head Oriented movement if possible In KAT Gateway enable 1 Body Reccommended Choose this option to enable Decoupled directions so you could walk towards the direction based on your body 2 Contro...

Page 33: ...omatically enable the running speed in the games with binary speed levels always either walking or running at constant speed once your real life speed on the KAT device reaches a certain speed thresho...

Page 34: ...ing modifying your name password and email address viewing game data and rankings replying or nding questions or answers 34 Edit modifying your name password and email address Data Displays the total...

Page 35: ...nt topics or look for the information you need b Community Settings coming soon You can share your own custom pro le for di erent game settings with other community members User Status You can login a...

Page 36: ...Oculus Games Click the game and proceed to the Oculus platform c Reccommended Steam Games Click the game and proceed to the Steam platform d Developer Games coming soon If you re a developer of a VR g...

Page 37: ...can download the native game mods added by the KAT VR team c Developer Mods You can download the mods provided by the developers If you re a developer and would like to add game mods please feel free...

Page 38: ...unction to share your feedback with us Feedback The system settings page shows the currently selected language and the current inSteam driv ers and the current version of KAT Gateway From this page yo...

Page 39: ...ons by emulating the function of the buttons in some games Lab Functions coming soon Xinput This mode lets you achieve movement in all directions by taking over the function of a connected XBOX Contro...

Page 40: ...open the Gateway in VR click the Calibration stand straight with your feet together look forward and click the Direction Calibration Direction calibration Calibration in VR Note Incorrect calibration...

Page 41: ...you should calibrate the sensor direc tion to achieve the correct movement direction in VR The KAT Walk Coord 2 has been moved The HMD base stations if any have been moved You can also do that with th...

Page 42: ...Note Beforeusingthe device ensurethesurfaceofthe shoesensoriscleanandfreeof dust Usethebrushifneeded The sensors must be installed exactly as shown in the previous step Incorrect mounting of the senso...

Page 43: ...atform with the waist harness securely fastened you can unlock the anti slip as shown in the picture below You can now walk on the platform Note 1 The dedicated shoes must not be used on any other sur...

Page 44: ...onnection Constant successfulconnection None sleepmode nopower Strapping in 04 4 05 Adjust the waist harness to a position at which the belts closely t the thinnest part of your waist Starting with th...

Page 45: ...System Button on the control ler open Gateway via KAT icon in SteamVR dashboard 06 Standstraightwith feet at the back as shown Leanforwardalittlebittillyou start to feel the shoe wheels started rollin...

Page 46: ...d stepping on it It may occur that the rotational structure gets continuously pulled towards a certain side of the platform due to uneven ground or other reasons If that happens please follow the step...

Page 47: ...ing for a few minutes until you get used to the simulated gait 01 d Tighten the nuts holding the waist harness First Steps How to walk Loosen the nuts holding the waist harness If the beam tends to co...

Page 48: ...other purposes Avoid excessive use The device has been strictly tested to ensure full safety and protection from ipping under normal conditions of use However if any sudden large movement caused a la...

Page 49: ...tances or dust 3 Before use please check whether the surface of the laser head of the foot sensor is smooth and clean If there is any foreign matter please clean it otherwise it will a ect the use e e...

Page 50: ...kat vr com Company Hangzhou Virtual and Reality Technology Co Ltd 9th oor Building 6 No 1818 2 West Wenyi Road Yuhang Street Yuhang District Hangzhou City Zhejiang Province China Add Postal code 3111...

Page 51: ...www kat vr com...

Reviews: