background image


WARRANTY AND SUPPORT 


Kasen  warrants  the  electrical  components  (Controller,  Motor,  Display, 

Battery, & Charger) of each e-bike against defects in workmanship and 

materials for 365 days from the date of purchase. Proof of purchase is 

required for any claim. This warranty does not apply to normal wear and 

tear,  improper  assembly,  improper  or  lack  of  maintenance,  incorrect 

usage of parts or incorrect parts used on the bicycle, damage or failure 

due to impact from accident, abuse, negligence in use, and labor charge 

on any replacement components. 


The User assumes all inherent risks in the use of the product, including 

but not limited to personal injury, property damage and/or other losses. 

If you have any warranty/parts inquiries, please contact our customer 

service  email  at 

[email protected]


or  call  us 

at:  909.393.3977 to  diagnose  and  repair  your  Kasen  Electric  Bicycle. 


This  is  an  integrated  and  final  statement  of  Kasen  Electric  Bicycles 

limited  warranty.  Kasen  Electric  Bicycles  does  not  authorize  or  allow 

anyone  to  extend  any  other  warranties,  express  or  implied.   This 

warranty is expressly limited to the repair or replacement of a defective 

item,  and  said  repair  or  replacement  is  the  sole  remedy  of  the 

warranty.   Kasen  Electric 

Bicycles’

  liability under  this  limited  warranty 

shall be no greater than the amount of the original components, and in 

no  event  shall  Kasen  Electric  Bicycles  be  liable  for  incidental  or 

consequential damages. 


Summary of Contents for KABBIT

Page 1: ...KABBIT OWNER S MANUAL GENERATING PURE EXCITEMENT...

Page 2: ...d your e bike on your adventures we d love to add them to our website s photo gallery You can email photos to KasenBikeCustomerService gmail com or tag us on Instagram by adding the hashtag Kasenbikes...

Page 3: ...he respective model o It is intended to be used as a bicycle and not intended for interstate atv offroad or other use not intended for a bicycle of this model o This e bike is not intended to be used...

Page 4: ...time Check the e bike and all related products before each use to confirm proper assembly and that it is in working order Check the e bike and all related products after a crash to ensure it is still...

Page 5: ...r know how to ride a bicycle before riding a Kasen Electric Bicycle Medical limitations Do not use if you have an existing medical condition injury or other limitation which could affect your balance...

Page 6: ...e bike rack weight restrictions prior to transporting using a traditional e bike rack Weight limits on bike racks are often not compatible with the heavier weight of electric bicycles As a result spec...

Page 7: ...by using the throttle o When starting from a stop pedal the bike first then engage the thumb throttle Failure to do so may damage the motor o When riding the e bike up steep grades for extended period...

Page 8: ...When climbing you may have to lean forward and stand up on the pedals When descending you may have to shift your body weight backwards You need to make sure all these maneuvers are possible so you ca...

Page 9: ...ezing the brake levers This habit stops you from accidentally engaging the motor Release the brake levers when you begin riding and intend to use pedal assist again The motor interrupt brake levers ca...

Page 10: ...xtreme hot and cold temperatures DO NOT submerge your bike or any of the components in water This action will void the warranty To optimize the battery s performance over time do your best to use it d...

Page 11: ...preload and lighter more cautious riders usually have less As a general guideline if the fork doesn t move much on bumps less spring preload is needed if the fork frequently bottoms out reaches the e...

Page 12: ...oving parts including the chain derailleur pivots and shifter cable inner wire where it enters the cable housing If you ride in wet or humid environments clean and dry electric connections and apply a...

Page 13: ...reflective tail light we encourage you not to remove them You should use the front and rear lights when riding in dim or dark conditions Some jurisdictions restrict where e bikes can and cannot be rid...

Page 14: ...rmly and fully plugged in If necessary loosen the clips holding the cable to the frame to create additional slack in the cable then re tighten the clips after the motor cable is firmly plugged in 3 If...

Page 15: ...he battery 3 Plug the charger into wall power 4 Tap the power button on the battery once to turn it on 5 Charge the battery overnight 6 When charging is complete put the battery back on the bike and c...

Page 16: ...ight see one single LED flashing constantly on the battery One blinking LED is a warning of excessive strain on the battery for its charge level To correct this issue Reduce the strain on the battery...

Page 17: ...o personal injury property damage and or other losses If you have any warranty parts inquiries please contact our customer service email at KasenBikeCustomerService gmail com or call us at 909 393 397...

Page 18: ...ive list of every possible operation fit troubleshooting or maintenance scenario Your e bike should be assembled maintained and serviced by a qualified person If in doubt about your knowledge or capab...

Page 19: ...i tech Industrial Development Zone Tianjin China Tel TEL 86 22 83715556 FAX 86 22 83719955 Email yzhao aptdevelop com 1001 Building 5 HuaDing No 1 HuaKe 3 Road 1 TEL 86 22 2634 5859 Binhai hi tech Ind...

Page 20: ...rameters 2 2inch IPS screen 24V 36V 48V battery supply Rated operating current 40mA Off leakage current 1uA Max output current to controller 100mA Operating temperature 20 70 Storage temperature 30 80...

Page 21: ...Kilometer Mile Can be set according to customers habits Smart battery indicator Provide a reliable battery indicator 9 level Assist 3 level 5 level 9 level optional Mileage indicator Odometer Trip di...

Page 22: ...nge the assist level Top assist level is 9 0 for neutral Level quantities can be adjusted according to the customer requirements 7 3 Speed Mileage mode switch Short press POWER button can change the s...

Page 23: ...to setting menus press UP DOWN buttons to change the parameter setting press M button can switch to next item Press M press no less than 2second button will exit from menu Display will automatically q...

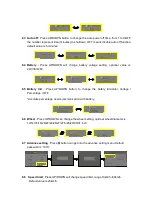
Page 24: ...isable auto off function default value is 5 minutes 8 4 Battery ress UP DOWN will c nge battery voltage s g optional value is 24V 36V 48V 8 5 Battery In ress UP DOWN b n to change the bat dicator Volt...

Page 25: ...1 Start Poles 2 Start Poles 3 8 11 Assist levels This parameter can customize assist levels options are 3 5 9 Assist 3 Assist 5 Assist 9 9 Error Code define 500C can show warning message icon shows o...

Page 26: ...T Science and Technology Co Ltd 10 Assembly instructions M4 10 Please pay attention to the screw s torque value damaged caused by excessive torque is not within the scope of the warranty 11 Connector...

Page 27: ...1 Red wire Anode 24v 36v 48V 2 Blue wire Power cord to the controller 3 Black wire GND 4 Green wire RxD controller display 5 Yellow wire TxD display controller 12 Assist level instructions Assist leve...

Page 28: ......

Reviews: