background image


29

5.12 Disassembling and Assembling the KP-10.3 Series 


WARNING 

●Make sure to remove the cable from the transmission connector before 

disassembling the wheelchair. Otherwise, the cable could be damaged.

5.12.1 Disassembling and Assembling KP-10.3 

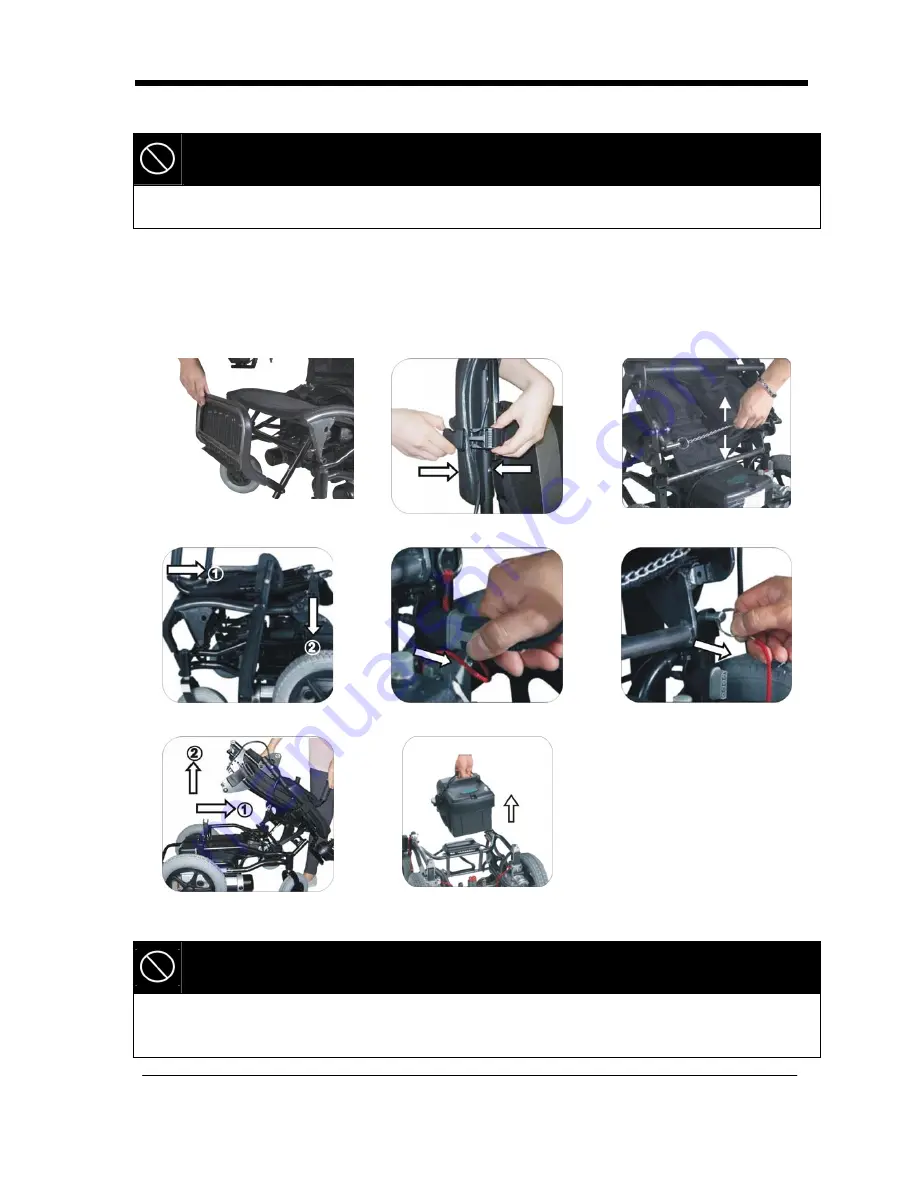
The KP-10.3 can be disassembled into three parts easily and can also be 
quickly assembled which is convenient for storage and transportation. 
Please follow the following steps.   


WARNING 

●The heaviest component is base which weighs 24 kg.

●Please be careful about hands' injury when assembling and disassembling.

●Always use the anti-tippers on your wheelchair to prevent injury.


1. Fold the footrest upward. 

2. Flip back both the armrest, 

and buckle up the straps.

3. Pull the chain behind the 

seat. 


4. Fold the backrest forwards 

and press it. 

5. Remove the cable from the 

transmission connector.

6. Pull the pins out from both 

sides of the mounting bases.


●Assemble the KP-10.3 by 

reversing this procedure. 


7. Pull the seat forward and 

upward to lift it. 

8. Hold onto the battery     

pack's strap and lift it up.


Summary of Contents for KP-10.3

Page 1: ...Powered Wheelchair Owner s Manual Ergo Nimble Series KP 10 3 Series KP 10 3 KP 10 3S KP 10 3 CPT...

Page 2: ...owever the responsibility of final selection of the type of powered wheelchair to be used by an individual rests solely with the user and his her healthcare professional capable of making such a selec...

Page 3: ...the direction you are reaching as the powered wheelchair may tip over DO NOT use an escalator to move a powered wheelchair between floors Serious bodily injury may occur DO NOT operate in car lanes on...

Page 4: ...tromagnetic brakes are not engaged in this mode without these brakes it will roll down a hill causing injury or damage Never drive under the influence of alcohol or medication DO NOT sit in the powere...

Page 5: ...for this unit Refer to Section 6 Carefully read the battery and charger information prior to installing servicing or operating your wheelchair RAIN TEST KARMA has tested its powered wheelchair in acc...

Page 6: ...y defective parts or lose any parts please contact your dealer for repair and or replacement Please only use parts authorized by KARMA Use of parts that are not authorized by KARMA will void your warr...

Page 7: ...roads have been met i e a pelvic belt lighting registration or licensing CE MARKING This powered wheelchair complies with the requirements of the Medical Devices Directive 93 42 EEC CAUTION When pres...

Page 8: ...12 Ramps Inclines and Drops 4 2 13 Maximum User Weight Limit 5 2 14 KP 10 3 Series Labeling 6 3 EMI RFI 10 3 1 Electromagnetic Interference From Radio Wave Sources 10 3 2 The sources of radiated EMI...

Page 9: ...elchair 25 5 9 Armrest Adjustment for KP 10 3 Series 27 5 10 KP10 3 CPT Seat position adjustment 28 5 11 Backrest Adjustment for KP 10 3 Series 28 5 12 Disassembling and Assembling the KP 10 3 Series...

Page 10: ...s Instructions for Lubrication 41 7 7 Transporting and Storing 41 8 OPTIONAL ACCESSORIES 42 9 TROUBLESHOOTING 43 10 SPECIFICATIONS 45 11 CLEANING RECYCLING 48 11 1 Cleaning 48 11 2 Post Consumer Recyc...

Page 11: ...ols WARNING Improper use could lead the user to severe injury or death CAUTION Improper use could lead the user to severe injury and or damage to your wheelchair SUGGESTION Follow these instructions t...

Page 12: ...2 4 Be extremely cautious when driving your wheelchair in heavy traffic or the shopping mall 2 2 5 DO NOT drive your wheelchair when you feel tired or consume alcohol 2 2 6 Please do not drive your wh...

Page 13: ...ch an action may cause you to lose balance and fall 2 8 2 Use caution to assure your clothing doesn t get tangled with the wheels 2 9 Railroad Crossing 2 9 1 Before crossing the tracks please stop com...

Page 14: ...ther such as potholes or washboard roads See Figure 2 4 2 12 5 Do not make sudden turns when driving on gravel roads or ramps 2 12 6 The maximum surmountable obstacle height is 5 cm for your wheelchai...

Page 15: ...oming set to freewheel mode and push the wheelchair off the tracks 2 13 Maximum User Weight Limit 2 13 1 Refer to Max User Weight in section 10 SPECIFICATIONS 2 13 2 Loads exceeding maximum capacity c...

Page 16: ...6 2 14 KP 10 3 Series Labeling Please carefully read all the labeling on the wheelchair before driving it Do not remove them Protect them for future reference...

Page 17: ...7...

Page 18: ...8...

Page 19: ...9...

Page 20: ...ave sources can cause the powered vehicle to release its brakes move by itself or move in unintended directions It can also permanently damage the powered vehicle s control system The intensity of the...

Page 21: ...nsmitters radio and TV broadcast antenna towers and amateur HAM radios NOTE Other types of hand held devices cordless phones laptop computers AM FM radios TV sets CD players cassette players and small...

Page 22: ...owered vehicle is turned ON 3 4 1 2 Be aware of nearby transmitters such as radio or TV stations and try to stay away from them 3 4 1 3 If unintended movement or brake release occurs turn the powered...

Page 23: ...13 4 PARTS KP 10 3 Parts Introduction 1 Pelvic Belt 2 Joystick Controller 3 Charging Socket 4 Seat 5 Calf Strap 6 Footplate 7 Backrest 8 Armrest 9 Backrest Angle Adjustment 10 Motor 11 Caster...

Page 24: ...14 12 Armrest Fixing Strap 13 Push Handle 14 Backrest Angle Adjustment Chain 15 Freewheel Lever 16 Battery Pack s Strap 17 Circuit Breaker 18 Anti Tipper 19 Rear Wheel...

Page 25: ...10 3S equipped with 22Ah batteries Parts Introduction 1 Pelvic Belt 2 Joystick Controller 3 Charging Socket 4 Seat 5 Heel Loop 6 Footplate 7 Backrest 8 Armrest 9 Backrest Angle Adjustment 10 Motor 11...

Page 26: ...16 12 Armrest Fixing Strap 13 Rear Wheel 14 Anti Tipper 15 Push Handle 16 Backrest Angle Adjustment Chain 17 Freewheel Lever 18 Battery Pack s Strap 19 Circuit Breaker...

Page 27: ...7 KP 10 3S Parts Introduction 1 Pelvic Belt 2 Joystick Controller 3 Charging Socket 4 Seat 5 Heel Loop 6 Footplate 7 Backrest 8 Armrest 9 Backrest Angle Adjustment 10 Circuit Breaker 11 Motor 12 Caste...

Page 28: ...18 13 Armrest Fixing Strap 14 Rear Wheel 15 Anti Tipper 16 Push Handle 17 Backrest Angle Adjustment Chain 18 Freewheel Lever...

Page 29: ...batteries Parts Introduction 1 Seat 2 Armrest 3 Side Panel 4 Armrest Height Adjusting Knob 5 Rear Wheel 6 Motor 7 Caster 8 Pelvic Belt 9 Joystick Contrlller 10 Joystick Controller Connection Tube 11 C...

Page 30: ...20 14 Anti Tipper 15 Battery Casing 16 Clutch...

Page 31: ...1 1 2 Your battery diagnostics indicator should light up 5 1 2 Speed Adjustment Buttons 5 1 2 1 The speed adjustment buttons allows you to set various forward and reverse speeds 5 1 2 2 The settings a...

Page 32: ...s 5 1 3 2 3 Deflect the joystick in reverse until the control system beeps 5 1 3 2 4 Release the joystick there will be a long beep 5 1 3 2 5 The wheelchair is now unlocked 5 2 Controller Cable Fasten...

Page 33: ...when indoor 5 4 Forward Reverse and Braking 5 4 1 Release the joystick and the electromagnetic brake will stop the vehicle 5 4 2 Come to a complete stop before turning the power OFF 5 4 3 Push forwar...

Page 34: ...a long journey In wintertime the batteries may respond slowly and the drive range may also be reduced You must store your wheelchair indoors above freezing temperatures When driving on an incline the...

Page 35: ...st Your wheelchair Disassemble and Assemble Your wheelchair 5 8 1 Footrest Adjustment for KP 10 3 5 8 1 1 The footrest assembly can fold up and be adjusted 5 8 1 2 Your footplate length should be adju...

Page 36: ...ootplate height The adjustment is in increments of 2 5 cm 4 positions 5 8 2 2 Your footplate length should be adjusted according to your calf length 5 8 2 3 Use the Allen Wrench included in your KARMA...

Page 37: ...the bolts securely see figure 5 16 5 9 2 Swing backwards 5 9 2 1To make side transfers easy the chair is equipped with swing away armrests 5 9 2 2Lift and swing backwards to remove see figure 5 17 Fi...

Page 38: ...want See Figure 5 24 5 10 1 4 Tighten the screws See Figure 5 25 Figure 5 22 Figure 5 23 Figure 5 24 Figure 5 25 5 11 Backrest Adjustment for KP 10 3 Series 5 11 1 There are two angles for the KP 10 3...

Page 39: ...steps WARNING The heaviest component is base which weighs 24 kg Please be careful about hands injury when assembling and disassembling Always use the anti tippers on your wheelchair to prevent injury...

Page 40: ...st and buckle up the straps 3 Pull the chain behindthe seat 4 Fold the backrest forwards and press it 5 Remove the cable from the transmission connector 6 Pull the pins out from both sides of the moun...

Page 41: ...that the front of the plug should face inward of the wheelchair as the the same direction as it faces when it is still plugged and plug it in The direction of the plug should be maintained Otherwise i...

Page 42: ...e been fitted incorrectly there is a risk of tipping over and of injury 5 15 Getting In and Out 5 15 1 The freewheel levers are above the motors in the back of the wheelchair 4 Pull the pins out from...

Page 43: ...rn the foot plates back down and re locate the footrests so that the user can place his feet upon them 5 17 Getting Out 5 17 1 Make sure that the chair is as close as possible to your transfer point 5...

Page 44: ...e battery See Figures 6 1 6 3 WARNING Please read the owner s manual that is included with the charger that came with your powered wheelchair The information in the original manufacturer s owner s man...

Page 45: ...d 6 2 2 7 Disconnect the cord and pull out the round plug from the charging socket Figure 6 4 Figure 6 5 SUGGESTION Do not disconnect the charger cord if the charging is not completed The battery life...

Page 46: ...be fully charged prior to initial use of the powered wheelchair Always charge new batteries before initial use or battery life will be reduced As a general rule recharge batteries as frequently as pos...

Page 47: ...lly metal away from battery terminals There are many risks involved with improper disposal of batteries whether damaged or not atteries may contain heavy metals and be considered hazardous waste Many...

Page 48: ...chair for a long time the wheelchair should still be maintained regularly You should clean your wheelchair inside and out regularly to keep it clean and safe Item Inspection Content Joystick Controlle...

Page 49: ...ctrical Cord Cable I I Charger Charging Function and LED Light I I I I I I Socket Plug and Cords I I Fan Functions Properly if applicable I I Tires Cracks Surface Damage I 3 I 3 I 3 I 3 I 3 I 3 Tread...

Page 50: ...t as this could lead to a malfunction in the electric system Do not use gasoline solvents or other abrasive solutions the casing may become deformed or damaged WARNING After ANY adjustments repair or...

Page 51: ...n how often you use the chair normally 1 2 times of lubrication per month is fine Proper lubrication can extend the life span of a part in addition to prevent noise from accruing Check if the bolts ar...

Page 52: ...NOT use parts accessories or adapters other than those authorized by KARMA Attaching accessories may alter the overall stability and centre of gravity of the chair Thus this should be performed by an...

Page 53: ...lve the problem by yourself contact your KARMA wheelchair dealer for help Problem Checking Points and Corrective Action My wheelchair does not start Is the power turned OFF Unlocked the seat release l...

Page 54: ...he connections to the left hand motor 5 signals The left hand motor has a short circuit to a battery connection Connect your service agent 6 signals The wheelchair is being prevented from driving by a...

Page 55: ...22Ah 2pcs Controller VR2 50A Caster Wheel inch material 200 50 Rear Wheel inch material 12 Max Safe Slope 8 Static Stability Downhill 21 5 Static Stability Uphill 13 Static Stability Sideways 20 9 Max...

Page 56: ...ontroller VR2 50A Caster Wheel inch material 200 50 Rear Wheel inch material 12 Max Safe Slope 8 Max Speed 6 km hr Static Stability Downhill 25 5 Static Stability Uphill 11 Static Stability Sideways 2...

Page 57: ...28 km Maximum Obstacle Climbing Ability 3 Min Turning Radius 75 Overall Length w w o legrest Width Height 103 61 94 Max User Weight 115 Weight w o Accessories 26 24 Weight W O Batteries 37 5 39 5 Tota...

Page 58: ...t find shelter proceed to your destination 11 1 5 However we do not recommend you do this often as it may shorten the life of your wheelchair or cause damage 11 1 6 Driver s seat upholstery use soapy...

Page 59: ...organizations in many countries you can find on the internet that will accept used goods for charity or disassemble electronic equipment and batteries to recycle them 11 2 4 Please search the informat...

Page 60: ...12 2 2 2 The warranty repair can be performed by authorized KARMA wheelchair dealers only 12 2 2 3 KARMA is not responsible for the transportation costs for repair and replacement 12 2 2 4 Replaced p...

Page 61: ...unavailability of the wheelchair telephone use shipping car rental travel costs et cetera PROBLEMS NOT COVERED Problems caused by the following reasons are not covered 12 2 2 8 Failure to carry out th...

Page 62: ...is owner s manual 12 2 3 2 Performance of the daily inspections 12 2 3 3 Performance of the regular maintenance recommended by KARMA and 12 2 3 4 Keep a record of vehicle inspection and maintenance in...

Page 63: ...Model Serial Number Date of Purchase Purchaser Signature Dealer s Data Name of the Store Phone No and Address If you have any suggestions on how to improve our products please don t hesitate contacti...

Page 64: ...KARMA reserves the right to modify information herein without further notice 110404050018 104 45027 Rev 10 2016 08...

Reviews: