7
6
1.
Posizionate il prodotto nel luogo
desiderato avendo cura che disponga
di spazio sufficiente per una adeguata
ventilazione. La particolare doppia
staffa (6) consente, oltre a posizionare il
faro su qualsiasi superficie, il fissaggio
a tralicci. Agite sui pomelli (5) per
sbloccare la staffa, e una volta regolata,
per bloccarla adeguatamente.
2.
Se desiderate collegare il faro ad
un impianto DMX, collegate il cavo
in ingresso alla presa XLR IN (2) e
eventuale cavo in uscita (destinato
all’apparecchio DMX successivo) alla
presa DMX OUT (1). I connettori sono di
tipo tripolare.
3.
Inserite il cavo di alimentazione nella
presa (3) e quindi collegatelo ad una
presa di corrente domestica 110/220V.
Il faro si accenderà. In caso di mancata
accensione, scollegate la presa di
alimentazione e verificate l’integrità
del fusibile contenuto nel vano (4).
Eventualmente sostituitelo con uno di
eguale valore amperometrico.
4.
Agite sui tasti posti sotto il display (6)
per selezionare la modalità di utilizzo
e i vari parametri di funzionamento.
Riferitevi alle tabelle riportate nelle
pagine successive.
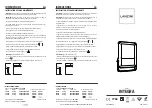
1.
Place the product in the desired location
taking care that it has enough space
for adequate ventilation. The particular
double bracket (6) allows both to
position the led par on any surface, and
to mount it on stands. Use the knobs (5)
to unlock the bracket, and once adjusted
it, to tighten it properly.
2.
If you wish to connect the par to a DMX
system, connect the input cable to the
XLR IN socket (2) and, if any, the output
cable (addressed to the next DMX
device) to the DMX OUT socket (1). The
connectors are three-pole type.
3.
Put the power cord into the socket
(3) and then plug it into a 110 / 220V
household power outlet. The par will
turn on. If it doesn’t light on, disconnect
the power supply and check if the fuse
in the speficic compartment is ok (4).
If necessary replace it with one of the
same amperometric value.
4.
Use the keys under the display (6) to
select the mode of use and the various
operating parameters. Refer to the
tables on the following pages.
Funzioni
Functions
TASTO MENU
Scelta della modalità desiderata (Auto, DMX..)
TASTO UP
Scorre tra le voci del menu, o aumenta i settaggi
scelti
TASTO DOWN
Scorre tra le voci del menu, o diminuisce i settaggi
scelti
MENU BUTTON
Choice of the desired mode (Auto, DMX etc).
UP BUTTON
Use it to scroll through the menu options, or to
increase the value of the selected setting.
DOWN BUTTON
Use it to scroll through the menu options, or to
reduce the value of the selected setting.
MENU
UP
DOWN
ENTER


