©
Karma Limbo
(aka James Thompson) February 2008
Page 5 of 7
5e.
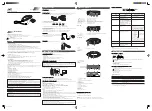
STEP 6:
INSTALL TOP CASE
For the top and back case pieces, the opposite steps as used during the disassembly is not the best
order to use for the reassembly. Instead the top case should be installed first. Make sure the power
button is in place before you pop the left hand end of the top case on (6a). Then use your #0 Philips
to put the screw in the middle of the top case in place (6b). Make sure you push down on the top
case to make sure it is down all the way when you tighten the screw.
6a.
6b.
STEP 7:
INSTALL BACK CASE
The back case takes a little finagling to put on, but it isn’t as delicate a job as the front case was in
Step 5. The front and back cases hook together on the left side to make a sort of hinge. Hook them
together (7a) and close the two pieces up like a book. Make sure you pinch the left side of the player
with your fingers, keeping the two case pieces hooked together. You will find that the back case hits
on a few tabs on the top case. Use a screw driver or other tool to gently flex the tabs down enough
for the back case to snap overtop (7b). When properly popped into place, all three covers will hold
themselves together without screws. Use your #0 Philips to put the side screw in anyway (7c).