


You
have
decided
on
a
summer-house
of
wood.
The
struc
-
ture
of
the
wood
with
its
knots,
knots
and
resin
gall,
which
arise
during
the
growth
of
the
tree,
lend
your
summer-
house its natural charm.
Here
are
summarized
some
tips
for
assembling
and
maintaining the product, as well as explanations of terms.
Bef
or
e the assembl
y:
You
have
acquired
a
product
for
which
we
use
mainly
fir
wood
from
the
forests
of
Northern
Europe.
Because
spruce
grows
more
slowly
there,
and
therefore
develops
fine
annual
rings,
it
is stronger
.
W
ood
reacts
to
environment
al
influences.
Thus
swelling
and
shrinkage
occur
in
the
wood
according
to
the
weather
. Through
this,
dimension
ally-deviating
cracks,
knots
and
so
forth,
can
occur
. This is unavoidable.
The
wood
may
be
not
be
exposed
to
direct
sunlight
or
permanent
moisture before and during the installation.
If
waterlogging
occurs
or
if
e.g.
through
plants,
walls
and
so
forth,
sufficient
ventilation
of
this
product
is
not
ensured,
fungal,
blue
stain
and
mold
attacks
can
result.
Blue
stain
represents
a
visual impairment only in this case.
For
plants
above
a
growth
heig
ht
of
10
cm,
a
minimum
distance
of
2
m
must
be
kept
around
our
houses.
This
provides
for
sufficient
ventilation of the walls.
If
natural
wood
is
left
exposed
to
sunlight,
this
results
in
discoloration and this can extend to gray-shading.
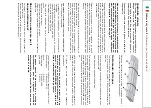
W
ha
t is r
esin gall?
Resin
filled
empty
cavities
in
the
main
trunk
of
resin-rich
tree
types
(spruce,
pine,
larch).
If
these
empty
cavities
are
opened
by
sawing
or
planing
during
the
processing,
the
sticky
resin
leaks
out.
You
can
easily
wipe
this
away
with
an
acetone-
soaked cloth.
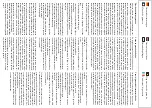
W
ha
t is r
ough sheeting?
„Rough“,
therefore
not
planed,
however
,
tongued
boards.
(T
onguing;
providing
a
board
with
tongue
and
groove).
Rough
sheeting
is
idea
l construction
timber
for
attics,
roof
formwork
or
floors
and
ceilings
of
summer-houses.
Today
,
rough
sheeting
is
mostly
of
fered
in
the
form
of
sheeting
planed
single-sided
on
the visible side.
A
bo
ve
Gr
oo
ve
Tongue
In
case
of
the
rough
sheeting
employed
by
us,
there
are
always
good
thick
sides
and
inferior
thin
sides.
A
high
knot
number
in
the
boards
underlines
the
naturalness
of
the
wood
and
is
not
a
quality
impairment.
Please
insert
the
boards
into
each
other
only
and
do
not
press
them
together
. The
wood
must
not
be
exposed
to
direct
sunlig
ht
or
permanent
moisture
before
and
during
the
installation.
W
ood
is
subject
to
natural
swelling
and
shrinking
characteristic
behavior
. As
a
result
of
this,
small
dimensional variations can occur
.
If
you
have
acquired
a
block
planking
house
(delivery
without
preassembled
walls)
please
consider
the
following
note:
The
planks
may
not
be
fixed-connected
with
each
other
over
several
block
planks
(e.g
through
shelves),
in
order
to
ensure
a
uniform
„swelling“
and
„shrinkage“.
If
this
is
not
considered,
opening
formation
etc.
can
result
This
is
also
to
be
considered
with
the
installation
of
the
windows
and
doors.
The
door
and
window
strips
may
be
connected
only
with
the
window
and
with
the door and, under no circumstances, with the block planking.
T
he assembl
y:
Please
first
read
through
the
building
instructions
completely
.
The
drawings
in
these
building
instructions
are
not
strictly
accurate
and
are
used
merely
for
the
sake
of
illustration.
Changes in optical and technical type are possible.
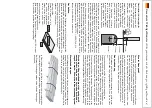
Note
whether
the
bolts
are
to
be
screwed
in
from
insid
e
or
outside.
Bolts
which
are
not
visible
from
outside
give
your
summer-house a better appearance.
The
wood
must
not
be
exposed
to
direct
sunlight
or
permanent
moisture before and during the installation.
W
ood
is
sometimes
a
quite
self-willed
material
and,
for
this
reason,
every
screwed
connection
should
first
be
pre-bored
with
a
drill
3.5
mm
(see
details)!!
Otherwise
the
wood
can
easily
tear and split along its length!
Par
t 1
Par
t 2
Pr
e-drilled
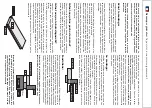
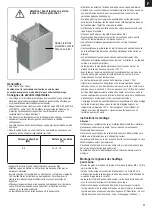
Founda
tion pr
epar
ation:
W
e
recommend
a
base
slab
as
a
foundation.
It
should
connect
flush
with
the
underlay
. Furthermore,
this
slab
must
be
at
least
10
cm
higher
than
the
surroun
ding
ground.
This
serves
as
splash
protection.
The
underlay
must
be
laid
in
a
right-angled
square.
Every
underlay
is
to
be
fixed
connected
with
the
founda
tion.
This
serves
for
wind
protection.
Cut
the
packaging
film
of
your
house
into
approx.
65
mm
strips
and
place these below the underlay as a protection against rising damp.
Attention!
When
additiona
l
installation
of
decking,
the
entire house was rebuilt 40mm higher
.
For
further
questions
on
the
foundation
preparation,
please
refer
to
a
trusted specialist.
Side
Flo
or
boar
d
Film
Founda
tion
10
cm
Flo
or
Under
la
y
Important:
The
carefully
prepared
underlay
substrate
is
a
prerequisite
for
an
accurate
fit
with
the
assembly
of
the
building
components.
If
faults
occur
here,
difficulties
will
be
encounterd
during
the
assembly
, which
can
impair
the
stability
and
optics
of the house.
General r
efer
ences •
Caution, please r
etain!
General r
efer
ences •
Caution, please r
etain!
General r
efer
ences •
Caution, please r
etain!
General r
efer
ences •
Caution, please r
etain!
Summary of Contents for Sauna 330
Page 1: ...Sauna 330...
Page 5: ...Sauna 330 1 6xM 6xM 3 xDET 1 2x DET A 3x DET 1 2xDET A 2800 1600 950 mm mm mm mm...
Page 6: ...Sauna 330 2 I 1x DET 2 II 2 3a 3b 4 x DET 3a 4 x DET 3b X W Y Z mm mm 100mm 100 mm 3x M...
Page 7: ...Sauna 330 3 I II 24x M...
Page 8: ...Sauna 330 90 2x DET P 3A Bohren Sie 4 L cher in DET 2 10 mm...
Page 11: ...6 I II 11x DET 5b 10x DET 5a 8x DET 3a 8x DET 3b 16xH 16xH 20xH Siehe Seite 6A Sauna 330...
Page 17: ...Sauna 330 9 2xDET F 1xDET G 1xDET F 3x K 3x K 3x K 3x K...
Page 18: ...Sauna 330 10 8x DET 7 24x H 575 I II 2xDET 8 2x DET 9...
Page 19: ...Sauna 330 4xDET 10 Bitte bohren Sie 4mm L cher vor dem festschrauben 8x H 11 8x H 770 4x H...
Page 23: ...Sauna 330 15 I r 300 10x H mm mm 2xDET 19 II...
Page 24: ...Sauna 330 16 I 13x DET 20 II 26x H Entfernen DET A...
Page 44: ...Karibu Artikel Nr Artikel Nr I Nr Typ 59319 37 468 25 11011 9 kW Saunaofen externe Steuerung...
Page 45: ...2...
Page 68: ...25...
Page 75: ...ISC GmbH Art Nr 086 50 009 23 11011...
Page 81: ...D 6 0 Wandmontage Steuerger t 2 St ck Schrauben 4 x 25 mm 1 St ck Schraube 4 x 25 mm...
Page 87: ...D 080 000 000 020 000 000 OFF 70 OFF 70 Einstellung Beleuchtung...
Page 95: ...D 13 0 Explosionszeichnung STG 2100 F STG 2100 F Art Nr 37 470 01 I Nr 18012...
Page 96: ...D 13 1 St ckliste STG 2100 F I Nr 18012...
Page 97: ...D STG 2100 FH Art Nr 37 470 11 I Nr 18012 13 2 Explosionszeichnung STG 2100 FH...
Page 98: ...D 13 2 St ckliste STG 2100 FH I Nr 18012...
Page 99: ...D...
Page 102: ...D...


